


What If It Doesn’t Work? • 97
ID in line 31. Then we check whether the current distance is less than or equal to the threshold value that belongs to the current LED. If yes, we change the LED’s color accordingly. Otherwise, we set its color to white.
 Some Fun with Sensors
With an ultrasonic sensor, you can easily detect whether someone is nearby. This automatically brings a lot of useful applications to mind. You could open a door automatically as soon as someone is close enough, for example.
Alternatively, you can use advanced technology for pure fun. What about some Halloween gimmicks, such as a pumpkin that shoots silly string whenever you cross an invisible line?a It could be a nice gag for your next party, and you can build it using the PING))) sensor.
a.http://www.instructables.com/id/Arduino-controlled-Silly-String-shooter/
Connect the Arduino to your computer and upload the sketch we developed in the previous section. Start the Chrome App and move your hand back and forth in front of the PING))) sensor. The display on the screen will look exactly like the display in a typical car.
Sensors are an exciting topic, and in this chapter you’ve learned the basics of working with both analog and digital sensors. In the next chapter, we’ll build on that foundation and connect the Arduino to an accelerometer to create a motion-sensing game controller.
What If It Doesn’t Work?
See What If It Doesn’t Work?, on page 59, and make sure that you’ve connected all parts properly to the breadboard. Take special care with the PING))) and the TMP36 sensors, because you haven’t worked with them before. Make sure you’ve connected the right pins to the right connectors of the sensors.
In case of any errors with the software—no matter whether it’s JavaScript or Arduino code—download the code from the book’s website and see whether it works.
If you have problems with serial communication, double-check whether you’ve used the right serial port and the right Arduino type. Remember to adjust the path to your Arduino’s serial port in the first line of dashboard.js. Also check whether the baud rate in the JavaScript code matches the baud rate you’ve used in the Arduino code.
report erratum • discuss

Chapter 5. Sensing the World Around Us • 98
Make sure that the serial port isn’t blocked by another application, such as
a serial monitor window you forgot to close.
Exercises
•Build an automatic burglar alarm that shows a stop sign whenever someone is too close to your computer.4 Make the application as smart as possible. It should have a small activation delay to prevent it from showing a stop sign immediately when it’s started.
•The speed of sound depends not only on the temperature, but also on humidity and atmospheric pressure. Do some research to find the right formula and the right sensors. Use your research results to make the circuit for measuring distances even more precise.
•Use an alternative technology for measuring distances—for example, an infrared sensor. Try to find an appropriate sensor, read its data sheet, and build a basic circuit so you can print the distance to the nearest object to the serial port.
4.You can find a stop sign here: http://en.wikipedia.org/wiki/File:Stop_sign_MUTCD.svg.
report erratum • discuss

CHAPTER 6
BuildingaMotion-SensingGameController
It’s astonishing how quickly we get used to new technologies. A decade ago, not many people would’ve imagined that we would use devices someday to follow our movements. Today, it’s absolutely normal for us to physically turn our smartphones when we want to change from portrait to landscape view. Even small children intuitively know how to use motion-sensing controllers for video game consoles, such as Nintendo’s Wii. You can build your own motion-sensing devices using an Arduino, and in this chapter you’ll learn how.
We’ll work with one of the most widespread motion-sensing devices: the accelerometer. Accelerometers detect movement in all directions—they notice if you move them up or down (Z-axis), forward or backward (Y-axis), and to the left or to the right (X-axis). Many popular gadgets, such as the iPhone and the Nintendo Wii controllers, contain accelerometers, so accelerometers are produced in large quantities. That’s why they’re cheap.
Both fun and serious projects can benefit from accelerometers. When working with your computer, you certainly think of devices, such as game controllers or other input control devices, that you connect via USB. But you can also use them when exercising or to control a real-life marble maze. They are also the right tool for measuring acceleration indirectly, such as in a car.
You will learn how to interpret accelerometer data correctly and how to get the most accurate results. Then you’ll use an accelerometer to build a motionsensing game controller, and in the next chapter you’ll implement a game that uses it.
report erratum • discuss
Chapter 6. Building a Motion-Sensing Game Controller • 100
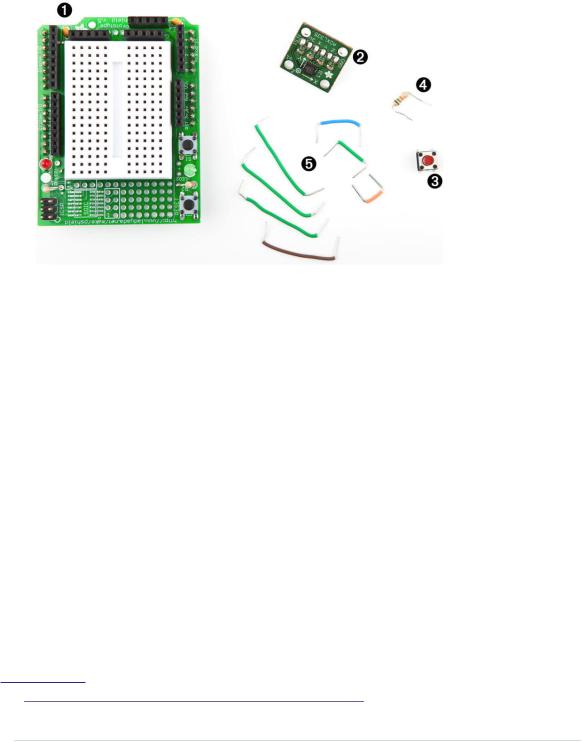
What You Need
1.An Arduino Proto Shield (optional)
2.An ADXL335 accelerometer
3.A pushbutton
4.A 10kΩ resistor
5.Some wires
6.A half-size breadboard (if you’re not using a Proto Shield)
7.An Arduino board, such as the Uno, Duemilanove, or Diecimila
8.A USB cable to connect the Arduino to your computer
9.A 6-pin 0.1-inch standard header
Wiring Up the Accelerometer
There are many different accelerometers, differing mainly in the number of spatial axes they support (usually two or three). I’ll use the ADXL335 from Analog Devices—it’s easy to use and widely available.1 Analog Devices offers many more accelerometers, named ADXL345, ADXL377, or ADXL326, for example. They all work the same, and they differ only in accuracy and price.
In this section, we’ll connect the ADXL335 to the Arduino and create a small demo program showing the raw data the sensor delivers. At that point, we will have a quick look at the sensor’s specification and interpret the data.
1.http://www.analog.com/en/sensors/inertial-sensors/adxl335/products/product.html
report erratum • discuss
Wiring Up the Accelerometer • 101
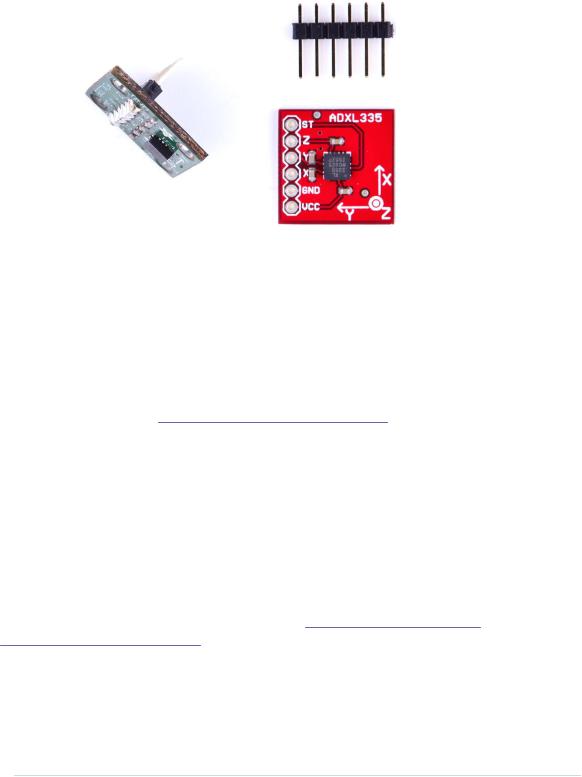
This picture shows a breakout board containing an ADXL335 sensor on the right. The sensor is the small black integrated circuit (IC), and the rest is just a carrier to allow connections. On the top, you see a 6-pin 0.1-inch standard header. The sensor has six connectors, labeled GND, Z, Y, X, VCC, and ST. To use the sensor on a breadboard, solder the standard header to the connectors. This not only makes it easier to attach the sensor to a breadboard, but it also stabilizes the sensor so it doesn’t move accidentally. You can see the result on the left side of the photo. (Note that the breakout board on the left isn’t the same as on the right, but it’s very similar.) Don’t worry if you’ve never soldered before. In Learning How to Solder, on page 243, you can learn how to do it.
You can ignore the connector labeled ST, and the meaning of the remaining connectors should be obvious. To power the sensor, connect GND to the Arduino’s ground pin and VCC to the Arduino’s 3.3V power supply. X, Y, and Z will then deliver acceleration data for the x-, y-, and z-axes.
Note that not all breakout boards have the same connectors. Usually, they have six or seven connectors. Some breakout boards can cope with 5V, while others only work with 3.3V. Some boards have an input pin named VIN that you have to connect to one of the Arduino’s power supply pins (5V or 3.3V).
Like the TMP36 temperature sensor we used in Increasing Precision Using a Temperature Sensor, on page 86, the ADXL335 is an analog device: it delivers results as voltages that have to be converted into acceleration values. So, the X, Y, and Z connectors have to be connected to three analog pins on the Arduino. We connect Z to analog pin 0, Y to analog pin 1, and X to analog pin 2. (See the following image and double-check the pin labels on the
report erratum • discuss