

This material is copyright and is licensed for the sole use by Kliwon Klimis on 28th October 2008 425 cilce, , frood, grradt, 525254
Chapter 4
Adding Appointments
There are a couple of different ways to add an appointment to your calendar. The easiest way is to simply click on a date in the calendar (at the bottom of the Navigation Pane) and this will open up the Calendar view of the Content Pane.
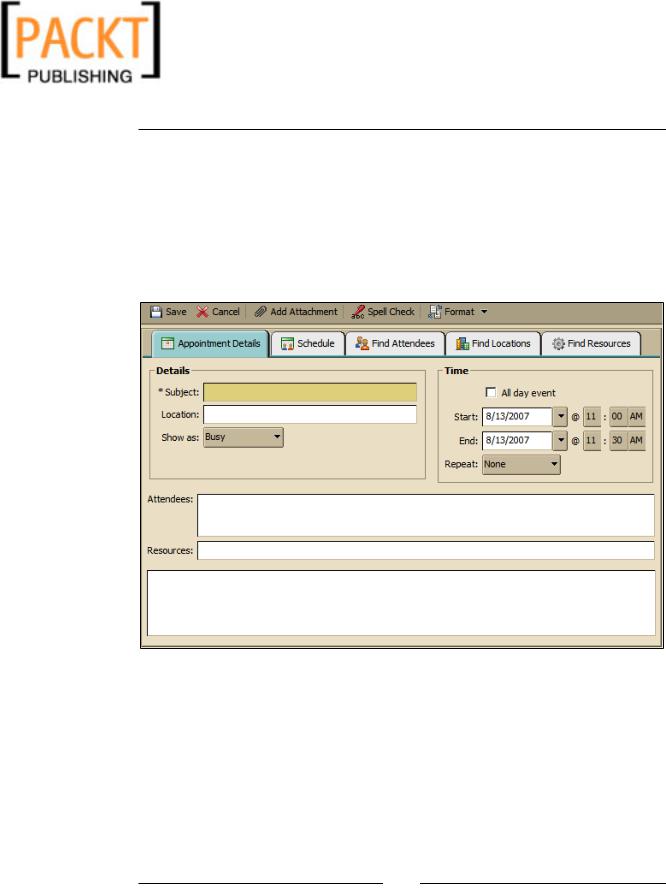
1.Click New from the Toolbar and select Appointment.
2.From there, the Appointment dialog box opens with five tabs that could be completed if necessary.
3.The Appointment Details tab is just that: the overall details of the appointment itself. For this example, add "Training" to the Subject and CEO for location (CEO's Office). The show as drop-down menu is how you would like the Schedule to show that time as. This is especially important when others are looking at your schedule to determine a good time to contact you.
4.Let's make this an All Day Event by checking the checkbox and clicking on the Schedule tab.
[ 107 ]
This material is copyright and is licensed for the sole use by Kliwon Klimis on 28th October 2008 425 cilce, , frood, grradt, 525254
The Zimbra Web Client
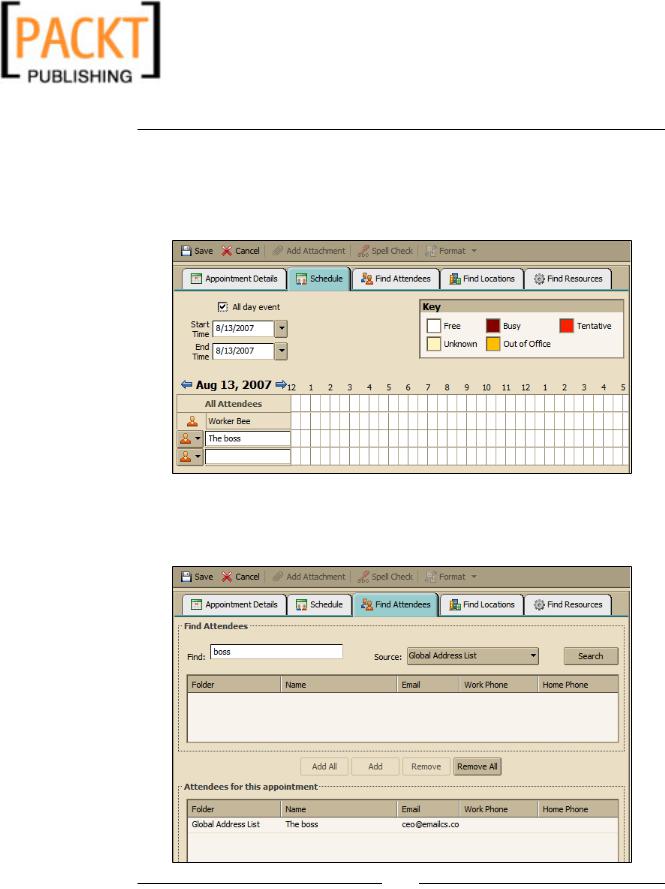
5.The Schedule tab allows us to check our availability, as well as other members of our organization's availablility in order to know if we should invite them to our meeting/event at that time. By default, you will see your own schedule. In the box directly underneath, add worker and it will reveal his schedule, which at this point should be wide open.
6.On the Find Attendees tab, you could now search for people to attend this event. Type Boss in the Find textbox and click Search. Once The Boss shows up in the results pane, click Add.
[ 108 ]
This material is copyright and is licensed for the sole use by Kliwon Klimis on 28th October 2008 425 cilce, , frood, grradt, 525254
Chapter 4
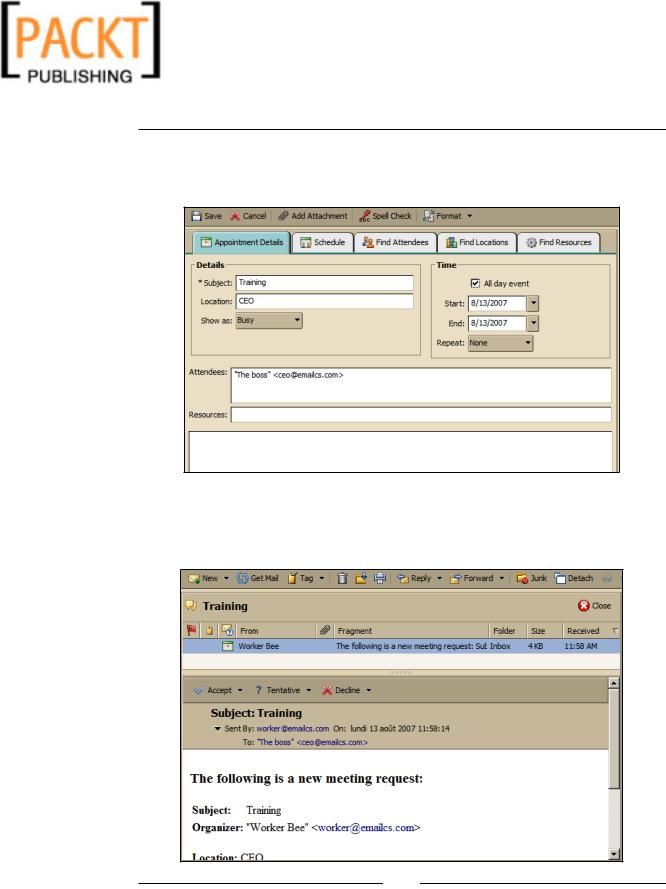
7.As we have not set up any locations or resources in our system, we could skip those two tabs. Click back on the Appointment Details tab and it should now look as shown in the following screenshot.
8.Click Save and your event is now scheduled. Because you added The Boss to your attendees list, he will receive an email like the one below to accept or decline the invitation. By accepting the invitation, it will be added to his schedule as well.
[ 109 ]

This material is copyright and is licensed for the sole use by Kliwon Klimis on 28th October 2008 425 cilce, , frood, grradt, 525254
The Zimbra Web Client
Creating Multiple Calendars
Zimbra also provides the ability for someone to have multiple calendars. This is especially useful if you are managing multiple projects, or you have a need to keep a personal and/or business calendar separate. This is also very useful if you are managing multiple calendars for different users.
To create an additional calendar:
1.Open the Calendar Application (as the CEO user) and click New.
2.From the drop-down menu, select Calendar.
3.This will open up the Create New Calendar dialog box.
4.We will call this Calendar "personal" and use blue as its color.
5.Check the box to have it included when reporting free/busy times.
6.Leave the remote calendar synchronizing box unchecked. This would be used if we were syncing the calendar with another application such as iCal or
Outlook. You could use the "remote sync" with an external calendar such as the one provided by Mozilla's website that contains the days of country per country.
7.Click OK.
You should now see an additional calendar in the Navigation Pane. Now, when you create a new event, you will have the choice of which calendar to add it to. Also, appointments will show up in the color of its respective calendar. In this case, personal appointments will be blue, and regular calendar appointments will
be orange.
As Worker has done such a great job managing the CEO's contacts, the CEO has determined he would like Worker to now manage his schedule.
Sharing Calendars
Sharing Calendars works exactly the same as sharing Address Books. Users have the ability to share any of their calendars and give additional users rights to view or completely manage the calendar from their own web client.
To share the CEO's calendar:
1.Login to Zimbra as the CEO.
2.Click on the Calendar application.
[ 110 ]
This material is copyright and is licensed for the sole use by Kliwon Klimis on 28th October 2008 425 cilce, , frood, grradt, 525254
Chapter 4
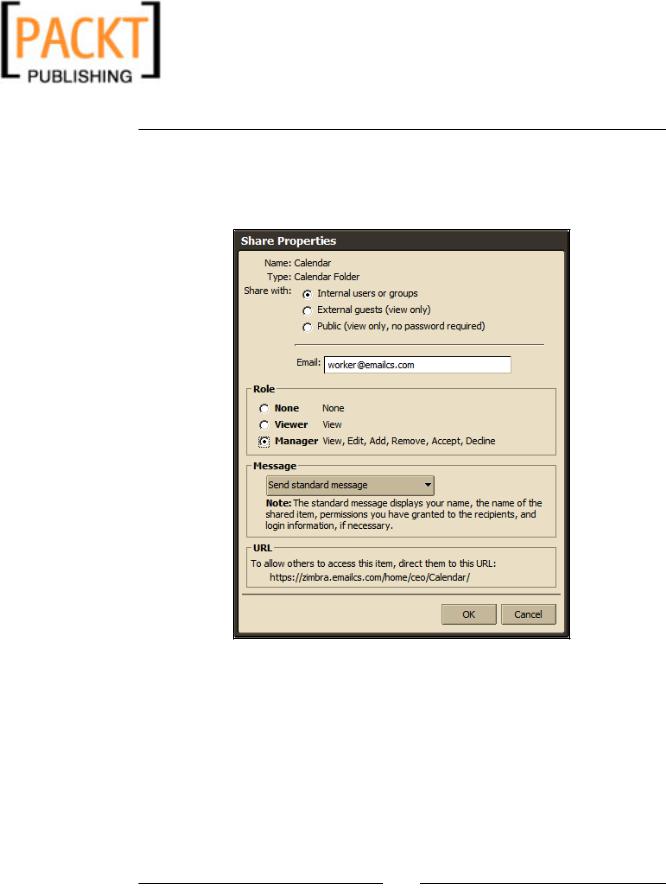
3.Right click on the calendar you wish to share. For this exercise, right click the orange calendar and select Share Calendar.
4.Complete the Share Calendar dialog box giving access to worker@emailcs.com and select Manager for the role as shown below.
5.When completed, click OK.
6.Log out of Zimbra and log back in as Worker.
7.You should now see a message from "The Boss" in the CEO folder of the Inbox with the subject line "Share Created".
8.Double-click on the message, and select Accept Share.
[ 111 ]