epwzf20
.pdf
Easy PHP Websites with the Zend Framework |
58 |
|
|
$options = $this->getInvokeArg('bootstrap')->getOptions();
The getInvokeArg() call retrieves an instance of the bootstrap object which is invoked every time the front controller responds to a request. This object includes the getOptions() method which can be used to retrieve a multidimensional array consisting of the defined stage's configuration parameters. For instance, you can retrieve the Google Maps API key referenced in an earlier example using the following syntax:
echo $options['webservices']['google']['maps']['api'];
I think the multidimensional array syntax is a bit awkward to type, and instead prefer an objectoriented variant also supported by the Zend Framework. To use this variant, you'll need to load the parameters into an object by passing the array into the Zend_Config class constructor:
$options = new Zend_Config($this->getInvokeArg('bootstrap')->getOptions());
This approach allows you to use object notation to reference configuration parameters like so:
$googleMapsApiKey = $options->webservices->google->maps->api->key;
Using the Controller's init() Method to Consolidate Code
If you plan on using configuration parameters throughout a particular controller, eliminate the redundant calls to the getOptions() method by calling it from within your controller's init() method.
public function init()
{
$this->options = new Zend_Config($this->getInvokeArg('bootstrap')->getOptions());
}
...
public function contactAction()
{
$this->view->email = $this->options->company->email->support;
}
Accessing Configuration Parameters Globally Using
Zend_Registry
While retrieving the options within the init() method is an improvement over the first approach, we're still not as DRY as we'd like to be if it's necessary to access configuration parameters within multiple controllers. Therefore my preferred approach is to automatically make the options globally

Easy PHP Websites with the Zend Framework |
59 |
|
|
available by assigning the object returned by Zend_Config to a variable stored within the application registry. This registry is managed by a Zend Framework component called Zend_Registry. You can use this registry to set and retrieve variables which are accessible throughout the entire application. Therefore by assigning the configuration parameters object to a registry variable from within the bootstrap, this variable will automatically be available whenever needed from within your controllers.
As discussed in the Chapter 2, tasks performed within the application bootstrap are typically grouped into methods, with each method appropriately named to identify its purpose. Each time the bootstrap runs (which occurs with every request), these methods will automatically execute. Therefore to load the configuration object into the registry, you should create a new method within the bootstrap, and call the appropriate commands within, as demonstrated here:
protected function _initConfig()
{
$config = new Zend_Config($this->getOptions()); Zend_Registry::set('config', $config);
return $config;
}
With the configuration object now residing in a registry variable, you'll be able to retrieve it within any controller action simply by calling the Zend_Registry component's static get method. This means you won't have to repetitively retrieve the configuration data from within every controller init() method! Instead, you can just retrieve the configuration parameters like this:
$this->view->supportEmail = Zend_Registry::get('config')->company->email->support;
Test Your Knowledge
Test your understanding of the concepts introduced in this chapter by answering the following questions. You can find the answers in the back of the book.
•Which Zend Framework component is primarily responsible for simplifying the accessibility of project configuration data from a central location?
•What is the name and location of the default configuration file used to store the configuration data?
•Describe how the configuration data organized such that it is possible to define stage-specific parameters.
•What is the easiest way to change your application's life cycle stage setting?

Chapter 5. Creating Web Forms with Zend_Form
When I was first acquainted with the Zend Framework back in 2008, the Zend_Form component was the lone feature which I was convinced was a horribly misguided implementation. I simply could not understand why any sane developer would want to programmatically generate HTML forms when they are so easy to write manually.
As it turns out, it was I who was horribly misguided. While HTML forms can indeed be created in mere minutes, the time and effort required to write the code used to populate, process, validate, and test these forms can be significant. It is here where Zend_Form's power is apparent, as it can greatly reduce the time and effort needed to carry out these tasks. Further, you won't lose any control over the ability to format and stylize forms!
In my experience Zend_Form is the most difficult of the Zend Framework's components, largely because of the radical shift towards the programmatic creation of forms. Therefore you'll likely need to remain patient while making your first forays into creating and validating forms using this component. I'll do my best to guide you through the process and make you aware of potential gotchas as we work through the chapter.
Caution
While this chapter will indeed provide a detailed introduction to Zend_Form, I've decided to spend little time talking about the many rendering options at your disposal. Instead, I'm going to focus upon what I believe to be the rendering solution which will appeal to the vast majority of readers who wish to balance Zend_Form's convenient form processing and validation features with the ability to maintain control over the form's layout and styling. However, in order to ensure you fully understand many of the most confusing issues surrounding Zend_Form's approach to rendering forms, several of this chapter's early examples will employ a trial-and-error approach, showing you how the form's appearance changes with each iteration.
Creating a Form with Zend_Form
You'll use Zend_Form's class methods to not only create the form, but also validate form data and even determine how the form is presented to the user. To create a form you'll invoke the Zend_Form

Easy PHP Websites with the Zend Framework |
61 |
|
|
class, create the form field objects using a variety of classes such as Zend_Form_Element_Text, and then add those form field objects to the form using methods exposed through the Zend_Form class.
I'd imagine this sounds pretty elementary, however there's a twist to the approach which causes a great deal of confusion among newcomers to framework-driven development. You'll actually want to encapsulate each form within a model! This is a preferable approach because the model can contain all of the functionality required to manage the form data and behavior, not only resulting in easier maintainability but also allowing you to easily reuse that model within multiple applications. Let's use this approach to create the model used to sign registered GameNomad users into their accounts.
Begin by using the ZF CLI to create the model. You're free to name the model however you please, although I suggest choosing a name which clearly identifies the model as a form. For instance I preface all form-specific models with the string Form (for instance FormLogin, FormRegister, and
FormForgetPassword):
%>zf create model FormLogin
Creating a model at /var/www/dev.gamenomad.com/application/models/FormLogin.php Updating project profile '/var/www/dev.gamenomad.com/.zfproject.xml'
Next open up the FormLogin.php file, located in the directory application/models/, and add a constructor method containing the following elements (also note that the class definition has also been modified so that it extends the Zend_Form class:
01 |
<?php |
02 |
|
03 |
class Application_Model_FormLogin extends Zend_Form |
04 |
{ |
05 |
|
06 |
public function __construct($options = null) |
07 |
{ |
08 |
|
09parent::__construct($options);
10$this->setName('login');
11$this->setMethod('post');
12$this->setAction('/account/login');
14$email = new Zend_Form_Element_Text('email');
15$email->setAttrib('size', 35);
17$pswd = new Zend_Form_Element_Password('pswd');
18$pswd->setAttrib('size', 35);
20$submit = new Zend_Form_Element_Submit('submit');
22$this->setDecorators( array( array('ViewScript',

|
Easy PHP Websites with the Zend Framework |
62 |
|
|
|
|
|
|
|
|
|
|
23 |
array('viewScript' => '_form_login.phtml')))); |
|
|
24 |
|
|
|
25 |
$this->addElements(array($email, $pswd, $submit)); |
|
|
26 |
|
|
|
27 |
} |
|
|
28 |
|
|
|
29 |
} |
|
|
|
|
|
Let's review this example:
•Line 03 defines the model. Note how this model extends the Zend_Form class. When you generate a model using the zf tool, this extension isn't done by default so you'll need to add the extension syntax manually.
•Line 06 defines a class constructor method. All of the remaining code found in this example is encapsulated in this constructor because we want the code to automatically execute when the model object is created within the controller. Note how this constructor can also accept a lone parameter named $options. I'll talk more about the utility of this parameter in the section "Passing Options to the Constructor".
•Line 09 calls the class' parent constructor, which is required in order to properly initialize the
Application_Model_FormLogin class.
•Line 10 defines the form's name, which can be used to associate CSS styles and Ajax-based functionality. Line 11 defines the form method, which can be set to get or post. Line 12 defines the form action, which points to the URL which will process the form data. In order to ensure maximum model portability, you may not want to hard wire these values and instead want to pass them through the constructor. I'll show you how this is done in the section "Passing Options to the Constructor".
•Lines 14 and 15 define the text field which will accept the user's e-mail address. The email value passed into the Zend_Form_Element_Text constructor will be used to set the field's name.
•Lines 17 and 18 define the password field which will accept the user's password. The
Zend_Form_Element_Password class is used instead of Zend_Form_Element_Text because the
former will present a text field which masks the password as the user enters it into the form.
•Line 20 defines a submit field used to represent the form's Submit button.
•Lines 22-23 defines the view script which will be used to render this form. I'll talk more about this form in the next section.

Easy PHP Websites with the Zend Framework |
63 |
|
|
•Line 25 adds all of the form elements defined in lines 12-18 to the form object. It is also possible to add each separately using the addElement() method however using addElements() will save you a few keystrokes.
Notice how this model places absolutely no restrictions on how the form will actually be presented to the user, other than to reference a script named _form_login.phtml which contains the form's formatting instructions (more on this in the next section). Let's move on to learn how the form is rendered.
Rendering the Form
To render a form, all you need to do is instantiate the class within your controller, and then assign that object to a variable made available to the view, as demonstrated here:
public function loginAction()
{
$form = new Application_Model_FormLogin();
$this->view->form = $form;
}
Within the application/views/account/login view you'll need to echo the $this->view:
<?= $this->form; ?>
Finally, create the file named _form_login.phtml (placing it within application/views/scripts) which was referenced within the FormLogin model. This file is responsible for rendering the form exactly as you'd like it to appear within the browser.
<form id="login" action="<?= $this->element->getAction(); ?>" method="<?= $this->element->getMethod(); ?>">
<p>
E-mail Address<br />
<?= $this->element->email; ?> </p>
<p> Password<br />
<?= $this->element->pswd; ?> </p>
<p>
<?= $this->element->submit; ?>

Easy PHP Websites with the Zend Framework |
64 |
|
|
</p>
</form>
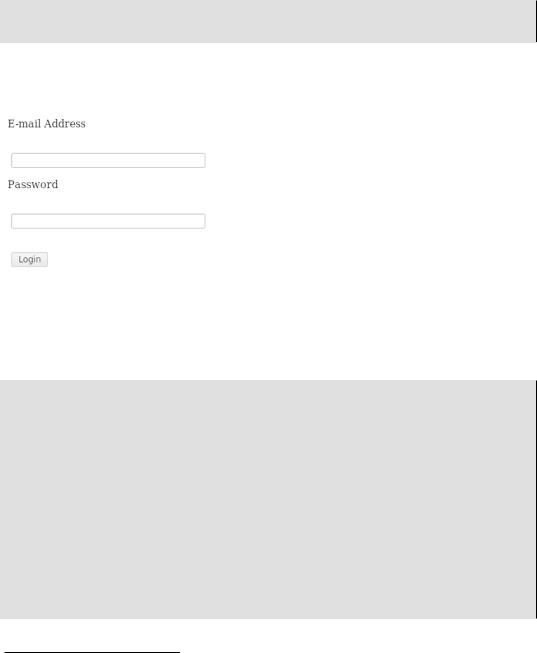
Calling http://dev.gamenomad.com/account/login within the browser, you should see the form presented in Figure 5.1.
Figure 5.1. Creating a form with Zend_Form
The form rendered just fine, however you might notice that the spacing seems a bit odd. To understand why, use your browser's View Source feature to examine the form HTML. I've reproduced it here for easy reference:
<form id="login" action="/account/login" method="post"> <p>
E-mail Address<br />
<dt id="email-label">&</dt> <dd id="email-element">
<input type="text" name="email" id="email" value="" size="35"></dd></p> <p>
Password<br />
<dt id="pswd-label">&</dt> <dd id="pswd-element">
<input type="password" name="pswd" id="pswd" value="" size="35"></dd></p>
<p>
<dt id="submit-label">&</dt><dd id="submit-element">
<input type="submit" name="submit" id="submit" value="Login"></dd></p>
</form>

Easy PHP Websites with the Zend Framework |
65 |
|
|
Where did all of those dt and dd tags come from? They are present because Zend_Form is packaged with a number of default layout decorators which will execute even if you define a view script within the model. A decorator is a design pattern which makes it possible to extend the capabilities of an object. In the case of Zend_Form, these decorators determine how each form field will be rendered within the browser. Why the developers chose the dt and dd tags over others isn't clear, although one would presume it has to do with the ability to easily stylize these tags using CSS. Even so, I doubt you want these decorators interfering with your custom layout, so you'll want to suppress them. This is accomplished easily enough using the removeDecorator() method. Because the decorator is associated with each form field object, you'll need to call removeDecorator() every time you create a form field, as demonstrated here:
$email = new Zend_Form_Element_Text('email'); $email->setAttrib('size', 35)
->removeDecorator('label') ->removeDecorator('htmlTag');
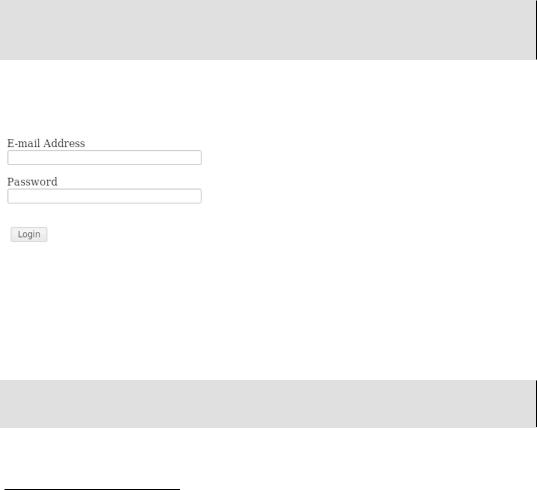
In this example I'm removing the decorator used to remove the default label formatting in addition to the label used to format the field itself. Execute /account/login again and you'll see the form presented in Figure 5.2.
Figure 5.2. Removing the default Zend_Form decorators
This is clearly an improvement, however if you again examine the source code underlying this form, you'll see that the submit button is still rendered using a default decorator, even if you explicitly removed the htmlTag decorator from the Zend_Form_Element_Submit object. This is because the Zend_Form_Element_Submit does not support the htmlTag decorator. Instead, you'll want to remove the DtDdWrapper decorator:
$submit = new Zend_Form_Element_Submit('submit'); $submit->setLabel('Login'); $submit->removeDecorator('DtDdWrapper');
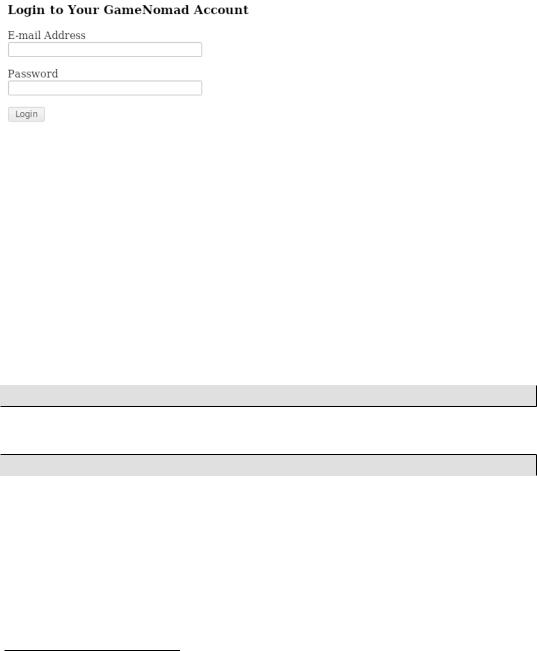
With this change in place, call /account/login anew and you'll see the form presented in Figure 5.3.

Easy PHP Websites with the Zend Framework |
66 |
|
|
Figure 5.3. Controlling form layout is easy after all!
This is just one approach to maintaining control over your form's presentation when using Zend_Form, and in fact more sophisticated solutions are available. In fact, the easiest solution might involve simply stylizing the dt and dd tags using CSS. However, for the majority of readers, present party included, the approach described here is quite satisfactory.
Passing Options to the Constructor
I mentioned earlier in this chapter the utility of being able to reuse models across applications. In fact, you'll probably want to reuse models several times within the same application, because of the need to not only insert data, but also later modify it. Although multiple actions will be involved in carrying out these tasks /location/insert and /location/update for instance), there's no reason you should maintain separate forms! Fortunately, changing the form model's action setting is easy, done by passing the desired setting through the form's object constructor:
$form = new Application_Model_FormLocation(array('action' => '/locations/add'));
You'll also need to modify the form model so that the setAction() method refers to the passed associative array value rather than a hardwired setting:
$this->setAction($options['action']);
Of course, you're not limited to setting solely the form action; just expand the number of associative array keys and corresponding values as you see fit.
Processing Form Contents
Now that you know how to define a form object and render its contents, let's write the code used to process the form input and return feedback to the user. The execution path this task takes depends on whether the user has submitted the form:

Easy PHP Websites with the Zend Framework |
67 |
|
|
•Form not submitted: If the form has not been submitted, render it to the browser, auto-populating the fields if necessary.
•Form submitted: If the form has been submitted, validate the input. If any of the input is deemed invalid, notify the user of the problem, display the form again, and populate the form with the previously submitted input as a convenience to the user. If the form input is valid, process the data and notify the user of the outcome.
Let's tackle each of these problems independently, and then assemble everything together at the conclusion of the section.
Determining if the Form Has Been Submitted
The Zend Framework's request object offers a useful method called getPost() which can determine if the incoming request has been made using the POST method. If it has, you can use the request object's getPost() method to retrieve the input values (this method was introduced in Chapter 2). The request object's isPost() method returns TRUE if the request has been POSTed, and FALSE if not, meaning you can evaluate it within an if-conditional statement, like this:
public function loginAction()
{
$form = new Application_Model_FormLogin();
if ($this->getRequest()->isPost()) {
$email = $form->getValue('email'); $pswd = $form->getValue('pswd');
echo "<p>Your e-mail is {$email}, and password is {$pswd}</p>";
}
$this->view->form = $form;
}
Try executing the revised /account/login action, completing and submitting the form. When submitted, you should see your e-mail address and password echoed back to the browser.
