371
Figure 28-1 – A simple drawing program we will use for illustrating the State pattern
Each one of the tool buttons does something rather different when it is selected and you click or drag your mouse across the screen. Thus, the state of the graphical editor affects the behavior the program should exhibit. This suggests some sort of design using the State pattern.
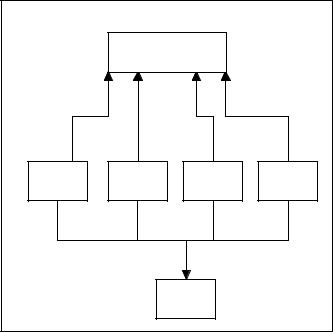
Initially we might design our program like this, with a Mediator managing the actions of five command buttons, as shown in Figure 28-2
Copyright © , 2002 by James W Cooper
372
Pick |
|
Rect |
Screen |
|
|
Mediator |
Fill |
|
Circle |
Mouse |
|
Clear |
|
Figure 28-2– One possible interaction between the classes needed to support the simple drawing program
However, this initial design puts the entire burden of maintaining the state of the program on the Mediator, and we know that the main purpose of a Mediator is to coordinate activities between various controls, such as the buttons. Keeping the state of the buttons and the desired mouse activity inside the Mediator can make it unduly complicated, as well as leading to a set of If or Select tests that make the program difficult to read and maintain.
Further, this set of large, monolithic conditional statements might have to be repeated for each action the Mediator interprets, such as mouseUp, mouseDrag, rightClick, and so forth. This makes the program very hard to read and maintain.
Instead, let’s analyze the expected behavior for each of the buttons.
1.If the Select button is selected, clicking inside a drawing element should cause it to be highlighted or appear with
Copyright © , 2002 by James W Cooper
373
“handles.” If the mouse is dragged and a drawing element is already selected, the element should move on the screen.
2.If the Rect button is selected, clicking on the screen should cause a new rectangle drawing element to be created.
3.If the Fill button is selected and a drawing element is already selected, that element should be filled with the current color. If no drawing is selected, then clicking inside a drawing should fill it with the current color.
4.If the Circle button is selected, clicking on the screen should cause a new circle drawing element to be created.
5.If the Clear button is selected, all the drawing elements are removed.
There are some common threads among several of these actions we should explore. Four of them use the mouse click event to cause actions. One uses the mouse drag event to cause an action. Thus, we really want to create a system that can help us redirect these events based on which button is currently selected.
Let’s consider creating a State object that handles mouse activities.
public class State {
//keeps state of each button protected Mediator med; public State(Mediator md) {
med = md; //save reference to mediator
}
public virtual void mouseDown(int x, int y) {} public virtual void mouseUp(int x, int y) { } public virtual void mouseDrag(int x, int y) {}
}
Note that we are creating an actual class here with empty methods, rather than an interface. This allows us to derive new State objects from this class and only have to fill in the mouse actions that actually do anything for that case. Then we’ll create four derived State classes for Pick, Rect, Circle, and Fill and put instances of all of them inside a StateManager
Copyright © , 2002 by James W Cooper
374
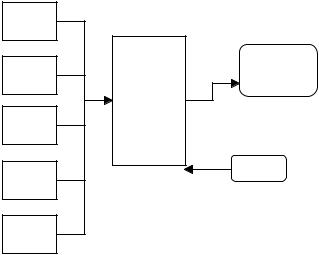
class that sets the current state and executes methods on that state object. In Design Patterns, this StateManager class is referred to as a Context. This object is illustrated in Figure 28-3.
StateManager |
|
|
|
|
currentState |
|
|
Pick |
Rect |
Fill |
Circle |
|
State |
|
|
Figure 28-3– A StateManager class that keeps track of the current state
A typical State object simply overrides those event methods that it must handle specially. For example, this is the complete Rectangle state object. Note that since it only needs to respond to the mouseDown event, we don’t have to write any code at all for the other events.
public class RectState :State |
{ |
public RectState(Mediator |
md):base (md) {} |
//-----
public override void mouseDown(int x, int y) { VisRectangle vr = new VisRectangle(x, y); med.addDrawing (vr);
Copyright © , 2002 by James W Cooper
375
}
}
The RectState object simply tells the Mediator to add a rectangle drawing to the drawing list. Similarly, the Circle state object tells the Mediator to add a circle to the drawing list.
public class CircleState : State {
public CircleState(Mediator md):base (md){ } //-----
public override void mouseDown(int x, int y) { VisCircle c = new VisCircle(x, y); med.addDrawing (c);
}
}
The only tricky button is the Fill button because we have defined two actions for it.
1.If an object is already selected, fill it.
2.If the mouse is clicked inside an object, fill that one.
In order to carry out these tasks, we need to add the selectOne method to our base State interface. This method is called when each tool button is selected.
public class State {
//keeps state of each button protected Mediator med; public State(Mediator md) {
med = md; //save reference to mediator
}
public virtual void mouseDown(int x, int y) {} public virtual void mouseUp(int x, int y) { } public virtual void mouseDrag(int x, int y) {} public virtual void selectOne(Drawing d) {}
}
The Drawing argument is either the currently selected Drawing or null if none is selected. In this simple program, we have arbitrarily set the fill color to red, so our Fill state class becomes the following.
Copyright © , 2002 by James W Cooper
376
public class FillState : State |
{ |
public FillState(Mediator md): base(md) { } |
//----- |
|
public override void mouseDown(int x, int y) { //Fill drawing if you click inside one int i = med.findDrawing(x, y);
if (i >= 0) {
Drawing d = med.getDrawing(i); d.setFill(true); //fill drawing
}
}
//-----
public override void selectOne(Drawing d) { //fill drawing if selected
d.setFill (true);
}
}
Switching Between States
Now that we have defined how each state behaves when mouse events are sent to it, we need to examine how the StateManager switches between states. We create an instance of each state, and then we simply set the currentState variable to the state indicated by the button that is selected.
public class StateManager { private State currentState; private RectState rState; private ArrowState aState; private CircleState cState; private FillState fState;
public StateManager(Mediator med) |
{ |
//create an instance of each state |
|
rState = new RectState(med); |
|
cState = new CircleState(med); |
|
aState = new ArrowState(med); |
|
fState = new FillState(med); |
|
//and initialize them |
|
//set default state |
|
currentState = aState; |
|
} |
|
Copyright © , 2002 by James W Cooper
377
Note that in this version of the StateManager, we create an instance of each state during the constructor and copy the correct one into the state variable when the set methods are called. It would also be possible to create these states on demand. This might be advisable if there are a large number of states that each consume a fair number of resources.
The remainder of the state manager code simply calls the methods of whichever state object is current. This is the critical piece—there is no conditional testing. Instead, the correct state is already in place, and its methods are ready to be called.
public void mouseDown(int x, int y) { currentState.mouseDown (x, y);
}
public void mouseUp(int x, int y) { currentState.mouseUp (x, y);
}
public void mouseDrag(int x, int y) { currentState.mouseDrag (x, y);
}
public void selectOne(Drawing d) { currentState.selectOne (d);
}
How the Mediator Interacts with the State Manager
We mentioned that it is clearer to separate the state management from the Mediator’s button and mouse event management. The Mediator is the critical class, however, since it tells the StateManager when the current program state changes. The beginning part of the Mediator illustrates how this state change takes place. Note that each button click calls one of these methods and changes the state of the application. The remaining statements in each method simply turn off the other toggle buttons so only one button at a time can be depressed.
|
|
|
public class Mediator |
{ |
private |
bool startRect; |
private |
int selectedIndex; |
Copyright © , 2002 by James W Cooper
378
private RectButton rectb; |
|
private bool dSelected; |
|
private ArrayList drawings; |
|
private ArrayList undoList; |
|
private RectButton rButton; |
|
private FillButton filButton; |
|
private CircleButton circButton; |
|
private PickButton arrowButton; |
|
private PictureBox canvas; |
|
private int selectedDrawing; |
|
private StateManager stMgr; |
|
//----- |
|
|
public Mediator(PictureBox pic) |
{ |
startRect = |
false; |
|
dSelected = |
false; |
|
drawings = new ArrayList(); undoList = new ArrayList(); stMgr = new StateManager(this); canvas = pic;
selectedDrawing = -1;
}
//-----
public void startRectangle() { stMgr.setRect(); arrowButton.setSelected(false); circButton.setSelected(false); filButton.setSelected(false);
}
//-----
public void startCircle() { stMgr.setCircle(); rectb.setSelected(false); arrowButton.setSelected(false); filButton.setSelected(false);
}
The ComdToolBarButton
In the discussion of the Memento pattern, we created a series of button Command objects paralleling the toolbar buttons and keep them in a Hashtable to be called when the toolbar button click event occurs. However, a powerful alternative os to create a ComdToolBarButton class which implements the Command interface as
Copyright © , 2002 by James W Cooper
379
well as being a ToolBarButton. Then, each button can have an Execute method which defines its purpose. Here is the base class
public class ComdToolBarButton : ToolBarButton , Command { private System.ComponentModel.Container components = null; protected Mediator med;
protected bool selected;
public ComdToolBarButton(string caption, Mediator md)
{
InitializeComponent(); med = md;
this.Text =caption;
}
//------
public void setSelected(bool b) { selected = b; if(!selected)
this.Pushed =false;
}
//-----
public virtual void Execute() {
}
Note that the Execute method is emp ty in this base class, but is virtual so we can override it in each derived class. In this case, we cannot use the IDE to create the toolbar, but can simply add the buttons to the toolbar programmatically:
private void init() { //create a Mediator
med = new Mediator(pic); //create the buttons
rctButton = new RectButton(med); arowButton = new PickButton(med); circButton = new CircleButton(med); flButton = new FillButton(med); undoB = new UndoButton(med);
clrb = new ClearButton(med);
//add the buttons into the toolbar tBar.Buttons.Add(arowButton); tBar.Buttons.Add(rctButton); tBar.Buttons.Add(circButton); tBar.Buttons.Add(flButton); //include a separator
Copyright © , 2002 by James W Cooper
380
ToolBarButton sep =new ToolBarButton(); sep.Style = ToolBarButtonStyle.Separator; tBar.Buttons.Add(sep); tBar.Buttons.Add(undoB); tBar.Buttons.Add(clrb);
}
Then we can catch all the toolbar button click events in a single method and call each button’s Execute method.
private void tBar_ButtonClick(object sender, ToolBarButtonClickEventArgs e) {
Command comd = (Command)e.Button ; comd.Execute ();
}
The class diagram for this program illustrating the State pattern in this application is illustrated in two parts. The State section is shown in Figure 28-4
Figure 28-4 – The StateManager and the Mediator
Copyright © , 2002 by James W Cooper