

C# ПІДРУЧНИКИ / c# / [IBM] C# Design Patterns- A Tutorial
.pdf221
c.MouseHover += evh; c.MouseEnter+= evh;
//mouse move handler
c.MouseMove += new MouseEventHandler(mouseMove); c.MouseLeave += new EventHandler(mouseLeave);
Similarly, we create a PaintEventHandler for the paint event.
//paint handler catches button's paint c.Paint += new PaintEventHandler( paint);
Layout Considerations
If you create a Windows form containing buttons, the GUI designer automatically generates code to add that Control to the Controls array for that Window. We want to change this by adding the button to the Controls array for the new panel, adding the panel to the Controls array for the Window, and removing the button from that array. Here is the code to add the panel and remove the button in the Form initialization method:
//add outside decorator to the layout //and remove the button from the layout
this.Controls.AddRange(new System.Windows.Forms.Control[] {cdec}); this.Controls.Remove (btButtonA);
and this is the code to add the button to the Decorator panel:
public CoolDecorator(Control c) {
contl = c; |
//copy |
in control |
//add button to controls contained in panel |
||
this.Controls.AddRange(new |
Control[] {contl}); |
|
Control Size and Position
When we decorate the button by putting it in a Panel, we need to change the coordinates and sizes so that the Panel has the size and coordinates of the button and the button has a location of (0, 0) within the panel. This also happens in the CoolDecorator constructor:
this.Location = p;
Copyright © , 2002 by James W Cooper

222
contl.Location =new Point(0,0);
this.Name = "deco"+contl.Name ; this.Size = contl.Size;
x1 = c.Location.X - 1;
y1 = c.Location.Y - 1;
x2 = c.Size.Width;
y2 = c.Size.Height;
We also create instances of the Pens we will use in the Paint method in this constructor:
//create the overwrite pens
gPen = new Pen(c.BackColor, 2); //gray pen overwrites borders bPen = new Pen(Color.Black , 1);
wPen = new Pen(Color.White, 1);
Using a Decorator
This program is shown in Figure 17-1, with the mouse hovering over one of the buttons.
Figure 17-1 – The A button and B button are CoolButtons, which are outlined when a mouse hovers over them. Here the B button is outlined.
Multiple Decorators
Now that we see how a single decorator works, what about multiple decorators? It could be that we’d like to decorate our CoolButtons with another decoration— say, a diagona l red line.
Copyright © , 2002 by James W Cooper
223
This is only slightly more complicated, because we just need to enclose the CoolDecorator inside yet another decorator panel for more decoration to occur. The only real change is that we not only need the instance of the panel we are wrapping in another, but also the central object (here a button) being decorated, since we have to attached our paint routines to that central object’s paint method.
So we need to create a constructor for our decorator that has both the enclosing panel and the button as Controls.
public class CoolDecorator :Panel, Decorator { protected Control contl;
protected Pen bPen, wPen, gPen; private bool mouse_over; protected float x1, y1, x2, y2;
//----------------------------------
public CoolDecorator(Control c, Control baseC) { //the first control is the one layed out
//the base control is the one whose paint method we extend //this allows for nesting of decorators
contl = c;
this.Controls.AddRange(new Control[] {contl});
Then, when we add the event handlers, the paint event handler must be attached to the base control:
//paint handler catches button's paint
baseC.Paint += new PaintEventHandler( paint);
We make the paint method virtual so we can override it as we see below.
public virtual void paint(object sender, PaintEventArgs e){ //draw over button to change its outline
Graphics g = e.Graphics;
It turns out that the easiest way to write our SlashDecorator, which draws that diagonal red line, is to derive it from CoolDecorato directly. We can reuse all the base methods and extend only the paint method from the CoolDecorator and save a lot of effort.
public class SlashDeco:CoolDecorator |
{ |
private Pen rPen; |
|
Copyright © , 2002 by James W Cooper
224
//----------------
public SlashDeco(Control c, Control bc):base(c, bc) { rPen = new Pen(Color.Red , 2);
}
//----------------
public override void paint(object sender, PaintEventArgs e){
Graphics g = e.Graphics ; x1=0; y1=0;
x2=this.Size.Width ; y2=this.Size.Height ;
g.DrawLine (rPen, x1, y1, x2, y2);
}
}
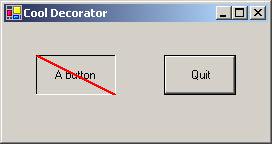
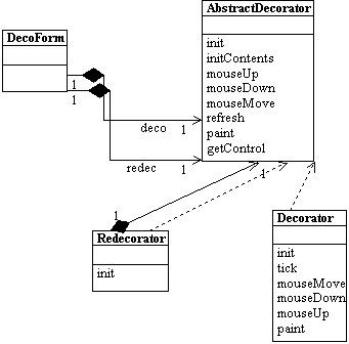
This gives us a final program that displays the two buttons, as shown in Figure Figure 17-2. The class diagram is shown in Figure 17-3
Figure 17-2 – The A CoolButton is also decorated with a SlashDecorator.
Copyright © , 2002 by James W Cooper
225
Figure 17-3 – The UML class diagram for Decorators and two specific Decorator implementations
Nonvisual Decorators
Decorators, of course, are not limited to objects that enhance visual classes. You can add or modify the methods of any object in a similar fashion. In fact, nonvisual objects can be easier to decorate because there may be fewer methods to intercept and forward. Whenever you put an instance of a class inside another class and have the outer class operate on it, you are essentially “decorating” that inner class. This is one of the most common tools for programming available in Visual Studio.NET.
Copyright © , 2002 by James W Cooper
226
Decorators, Adapters, and Composites
As noted in Design Patterns, there is an essential similarity among these classes that you may have recognized. Adapters also seem to “decorate” an existing class. However, their function is to change the interface of one or more classes to one that is more convenient for a particular program. Decorators add methods to particular instances of classes rather than to all of them. You could also imagine that a composite consisting of a single item is essentially a decorator. Once again, however, the intent is different.
Consequences of the Decorator Pattern
The Decorator pattern provides a more flexible way to add responsibilities to a class than by using inheritance, since it can add these responsibilities to selected instances of the class. It also allows you to customize a class without creating subclasses high in the inheritance hierarchy. Design Patterns points out two disadvantages of the Decorator pattern. One is that a Decorator and its enclosed component are not identical. Thus, tests for object types will fail. The second is that Decorators can lead to a system with “lots of little objects” that all look alike to the programmer trying to maintain the code. This can be a maintenance headache.
Decorator and Façade evoke similar images in building architecture, but in design pattern terminology, the Façade is a way of hiding a complex system inside a simpler interface, whereas Decorator adds function by wrapping a class. We’ll take up the Façade next.
Thought Questions
1.When someone enters an incorrect value in a cell of a grid, you might want to change the color of the row to indicate the problem. Suggest how you could use a Decorator.
2.A mutual fund is a collection of stocks. Each one consists of an array or Collection of prices over time. Can you see how a Decorator can be used to produce a report of stock performance for each stock and for the whole fund?
Copyright © , 2002 by James W Cooper
|
|
227 |
Programs on the CD-ROM |
|
|
|
|
|
|
\Decorator\Cooldecorator |
C#cool button decorator |
|
|
|
|
\Decorator\Redecorator |
C# cool button and slash decorator |
|
|
|
Copyright © , 2002 by James W Cooper

228
18.The Façade Pattern
The Façade pattern is used to wrap a set of complex classes into a simpler enclosing interface. As your programs evolve and develop, they grow in complexity. In fact, for all the excitement about using design patterns, these patterns sometimes generate so many classes that it is difficult to understand the program’s flow. Furthermore, there may be a number of complicated subsystems, each of which has its own complex interface.
The Façade pattern allows you to simplify this complexity by providing a simplified interface to these subsystems. This simplification may in some cases reduce the flexibility of the underlying classes, but it usually provides all the function needed for all but the most sophisticated users. These users can still, of course, access the underlying classes and methods.
Fortunately, we don’t have to write a complex system to provide an example of where a Façade can be useful. C# provides a set of classes that connect to databases, using an interface called ADO.Net. You can connect to any database for which the manufacturer has provided a ODBC connection class—almost every database on the market. Let’s take a minute and review how databases are used and a little about how they work.
What Is a Database?
A database is a series of tables of information in some sort of file structure that allows you to access these tables, select columns from them, sort them, and select rows based on various criteria. Databases usually have indexes associated with many of the columns in these tables, so we can access them as rapidly as possible.
Databases are used more than any other kind of structure in computing. You’ll find databases as central elements of employee records and payroll systems, in travel scheduling systems, and all through product manufacturing and marketing.
Copyright © , 2002 by James W Cooper
229
In the case of employee records, you could imagine a table of employee names and addresses and of salaries, tax withholding, and benefits. Let’s consider how these might be organized. You can imagine one table of employee names, addresses, and phone numbers. Other information that you might want to store would include salary, salary range, last raise, next raise, employee performance ranking, and so forth.
Should this all be in one table? Almost certainly not. Salary ranges for various employee types are probably invariant between employees, and thus you would store only the employee type in the employee table and the salary ranges in another table that is pointed to by the type number. Consider the data in Table 18-1.
Key |
Lastname |
SalaryType |
|
|
|
1 |
Adams |
2 |
|
|
|
2 |
Johnson |
1 |
|
|
|
3 |
Smyth |
3 |
|
|
|
4 |
Tully |
1 |
|
|
|
5 |
Wolff |
2 |
|
|
|
SalaryType |
Min |
Max |
|
|
|
1 |
30000 |
45000 |
|
|
|
2 |
45000 |
60000 |
|
|
|
3 |
60000 |
75000 |
|
|
|
Table 18-1 – Employee Names and Salary Type Tables
The data in the SalaryType column refers to the second table. We could imagine many such tables for things like state of residence and tax values for each state, health plan withholding, and so forth. Each table will have a primary key column like the ones at the left of each table and several more columns of data. Building tables in a database has evolved to both an art and a science. The structure of these tables is referred to by their normal form. Tables are said to be in first, second, or third normal form, abbreviated as 1NF, 2NF, or 3NF.
∙ First. Each cell in a table should have only one value (never an array of values). (1NF)
Copyright © , 2002 by James W Cooper
230
∙Second. 1NF and every non-key column is fully dependent on the key column. This means there is a one-to-one relationship between the primary key and the remaining cells in that row. (2NF)
∙Third. 2NF and all non-key columns are mutually independent. This means that there are no data columns containing values that can be calculated from other columns’ data. (3NF)
Today, nearly all databases are constructed so that all tables are in third normal form (3NF). This means that there are usually a fairly large number of tables, each with relatively few columns of information.
Getting Data Out of Databases
Suppose we wanted to produce a table of employees and their salary ranges for some planning exercise. This table doesn’t exist directly in the database, but it can be constructed by issuing a query to the database. We’d like to have a table that looked like the data in Table 18-2.
Name |
Min |
Max |
Adams |
$45,000.00 |
$60,000.00 |
Johnson |
$30,000.00 |
$45,000.00 |
Smyth |
$60,000.00 |
$75,000.00 |
Tully |
$30,000.00 |
$45,000.00 |
Wolff |
$45,000.00 |
$60,000.00 |
Table 18-2 - Employee Salaries Sorted by Name
Maybe we want data sorted by increasing salary, as shown in Table 18-3.
Name |
Min |
Max |
Tully |
$30,000.00 |
$45,000.00 |
Johnson |
$30,000.00 |
$45,000.00 |
Wolff |
$45,000.00 |
$60,000.00 |
Adams |
$45,000.00 |
$60,000.00 |
Smyth |
$60,000.00 |
$75,000.00 |
Table 18-3– Employee Salaries Sorted by Magnitude
Copyright © , 2002 by James W Cooper