
- •Disclaimer
- •Contact
- •Table of Contents
- •Welcome to REAKTOR
- •System Requirements
- •REAKTOR Modes: Full, Player and Demo
- •How to Get Started
- •The REAKTOR Documentation
- •Special Formatting used in this Document
- •Basic Settings in REAKTOR
- •Configuring the Audio Hardware
- •Accessing the Audio and MIDI Settings… dialog
- •Selecting an Audio Hardware Device
- •Selecting a Sample Rate
- •Adjusting Output Latency
- •Routing: Assigning REAKTOR's Inputs
- •Routing: Assigning REAKTOR's Outputs
- •Configuring the MIDI Hardware
- •Loading and Playing
- •A Few Important Buttons
- •Ensembles, Instruments and KOMPLETE Instruments
- •Loading Carbon 2
- •Opening the Sidepane
- •Opening the Browser
- •Loading a File
- •Playing Carbon 2 and its Snapshots
- •Loading a Snapshot
- •Adjusting the Sound
- •Switching Effects
- •Changing the Filter Movement
- •Changing the Filter Settings
- •Saving Your Settings
- •Modifying a REAKTOR Ensemble
- •Recap
- •Using the Browser to Load the Ensemble
- •Instruments inside Ensembles
- •Junatik Panel Overview
- •The Difference Between an Ensemble and an Instrument
- •Snapshot Master for Plug-In and Snapshot Hierarchies
- •Snapshot Hierarchy as seen in Properties
- •Recall by MIDI and Snapshot Master for Plug-In
- •Snapshot Properties for the Junatik Instrument
- •Snapshot with a REAKTOR Switch Turned Off
- •Snapshot Flexibility
- •Swapping the Delay Instrument for a Reverb Instrument
- •Opening a REAKTOR Structure
- •Removing an Instrument from the Structure
- •Using the Bowser to Search for Instruments
- •Connecting the Instrument to the Audio Out
- •Making the Connections
- •Resetting the Positions of Instruments in the Ensemble Panel
- •Restoring the Correct Snapshot Hierarchy
- •Opening the Instrument Properties
- •Creating a Sequenced Synthesizer
- •Recap and Overview
- •Creating the Synth Sequencer Ensemble
- •Create a New Ensemble
- •Using the Browser to Load the Instruments
- •Making the Synth Sequencer Work
- •Overview of the Structure
- •Removing the Unwanted Instrument
- •Connecting ANALOG Outputs to the Audio Out
- •Overview of Monoliner and ANALOG
- •Making the MIDI Connections between Instruments
- •Using Internal MIDI Connections
- •REAKTOR Run and Stop Buttons
- •Looking More Closely at Monoliner
- •Changing the Direction and Speed
- •Number of Steps, Step Offset and Shuffle/Swing
- •GATE, VELOCITY and PITCH Knobs and On/Off Buttons
- •Exploring the Snapshots/Show Hints
- •Exploring Snapshots in Monoliner and ANALOG
- •Show/Hide Hints
- •Exploring a REAKTOR Sampler
- •Recap and Overview
- •Using the Browser to Launch Memory Drum 2
- •Replacing and Editing Samples in the Sample Map Editor
- •Opening the Map and Playing the Samples
- •Using Replace in the Edit Sample List
- •Using Add from the Edit Sample List
- •The Memory Drum Interface
- •Changing Pitch for Just one Sample Slot
- •Exploring the Memory Drum Snapshots
- •Building a Synth Using Macros
- •What is a Macro
- •Preparation
- •Loading a New Ensemble
- •Removing the Default Instrument
- •Inserting a New Instrument
- •Connecting the Instrument to the Audio Out
- •Adding an Oscillator and an ADSR Env to the Instrument
- •Inserting an Oscillator
- •Inserting the ADSR Env
- •Inserting Pitch and Gate Modules
- •Connecting the Pitch and Gate Modules
- •Safe Output Level
- •Inserting the Filter
- •Inserting the Filter Macro and Doing Some Rewiring
- •Unlocking the Panel to Move the Macros
- •Adding a Second Oscillator and a Mixer
- •Adding a Second Oscillator Using Duplicate
- •Using Properties to Rename the Oscillator Macros
- •Adding a Mixer
- •Increasing the Number of Mixer Inputs
- •Adding Faders and Connecting them to the Mixer
- •Connecting the NotePitch Module to the ADSR Envelopes and Filter
- •Tidying Up in the Instrument Panel
- •Changing the Appearance of the Faders
- •Playing Your Synth and Making Changes to the Sound
- •Changing the Oscillators Waveform, Resetting the Filter and Output Level
- •Creating some Snapshots
- •Saving Your Work Using Save As
- •Make a Sampler Using REAKTOR Modules
- •Recap and Overview
- •What Kind of Sampler?
- •Building the Basic Structure
- •Load up a New Ensemble
- •Inserting the First Modules
- •Inserting the Envelope
- •Adding the Controls for the Envelope
- •Making the Connections
- •Connecting the Sampler to the 2 Audio Voice Combiners
- •Connecting the NotePitch and Gate Modules
- •Loading a Sample into the Sampler
- •Opening the Sample Map Editor from the View Menu
- •Adding a Sample to the Sample Map Editor
- •Tidying Up the Appearance and Moving the Modules
- •Moving Modules in the Structure
- •Deleting unwanted Modules
- •Using the Panel Lock Button to Move the Knobs
- •Adding More Samples and Changing their Settings
- •Changing the Settings of the Existing Sample
- •Adding More Samples
- •Sample Reverse and Other Playback Possibilities
- •Looping, and Direction Buttons
- •Transposing a Sample
- •Adding a Filter
- •Inserting the Filter Into the Structure
- •Creating the Filter Controls and Making the Connections
- •Tidying Up the Appearance in the Instrument Panel
- •Using Save Ensemble to Update Your Already Saved Sampler
- •Modifying the Existing Sampler
- •Inserting the Selector
- •Connecting the Filter Outputs
- •Increasing the Number of Selector Inputs
- •Adding the Position Fader and Changing its Range
- •Final connections and Panel Appearance
- •Explore Your Sampler and Make Some Snapshots
- •What’s Next?

Make a Sampler Using REAKTOR Modules
Adding a Filter
8.9Adding a Filter
Now we will add a Filter to our Sampler, and create controls for Cutoff and Resonance. We will also try different filter characteristics such as High Pass, Band Pass, and Low Pass.
8.9.1Inserting the Filter Into the Structure
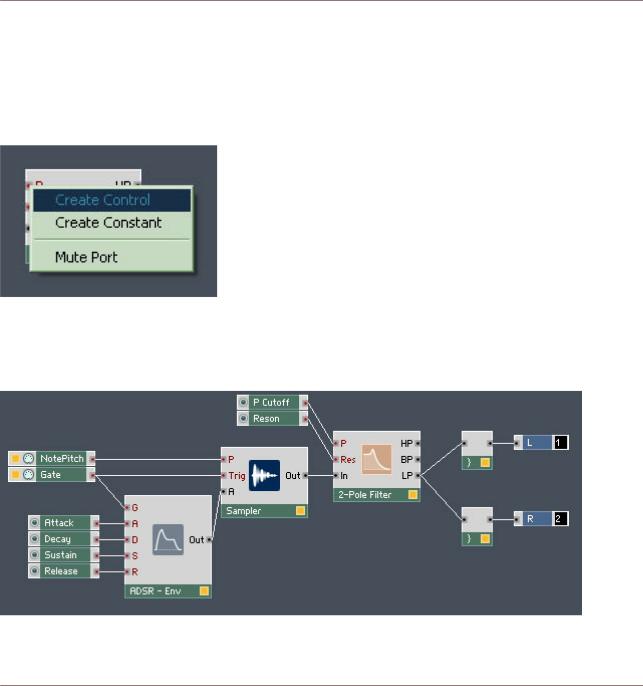
In Windows®, right-click (in Mac OS® X [Ctrl]+click) on a space inside the Instrument Structure and choose the Built-In Module > Filter > Multi 2-Pole menu entry.
Fig. 8.14 Inserting a Filter.
REAKTOR 5.5 - Getting Started Guide - 133

Make a Sampler Using REAKTOR Modules
Adding a Filter
8.9.2Creating the Filter Controls and Making the Connections
We are going to create controls for the P (Pitch Cutoff) Input and the Res (Resonance) In put.
1.As before, right-click on the respective Inputs if you are in Windows® ([Ctrl]+click if you are in Mac OS® X) and choose the Create Control menu entry.
2.Now connect the output of the Sampler to the Input of the Multi 2-Pole, and the Out put of the LP (Lowpass) Output of the Filter to the 2 Audio Voice Combiners.
After moving the Modules around to create some space, your Structure should look some thing like this:
Fig. 8.15 Filter with controls in the Structure
REAKTOR 5.5 - Getting Started Guide - 134

Make a Sampler Using REAKTOR Modules
Adding a Filter
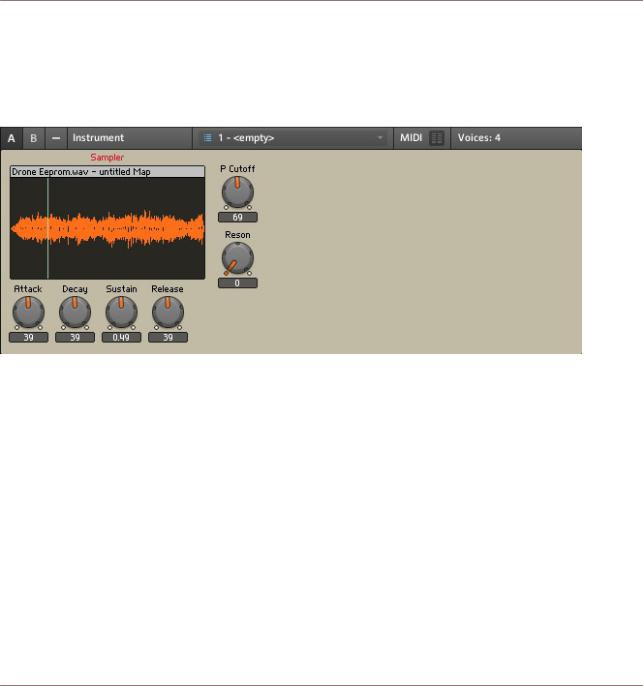
8.9.3Tidying Up the Appearance in the Instrument Panel
▪Once more, we need to unlock the Panel, so that we can move the Cutoff and Resonance knobs. After moving, they are no longer on top of the Sampler.
Your Instrument Panel should look like this:
Fig. 8.16 Tidied Panel
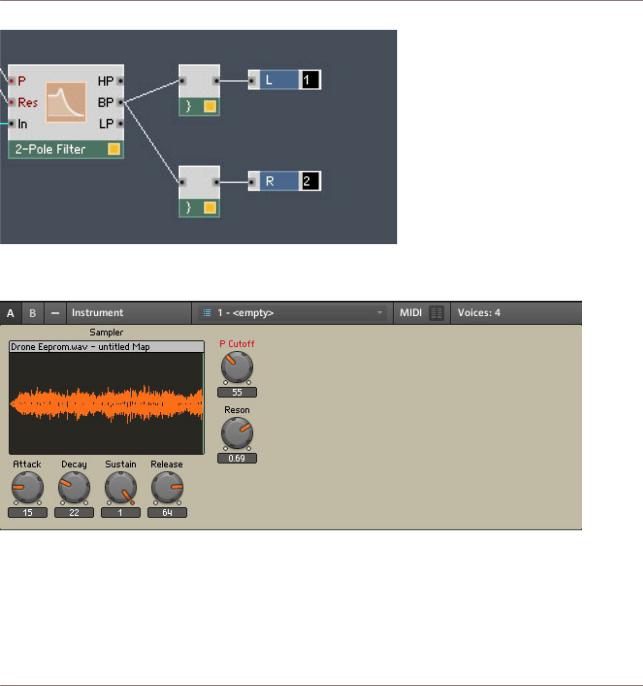
8.9.4Trying the Band-Pass and Hi-Pass Filter Outputs/Saving Your Work
With Samples, it is sometimes better to use the Band-Pass or High-Pass Filters, as these are often more suitable than the Low-Pass.
1.But before we do that, press the Menu button and choose the Save Ensemble As… menu entry to save your Ensemble!
2.Now you have saved your work, just experiment with the different Filter Outputs. In your Instrument Structure, click on the BP Output from the Multi 2-Pole and drag the wires to the Audio Voice Combiners.
REAKTOR 5.5 - Getting Started Guide - 135

Make a Sampler Using REAKTOR Modules
Adding a Filter
3.Now play your MIDI keyboard and change the settings of the Filter and maybe the controls for the ADSR as well.
4.Finally connect the HP Output to the 2 Audio Voice Combiners. Then decide which Filter Outputs is best for you.
5.Save your work.
REAKTOR 5.5 - Getting Started Guide - 136