- •Chapter 5 Lab 5-2, Configure ip sla Tracking and Path Control
- •Required Resources
- •Step 1: Configure loopbacks and assign addresses.
- •Step 2: Configure static routing.
- •209.165.200.254
- •Step 4: Configure tracking options.
- •Step 5: Verify ip sla operation.
- •Device Configurations (Instructor version)
CCNPv7 ROUTELab 5-2, Configure IP SLA Tracking and Path Control

CCNPv7 ROUTE
Chapter 5 Lab 5-2, Configure ip sla Tracking and Path Control
Instructor Version
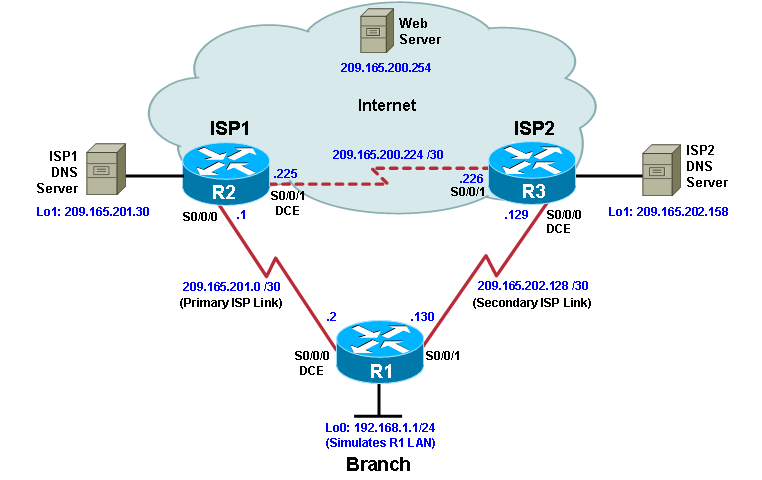
Topology

Objectives
Configure and verify the IP SLA feature.
Test the IP SLA tracking feature.
Verify the configuration and operation using showanddebugcommands.
Background
You want to experiment with the Cisco IP Service Level Agreement (SLA) feature to study how it could be of value to your organization.
At times, a link to an ISP could be operational, yet users cannot connect to any other outside Internet resources. The problem might be with the ISP or downstream from them. Although policy-based routing (PBR) can be implemented to alter path control, you will implement the Cisco IOS SLA feature to monitor this behavior and intervene by injecting another default route to a backup ISP.
To test this, you have set up a three-router topology in a lab environment. Router R1 represents a branch office connected to two different ISPs. ISP1 is the preferred connection to the Internet, while ISP2 provides a backup link. ISP1 and ISP2 can also interconnect, and both can reach the web server. To monitor ISP1 for failure, you will configure IP SLA probes to track the reachability to the ISP1 DNS server. If connectivity to the ISP1 server fails, the SLA probes detect the failure and alter the default static route to point to the ISP2 server.
Note:This lab uses Cisco 1941 routers with Cisco IOS Release 15.2 with IP Base. Depending on the router or switch model and Cisco IOS Software version, the commands available and output produced might vary from what is shown in this lab.
Required Resources
3 routers (Cisco IOS Release 15.2 or comparable)
Serial and Ethernet cables
Step 1: Configure loopbacks and assign addresses.
Cable the network as shown in the topology diagram. Erase the startup configuration and reload each router to clear the previous configurations. Using the addressing scheme in the diagram, create the loopback interfaces and apply IP addresses to them as well as the serial interfaces on R1, ISP1, and ISP2.
You can copy and paste the following configurations into your routers to begin.
Note: Depending on the router model, interfaces might be numbered differently than those listed. You might need to alter them accordingly.
Router R1
hostname R1
interface Loopback 0
description R1 LAN
ip address 192.168.1.1 255.255.255.0
interface Serial0/0/0
description R1 --> ISP1
ip address 209.165.201.2 255.255.255.252
clock rate 128000
bandwidth 128
no shutdown
interface Serial0/0/1
description R1 --> ISP2
ip address 209.165.202.130 255.255.255.252
bandwidth 128
no shutdown
Router ISP1 (R2)
hostname ISP1
interface Loopback0
description Simulated Internet Web Server
ip address 209.165.200.254 255.255.255.255
interface Loopback1
description ISP1 DNS Server
ip address 209.165.201.30 255.255.255.255
interface Serial0/0/0
description ISP1 --> R1
ip address 209.165.201.1 255.255.255.252
bandwidth 128
no shutdown
interface Serial0/0/1
description ISP1 --> ISP2
ip address 209.165.200.225 255.255.255.252
clock rate 128000
bandwidth 128
no shutdown
Router ISP2 (R3)
hostname ISP2
interface Loopback0
description Simulated Internet Web Server
ip address 209.165.200.254 255.255.255.255
interface Loopback1
description ISP2 DNS Server
ip address 209.165.202.158 255.255.255.255
interface Serial0/0/0
description ISP2 --> R1
ip address 209.165.202.129 255.255.255.252
clock rate 128000
bandwidth 128
no shutdown
interface Serial0/0/1
description ISP2 --> ISP1
ip address 209.165.200.226 255.255.255.252
bandwidth 128
no shutdown
Verify the configuration by using the show interfaces descriptioncommand. The output from router R1 is shown here as an example.
R1# show interfaces description | include up
Se0/0/0 up up R1 --> ISP1
Se0/0/1 up up R1 --> ISP2
Lo0 up up R1 LAN
R1#
All three interfaces should be active. Troubleshoot if necessary.
