

BRITTON Michael R - Drawing Skulls Part 1
.pdfMichael R. Britton
Drawing
Skulls Part 1
February 2005
An interesting question I often get asked by prospective students is; Which is better: studying in a class-room or from the Mastering Portrait Drawing DVD workshop?
There are pros and cons to both. As a teacher who has taught for many years in the classroom I am well aware of the limitations of the classroom, or studio, environment. First, there is the time limitation. The course material must be presented in the number of hours allotted for the course, whether that be 18, 24, or 36 hours. If you missed, or did not understand a lecture, there simply is not sufficient time to re-present it. At most, a quick review will have to do.
1-800-427-2468
© All rights reserved.

Also, most students need to take a course at least a few times to start getting a grasp of the skills and knowledge required, while others choose to take the course every semester to continually improve their skill under the guidance of a master artist which can be very costly in both time and money. That’s all well and good as long as you live in a major artistic centre that has a master artist teaching realist portraiture and you can get a space in the class.
Many of you have a passion and drive for art and drawing and want to learn correctly at a serious level, but live in small towns or cities or countries that just don’t offer classical realist courses of study, or even, just a good portrait class. So that is the real beauty of our DVD workshops and newsletters. We have people studying the workshops up on remote weather stations in the Arctic, and we have had several people buy them who are heading off on holiday or to live overseas and want to continue studying while they are gone, not to mention people who are housebound or who have small children or work obligations who just can’t make it to a 3
hour class.
With the DVD workshop you can replay and study a particular lecture at your convenience as often as you need, until it is fully understood, at one low cost. The convenience, the cost, the lifetime reference material, the privacy, and the unique content of Artacademy.com’s DVD’s can certainly be an essential part of your learning arsenal, because very few teachers, books or videos currently cover this valuable material.
With a DVD Workshop some people worry about the lack of direct teacher/ student interaction. This was one of my prime concerns with the feasibility of putting out a workshop on DVD. But the results coming in from students studying from the DVDs has been more than I thought would be possible and has been incredibly gratifying as a teacher. In a class situation you really don’t get more than 30 seconds to a few minutes with the teacher while they try to see everyone’s work and make the rounds and that can
be frustrating for both the teacher and student. That’s why I filmed and structured the DVD’s just as though it were a private lesson from me to you.
The fact is the DVD’s cover the material in a succinct logical sequence that I don’t have time to cover in a workshop or course with all the chatter and interruptions which often consume a large portion of a class. Every conceivable question has already been answered and if there is something

extra you are not sure of just fire me a quick email. This is like my dream class, the opportunity to cover everything I have always wanted to cover in the classroom but which usually takes quite a few semesters of courses to get through, (which is another reason people keep taking the course).
But here’s the very real issue. To really learn portraiture well you should ideally be drawing from life a substantial portion of the time. Drawing from a photograph is only a substitute, although it is better not drawing.
Not having a ‘live’ model to work from as you would have in a classroom is not an ideal learning situation. This can be easily rectified by asking your family or friends to sit for you, doing self portraits in a mirror (think of how many Vincent Van Gogh did), or hiring a model if you prefer. Find an artist friend(s) to have drawing sessions with and take turns drawing each other or share the cost of a model or join a life-drawing group in your area.
Working from life the classroom is not always an ideal situation either, especially if you are in the far corner of the class-room peering through a forest of easels trying to catch a glimpse of the model. Also, when the instructor is demonstrating (which they should be!) only a few students will be able to see the same view that the instructor is drawing from. For example, the instructor may be demonstrating a full, frontal portrait but if you are seated off to the side you will see the model in a profile view. And that’s a different lesson. This isn’t the case in the DVD Workshop, you see the model in exactly the same view that I do.
Another issue is that to significantly improve your portrait drawing you must know the anatomy of the head. That’s the skull and the musculature.
Well, about a month ago, I found the manufacturer of my favorite skull while doing research on the internet. Most manufacturers only sell to whole-salers and distributors, but I called them anyway and asked if they would be willing to sell directly to artists and art-students. And they said yes. And before long I had a whole new Anatomical Supply division added to my web-site (www.artacademy.com).

Classic Human Skull
$90 + shipping
Human Skull with Cervical Vertebrae with Stand $198 + shipping
The skull that I use is the Human Skull with Cervical Vertebrae. When I originally purchased mine, about 6 years ago and paid $278! it came without a stand. I had to make my own stand. Fortunately, it now comes with a stand which makes it ideal for drawing. (If you choose to buy the less-expensive Classic Human Skull you can make your own stand.)
The very real benefit of drawing from a good skull is that you are drawing from ‘life’ and learning the anatomy simultaneously. Nothing, but nothing, will improve your portrait drawing skills faster than drawing from the skull. Draw it in full frontal, 3/4, 7/8’s profile. Set up your light in as many variations as you can possibly think of.
However, avoid drawing from a novelty or cheap, knock-off skull. They are poorly proportioned and detailed and will only re-inforce your symbolic preconceptions. Thus doing more harm than good.

Now how to draw the skull.
For more details visit our new Anatomical Supplies for
Artists section. Just click on the skeleton!
Drawing the Skull – Part 1
To gain the maximum benefit your drawing should be lifesize, approximately 10” from the top of the skull (the calvarium) to the bottom of the chin (the mental tubercle).
Begin by striking the arabesque using straight, architectonically sound lines. Don’t premeasure the width, just take your best guess. This is how you train your eye to assess proportion.
The images used in this article are still-frames from the Drawing the Skull
DVD.
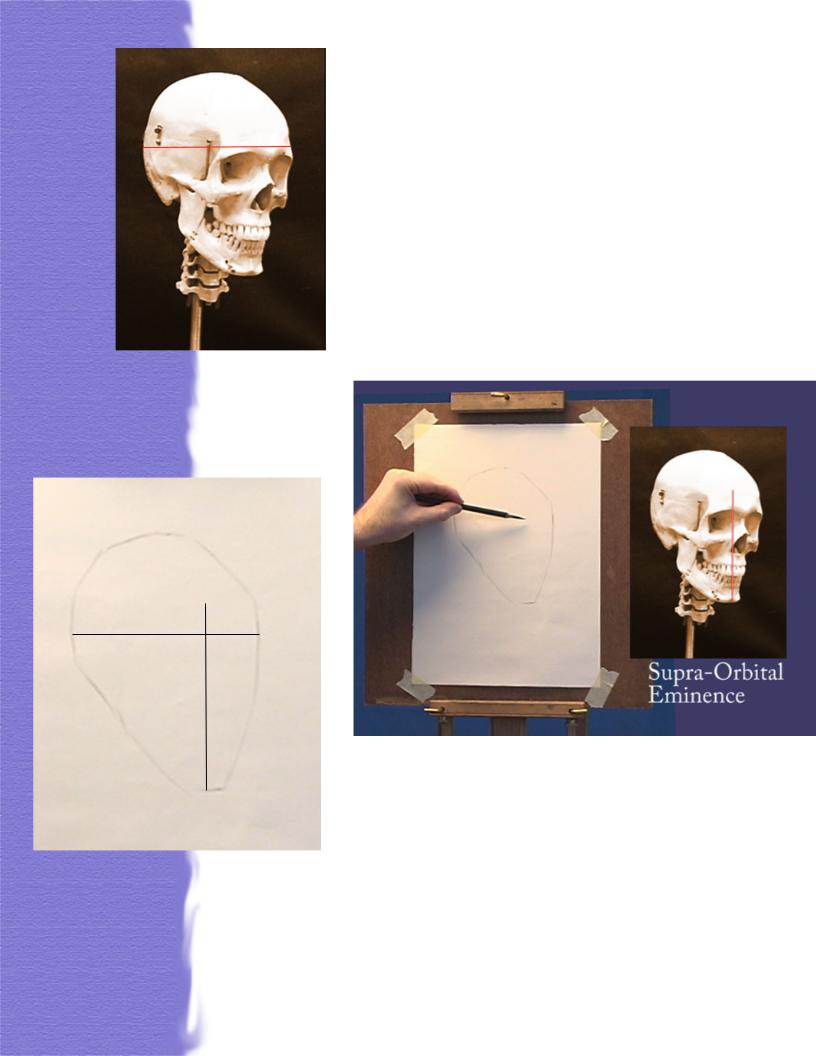
Once you have struck your initial arabesque you then need to verify its accuracy. To do this ‘sight’ the width of the skull by holding your pencil horizontally at arm’s length (elbows locked!) so that the point of your pencil is at the far edge of the forehead and adjust your thumb on the pencil so that it is at the back of the skull.
Keeping your elbow locked and without moving your thumb, turn the pencil so that it is perpendicular and your thumb is now at the bottom of the chin at the mental tubercle. Note where your pencil point is now. It will be a small distance below the top of the skull.
You now need to take your best possible guess at where that point is below the top of the skull. It takes practice and training (Mastering Portrait Drawing goes into the particulars of sighting indepth), but the assumption here is that you will better adjudge a small, short distance than a long one. Always use the shortest measure!
Now check that the proportions of your drawn arabesque correlate to these measures and make whatever corrections are necessary.
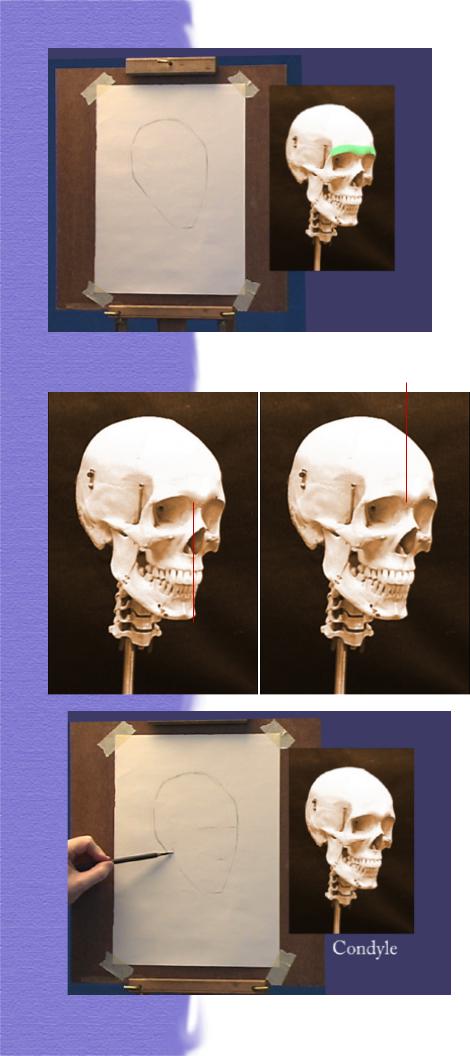
Once the correct proportions of the arabesque have been established, the critical landmark of the skull (or portrait) must be placed. That is the brow ridge (the supraorbital eminence, or prominence) which is highlighted here in neon green.
Again, take your best guess at where you believe the brow ridge to be then check it by sighting.
First sight from the mental tubercle to the a point on the brow ridge (your choosing, but you have to stick with it). Now raise
your pencil so that your thumb is now on your point on the brow ridge and note where your pencil point is. It should be a small distance above the top of the skull.
Mark on your drawing where you can best place that point above the skull. This is called the ‘check point’. Again, the smallest measured distance will be the more accurate. Your point on the brow ridge should, if it was placed correctly, be exactly halfway between the mental tubercle and your check point. If it isn’t – then correct the placement of your brow ridge.
Now you can fix the width of the face. In the 3/4 view the hinge of the jaw (condyle) is the critical landmark. Again, take your best guess then check by sighting horizontally from the condyle to the far edge of the cheek bone (zygomatic arch) and vertically relating that measure from the mental tubercle.
From my view point, that measure takes me up from the mental tubercle to the top of the bilateral nasal bone. Since we have already established the brow ridge we now only have to estimate a small distance to fix the top of the nasal bone.
If you placed the condyle correctly, it should equal the measure from mental tubercle to nasal bone. If you’re off a bit, then correct the placement of the condyle. Always assume that the short distance estimated is the correct one!
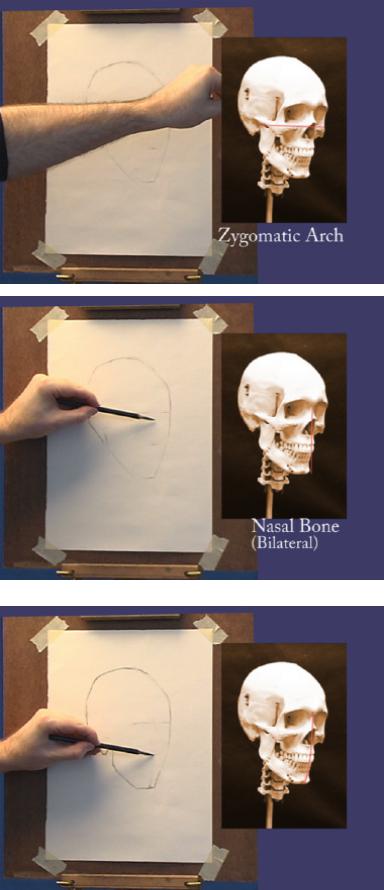
Now that the primary elements of proportioned and placed you can further work out the arabesque. I find it best to further resolve only the back, least intricate, part of the skull at this early stage.
Before placing the internal elements of the skull’s face you need to establish the facial angle which is the center line of the face. Draw a slightly arcing line from the middle of the mental tubercle up through the center of the brow ridge. The placement of the facial angle is very important. You have to feel your way through this as there is no way to accurately measure it.
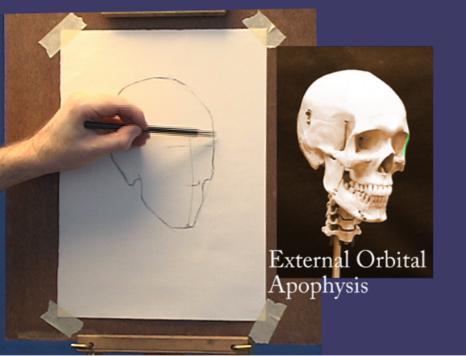
Once the facial angle is established continue resolving the arabesque carefully observing the shape of the muzzle (the mouth area), the zygomatic process and arch, up through the external orbital apophysis to the forehead.
Now we’re ready to map the size and placements of the skulls face and teeth. The will be covered in Part 2 in the March issue of The Drawing Newsletter.