
- •Worldwide Technical Support and Product Information
- •National Instruments Corporate Headquarters
- •Worldwide Offices
- •Important Information
- •Warranty
- •Copyright
- •Trademarks
- •WARNING REGARDING USE OF NATIONAL INSTRUMENTS PRODUCTS
- •Contents
- •About This Manual
- •Conventions
- •Related Documentation
- •Calling Code in Various Platforms
- •Characteristics of the Two Calling Approaches
- •Details of Call Library Function
- •Details of a CIN
- •Calling Shared Libraries
- •Figure 2-1. Call Library Function Dialog Box
- •Calling Conventions (Windows)
- •Parameters
- •Calling Functions That Expect Other Data Types
- •Building a Shared Library (DLL)
- •Task 1: Build the Function Prototype in LabVIEW
- •Task 2: Complete the .c File
- •Required Libraries
- •Task 3: Build a Library Project in an External IDE
- •Figure 2-2. Creating a Project in Visual C++
- •Figure 2-3. Setting the Use run-time library control, Microsoft Visual C++
- •Gnu C or C++ Compilers on Solaris, Linux, or HP-UX
- •Metrowerks CodeWarrior on Power Macintosh
- •Calling External APIs
- •Common Pitfalls with the Call Library Function
- •Incorrect Function Name
- •Data Types
- •Constants
- •Calling Conventions
- •Example 1: Call a Shared Library that You Built
- •Configuration of Call Library Function
- •Create Front Panel
- •Create the Block Diagram
- •Example 2: Call a Hardware Driver API
- •Figure 2-4. VI That Calls Hardware
- •Example 3: Call the Win32 API
- •Table 2-1. Mapping Win32 Data Types to Standard C Data Types
- •Table 2-2. Mapping Win32 Data Types to LabVIEW Data Types
- •Constants
- •Table 2-3. Selected Constants for MessageBox
- •Figure 2-5. Combining Function Constants in LabVIEW
- •Determining the Proper Library and Function Name
- •Unicode Versions and ANSI Versions of Functions
- •Configuring a Call to the Win32 API
- •Figure 2-6. Configuring Call Library Function to call the Win32 API
- •Figure 2-7. Block Diagram for a Call to the Win32 API
- •Figure 2-8. Running a LabVIEW Call to the Win32 API
- •Additional Examples of LabVIEW Calls to DLLs
- •Debugging DLLs and Calls to DLLs
- •Troubleshooting the Call Library Function
- •Troubleshooting your DLL
- •Troubleshooting Checklist
- •Module Definition Files
- •Array and String Options
- •Arrays of Numeric Data
- •String Data
- •Figure 2-9. The LabVIEW String Format
- •Figure 2-10. The Pascal String Format
- •Figure 2-11. The C String Format
- •Array and String Tip
- •Supported Languages
- •Macintosh
- •Microsoft Windows
- •Solaris, Linux, and HP-UX
- •Resolving Multithreading Issues
- •Making LabVIEW Recognize a CIN as Thread Safe
- •Using C Code that is Thread Safe
- •Creating a CIN
- •Step 1. Set Up Input and Output Terminals for a CIN
- •Input-Output Terminals
- •Output-Only Terminals
- •Step 2. Wire the Inputs and Outputs to the CIN
- •Step 3. Create a .c File
- •Step 4. Compile the CIN Source Code
- •Compile on Macintosh
- •Microsoft Windows
- •Solaris 2.x
- •HP-UX and Linux
- •gcc Compiler
- •Step 5. Load the CIN Object Code
- •LabVIEW Manager Routines
- •Pointers as Parameters
- •Debugging External Code
- •DbgPrintf
- •Windows
- •UNIX
- •Passing Parameters
- •Parameters in the CIN .c File
- •Passing Fixed-Size Data to CINs
- •Scalar Numerics
- •Scalar Booleans
- •Refnums
- •Clusters of Scalars
- •Return Value for CIN Routines
- •Examples with Scalars
- •Creating a CIN That Multiplies Two Numbers
- •Passing Variably Sized Data to CINs
- •Alignment Considerations
- •Arrays and Strings
- •Paths
- •Clusters Containing Variably Sized Data
- •Resizing Arrays and Strings
- •SetCINArraySize
- •NumericArrayResize
- •Examples with Variably Sized Data
- •Concatenating Two Strings
- •Working with Clusters
- •Manager Overview
- •Basic Data Types
- •Scalar
- •char
- •Dynamic
- •Memory-Related
- •Constants
- •Memory Manager
- •Memory Allocation
- •Memory Zones
- •Using Pointers and Handles
- •File Manager
- •Identifying Files and Directories
- •Path Specifications
- •File Descriptors
- •File Refnums
- •Support Manager
- •CIN Routines
- •Data Spaces and Code Resources
- •One Reference to the CIN in a Single VI
- •Loading a VI
- •Unloading a VI
- •Loading a New Resource into the CIN
- •Compiling a VI
- •Running a VI
- •Saving a VI
- •Aborting a VI
- •Multiple References to the Same CIN in a Single VI
- •Multiple References to the Same CIN in Different VIs
- •Single-Threaded Operating Systems
- •Multithreaded Operating Systems
- •Code Globals and CIN Data Space Globals
- •Examples
- •Memory Manager Functions
- •Support Manager Functions
- •Mathematical Operations
- •ASCIITime
- •AZCheckHandle/DSCheckHandle
- •AZCheckPtr/DSCheckPtr
- •AZDisposeHandle/DSDisposeHandle
- •AZDisposePtr/DSDisposePtr
- •AZGetHandleSize/DSGetHandleSize
- •AZHandAndHand/DSHandAndHand
- •AZHandToHand/DSHandToHand
- •AZHeapCheck/DSHeapCheck
- •AZHLock
- •AZHNoPurge
- •AZHPurge
- •AZHUnlock
- •AZMaxMem/DSMaxMem
- •AZMemStats/DSMemStats
- •AZNewHandle/DSNewHandle
- •AZNewHClr/DSNewHClr
- •AZNewPClr/DSNewPClr
- •AZNewPtr/DSNewPtr
- •AZPtrAndHand/DSPtrAndHand
- •AZPtrToHand/DSPtrToHand
- •AZPtrToXHand/DSPtrToXHand
- •AZRecoverHandle/DSRecoverHandle
- •AZSetHandleSize/DSSetHandleSize
- •AZSetHSzClr/DSSetHSzClr
- •BinSearch
- •BlockCmp
- •Cat4Chrs
- •ClearMem
- •CPStrBuf
- •CPStrCmp
- •CPStrIndex
- •CPStrInsert
- •CPStrLen
- •CPStrRemove
- •CPStrReplace
- •CPStrSize
- •CToPStr
- •DateCString
- •DateToSecs
- •FAddPath
- •FAppendName
- •FAppPath
- •FArrToPath
- •FCopy
- •FCreate
- •FCreateAlways
- •FDepth
- •FDirName
- •FDisposePath
- •FDisposeRefNum
- •FEmptyPath
- •FExists
- •FFlattenPath
- •FFlush
- •FGetAccessRights
- •FGetDefGroup
- •FGetEOF
- •FGetInfo
- •FGetPathType
- •FGetVolInfo
- •FileNameCmp
- •FileNameIndCmp
- •FileNameNCmp
- •FIsAPath
- •FIsAPathOfType
- •FIsAPathOrNotAPath
- •FIsARefNum
- •FIsEmptyPath
- •FListDir
- •FLockOrUnlockRange
- •FMakePath
- •FMClose
- •FMOpen
- •FMove
- •FMRead
- •FMSeek
- •FMTell
- •FMWrite
- •FName
- •FNamePtr
- •FNewDir
- •FNewRefNum
- •FNotAPath
- •FPathCmp
- •FPathCpy
- •FPathToArr
- •FPathToAZString
- •FPathToDSString
- •FPathToPath
- •FRefNumToFD
- •FRefNumToPath
- •FRelPath
- •FRemove
- •FSetAccessRights
- •FSetEOF
- •FSetInfo
- •FSetPathType
- •FStrFitsPat
- •FStringToPath
- •FTextToPath
- •FUnFlattenPath
- •FVolName
- •GetALong
- •HexChar
- •HiByte
- •HiNibble
- •IsAlpha
- •IsDigit
- •IsLower
- •IsUpper
- •LoByte
- •Long
- •LoNibble
- •LStrBuf
- •LStrCmp
- •LStrLen
- •LToPStr
- •MilliSecs
- •MoveBlock
- •NumericArrayResize
- •Offset
- •PPStrCaseCmp
- •PPStrCmp
- •Printf
- •PStrBuf
- •PStrCaseCmp
- •PStrCat
- •PStrCmp
- •PStrCpy
- •PStrLen
- •PStrNCpy
- •PToCStr
- •PToLStr
- •QSort
- •RandomGen
- •SecsToDate
- •SetALong
- •SetCINArraySize
- •StrCat
- •StrCmp
- •StrCpy
- •StrLen
- •StrNCaseCmp
- •StrNCmp
- •StrNCpy
- •SwapBlock
- •TimeCString
- •TimeInSecs
- •ToLower
- •ToUpper
- •Unused
- •Word
- •Glossary
Chapter 2 Shared Libraries (DLLs)
Task 3: Build a Library Project in an External IDE
The process of building a library project is specific to each integrated development environment (IDE) and each operating system. Therefore, this section describes three compiler/platform combinations that you can use to build shared libraries to use in LabVIEW: Microsoft Visual C/C++ on Windows, Gnu C/C++ on UNIX, and Metrowerks CodeWarrior on Macintosh.
Microsoft Visual C++ 6.0 on 32-bit on Windows
Platforms
Follow the steps in this section to build a project and that compiles myshared.c and generates myshared.dll.
Adding the DLL Export Keyword
You must explicitly export each function from your DLL to make it available to LabVIEW. For this example, you should use the _declspec (dllexport) keyword to export the avg_num function. By declaring the dllexport keyword, you eliminate the need for a module definition file, which the Module Definition Files section describes. _declspec (dllexport) is a Microsoft-specific extension to the C or C++ language.
1.Open myshared.c and insert the _declspec(dllexport) keyword in front of the code for avg_num. This function also has a declaration statement, and you must place the keyword in front of the declaration, too.
The following excerpt shows the two places in myshared.c that require the _declspec(dllexport) keyword.
_declspec(dllexport) long avg_num(float *a,
long size, float *avg); _declspec(dllexport) long avg_num(float *a,
long size, float *avg)
Setting Up the Project
Perform the following steps in the Microsoft Visual C++ integrated development environment to set up a project for myshared.c.
2.Select File»New and select Win32 Dynamic Link Library (DLL) in the listbox of the Projects tab. Click OK to continue.
Using External Code in LabVIEW |
2-10 |
www.ni.com |

Chapter 2 Shared Libraries (DLLs)
Note You do not use Microsoft Foundation Classes (MFC) in this example. However, if you want to use these object classes in a project, you can select MFC AppWizard (dll) at this point, instead of selecting Win32 Dynamic Link Library. Then, copy the code from the myshared.c source file and place it into the skeleton source code file that the MFC AppWizard generates.
Figure 2-2. Creating a Project in Visual C++
3.The application prompts you to choose the type of DLL that you want to create; select An empty DLL project.
4.Click Finish to finish creating your project and return to the Visual C++ workspace.
5.From the Project menu, select Add to Project»Files and add the myshared.c source file.
Note When you want to use the LabVIEW manager functions in a Windows DLL, you also must add labview.lib to your project. The cintools directory of your LabVIEW installation contains this .lib file.
© National Instruments Corporation |
2-11 |
Using External Code in LabVIEW |

Chapter 2 Shared Libraries (DLLs)
6.Select Project»Settings and access the C++ tab of the Project Settings dialog box and make the following settings:
a.Select Code Generation in the Category pull-down menu.
b.For this example and for all configurations, set the Struct member alignment control to 1 Byte.
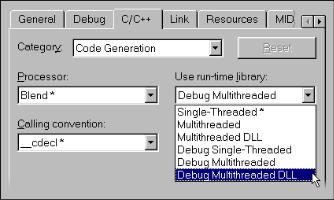
c.Select Debug Multithreaded DLL in the Use run-time library control to apply the Win32 Debug configuration, as shown in the following figure.
You have the option to choose the Win32 Release configuration, instead. In that case you would select Multithreaded DLL in the
Use run-time library control.
Figure 2-3. Setting the Use run-time library control, Microsoft Visual C++
7.Select Build»Build myshared.dll to cause Visual C/C++ to build a DLL and place it in either the Debug or Release output directory, depending on which configuration option you selected in step 6c.
In the Example 1: Call a Shared Library that You Built section, you call this
DLL from LabVIEW.
Gnu C or C++ Compilers on Solaris, Linux, or HP-UX
Use the following command to compile the myshared.c source file that you completed in the Task 2: Complete the .c File section.
gcc -fPIC -shared -o <output name> <source file>
The –fPIC option instructs GCC to produce position independent code, which is suitable for shared libraries. The -shared option specifies that the output should be a shared library file.
Using External Code in LabVIEW |
2-12 |
www.ni.com |

Chapter 2 Shared Libraries (DLLs)
Note Some versions of the Gnu linker do not produce suitable output for shared libraries. The –fno-gnu-linker instructs GCC to use the system linker rather than the Gnu linker. The output name is normally a file with a .so extension on Solaris, Linux, .sl on HP-UX.
Note If you use g++ to compile a shared library on HP-UX, check to be sure that the Dynamic Loader is calling the shared static global shared class initializers in that library.
Reducing Symbol Scope
By default, all symbols (functions and global variables) defined in your code are available. It is sometimes desirable for your library to distinguish between those symbols that should be accessed by external objects, and those that are for internal use only. Use a mapfile to make these distinctions. The mapfile is a text document that the linker takes as input and uses to determine, among other things, which symbols should be exported.
Use the following basic syntax for a mapfile, where <library file> is the name of the output file:
<library file> { global:
[Symbol for global scope 1]; [Symbol for global scope 2];
...
local:
[Symbols for local scope 1]; or “*”
...
};
Under the global and local sections, list all of the symbols that you want to be available globally or locally, respectively. Each section is optional, but remember that all symbols are global, by default. In the local section, you can choose to use the “*” wildcard, rather than listing individual symbols. This wildcard means, “any symbol not already defined as global,” and allows you to easily make symbol definitions in terms of symbols to be exported, rather than symbols to be reduced in scope.
After you create the mapfile, save it, and instruct the linker to use it by appending -M <mapfile> to the gcc command-line argument list.
© National Instruments Corporation |
2-13 |
Using External Code in LabVIEW |