

Beginning Python - From Novice To Professional (2005)
.pdf320 C H A P T E R 1 5 ■ P Y T H O N A N D T H E W E B
You didn’t write that awful page. You’re just trying to get some data out of it. Right now, you don’t really care what HTML is supposed to look like.
Neither does this parser.
—(Beautiful Soup Web site, May 2005)
Downloading and installing Beautiful Soup (as of version 2.1.0) is a breeze: Download the file BeautifulSoup.py and put it in your Python path (for example, in the site-packages directory of your Python installation). If you want, you can instead download a tar archive with installer scripts and tests. With Beautiful Soup installed, the running example of extracting Python jobs from the Python Job Board becomes really, really simple—and readable, as shown in Listing 15-3.
Listing 15-3. A Screen Scraping Program Using Beautiful Soup
from urllib import urlopen
from BeautifulSoup import BeautifulSoup
text = urlopen('http://python.org/Jobs.html').read() soup = BeautifulSoup(text)
jobs = set()
for header in soup('h4'):
links = header('a', 'reference') if not links: continue
link = links[0]
jobs.add('%s (%s)' % (link.string, link['href']))
print '\n'.join(sorted(jobs, key=lambda s: s.lower()))
I simply instantiate the BeautifulSoup class with the HTML text I want to scrape, and then use various mechanisms to extract parts of the resulting parse tree. For example, I call soup('h4') to get a list of all h4 elements. I iterate over these, binding the header variable to each one in turn, and call header('a', 'reference') to get a list of a child elements of the reference class (I’m talking CSS classes here). I could also have followed the strategy from previous examples, of retrieving the a elements that have href attributes; in Beautiful Soup, using class attributes like this is easier.
As I’m sure you noticed, I added the use of set and sorted (with a key function set to ignore case differences) in Listing 15-3. This has nothing to do with Beautiful Soup; it was just to make the program more useful, by eliminating duplicates and printing the names in sorted order.
■Note There are other tools for screen scraping with Python. You might, for example, want to check out Ka-Ping Yee’s scrape.py (found at http://zesty.ca/python).
If you want to use your scrapings for an RSS feed (discussed later in this chapter), you can use another tool related to Beautiful Soup, called Scrape ’N’ Feed (at http://crummy.com/ software/ScrapeNFeed).
C H A P T E R 1 5 ■ P Y T H O N A N D T H E W E B |
321 |
Dynamic Web Pages with CGI
This section deals with a basic Web programming technology: the Common Gateway Interface, or CGI. CGI is a standard mechanism by which a Web server can pass your queries (typically supplied through a Web form) to a dedicated program (for example, your Python program) and display the result as a Web page. It is a simple way of creating Web applications without writing your own special-purpose application server. For more information about CGI programming in Python, see the Web Programming Topic Guide on the Python Web site (http://python.org/ topics/web).
The key tool in Python CGI programming is the cgi module. You can find a thorough description of it in the Python Library Reference (http://python.org/doc/lib/module-cgi.html). Another module that can be very useful during the development of CGI scripts is cgitb—more about that later.
Before you can make your CGI scripts accessible (and runnable) through the Web, you need to put them where a Web server can access them, add a pound bang line, and set the proper file permissions. These three steps are explained in the following sections.
Step 1. Preparing the Web Server
I’m assuming that you have access to a Web server—in other words, that you can put stuff on the Web. Usually, that is a matter of putting your Web pages, images, and so on in a particular directory (in UNIX, typically called public_html). If you don’t know how to do this, you should ask your ISP or system administrator.
Your CGI programs must also be put in a directory where they can be accessed via the Web. In addition, they must somehow be identified as CGI scripts, so the Web server doesn’t just serve the plain source code as a Web page. There are two typical ways of doing this:
•Put the script in a subdirectory called cgi-bin.
•Give your script the file name extension .cgi.
Exactly how this works varies from server to server—again, check with your ISP or system administrator if you’re in doubt. (For example, if you’re using Apache, you may need to turn on the ExecCGI option for the directory in question.)
Step 2. Adding the Pound Bang Line
When you’ve put the script in the right place (and possibly given it a specific file name extension), you must add a pound bang line to the beginning of the script. I mentioned this in Chapter 1 as a way of executing your scripts without having to explicitly execute the Python interpreter.
Usually, this is just convenient, but for CGI scripts it’s crucial; without it, the Web server won’t know how to execute your script. (For all it knows, the script could be written in some other programming language such as Perl or Ruby.) In general, simply adding the following line to the beginning of your script will do:
#!/usr/bin/env python
Note that it has to be the very first line. (No empty lines before it.) If that doesn’t work, you have to find out exactly where the Python executable is and use the full path in the pound bang line, as in the following:

322 C H A P T E R 1 5 ■ P Y T H O N A N D T H E W E B
#!/usr/bin/python
If this doesn’t work, it may be that there’s something wrong that you cannot see, namely that the line ends in \r\n instead of simply \n, and your Web server gets confused. Make sure you’re saving the file as a plain UNIX-style text file.
In Windows, you would use the full path to your Python binary, such as
#!C:\Python22\python.exe
Step 3. Setting the File Permissions
The last thing you have to do (at least if your Web server is running on a UNIX or Linux machine) is to set the proper file permissions. You must make sure that everyone is allowed to read and execute your script file (otherwise the Web server wouldn’t be able to run it), but also make sure that only you are allowed to write to it (so nobody can change your script).
■Tip Sometimes, if you edit a script in Windows and it’s stored on a UNIX disk server (you may be accessing it through Samba or FTP, for example), the file permissions may be fouled up after you’ve made a change to your script. So if your script won’t run, make sure that the permissions are still correct.
The UNIX command for changing file permissions (or file mode) is chmod. Simply run the following command (if your script is called somescript.cgi):
chmod 755 somescript.cgi
After having performed all these preparations, you should be able to open the script as if it were a Web page and have it executed.
■Note You shouldn’t open the script in your browser as a local file—you must open it with a full URL so that you actually fetch it via the Web (through your Web server).
Your CGI script won’t normally be allowed to modify any files on your computer. If you want to allow it to change a file, you have to explicitly give it permission to do so. You have two options. If you have root (system administrator) privileges, you may create a specific user account for your script and change ownership of the files that need to be modified. If you don’t have root access, you can set the file permissions for the file so all users on the system (including that used by the Web server to run your CGI scripts) are allowed to write to the file. You can set the file permissions with this command:
chmod 666 editable_file.txt

C H A P T E R 1 5 ■ P Y T H O N A N D T H E W E B |
323 |
■Caution This also means that everyone who has a user account on the machine can edit your file. You should be extremely cautious about this, especially if the file you are modifying is accessible through your Web server. If you are in doubt, ask your ISP or system administrator for advice. See also the following section, “CGI Security Risks.”
CGI Security Risks
Note that there are security issues involved in using CGI programs. If you allow your CGI script to write to files on your server, that ability may be used to destroy data unless you code your program carefully. Similarly, if you evaluate data supplied by a user as if it were Python code (for example, with exec or eval) or as a shell command (for example, with os.system or using the subprocess module), you risk performing arbitrary commands, which is a huge (as in humongous) risk. For a relatively comprehensive source of information about Web security, see the World Wide Web Consortium’s security FAQ (http://www.w3.org/Security/Faq). See also the security note on the subject in the Python Library Reference (http://python.org/doc/ lib/cgi-security.html).
A Simple CGI Script
The simplest possible CGI script looks something like Listing 15-4.
Listing 15-4. A Simple CGI Script
#!/usr/bin/env python
print 'Content-type: text/plain'
print # Prints an empty line, to end the headers
print 'Hello, world!'
If you save this in a file called simple1.cgi and open it through your Web server, you should see a Web page containing only the words “Hello, world!” in plain text. To be able to open this file through a Web server, you must put it where the Web server can access it. In a typical UNIX environment, putting it in a directory called public_html in your home directory would enable you to open it with the URL http://localhost/~username/simple1.cgi (substitute your user name for username). Ask your ISP or system administrator for details.
As you can see, everything the program writes to standard output (for example, with print) ends up in the resulting Web page—at least almost. The fact is that the first things you print are HTTP headers—lines of information about the page. The only header I concern myself with here is Content-type. As you can see, the phrase “Content-type” is followed by a colon, a space, and the type name text/plain. This indicates that the page is plain text; to indicate HTML, this line should instead be
print 'Content-type: text/html'

324 C H A P T E R 1 5 ■ P Y T H O N A N D T H E W E B
■Note The names text/plain and text/html refer to MIME (Multipurpose Internet Mail Extensions) types. For a list of official MIME types, see http://www.iana.org/assignments/media-types.
After all the headers have been printed, a single empty line is printed to signal that the document itself is about to begin. And, as you can see, in this case the document is simply the string "Hello, world!".
Debugging with cgitb
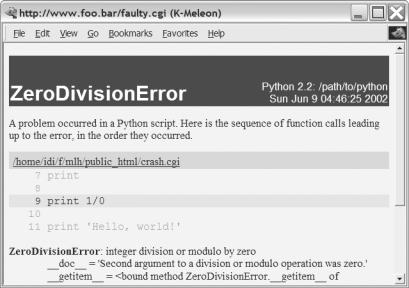
Sometimes a programming error makes your program terminate with a stacktrace due to an uncaught exception. When running the program through CGI, this will most likely result in an unhelpful error message from the Web server. In Python 2.2, a new module called cgitb (for CGI traceback) was added to the standard library. By importing it and calling its enable function, you can get a quite helpful Web page with information about what went wrong. Listing 15-5 gives an example of how you might use the cgitb module.
Listing 15-5. A CGI Script That Invokes a Traceback (faulty.cgi)
#!/usr/bin/env python
import cgitb; cgitb.enable()
print 'Content-type: text/html'
print 1/0
print 'Hello, world!'
The result of accessing this script in a browser (through a Web server) is shown in Figure 15-1.
Note that you might want to turn off the cgitb functionality after developing the program; the traceback page isn’t meant for the casual user of your program. (An alternative is to turn off the display and log the errors to files instead. See the Python Library Reference for more information.)
C H A P T E R 1 5 ■ P Y T H O N A N D T H E W E B |
325 |
Figure 15-1. A CGI traceback from the cgitb module
Using the cgi Module
So far the programs have only produced output; they haven’t used any form of input. Input is supplied to the CGI script from an HTML form (described in the next section) as key-value pairs, or fields. You can retrieve these fields in your CGI script using the FieldStorage class from the cgi module. When you create your FieldStorage instance (you should create only one), it fetches the input variables (or fields) from the request and presents them to your program through a dictionary-like interface. The values of the FieldStorage can be accessed through ordinary key lookup, but due to some technicalities (related to file uploads, which we won’t be dealing with here) the elements of the FieldStorage aren’t really the values you’re after. For example, if you know the request contained a value named name, you couldn’t simply do this:
form = cgi.FieldStorage() name = form['name']
You’d have to do this:
form = cgi.FieldStorage() name = form['name'].value

326 C H A P T E R 1 5 ■ P Y T H O N A N D T H E W E B
A simpler way of fetching the values is the getvalue method, which is similar to the dictionary method get, except that it returns the value of the value attribute of the item. For example:
form = cgi.FieldStorage()
name = form.getvalue('name', 'Unknown')
In the preceding example, I have supplied a default value ('Unknown'). If you don’t supply one, None will be the default. The default is used if the field is not filled in.
Listing 15-6 contains a simple example that uses cgi.FieldStorage.
Listing 15-6. A CGI Script That Retrieves a Single Value from a FieldStorage (simple2.cgi)
#!/usr/bin/env python
import cgi
form = cgi.FieldStorage()
name = form.getvalue('name', 'world')
print 'Content-type: text/plain' print
print 'Hello, %s!' % name
INVOKING CGI SCRIPTS WITHOUT FORMS
Input to CGI scripts generally comes from Web forms that have been submitted, but it is also possible to call the CGI program with parameters directly. You do this by adding a question mark after the URL to your script, and then adding key-value pairs separated by ampersands (&). For example, if the URL to the script in Listing 15-6 were http://www.someserver.com/simple2.cgi, you could call it with name=Gumby and age=42 with the URL http://www.someserver.com/simple2.cgi?name=Gumby&age=42. If you try that, you should get the message “Hello, Gumby!” instead of “Hello, world!” from your CGI script. (Note that the age parameter isn’t used.) You can use the urlencode method of the urllib module to create this kind of URL query:
>>> urllib.urlencode({'name': 'Gumby', 'age': '42'}) 'age=42&name=Gumby'
You can, of course, use this strategy in your own programs, together with urllib, to create a screen scraping program that can actually interact with a CGI script. However, if you’re writing both ends (that is, both server and client side) of such a contraption, you would, most likely, be better off using some form of Web service (as described later in this chapter).
Note that there are two main ways of getting information from a CGI script: the GET method and the POST method. For the purposes of this chapter, the difference between the two isn’t really important (basically, GET is for retrieving things, and encodes its query in the URL, while POST can be used for any kind of query, but encodes the query a bit differently). For more information about GET and POST, see the forms tutorials in the next section.
C H A P T E R 1 5 ■ P Y T H O N A N D T H E W E B |
327 |
A Simple Form
Now you have the tools for handling a user request; it’s time to create a form that the user can submit. That form can be a separate page, but I’ll just put it all in the same script.
To find out more about writing HTML forms (or HTML in general), you should perhaps get a good book on HTML (your local bookstore probably has several). You can also find plenty of information on the subject online. Here are some resources:
•http://www.webreference.com/htmlform
•http://www.htmlhelp.com/faq/html/forms.html
•http://www.cs.tut.fi/~jkorpela/forms
•http://www.htmlgoodies.com/tutors/fm.html
Also, if you find some page that you think looks like a good example for what you’d like to do, you can inspect its source in your browser by choosing View Source or something similar (depending on which browser you have) from one of the menus.
Let’s return to our script. An extended version can be found in Listing 15-7. In the beginning, the CGI parameter name is retrieved, as before, with the default 'world'. If you just open the script in your browser without submitting anything, the default is used.
Then, a simple HTML page is printed, containing name as a part of the headline. In addition, this page contains an HTML form whose action attribute is set to the name of the script itself (simple3.cgi). That means that if the form is submitted, you are taken back to the same script. The only input element in the form is a text field called name. Thus, if you submit the field with a new name, the headline should change because the name parameter now has a value.
Listing 15-7. A Greeting Script with an HTML Form (simple3.cgi)
#!/usr/bin/env python
import cgi
form = cgi.FieldStorage()
name = form.getvalue('name', 'world')
print """Content-type: text/html
<html>
<head>
<title>Greeting Page</title> </head>
<body>
<h1>Hello, %s!</h1>
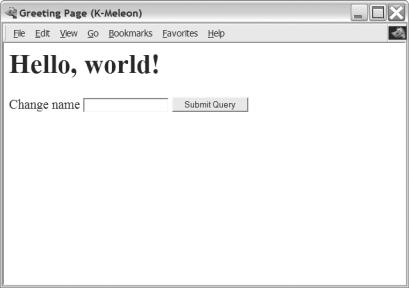
328 C H A P T E R 1 5 ■ P Y T H O N A N D T H E W E B
<form action='simple3.cgi'>
Change name <input type='text' name='name' /> <input type='submit' />
</form>
</body>
</html>
"""% name
Figure 15-2 shows the result of accessing the script in Listing 15-7 through a Web server.
Figure 15-2. The result of executing the CGI script in Listing 15-7
One Step Up: mod_python
If you like CGI, you will probably love mod_python. It’s an extension (module) for the Apache Web server, and you can get it from the mod_python Web site, http://modpython.org. It makes the Python interpreter directly available as a part of Apache, which makes a whole host of different cool stuff possible. At the core, it gives you the ability to write Apache handlers in Python, as opposed to in C, which is the norm. The mod_python handler framework gives you access to a rich API, uncovering Apache internals and more.
In addition to the basic functionality, however, it comes with several handlers that can make Web development a more pleasant task. There is the CGI handler, which lets you run CGI scripts using the mod_python interpreter, considerably speeding up their execution; there is the PSP handler, which lets you mix HTML and Python code to create executable Web pages, or Python Server Pages; and there is the publisher handler, which lets you call Python functions using URLs. In this section, I will focus on these three standard handlers; if you want to write your own custom handlers, you should check out the mod_python documentation.
C H A P T E R 1 5 ■ P Y T H O N A N D T H E W E B |
329 |
Installing
Installing mod_python and getting it to work is, perhaps, a bit more difficult than doing so for many of the other packages I’ve discussed so far. If nothing else, you have to make it cooperate with Apache. So, if you plan to install mod_python yourself, you should either use some form of package manager system (which will install it automatically) or make sure you know a bit about running and maintaining the Apache Web server. (You can find more information about Apache at http://httpd.apache.org.) If you’re lucky, of course, you may already have access to a machine where mod_python is installed; if you’re uncertain, just try and see. (And then you could bug your ISP or administrator to install it for you . . .)
If you do want to install it yourself, you can get the information you need in the mod_python documentation, available online or for download at the mod_python Web site (http:// modpython.org). You can probably also get some assistance on the mod_python mailing list (with subscription available from the same Web site). The process is slightly different depending on whether you use UNIX or Windows.
Installing on UNIX
Assuming you have already compiled your Apache Web server (version 2.0.40 or newer—or use an older version of mod_python) and you have the Apache source code available, here are the highlights of compiling and installing mod_python.
First, download the mod_python source code. Unpack the archive and enter the directory. Then, run the configure script of mod_python:
$ ./configure --with-apxs=/usr/local/apache/bin/apxs
(Modify the path to the apxs program if this is not where it is found; on my Gentoo system, for example, I would use /usr/sbin/apxs2. Or, rather, I would install mod_python automatically with the Portage package system, but that’s beside the point.)
Make a note of any useful messages, such as any messages about LoadModule. Once this configuration is done, compile everything:
$ make
Once everything has been compiled, install mod_python:
$ make install
Installing on Windows
At the time of writing, the binary version of mod_python for Windows requires Python version 2.3. You cannot use version 2.4. Download the mod_python installer from http://www.apache.org/ dist/httpd/modpython/win/ and double-click it. The installation is straightforward and will take you through the steps of finding your Python and Apache installations.
You may get an error at the end of the process if you did not install Tcl/Tk with Python, though the installer tells you how to finish the install manually. To do this, copy mod_python_so.pyd from Python’s Lib\site-packages folder to the modules directory under your Apache root folder.