

Beginning Python - From Novice To Professional (2005)
.pdf270 |
C H A P T E R 1 2 |
■ G R A P H I C A L U S E R I N T E R F A C E S |
Figure 12-1. A sketch of the text editor
The elements of the interface can be used as follows:
1.Type a file name in the text field to the left of the buttons and click Open to open a file. The text contained in the file is put in the text field at the bottom.
2.You can edit the text to your heart’s content in the large text field.
3.If and when you want to save your changes, click the Save button, which again uses the text field containing the file name—and writes the contents of the large text field to the file.
4.There is no Quit button—if the user closes the window, the program quits.
In some languages, writing a program like this is a daunting task, but with Python and the right GUI toolkit, it’s really a piece of cake. (You may not agree with me right now, but by the end of this chapter I hope you will.)
A Plethora of Platforms
Before writing a GUI program in Python, you have to decide which GUI platform you want to use. Simply put, a platform is one specific set of graphical components, accessible through a given Python module, called a GUI toolkit. There are many such toolkits available for Python. Some of the most popular ones are listed in Table 12-1. For an even more detailed list, you could search the Vaults of Parnassus (see Appendix C) for the keyword “GUI.” Cameron Laird

C H A P T E R 1 2 ■ G R A P H I C A L U S E R I N T E R F A C E S |
271 |
also maintains a Web page with an extensive list of GUI toolkits for Python (http://phaseit.net/ claird/comp.lang.python/python_GUI.html).
Table 12-1. Some Popular GUI Toolkits Available for Python
Package |
Description |
Tkinter |
Uses the Tk platform. Readily available. Semistandard. |
wxPython |
Based on wxWindows. Increasingly popular. |
PythonWin |
Windows only. Uses native Windows GUI capabilities. |
Java Swing |
Jython only. Uses native Java GUI capabilities. |
PyGTK |
Uses the GTK platform. Especially popular on Linux. |
PyQt |
Uses the Qt platform. Especially popular on Linux. |
|
|
Information about Tkinter and Jython with Swing can be found in the section “But I’d Rather Use . . .” later in this chapter. For information about PythonWin, PyGTK, and PyQT, check out the project home pages (see Appendix C).
As you can see, there are plenty of packages to choose from. So which toolkit should you use? It is largely a matter of taste, although each toolkit has its advantages and drawbacks. Tkinter is sort of a de facto standard because it has been used in most “official” Python GUI programs, and it is included as a part of the Windows binary distribution. On UNIX, however, you have to compile and install it yourself.
Another toolkit that is gaining in popularity is wxPython. This is a mature and feature-rich toolkit, which also happens to be the favorite of Python’s creator, Guido van Rossum.
Downloading and Installing wxPython
To download wxPython, simply visit the download page, http://wxpython.org/download.php. This page gives you detailed instructions about which version to download, as well as what prerequisites the various versions have. If you’re running Windows, you probably want a prebuilt binary. You can choose between one version with Unicode support and one without; unless you know you need Unicode, it probably won’t make much of a difference which one you choose. Make sure you choose the binary that corresponds to your version of Python. A version of wxPython compiled for Python 2.3 won’t work with Python 2.4, for example.
For Mac OS X, you should again choose the wxPython version that agrees with your Python version; you might also need to take the OS version into consideration. Again, you may need to choose between a version with Unicode support and one without; just take your pick. The download links and associated explanations should make it perfectly clear which version you need.
There are also RPM packages for various Linux distributions. If you’re running a Linux distribution with RPM, you should at least download the wxPython common and runtime packages; you probably won’t need the devel package. Again, choose the version corresponding to your Python version and Linux distribution.

272 |
C H A P T E R 1 2 ■ G R A P H I C A L U S E R I N T E R F A C E S |
■Note If you’re using a package system with automatic downloads, such as those found in Debian Linux and Gentoo Linux, for example, you may very well be able to get wxPython directly through that system.
If none of the binaries fit your hardware or operating system (or Python version, for that matter), you can always download the source distribution. Getting this to compile might require downloading further source packages for various prerequisites, and is beyond the scope of this chapter. There are fairly detailed explanations on the wxPython download page, though.
Once you’ve got wxPython itself, I would strongly suggest that you download the demo distribution, which contains documentation, sample programs, and one very thorough (and instructive) demo program. This demo program exercises most of the wxPython features, and lets you see the source code for each portion in a very user-friendly manner—definitely worth a look if you want to keep learning about wxPython on your own.
Installation should be fairly automatic and painless. To install Windows binaries, simply run the downloaded executables (.exe files); in OS X, the downloaded file should appear as if it were a CD-ROM that you can open, with a .pkg you can double-click; to install using RPM, consult your RPM documentation (or take a look at the brief discussion in Chapter 1). Both the Windows and OS X versions will start an install wizard, which ought to be simple to follow. Simply accept all default settings and keep clicking “Continue” and finally “Finish.”
Getting Started
To see whether your installation works, you could try out the wxPython demo (which must be installed separately). In Windows, It should be available in your Start menu; when installing it in OS X, you could simply drag the wxPython Demo file to Applications, and then run it from there later. Once you’ve finished playing with the demo (for now, anyway), you can get started writing your own program, which is, of course, much more fun.
To get started, import the wx module:
import wx
There are several ways of writing wxPython programs, but one thing you can’t escape is creating an application object. The basic application class is called wx.App, and it takes care of all kinds of initialization behind the scenes. The simplest wxPython program would be something like this:
import wx
app = wx.App() app.MainLoop()
■Note If you’re having trouble getting wx.App to work, you may want to try to replace it with wx.PySimpleApp.
C H A P T E R 1 2 ■ G R A P H I C A L U S E R I N T E R F A C E S |
273 |
Because there are no windows the user can interact with, the program exits immediately.
■Note As you can see from this example, the methods in the wx package are all capitalized, contrary to common practice in Python. The reason for this is that the method names mirror method names from the underlying C++ package, wxWidgets. Even though there is no formal rule against capitalized method or function names, the norm is to reserve such names for classes.
Creating Windows and Components
Windows, also known as frames, are simply instances of the wx.Frame class. Widgets in the wx framework are created with their parent as the first argument to their constructor. If you’re creating an individual window, there will be no parent to consider, so simply use None, as you see in Listing 12-1. Also, make sure you call the window’s Show method before you call app.MainLoop—otherwise it will remain hidden. (You could also call win.Show in an event handler; I discuss events a bit later.)
Listing 12-1. Creating and Showing a Frame
import wx
app = wx.App()
win = wx.Frame(None) win.Show() app.MainLoop()
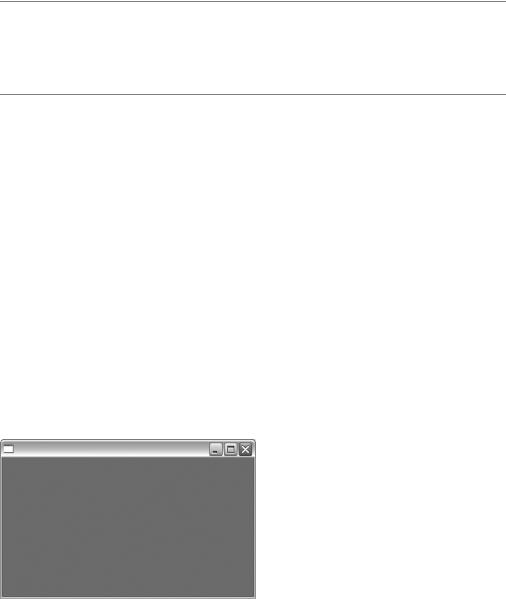
If you run this program, you should see a single window appear, similar to that in Figure 12-2.
Figure 12-2. A GUI program with only one window
Adding a button to this frame is about as simple as it can be—simply instantiate wx.Button, using win as the parent argument (see Listing 12-2).
274 |
C H A P T E R 1 2 ■ G R A P H I C A L U S E R I N T E R F A C E S |
Listing 12-2. Adding a Button to a Frame
import wx
app = wx.App()
win = wx.Frame(None) btn = wx.Button(win) win.Show() app.MainLoop()
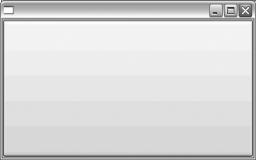
This will give you a window with a single button, as shown in Figure 12-3.
Figure 12-3. The program after adding a button
There are certainly a few rough corners still; the window has no title, the button has no label, and you probably don’t want the button to cover the entire window in this way . . .
Labels and Positions
You can set the labels of widgets when you create them, by using the label argument of the constructor. Similarly, you can set the title of frames by using the title argument. I find it most practical to use keyword arguments with the wx constructors, so I don’t have to remember their order. You can see an example of this in Listing 12-3.
Listing 12-3. Adding Labels and Titles with Keyword Arguments
import wx
app = wx.App()
win = wx.Frame(None, title="Simple Editor")
loadButton = wx.Button(win, label='Open')
saveButton = wx.Button(win, label='Save')
win.Show()
app.MainLoop()
C H A P T E R 1 2 ■ G R A P H I C A L U S E R I N T E R F A C E S |
275 |
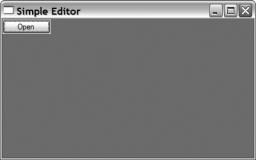
The result of running the previous program should be something like what you see in Figure 12-4.
Figure 12-4. A window with layout problems
As you can see, something isn’t quite right about this version of the program; one button seems to be missing! Actually, it’s not missing—it’s just hiding. By placing the buttons more carefully, you should be able to uncover the hidden button. A very basic (and not very practical) method is to simply set positions and size by using the pos and size arguments to the constructors, as in the code presented in Listing 12-4.
Listing 12-4. Setting Button Positions
import wx
app = wx.App()
win = wx.Frame(None, title="Simple Editor", size=(410, 335)) win.Show()
loadButton = wx.Button(win, label='Open',
pos=(225, 5), size=(80, 25))
saveButton = wx.Button(win, label='Save',
pos=(315, 5), size=(80, 25))
filename = wx.TextCtrl(win, pos=(5, 5), size=(210, 25))
contents = wx.TextCtrl(win, pos=(5, 35), size=(390, 260), style=wx.TE_MULTILINE | wx.HSCROLL)
app.MainLoop()
As you can see, both position and size are pairs of numbers. The position is a pair of x and y coordinates, while the size consists of width and height.
There are another couple of new things in this piece of code: I’ve created a couple of text controls (wx.TextCtrl objects), and given one of them a custom style. The default text control is a text field, with a single line of editable text, and no scroll bar. In order to create a text area, you
276 |
C H A P T E R 1 2 ■ G R A P H I C A L U S E R I N T E R F A C E S |
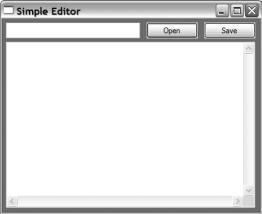
can simply tweak the style with the style parameter. The style is actually a single integer, but you don’t have to specify it directly. Instead, you use bitwise OR (the pipe) to combine various style facets that are available under special names from the wx module. In this case, I’ve combined wx.TE_MULTILINE, to get a multiline text area (which, by default, has a vertical scroll bar), and wx.HSCROLL, to get a horizontal scroll bar. The result of running this program is shown in Figure 12-5.
Figure 12-5. Properly positioned components
More Intelligent Layout
Although specifying the geometry of each component is easy to understand, it can be a bit tedious. Doodling a bit on graph paper may help in getting the coordinates right, but there are more serious drawbacks to this approach than having to play around with numbers. If you run the program and try to resize the window, you’ll notice that the geometries of the components don’t change. This is no disaster, but it does look a bit odd. When you resize a window, you assume that its contents will be resized and relocated as well.
If you consider how I did the layout, this behavior shouldn’t really come as a surprise. I explicitly set the position and size of each component, but didn’t say anything about how they should behave when the window was resized. There are many ways of specifying this. One of the easiest ways of doing layout in wx is using sizers, and the easiest one to use is wx.BoxSizer. A sizer manages the size of contents; you simply add widgets to a sizer, together with a
few layout parameters, and then give this sizer the job of managing the layout of their parent component. In our case, we’ll add a background component (a wx.Panel), create some nested wx.BoxSizers and then set the sizer of the panel with its SetSizer method, as shown in Listing 12-5.
Listing 12-5. Using a Sizer
import wx
app = wx.App()
win = wx.Frame(None, title="Simple Editor", size=(410, 335))

C H A P T E R 1 2 ■ G R A P H I C A L U S E R I N T E R F A C E S |
277 |
bkg = wx.Panel(win)
loadButton = wx.Button(bkg, label='Open') saveButton = wx.Button(bkg, label='Save') filename = wx.TextCtrl(bkg)
contents = wx.TextCtrl(bkg, style=wx.TE_MULTILINE | wx.HSCROLL)
hbox = wx.BoxSizer()
hbox.Add(filename, proportion=1, flag=wx.EXPAND) hbox.Add(loadButton, proportion=0, flag=wx.LEFT, border=5) hbox.Add(saveButton, proportion=0, flag=wx.LEFT, border=5)
vbox = wx.BoxSizer(wx.VERTICAL)
vbox.Add(hbox, proportion=0, flag=wx.EXPAND | wx.ALL, border=5) vbox.Add(contents, proportion=1,
flag=wx.EXPAND | wx.LEFT | wx.LEFT | wx.LEFT, border=5)
bkg.SetSizer(vbox)
win.Show()
app.MainLoop()
This code gives the same result as the previous program, but instead of using lots of absolute coordinates, I am now placing things in relation to one another.
The constructor of the wx.BoxSizer takes an argument determining whether it’s horizontal or vertical (wx.HORIZONTAL or wx.VERTICAL), with horizontal being the default. The Add method takes several arguments. The proportion argument sets the proportions according to which space is allocated when the window is resized. For example, in the horizontal box sizer (the first one), the filename widget gets all of the extra space when resizing. If each of the three had had their proportion set to 1, each would have gotten an equal share. You can set the proportion to any number.
The flag argument is similar to the style argument of the constructor; you construct it by using bitwise OR between symbolic constants (integers that have special names). The wx.EXPAND flag makes sure the component will expand into the allotted space. The wx.LEFT, wx.RIGHT, wx.TOP, wx.BOTTOM, and wx.ALL flags determine on which sides the border argument applies, and the border arguments gives the width of the border (spacing).
And that’s it. I’ve got the layout I wanted. One crucial thing is lacking, however. If you click the buttons, nothing happens.
■Tip For more information on sizers, or anything else related to wxPython, check out the wxPython demo. It has sample code for anything you might want to know about, and then some. If that seems daunting, check out the wxPython Web site, http://wxpython.org.
278 |
C H A P T E R 1 2 ■ G R A P H I C A L U S E R I N T E R F A C E S |
Event Handling
In GUI lingo, the actions performed by the user (such as clicking a button) are called events. You need to make your program notice these events somehow, and then react to them. You accomplish this by binding a function to the widget where the event in question might occur. When the event does occur (if ever), that function will then be called. You link the event handler to a given event with a widget method called Bind.
Let’s assume that you have written a function responsible for opening a file, and you’ve called it load. Then you can use that as an event handler for loadButton as follows:
loadButton.Bind(wx.EVT_BUTTON, load)
This is pretty intuitive, isn’t it? I’ve linked a function to the button—when the button is clicked, the function is called. The symbolic constant wx.EVT_BUTTON signifies a button event. The wx framework has such event constants for all kinds of events, from mouse motion to keyboard presses and more.
WHAT’S THIS LOAD STUFF ABOUT?
There is nothing magical about my choice to use loadButton and load as the button and handler names— even though the button text says “Open.” It’s just that if I had called the button openButton, open would have been the natural name for the handler, and that would have made the built-in file-opening function open unavailable. While there are ways of dealing with this, I found it easier to use a different name.
The Finished Program
Let’s fill in the remaining blanks. All you need now are the two event handlers, load and save. When an event handler is called, it receives a single event object, which holds information about what happened, but let’s ignore that here because you’re only interested in the fact that a click occurred.
Even though the event handlers are the meat of the program, they are surprisingly simple. Let’s take a look at the load function first. It looks like this:
def load(event):
file = open(filename.GetValue()) contents.SetValue(file.read()) file.close()
The file opening/reading part ought to be familiar from Chapter 11. As you can see, the file name is found by using filename’s GetValue method (where filename is the small text field, remember?). Similarly, to put the text into the text area, you simply use contents.SetValue.
The save function is just as simple: It’s the exact same as load—except that it has a 'w' and a write for the file-handling part, and GetValue for the text area:
C H A P T E R 1 2 ■ G R A P H I C A L U S E R I N T E R F A C E S |
279 |
def save(event):
file = open(filename.GetValue(), 'w') file.write(contents.GetValue()) file.close()
And that’s it. Now I simply bind these to their respective buttons, and the program is ready to run. See Listing 12-6 for the final program.
Listing 12-6. The Final GUI Program
import wx
def load(event):
file = open(filename.GetValue()) contents.SetValue(file.read()) file.close()
def save(event):
file = open(filename.GetValue(), 'w') file.write(contents.GetValue()) file.close()
app = wx.App()
win = wx.Frame(None, title="Simple Editor", size=(410, 335))
bkg = wx.Panel(win)
loadButton = wx.Button(bkg, label='Open') loadButton.Bind(wx.EVT_BUTTON, load)
saveButton = wx.Button(bkg, label='Save') saveButton.Bind(wx.EVT_BUTTON, save)
filename = wx.TextCtrl(bkg)
contents = wx.TextCtrl(bkg, style=wx.TE_MULTILINE | wx.HSCROLL)
hbox = wx.BoxSizer()
hbox.Add(filename, proportion=1, flag=wx.EXPAND) hbox.Add(loadButton, proportion=0, flag=wx.LEFT, border=5) hbox.Add(saveButton, proportion=0, flag=wx.LEFT, border=5)
vbox = wx.BoxSizer(wx.VERTICAL)
vbox.Add(hbox, proportion=0, flag=wx.EXPAND | wx.ALL, border=5) vbox.Add(contents, proportion=1,
flag=wx.EXPAND | wx.LEFT | wx.BOTTOM | wx.RIGHT, border=5)
bkg.SetSizer(vbox)
win.Show()
app.MainLoop()