
Visual CSharp 2005 Express Edition (2006) [eng]
.pdf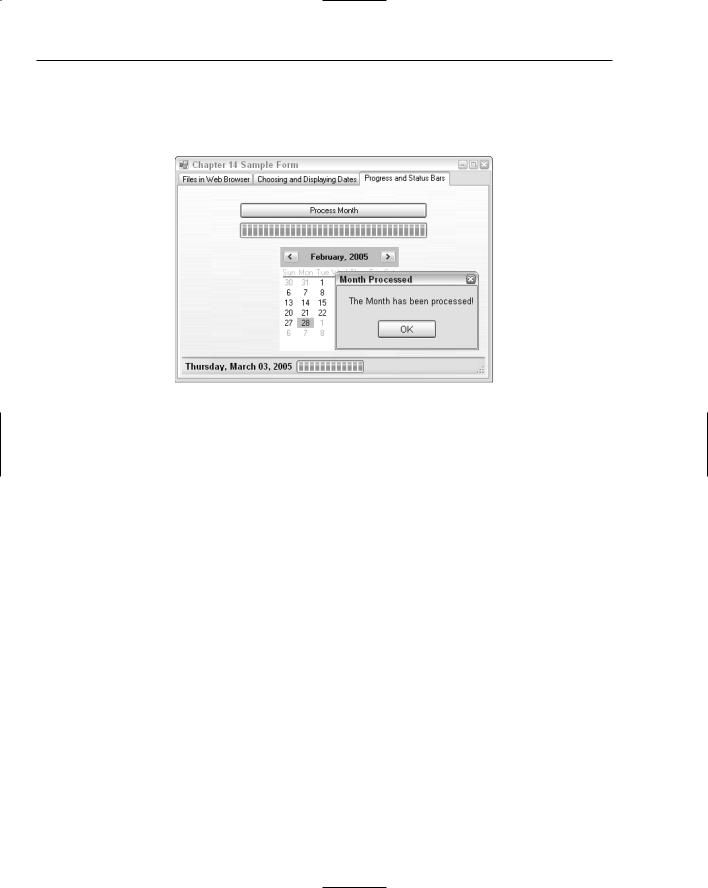
Chapter 14
For fun, the days in the MonthCalendar control are updated as the days are incremented. Lastly, a message box is displayed saying that the process is complete, and then the progress bars values are set to 0 and the MonthCalendar control’s SelectedStart property is set to 1. You can see an example of the demonstration after completing the loop, where it displays the message box shown in Figure 14-16.
Figure 14-16
To get started on building the demo itself, I want to discuss using ProgressBar controls.
Working with ProgressBar Controls
As mentioned, using a ProgressBar control is pretty easy, taking primarily three basic steps:
1.Drag and drop it on the form.
2.Set the Maximum property for the ProgressBar control, either in the design view in the properties window or using code.
3.Inside the iterative process (loop) that you are executing, increment the Value property of the ProgressBar control you are using.
That’s it. You can modify the ProgressBar control’s properties if you want to use different features such as changing the Style property of the ProgressBar. The choices are Blocks (default), Continuous, and Marquee. For the purpose of this example, the default style was used.
As with the first demonstration with the File Browser utility, I will break this demonstration up into a few Try It Outs to make it easier to follow. To start with, you will be adding the Button and MonthCalendar controls onto the form along with the first ProgressBar control. The next Try It Out and section goes through the code you will use for using the progress bar. Finally, the last Try It Out has you add the StatusStrip control and the controls included on it, as well as discuss the code used for setting the controls values at runtime.
244

Getting More Experience with Controls
Try It Out |
Add the Controls for Using the First Progress Bar |
Use the form created for the demonstrations in this chapter, in the design view of the form itself. For positioning of the controls you can use Figure 14-16 as an example:
1.Click the Progress and Status Bars tab.
2.Drag and drop a Button control from the Common Controls category in the Toolbox, sizing it to your desired width and height.
3.Set the Name property to btnProcessMonth and the Text property to Process Month.
4.Drag and drop a ProgressBar control onto the form from the Common Controls category in the Toolbox, again sizing it as desired.
5.Drag and drop a MonthCalendar control onto the form, again from the Common Controls category in the Toolbox.
6.Set the MaxSelectionCount of the MonthCalendar control you added to 1, using the properties window.
Okay, before adding the controls for the status bar, I want to have you add the code that sets up and iterates through the days of the current month.
Adding the Code to Setup and Update the ProgressBar Control
The first thing you need to do is set the ProgressBar up to reflect the current month. To accomplish this, you will create a routine called UpdateCal2Day that will take the day passed, which is of the int type, and assign that value to the Value property of the progress bar. Here is what that line of code will look like:
this.progressBar1.Value = intDay;
The complete code for using the main progress bar and MonthCalendar controls is as follows:
private void UpdateCal2Day(int intDay)
{
//Update the two progress bars with the current value (day) this.progressBar1.Value = intDay;
//If the current day is 0 (reset) set the calendar control to day 1,
//otherwise set it to the day specified.
if (intDay == 0)
{
this.monthCalendar2.SelectionStart =
new System.DateTime(monthCalendar2.SelectionStart.Year, monthCalendar2.SelectionStart.Month, 1);
}
else
245

Chapter 14
{
this.monthCalendar2.SelectionStart =
new System.DateTime(monthCalendar2.SelectionStart.Year,
monthCalendar2.SelectionStart.Month, intDay);
}
}
After assigning the passed day into the Value property of the ProgressBar control, the code sets the Calendar control on this page to the current day of the month based on the value passed into the routine. You will see that an if statement is used to check to see if the intDay is 0, reset the ProgressBar, and cause code to be run that sets the date to the first day of the month. This is accomplished with the following line of code:
this.monthCalendar2.SelectionStart =
new System.DateTime(monthCalendar2.SelectionStart.Year, monthCalendar2.SelectionStart.Month, 1);
Notice that the Year and Month properties of the SelectionStart property is combined with the 1 constant and is converted into a DateTime type using the System.DateTime class. If intDay wasn’t 0, the same basic line of code is used, with intDay taking the place of 1.
this.monthCalendar2.SelectionStart =
new System.DateTime(monthCalendar2.SelectionStart.Year, monthCalendar2.SelectionStart.Month, intDay);
Now this routine is first called when the form is loaded so that the MonthCalendar control is set to the first day of the month. You can see how the routine is called from the Load routine of the form.
private void frmChapter14Main_Load(object sender, EventArgs e)
{
//Initialize the progress bar set of controls
//for the second calendar.
UpdateCal2Day(0);
}
Before getting into actually creating the code that processes all the month’s days, I want you to go ahead and add the code for the routine that updates the progress bar and calendar. When the form is opened and the tab page clicked, you will see the box shown in Figure 14-17.
246

Getting More Experience with Controls
Figure 14-17
Try It Out |
Add the Code to Set Up Controls |
Using the form you created for this chapter:
1.Double-click the title bar of the form. This creates a Load routine for the form as shown here:
private void frmChapter14Main_Load(object sender, EventArgs e)
{
}
2.Type the following line of code in the blank line:
UpdateCal2Day(0);
If you were to try and build the application at this point, you would get an error, so don’t.
3.Position the cursor just after the closing curly bracket, and press Enter to add a blank line.
4.Type the following code provided here without comments:
private void UpdateCal2Day(int intDay)
{
this.progressBar1.Value = intDay;
if (intDay == 0)
{
this.monthCalendar2.SelectionStart =
new System.DateTime(monthCalendar2.SelectionStart.Year, monthCalendar2.SelectionStart.Month, 1);
}
else
247

Chapter 14
{
this.monthCalendar2.SelectionStart =
new System.DateTime(monthCalendar2.SelectionStart.Year, monthCalendar2.SelectionStart.Month, intDay);
}
}
5.Press F5 to test the application. When you click the Progress and Status Bars tab, the calendar appears with the first day of the month highlighted.
You have created code to update the progress bar and calendar based on the value passed to it. Now it is time to add code to the button on the form that runs though the days of the current month chosen.
Adding the Code to Run through the Days of the Month Chosen
Before you actually run through the days of the current month used in the calendar, the Maximum property of the ProgressBar control needs to be set. To accomplish this, the following line of code is used:
this.progressBar1.Maximum = System.DateTime.DaysInMonth(monthCalendar2.SelectionStart.Year, monthCalendar2.SelectionStart.Month);
This code uses the System.DateTime class again by calling the DaysInMonth method, which takes the year and month passed to it and returns the days in the month.
Remember that the System.DateTime class has a number of different methods and properties that deal with date and time information. It is worth your time to experiment with this class and look it up in the Object Browser.
After establishing the maximum value for the ProgressBar control, the code increment the values in the progress bar, causing the progress bar to fill up with blocks. To accomplish this, a for loop is used, with 1 as the minimum value and the Maximum property of the ProgressBar control as the maximum value of the loop. You can see the complete loop here, with the necessary code specified inside:
//Iterate through each tick in the progress bar,
//Which was set based on the # of days in the current month. for (int i = 1; i <= this.progressBar1.Maximum; i++)
{
//Update the calendar control date to display the current date. UpdateCal2Day(i);
//The following for loop is to slow down the progress bar.
for (int j = 1; j <= 5000000; j++) ;
}
In addition to calling the UpdateCal2Day routine, you will see an additional loop specified. Note that this loop is used to slow down the filling of the progress bar for demonstration purposes. You won’t need this when you use it for a real-life situation.
248

Getting More Experience with Controls
The last thing this routine needs to do is let the user know when the task has been completed, in this case when the days have been looped through.
MessageBox.Show(“The Month has been processed!”, “Month Processed”); // Reset the values.
UpdateCal2Day(0);
Try It Out |
Add Code to Process Each of the Days |
Making sure that the form you created in this chapter is opened in design view with the third tab page displayed:
1.Double-click the Button control called btnProcessMonth. The code file for the form opens, with the Click routine done for btnProcessMonth.
private void btnProcessMonth_Click(object sender, EventArgs e)
{
)
2.Type the following code:
this.progressBar1.Maximum = DateTime.DaysInMonth(monthCalendar2.SelectionStart.Year, monthCalendar2.SelectionStart.Month);
for (int i = 1; i <= this.progressBar1.Maximum; i++)
{
UpdateCal2Day(i);
for (int j = 1; j <= 5000000; j++) ;
}
MessageBox.Show(“The Month has been processed!”, “Month Processed”);
UpdateCal2Day(0);
3.Press F5 to test the application.
4.Click the Progress and Status Bar tab.
5.Click the Process Month button. You now see the progress bar fill up and the days whip through in the calendar. After completing, the message box appears.
6.Click OK. The progress bar is cleared and the date is positioned on the first day of the month.
Now that you have gotten the progress bar working on the form, it is time to look into using the
StatusStrip control.
Using the StatusStrip Control
While progress bars are primarily used for displaying the progress of a specific task, such as performing end-of-month processing, status bars are displayed on a form or at the bottom of an application to display the overall information about the current status of the application you are in. You have seen progress bars
249

Chapter 14
when you download a file from the Internet or copied a file on your local system. For an example, look at the status bar located at the bottom of the C# Express editor when in a code file, shown in Figure 14-18.
Figure 14-18
This status bar displays actions that are occurring, such as building the application. In C# Express, you will use the StatusStrip control to display a status bar.
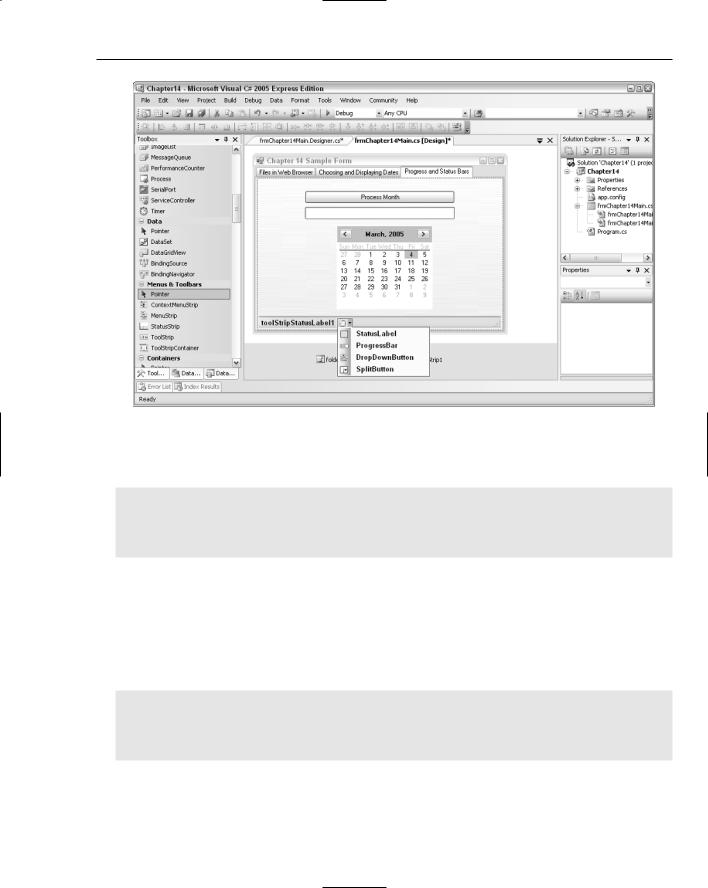
StatusStrip controls are made up of panels. When you add a StatusStrip control, a drop-down is displayed that lets you choose from four different types of controls you can display: StatusLabel, ProgressBar, DropDownButton, and SplitButton. For the purpose of this example, you will be using the first two types of controls. The actual types are ToolStripStatusLabel and
ToolStripProgressBar.
Once you have specified the controls to use on the StatusStrip control, you can utilize them at runtime as you would any other control. For example, now that you have a label on the status bar, you can update it when the form loads to display today’s date just as you would a regular label:
this.toolStripStatusLabel1.Text = DateTime.Today.ToLongDateString();
The same goes for the progress bar used in the StatusStrip control. The following lines of code, used in two different routines, set the Maxium and Value properties of the ToolStripProgressBar control:
this.toolStripProgressBar1.Maximum = this.progressBar1.Maximum;
this.toolStripProgressBar1.Value = intDay;
You will be guided as to where the lines of code will go.
Try It Out |
Add the StatusStrip Control and Code |
Using the same tab you used in the last Try It Out:
1.Drag and drop a StatusStrip control on to the form from the Menus & Toolbars category in the Toolbox.
2.A status bar appear across the bottom of the form with a drop-down arrow is displayed.
3.Click the drop down arrow and select StatusLabel from the list. The label appears in the first spot in the status bar, and the drop-down arrow appears to the right.
4.Click the drop-down arrow; the screen should appear as it does in Figure 14-19.
5.Click the ProgressBar item in the list. The progress bar appears in the status bar. At this point if you test the application, you would just see the current text in the status bar label displayed in the status bar. You need to now add the code. The three lines of code shown in the section are all you need.
250
Getting More Experience with Controls
Figure 14-19
6.Double-click the top of the form to open the code with the Load routine opened. You can see the current code here:
private void frmChapter14Main_Load(object sender, EventArgs e)
{
// Initialize the second set of controls for the second calendar. UpdateCal2Day(0);
}
7.Place the cursor after the opening curly bracket and press Enter to add new line.
8.Type in the following lines of code in the new blank line:
//Display the current date in the label ini the status bar. this.toolStripStatusLabel1.Text = DateTime.Today.ToLongDateString();
9.Switch back to the form, and double-click the btnProcessMonth button. The form opens with the current code displayed. Here are the first few lines of code from that routine:
private void btnProcessMonth_Click(object sender, EventArgs e)
{
this.progressBar1.Maximum = DateTime.DaysInMonth(monthCalendar2.SelectionStart.Year, monthCalendar2.SelectionStart.Month);
10.Type the following code in the line after the last line of code just displayed:
this.toolStripProgressBar1.Maximum = this.progressBar1.Maximum;
251
Chapter 14
11.Now locate the UpdateCal2Day routine, which starts off with the following code:
private void UpdateCal2Day(int intDay)
{
// Update the two progress bars with the current value (day) this.progressBar1.Value = intDay;
12.Add the following line of code to update the Value property of the progress bar in the status bar.
this.toolStripProgressBar1.Value = intDay;
13.Press F5 to execute the application.
14.Click the third tab. Today’s date appears in the status bar.
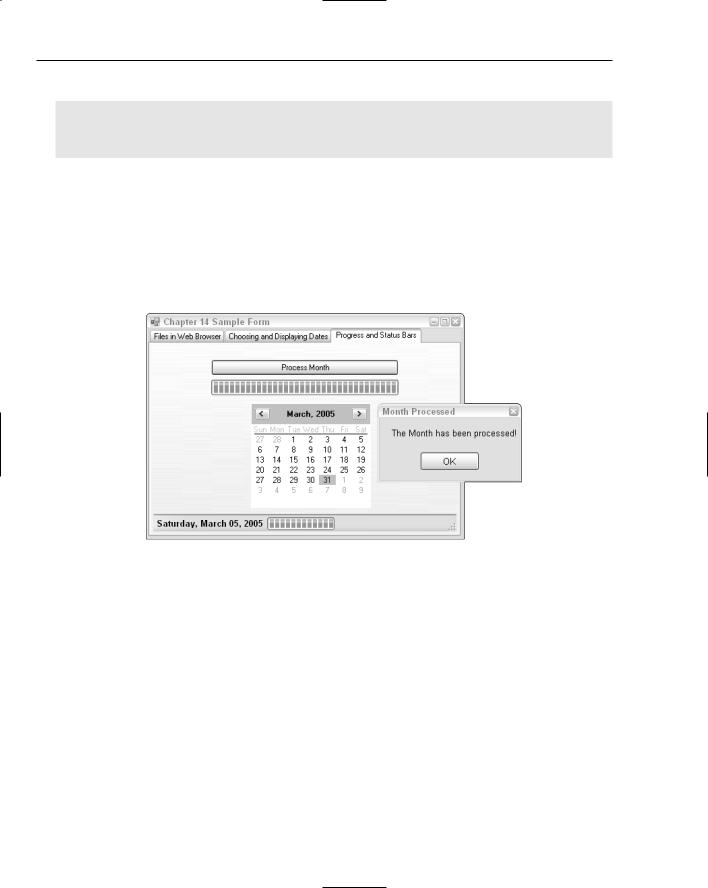
15.Click the Process Month button. The routine should run through the process, updating both progress bars on the screen as shown in Figure 14-20.
Figure 14-20
And there you go. You now have progress bars and status bars working on your form.
Summar y
There are so many excellent controls that come with C# Express for your use, whether you are trying to browse folders, load the files in the folder into a list box, or even click one of the files and have it display in a WebBrowser control. It is all very doable, as you can see in this chapter. Once you have become accustomed to adding controls, modifying them to meet your needs more concisely is a lot easier.
An example of how you could combine the examples give here is to display a progress bar when you are loading the files into the Items collection of the list box. That way, the form wouldn’t just sit there when you had to load folders with a higher number of files. As you create your forms, you can use one of the many controls you have access to, and then using the object browser, study the various methods, properties, and events available. So it’s time to get to work!
252

Getting More Experience with Controls
Exercises
1.What are the two properties for setting the range on a MonthCalendar control?
2.What is the control for displaying two different objects in it and letting them be resized separately?
3.Name the four types of controls that can be used in the StatusStrip control.
4.Which method on the System.DateTime class returns the number of days in a month, and what are the parameters it requires?
253
