
Visual CSharp 2005 Express Edition (2006) [eng]
.pdf

8
Working with Forms and Controls
Forms and controls are central to creating professional Windows applications. The more you know about those forms and controls, the more you can take advantage of them. There are standards that are used for creating Windows applications. Utilizing those standards ensures that users can count on having a similar experience when working in various Window applications, even though they may be created by different developers.
The great thing is that today the available controls are designed in such a way as to make it easier to follow these standards, and harder to break them. Often, things work just as you’d expect them to and fit in with the look and feel of other Windows apps with the minimum of effort (such as the default behavior of a form — even with no controls on it).
Besides following standards to create professional applications, developers can utilize properties, methods, and events to control information being entered and displayed on those forms and in the controls. There are various controls that are used for various tasks depending on what you are trying to accomplish with the forms. This chapter will discuss the following:
Some of the Windows standards used for creating interfaces
How to use properties, methods, and events to work with forms
How to utilize toolbars and menus on your forms
Useful controls available for use on forms
How to work with properties, methods, and events of those controls
Creating User Interfaces Using
Windows Standards
Learning the basics of how to create forms and utilize controls in C# Express is essential to creating applications. If you don’t create applications that are laid out logically and consistently, users will just get frustrated and not want to use those applications.
Chapter 8
Windows interface standards could fill a whole book, but I want to give you some suggestions on some standards that can make your interfaces more attractive and usable. To do this, I will cover the following areas: using form standards, adding menus and toolbars, and using the right control for the right purpose. I will start with a type of form that is simple to create and convenient to use.
Use of Switchboards
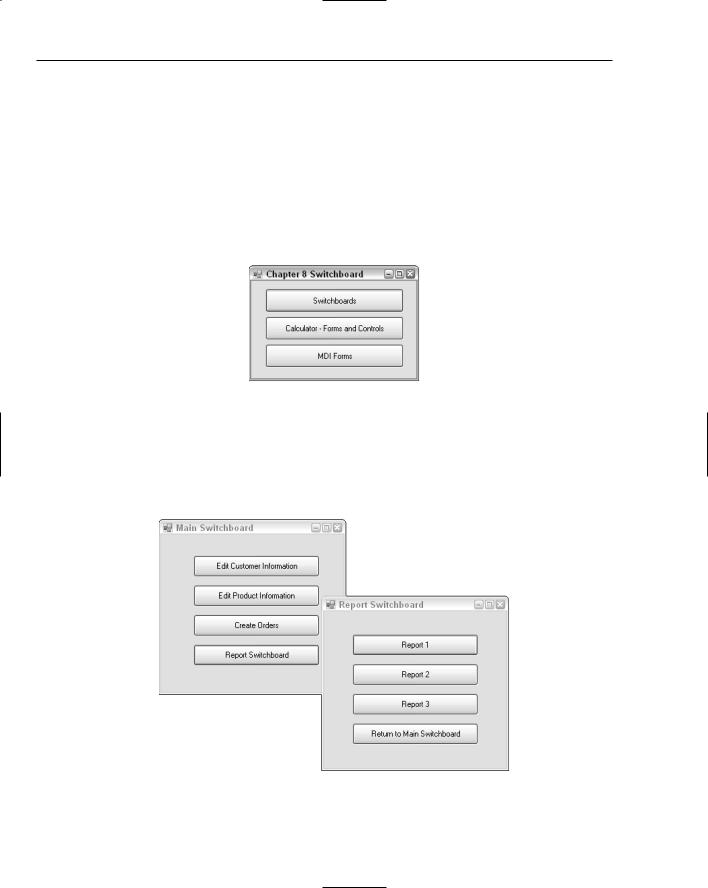
When creating switchboards, you will place buttons on forms to display possible tasks. Some of the chapters, including this one, use switchboard to help organize the tasks, and display those tasks in logical orders. This helps create a consistent interface for your application. Figure 8-1 displays the switchboard created for this chapter.
Figure 8-1
Switchboard can take on many forms. The ones used by the chapters of this book are probably the simplest. Multiple switchboards also can be used to display sub-menu-type tasks. For example, you may have a main switchboard that reflects all the choices for a application on the form’s buttons, with one of the buttons having a caption of “Reports.” This button then opens another switchboard when clicked. The two switchboards are displayed in Figure 8-2.
Figure 8-2
126
Working with Forms and Controls
Form Application Types and Standards
Before jumping into the various form standards that can be used, I want to discuss two types of form application standards that affect how your overall application works with forms.
Form Application Types
There are two main types of application styles that you can use to display your forms: single-document interface (SDI) and multiple-document interface (MDI). By default, the single-document interface is what is created when you create a Windows application project using C# Express. Single-document interface means just that, a single document (form) is displayed separately. You can see that in Fig-
ure 8-2 where each of the switchboards is treated as a separate window.
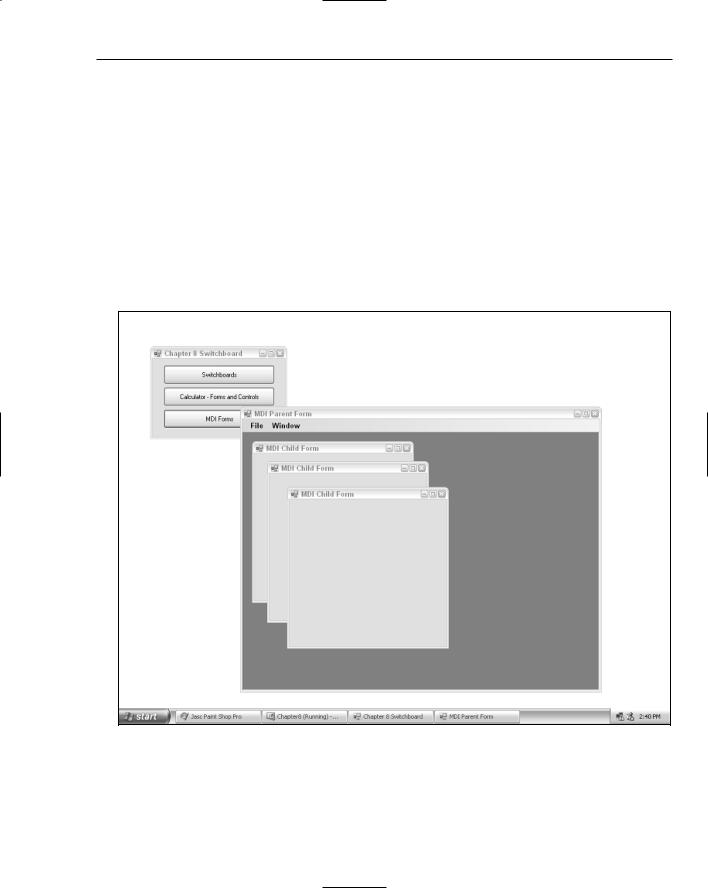
With MDI forms, you will have a main window, and then all windows (forms) are then opened within that main window. An example of using MDI forms is shown in Figure 8-3.
Figure 8-3
127

Chapter 8
Notice that even though there are two additional (child) forms opened inside the MDI parent or main form, you only see the parent form in the Windows task below the bottom of the screen. These child forms also are limited to moving inside the main parent form. You will learn how to create MDI forms later in this chapter in the section titled “Working with MDI Forms.”
Some Form Standards
Besides which type of application you decide to use, there are certain form standards that can be adhered to that make the users’ experience with your forms more enjoyable and, even more important, easier to use. While you can create your own style of forms that you think would be interesting and useful for the user, there are some things you can do to give the user a more consistent interface:
Be conservative with colors. Instead of having a different color for every form you create, use a consistent color combination, and keep it conservative. If you use the standard colors that forms are by default, then users can use the Windows theme to change the colors themselves, instead of having them dictated to them. I have literally seen color combinations that change so dynamically that they practically send users into seizures.
Display buttons in standard locations. When you are using buttons for closing your forms, locate them in the same locations on your forms, instead of making the user guess where you are going to put the buttons because you change them on the forms. If you decide to put the buttons for tasks in the upper right corner, do it on all the forms in your application.
Use menus and toolbars consistently. Be consistent in your use of menus and toolbars. Generally these two will reflect the same tasks: menus with text to display commands and toolbars to display commands graphically. If you use either one or both of these controls on one of your forms, then use them on all. Also, using the same base menu choices such as File, Edit, View, and Window, that are used in other major Windows applications helps to give a standard feel to the application.
Use the right control for the right purpose. When using the many various controls available to you in creating forms, you want to make sure you use the right control for the task you are trying to accomplish, down to taking a single piece of information from the user.
Now that you know the basics of creating standard forms, it is time now to go into more detail on how to create effective forms and some of the cool things you can do with them.
Looking at Forms
As discussed throughout the book thus far, when creating Windows applications, keep in mind that they are generally based around forms. To create useful forms, you need to know how to take advantage of them, and to do that, you need to know about how to work with form properties.
Form Properties
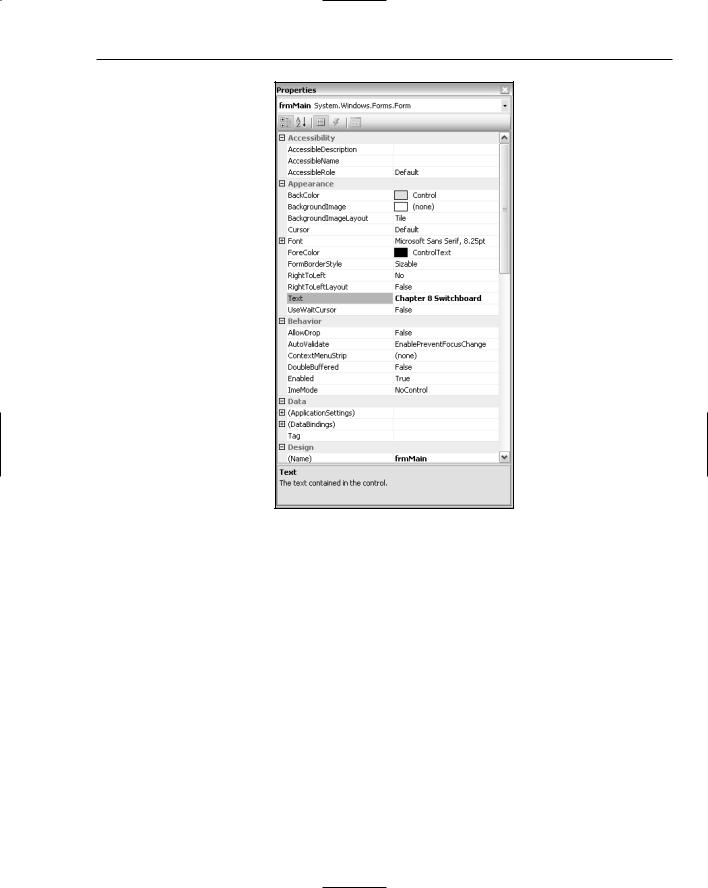
As with properties of other types of objects, properties of forms can be used to control how a form looks and behaves. You can see the property sheet for the main switchboard created for Chapter 8 in Figure 8-4.
128
Working with Forms and Controls
Figure 8-4
Form and control properties are broken up into the following categories:
Category |
Description |
|
|
Accessibility |
Used to control how screen looks and the size of the controls based on |
|
which type of accessibility you need, such as for the visually impaired. |
Appearance |
Controls the default settings for various display settings such as height, |
|
width, background color, and starting position for the form. |
Behavior |
Determines how a form behaves depending on that you are trying to |
|
accomplish. Properties in this category include Visible, which allows |
|
you to hide a form without closing it, so that even if the form isn’t |
|
visible, you still have access to all the controls on that form. |
|
Table continued on following page |
129

Chapter 8
Category |
Description |
|
|
Data |
For forms the main property of use in this category is the Tag property, |
|
which allows developers to store text for their own use. This category |
|
is used more on controls, when you can bind the control to data. Data |
|
binding is discussed further in Chapter 11, “Using SQL Server Express |
|
Features within C# Express.” |
Design |
Used for properties that have to do with how the form is treated in |
|
design mode. Also includes localization, controls that determine which |
|
language pack is used, and the name of the form. |
Focus |
The only property in this category is CauseValidation, which when |
|
set to True, causes the validation event to be raised when controls are |
|
changed on the form. |
Layout |
Various properties that control the layout of the form, including start |
|
position and the state of the form, such as minimized, maximized, or |
|
normal. |
Misc |
Contains some miscellaneous properties including two that let you |
|
specify which control is used when the Enter key is pressed |
|
(AcceptButton) and the Esc is pressed (CancelButton). |
Window Style |
Using the properties in this category, you can control what the actual |
|
window looks like and how it behaves based on which features you |
|
specify to use, such as help button and control box. |
|
|
There are so many properties that it would be hard to cover all of them in one chapter. The fact is that you won’t even have to use the majority of the properties, since they are set to use default values that cover most the types of forms you will use.
A Side Step — Creating Switchboards
Even before jumping into the various forms features in the next sections, you need to create the chapter switchboard. You will then use two Form properties: Name, used to specify the name of the form, and Text, used to display text in the title bar of the form.
Try It Out |
Creating the Chapter Switchboard Form |
For this Try It Out, you create the chapter’s switchboard form, which will be used for other examples.
1.Create a new Windows Forms project using C# Express as you have throughout the book. In this case, call it Chapter8.
2.With the form highlighted, in the Properties sheet, change the Name property of the form to be something more meaningful for you. In the sample for the chapter, this form is called frmChapter8Main.cs.
Changing the Name property doesn’t change the filename. Changing the filename does change the Name property, though.
130
Working with Forms and Controls
3.Type Chapter 8 Switchboard in the Text property of the form, found in the Properties sheet.
4.Open the Toolbox if it is not already open by choosing View Toolbox.
5.Drag and drop three Button controls on the form, laying them on the form as shown in Figure 8-1. Button controls can be found in the Toolbox under the Common Control category.
6.Click the first button added.
7.Locate the Name property in the Properties sheet.
8.Type btnSwitchboard for the Name property of the top button.
9.Click the middle button, and type btnCalculator for the Name property.
10.Click the bottom button, and type btnMDIForms. MDI forms are discussed later in the chapter in the section called “Working with MDI Forms.”
11.Click the first button again, and locate the Text property in the Properties pane.
12.Type Switchboards for the Text property of btnSwitchboards.
13.Type Calculator - Forms and Controls for the Text property of btnCalculator.
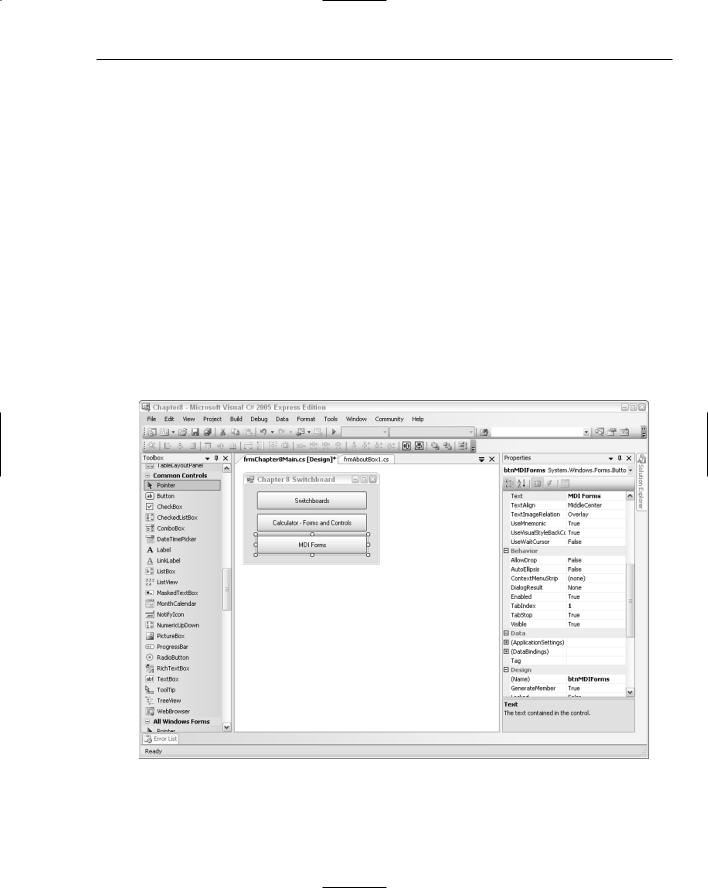
14.Type MDI Forms for the Text property of btnMDIForms. The form should then look somewhat as it does in Figure 8-5.
Figure 8-5
131
Chapter 8
Now, even though you have created a form, the switchboard doesn’t open another form. You need to create the next form and then write code in the Click event code of the buttons you want to program. The next Try It Out walks you through creating a second switchboard form, then writing the code to open the form.
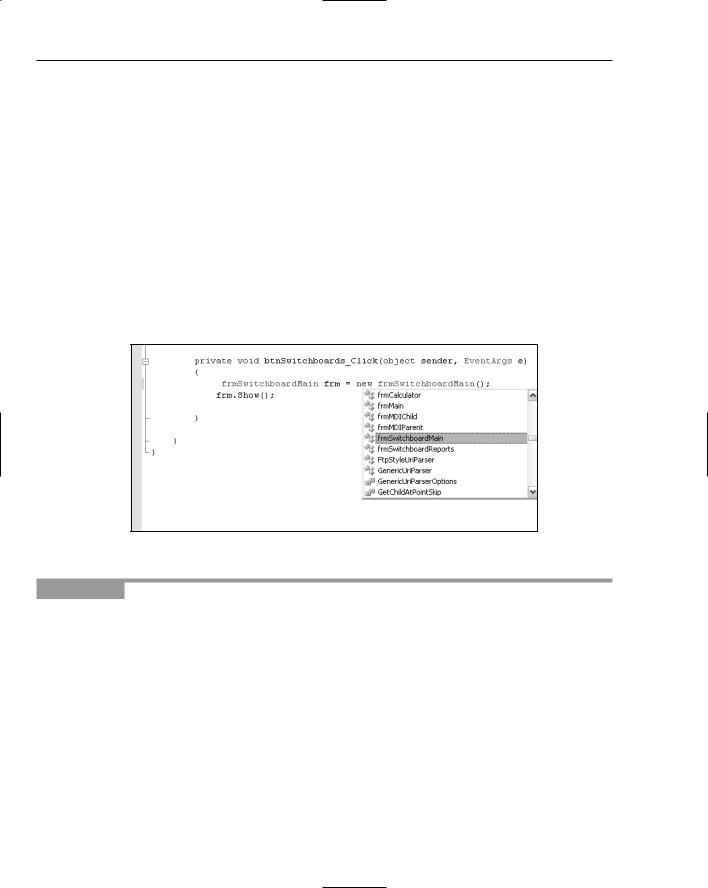
To accomplish this, you create a reference variable used to point to the new form; then you use the Show method of the form to open the form for the user. The following code accomplishes this task:
frmSwitchboardMain frm = new frmSwitchboardMain(); frm.Show();
You are familiar with declaring variables from the last chapter. This time you are declaring one to be the type of the new form you will create in the next Try It Out, adding the preceding code in the Click event code for btnSwitchboards. When you add a form or other type of object to a project, you will be able to see the object added to the list of types to declare. You can see this in Figure 8-6. When frmSwitchboardMain has been added to the project, it can be referred to in code, as shown using
the IntelliSense feature.
Figure 8-6
Try It Out |
Creating and Calling Another Switchboard Form |
To start off this Try It Out, you create a form that is a second switchboard. You then add code to the main chapter switchboard to open the new form. So, using the chapter project created in the last Try It Out:
1.Right-click the C# project file, located in the Solution Explorer.
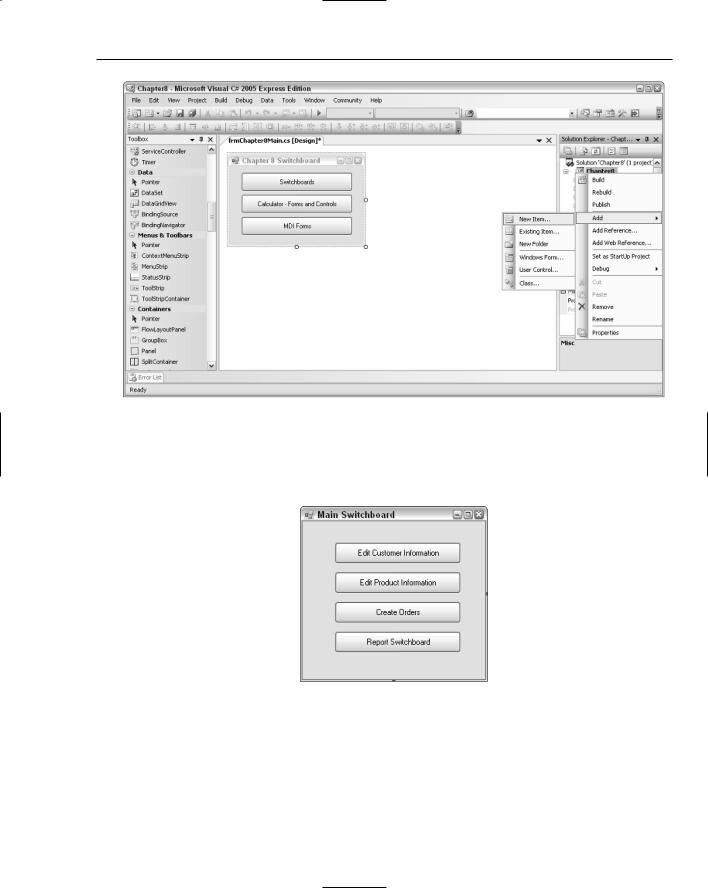
2.Choose Add New Item . . . from the right-click menu. You can see this choice in Figure 8-7. The Add New Item dialog box opens, letting you choose from various item templates.
3.Highlight the Windows Form template, and type the name frmSwitchboardMain.cs in the name of the form.
4.Click Add. The form is now added to the project and displayed in the designer.
5.Type the text Main Switchboard into the Text property of the form, using the Properties sheet.
132
Working with Forms and Controls
Figure 8-7
6.Using the same steps outlined in the last Try It Out, drag and drop a few buttons onto the new form; then type in text for the Text property of each button. You can see the four buttons added to the sample form and Text properties assigned to them in Figure 8-8.
Figure 8-8
7.Click the Save toolbar button to save your work; then click the frmChapter8Main.cs tab in the main editor page, or double-click the file in the Solution Explorer. The form will then be displayed in the main editor page.
8.Double-click the btnSwitchboards button. The code for the form appears in the main editor page with the opening and closing curly brackets displayed for the click routine.
133
