

Visual CSharp 2005 Express Edition (2006) [eng]
.pdfChapter 14
Demo 3: Working with Progress and Status Bars
The purpose of the last demo is to show how you can use both progress bars and status bars in your applications. Progress bars are very useful when you have a process that is going to take a while and you want to let your user know how far there is to go in the process. This works very well when you can calculate the number of steps it will take to perform the action the system is working on. For example, in the case of the demonstration, each day of the current month is iterated through. You can see this in action in Figure 14-4.
Figure 14-4
In fact, in this demo the MonthCalendar control displays each day as the routine whips though them. A progress bar also is updated in a StatusStrip control, which displays information you want in a status bar at the bottom of the container control specified, in this case a tab page. You also can have it display at the bottom of a form instead if desired. You can display information such as today’s date, as seen in Figure 14-4, progress bars, and other information. Creating status bars and what you can display will be discussed further later in this chapter in the section titled “Using ProgressBar and StatusStrip Controls.”
It is time to get busy creating the demo. To get started, you need to learn a bit more about the TabStrip control and how you can use it your applications.
Getting Star ted with the Tab Control
The Tab control is one of those controls that contain other controls. In this case, besides the controls you place on each of the pages of the Tab control, the Tab control is made up of TabPage controls, unlike prior versions of the Tab control such as the ActiveX control called the TabStrip control. This prior version consisted of a strip of tabs, in which you had to change the information displayed yourself by toggling the visibility of boxes and such.
A feature of the Tab control in C# Express is that you can click the tab you want to add controls to and then just place the controls on that tab page. If the Tab control you are adding to a form is going to take up the whole page, then you can set the Dock property to fill the Tab control, and its pages will fill the form. You have seen the way the Tab control looks at runtime in all the figures shown in this chapter thus far.
224

Getting More Experience with Controls
Try It Out |
Create the Main Form and Add a Tab Control |
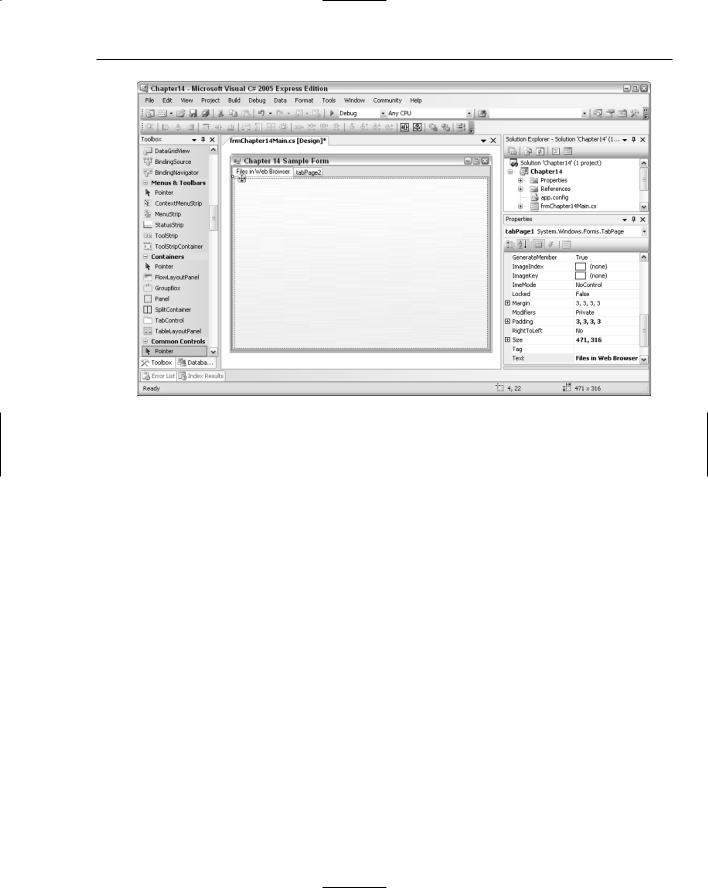
In this Try It Out, you see the control in design view as you create the form you will use throughout the rest of the chapter, and place a Tab control on it, setting it up for the first demonstration.
1.Open C# Express.
2.Click New Project in the Start Page.
3.Select Windows Application for the template to use, and type in the name of the project you want to call it. For the purpose of this example, it is called Chapter14. Pretty original, huh?
4.Rename the main form to what you want it to be. For the purpose of this example it is called frmChapter14Main.cs.
5.Resize the main form to be a little larger using the resize handles.
6.Drag and drop a Tab control onto the form, clicking where you want the top leftmost corner of the Tab control to be.
7.Click where you want to have the bottom right corner of the Tab control to be.
Note that it really doesn’t matter where you place the Tab control, since you will be setting the Dock property of the Tab control to be Fill, which will cause the control to fill the entire form.
8.Set the Dock property of the Tab control to Fill, as shown in Figure 14-5.
Figure 14-5
225

Chapter 14
If the Properties window doesn’t display the tabControl as the object to work on, click the blank space beside the tabs on the Tab control. This causes the Tab control to be selected. To select the individual tab pages, click the tab, then the page of the selected tab. You will work on that next. Remember that the TabPage controls are contained within the Tab control but have their own properties.
When the Tab control is highlighted, you can select various tasks to perform with the Tab control such as adding and removing tabs using the right-click menu. Another way to change properties of the TabPage controls, contained in the Tab Pages collection, is to click the builder button (...) next to the TabPages property. When you do this, the Tab Pages Collection Editor is opened, as shown in Figure 14-6, with the second tab page highlighted.
Figure 14-6
Using the arrows beside the list of tab pages, you can rearrange the pages if desired.
Try It Out |
Modify and Add Tab Pages |
For this Try It Out, you will set the Text property for the current two pages that exist for the Tab control and add a new tab page, setting the Text property for that as well. Using the form you created in the last Try It Out:
1.Click the tab with the label (Text property) that reads tabPage1.
2.Click the blank area of the Tab control down below the tabs. The Properties window reads tabPage1.
3.Type Files in Web Browser in the Text property, and then click off the property. You now see the text in the tab change as shown in Figure 14-7.
226
Getting More Experience with Controls
Figure 14-7
Remember that you have just changed the Text property of the TabPage control, not the name itself. Although not used in this chapter, you need to remember this if you are working with the TabPage controls using code.
4.Click the tab labeled tabPage2; then click the page itself below the tab as you did in Step 2.
5.Type Choosing and Displaying Dates in the Text property and press Enter. The second tab now displays the text you just typed in.
6.Right-click the Tab control (upper right area next to the tabs).
7.Choose Add Tab from the menu that is displayed. A new tab (tabPage3) is added.
8.Click the blank area in the tab page.
9.Type Progress and Status Bars in the Text property of tabPage3.
Now the Tab control is set up to use for the chapter. When you want to add controls to the pages, you will click the tab you are interested in, then drag and drop the controls onto the page. When you run the application, the user can click the tabs and the changing of pages is handled for you.
Now it is time to take a look at the first demonstration, displaying files in a Web browser.
227

Chapter 14
Displaying Files in a Web Browser
While it would be easy to throw the WebBrowser control onto a form and hard-code (set using the design properties) to demonstrate showing a file in the WebBrowser control, it is not near as interesting, or useful, in my opinion, as creating a form that will let the user specify the folder that contains files, loads them into a list box, and then loads the WebBrowser control with the specified file.
Controls Used for the Demonstration
To accomplish this, you will use the following controls:
Control |
How Used |
|
|
Button |
Code is written for the Click event that calls the |
|
ShowDialog method of the FolderBrowserDialog. The |
|
folder returned is then passed to the GetFiles method of |
|
the System.UI.Directory class, which returns the names |
|
of files in a string array. The array of filenames is then |
|
loaded into the ListBox control. |
FolderBrowserDialog |
The ShowDialog method is called to display the Folder |
|
Browse dialog box, just the other dialog controls used |
|
in the last chapter. After the user chooses a folder, the |
|
SelectFolder property contains the full path of the folder. |
|
Located in the Dialog category in the Toolbox. |
ListBox |
The AddItem method is used to load filenames into |
|
the ListBox. When selected, the current filename is |
|
retrieved and used by the Navigate method of the |
|
WebBrowser control. |
SplitContainer |
Enables the user to have control over the size of both the |
|
ListBox and WebBrowser controls, much like using |
|
Frames in a Web site. As with the Tab control, this is a |
|
container-type control, consisting of multiple panels. It is |
|
located in the Container category in the Toolbox. |
TextBox |
Displays the current folder being loaded into the ListBox. |
|
Updated in the code behind the Button control. |
WebBrowser |
Using the Navigate method displays the file picked from |
|
the ListBox control in a Web browser on the form. This is |
|
located in the Common Controls category in the Toolbox. |
|
|
While I normally rename each control to be more meaningful depending on the task, for the purposes of this chapter, I am leaving some of the controls with their original name as assigned by C# Express when only one of them is used on the form.
228

Getting More Experience with Controls
While there is a bit of code used for the controls discussed in the last table, I will walk you through each line so you will understand them as you write them. Also, I have added code to the code sample to discuss the blocks of code. To start with, you need to place the controls on the form.
Try It Out |
Adding the Controls for Displaying Files in a Web Browser |
To get going, you will want to have the first page of the Tab control display. Once you do:
1.Drag and drop a Button control onto the first page (tabPage1) of the Tab control, naming it btnSetFolder.
2.Type Set Folder for the Text property of the Button control added in Step 1.
3.Drag and drop a Label control onto the first page of the Tab control, lining it up beside the Button control added in Step 1.
4.Type Current Folder for the Text property and lblCurrentFolder for the Name property of the Label control added in the last step.
5.Set the AutoSize property of the Label control to False. The reason for this property setting is so that you can resize the label as you want in order to anticipate having text, in this case folder paths, bigger than the text set at design time.
6.Resize the Label control to stretch across the page.
7.Drag and drop a SplitContainer control onto the first page of the Tab control, placing it under the Button control.
8.Set the Anchor property of the SlipContainer to Top, Bottom, Right, Left. This will cause the SlipContainer control to resize itself down the tab page as the form is resized.
9.Resize the SlipContainer using the top middle resize handle so that it starts just below the Button and Label controls, as shown in Figure 14-8.
10.Set the BorderStyle of the SplitContainer to be FixedSingle. This will add more of an emphasis on the two panels when viewing.
11.Drag and drop a Label control into the first panel of the SlipContainer added in Step 8, typing Files to View for the Text property.
12.Drag and drop a ListBox control into the first panel, under the Label control added in the last step.
13.Set the Anchor property to Top, Bottom, Left, Right. This will cause the control to grow with the panel it is in.
14.Resize the ListBox control to fill the first panel under the Label control added in Step 10.
15.Drag and drop a WebBrowser control from the Common Control category in the Toolbox in the second panel of the SlipContainer control. Note that the Dock property of the WebBrowser control is automatically set to Fill. This will cause the control to fill the second panel of the
SlipContainer.
16.Drag and drop a FolderBrowserDialog control from the Dialogs category of the Toolbox onto the form. As with other dialog controls you won’t see anything on the form itself, but a component will be added to the component tray below the form. You can see the final form without code in Figure 14-9.
229

Chapter 14
Figure 14-8
Figure 14-9
230

Getting More Experience with Controls
Whew, quite a few controls. And this is just for the first demonstration. Now it is time to work on the code for actually using the controls.
Adding the Code for Browsing and Displaying Files
The majority of the commands in this chapter have been discussed at one point or another throughout the book, although there are some new properties and methods of individual controls. I will also review the use of arrays. While I will be discussing the code used for the method a line at a time, I want to go ahead and give you the whole method to look at, which is documented with comments fairly well. Again, don’t stress out looking at it, because you will be working on it by sections, or specific tasks, at a time.
// Declare the array of strings used for filenames string[] aryFileEntries;
private void btnSetFolder_Click(object sender, EventArgs e)
{
//Display the folder browser dialog folderBrowserDialog1.ShowDialog();
//Display the folder selected in the top label this.lblCurrentFolder.Text = folderBrowserDialog1.SelectedPath;
if (this.lblCurrentFolder.Text != “folderBrowserDialog1”)
{
//Clear the current list of files in the listbox
//and Web Browser control. this.listBox1.Items.Clear(); this.webBrowser1.Navigate(“”);
//Store the filenames into an array aryFileEntries =
System.IO.Directory.GetFiles(folderBrowserDialog1.SelectedPath);
//Iterate through each of the filenames loaded into the array foreach (string fileName in aryFileEntries)
{
//strip off the path, and add the filename into the list box string strFileNameOnly =
fileName.Substring(fileName.LastIndexOf(@”\”) + 1); this.listBox1.Items.Add(strFileNameOnly);
}
}
}
For the steps in Try It Outs of this chapter, I won’t be including the comments displayed in the code discussed. Also, remember that the complete code is provided in the sample application for this chapter if you just want to cut and paste it in. Lazy, but it works easier that way and in fact is the way you will learn additional methods and use somebody else’s routines.
231
Chapter 14
In the code used with the btnSetFolder Click event, the first step is to display the Folder Browser dialog box and to utilize the folder if one is selected.
Displaying and Utilizing the FolderBrowserDialog Control
To accomplish this, a method and property of the FolderBrowserDialog are used: the ShowDialog method and the SelectedPath property, as follows:
//Display the folder browser dialog folderBrowserDialog1.ShowDialog();
//Display the folder selected in the top label this.lblCurrentFolder.Text = folderBrowserDialog1.SelectedPath;
As explained in the code comments, after displaying the dialog box, the selected path is displayed in the Text property of the lblCurrentFolder label. This shows users which folder they selected. The next step is to look at the Text of lblCurrentFolder and see that it does not equal “folderBrowserDialog1,” which is what it will be if the user selected Cancel in the Folder Browser dialog box. This is accomplished with the following lines of code:
if (this.lblCurrentFolder.Text != “folderBrowserDialog1”)
{
// Statements in the True block of code.
}
Note that instead of using the lblCurrentFolder.Text value, you could also use the folderBrowserDialog1.SelectedPath directly.
Try It Out |
Add the Code to Use the FolderBrowserDialog |
As the title implies, you will be adding code to use the FolderBrowserDialog, display the selected path, and add a test to make sure a path has been chosen. To get started, open the form that you created on in the prior Try It Outs in the chapter:
1.Double-click the btnSetFolder button. The code file opens, and the btnSetFolder_Click routine is created for you, as shown in the following:
private void btnSetFolder_Click(object sender, EventArgs e)
{
}
2.Type the following code between the open and close curly brackets of the btnSetFolder_Click routine:
folderBrowserDialog1.ShowDialog();
this.lblCurrentFolder.Text = folderBrowserDialog1.SelectedPath;
if (this.lblCurrentFolder.Text != “folderBrowserDialog1”)
{
}
232
Getting More Experience with Controls
Notice that the open and close curly brackets were added for the if code block, even though you aren’t using it yet. It is a good idea to add these if you know you are going to use a code block even if you test the code in between updating the code.
3.Press F5 to test the application thus far. The application should open with the first page in the Tab control displayed.
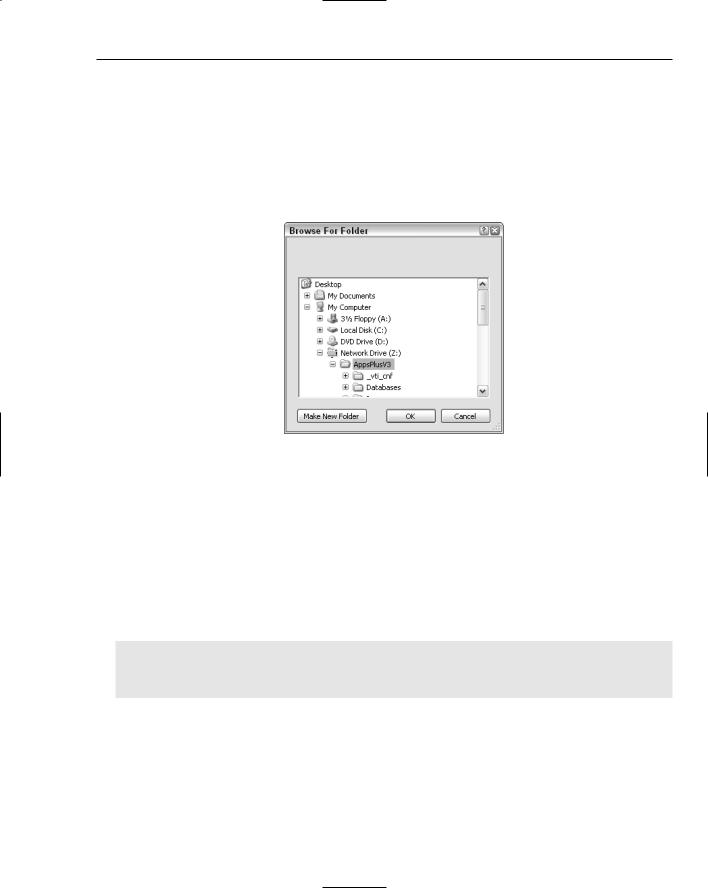
4.Click the Set Folder button. The Folder Browser dialog box opens, as shown here in Figure 14-10, where a folder has been chosen.
Figure 14-10
5.Click OK to accept the chosen folder. You now see the path you chose displayed beside the Set Folder button.
6.Close the sample form and return to the C# Express editor.
Clearing the ListBox and WebBrowser Controls
Continuing with the flow of the overall demo code, if the value in the Text property of lblCurrentFolder is a legitimate folder, the next piece of code is executed. The code clears both the Items collection of the ListBox collection, as well as clears the WebBrowser control by passing the Navigate parameter to the empty string (“”). You can see the code here:
//Clear the current list of files in the listbox
//and Web Browser control. this.listBox1.Items.Clear(); this.webBrowser1.Navigate(“”);
The purpose of this code is to make the demo usable more than one time when opened. If you didn’t include the preceding code, when new items are added, as shown in the next section, they would simply be added onto the current items already in the ListBox. Likewise, if you didn’t add the code for navigating to nothing in the last line of code, then the WebBrowser control would reflect the file that was last displayed, regardless of the current list of files.
233