

Visual CSharp 2005 Express Edition (2006) [eng]
.pdfChapter 14
You will be loading up the Items collection of the ListBox in the next section, and specifying where to navigate in the Web Control in the section titled “Navigating in the Web Browser Control.”
Try It Out |
Clearing the ListBox Items Collection and WebBrowser |
Make sure C# Express is opened in the editor into the btnSetFolder_Click routine:
1.Place the cursor in the code block of the if statement you added in the last Try It Out as shown here:
if (this.lblCurrentFolder.Text != “folderBrowserDialog1”)
{
}
2.Type the following lines of code:
this.listBox1.Items.Clear();
this.webBrowser1.Navigate(“”);
Since this code doesn’t really show much until the next section is added, there is no need to run the application again until after the next Try It Out.
Getting the List of Files and Loading the ListBox
The next line of code takes the selected path and passes it to the GetFiles method of the System.IO.Directory class. The System.IO.Directory class provides properties and methods for accessing and working with folders and their content. The GetFiles method goes out to the folder passed to it and returns the list of filenames as an array of strings, shown here:
// Store the filenames into an array
aryFileEntries = System.IO.Directory.GetFiles(folderBrowserDialog1.SelectedPath);
When using this in the real world, you may want to use exception handlers here. For more information on exception handling, reread Chapter 7.
In this case, the array is declared just before the btnSetFolder_Click routine at the class level so that the array is available to all the routines in the class. The following line of code is used to declare the array:
string[] aryFileEntries;
This line of code is place outside of the Click event handler, just above in the sample code. By specifying string[], you are telling C# that the variable named is going to be an array of strings. This means that there will be more than one entry in the variable. You can get to the entries using an index starting at 0. So if the list of filenames was FileA, FileB, and FileC, the array will look like this:
aryFileEntries[0] = “FileA”
aryFileEntries[1] = “FileB”
aryFileEntries[2] = “FileC”
234

Getting More Experience with Controls
You can load items into an array individually. However, there are some methods and statements that enable you to load the elements into the array, and others that iterate through the array to access all the elements. The code in this demonstration has examples of both. For instance, as mentioned, the GetFiles method loads the list of filenames into the aryFileEntries array for you by passing it as the return value.
Once the filenames have been loaded into the array, you can then go through the array and load them into the ListBox control using the foreach statement to iterate through the array. The lines of code to iterate through the array looks like the following:
// Iterate through each of the filenames loaded into the array foreach (string fileName in aryFileEntries)
{
// Statements performed for each array element that is loaded into fileName.
}
with the statements performed in the block of code discussed in a moment. This foreach statement iterates through the array called aryFileEntries, and creates a variable used within the code block called fileName. This variable is only seen within the code block, and as with variables stored in the for statements, can be declared for each iteration in the loop. For statements were first discussed in Chapter 7.
The last thing to discuss before actually walking you through the Try It Out is how to take the filenames and load them into the ListBox control. Before loading the name into the ListBox Items collection, you need to strip the path of the filename off of it. To accomplish this, you will two methods of the string type Substring and LastIndexOf, both of which were discussed in Chapter 5.
// strip off the path, and add the filename into the list box
string strFileNameOnly = fileName.Substring(fileName.LastIndexOf(@”\”) + 1);
The previous line of code creates a new variable and takes the filename of the path and filename by locating the position of the last “\” character in the current array element that was stored in the fileName variable. Remember that by not supplying the length of the substring to return, which is the second parameter, the Substring method returns the rest of the string beginning at the starting location, in this case provided by the LastIndexOf method.
The @ is necessary when you want to use the literal “\” value. Otherwise, the “\” is considered to be the newline character.
Finally, you will use the Add method of the ListBox Items collection to add the current filename, now stored in strFileNameOnly.
this.listBox1.Items.Add(strFileNameOnly);
Remember that the last couple of lines of code are located inside the code block for the foreach statement. Once each of the elements has been added, the ListBox control will then show the filenames.
235

Chapter 14
Try It Out |
Load the ListBox Control |
Now is your chance to add the code specified here and load the ListBox control for yourself. Open the form that you created on in the prior Try It Outs in the chapter:
1.Placing the cursor above the line of code that reads
private void btnSetFolder_Click(object sender, EventArgs e)
type the following line of code to declare the array:
string[] aryFileEntries;
2.Place the cursor in the if statement after the lines of code that read:
if (this.lblCurrentFolder.Text != “folderBrowserDialog1”)
{
this.listBox1.Items.Clear();
this.webBrowser1.Navigate(“”);
Then press Enter. This creates a blank line.
3.Type the following lines of code:
aryFileEntries = System.IO.Directory.GetFiles(folderBrowserDialog1.SelectedPath);
foreach (string fileName in aryFileEntries)
{
string strFileNameOnly = fileName.Substring(fileName.LastIndexOf(@”\”) + 1);
this.listBox1.Items.Add(strFileNameOnly);
}
The final lines of code should look like this:
// Declare the array of strings used for filenames string[] aryFileEntries;
private void btnSetFolder_Click(object sender, EventArgs e)
{
//Display the folder browser dialog folderBrowserDialog1.ShowDialog();
//Display the folder selected in the top label this.lblCurrentFolder.Text = folderBrowserDialog1.SelectedPath;
if (this.lblCurrentFolder.Text != “folderBrowserDialog1”)
{
//Clear the current list of files in the listbox
//and Web Browser control. this.listBox1.Items.Clear(); this.webBrowser1.Navigate(“”);
//Store the filenames into an array
236
Getting More Experience with Controls
aryFileEntries = System.IO.Directory.GetFiles(folderBrowserDialog1.SelectedPath);
// Iterate through each of the filenames loaded into the array foreach (string fileName in aryFileEntries)
{
// strip off the path, and add the filename into the list box string strFileNameOnly =
fileName.Substring(fileName.LastIndexOf(@”\”) + 1); this.listBox1.Items.Add(strFileNameOnly);
}
}
}
Comments have been added to this display so that you can add them yourself at this point if you want.
4.Press F5 to run the application.
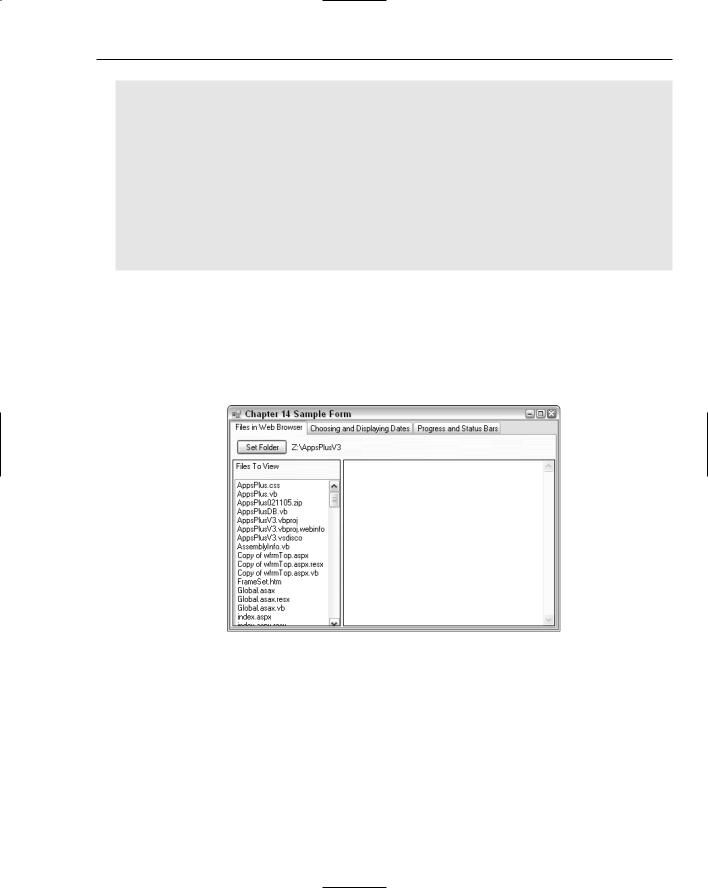
5.Click the Set Folder button to choose a folder. The Folder Browser dialog box opens.
6.Pick a folder and click OK. The list of files in the folder is displayed in the ListBox control as shown in Figure 14-11.
Figure 14-11
The speed in which the files are displayed in the ListBox will depend on the number of files in the folder you are pointing to.
Okay, down the home stretch for this demo. The last thing to discuss is displaying a file in the Web browser.
237

Chapter 14
Navigating in the Web Browser Control
Actually navigating in the WebBrowser control is as simple as calling a single method called Navigate, which, as discussed earlier in the chapter in the section called “Clearing the ListBox and WebBrowser Controls,” was executed with the empty string (“”) to clear the browser. In the case of using it for displaying a file, you will pass the literal “file://” with the full path of the file.
To retrieve the full path of the file you want to display, you take SelectIndex property of the ListBox control and use it as an index for aryFileEntries. You can see how this portion of the command would look here:
aryFileEntries[listBox1.SelectedIndex]
Taking the literal discussed in the first paragraph (“file://”) and adding that to the command just displayed, you will pass the two to the Navigate method as such:
this.webBrowser1.Navigate(“file://” + aryFileEntries[listBox1.SelectedIndex]);
This line of code will be executed using the SelectedIndexChange event of the ListBox. So the complete routine, with comments, will look something like the following:
|
|
private void listBox1_SelectedIndexChanged(object sender, EventArgs e) |
|
|
{ |
|
|
// Use the WebBrowser control to displayed the selected file |
|
|
this.webBrowser1.Navigate(“file://” + |
|
|
aryFileEntries[listBox1.SelectedIndex]); |
|
|
} |
|
|
|
Try It Out |
Add the Code to Display the File in the WebBrowser Control |
|
Using the form you created for this chapter:
1.Double-click the ListBox control. This causes C# Express to open the code file for the form and create the header for the SelectedIndexChanged routine:
private void listBox1_SelectedIndexChanged(object sender, EventArgs e)
{
}
2.Type the following line of code in between the curly brackets:
this.webBrowser1.Navigate(“file://” + aryFileEntries[listBox1.SelectedIndex]);
3.Press F5 to run the application.
4.Click the Set Folder button to choose a folder. The Folder Browser dialog box opens.
5.Pick a folder and click OK. The list of files in the folder is displayed in the ListBox control.
238
Getting More Experience with Controls
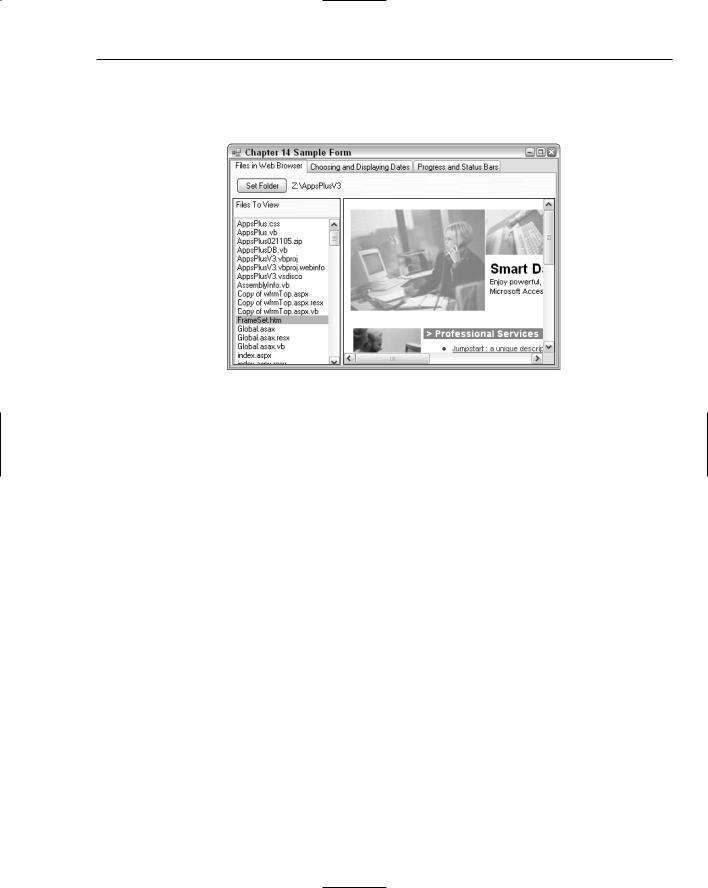
6.Click one of the files in the ListBox control. The file should then be displayed in the browser if it is of the right type as mentioned in the section titled “Demo 1: Browsing Web Files,” found in the beginning of the chapter. Figure 14-12 shows what the form will look like after picking a file.
Figure 14-12
There you have it, a very useful utility with not much code written. There are definitely ways to improve upon this design. One way would be to record the index in aryFileEntries in the list items. That way you’d be able to sort files in different ways without relying on list item indices to locate the full path to the files. I will leave this to you to work on, before moving on to the next section.
Working with Date Controls
The second tab on the chapter form, Choosing and Displaying Dates, is a lot easier to create than the first tab’s topic. Although in my opinion, even though using date controls is much simpler to understand and implement, I honestly think you will use them more often than displaying files in a Web browser
in your form.
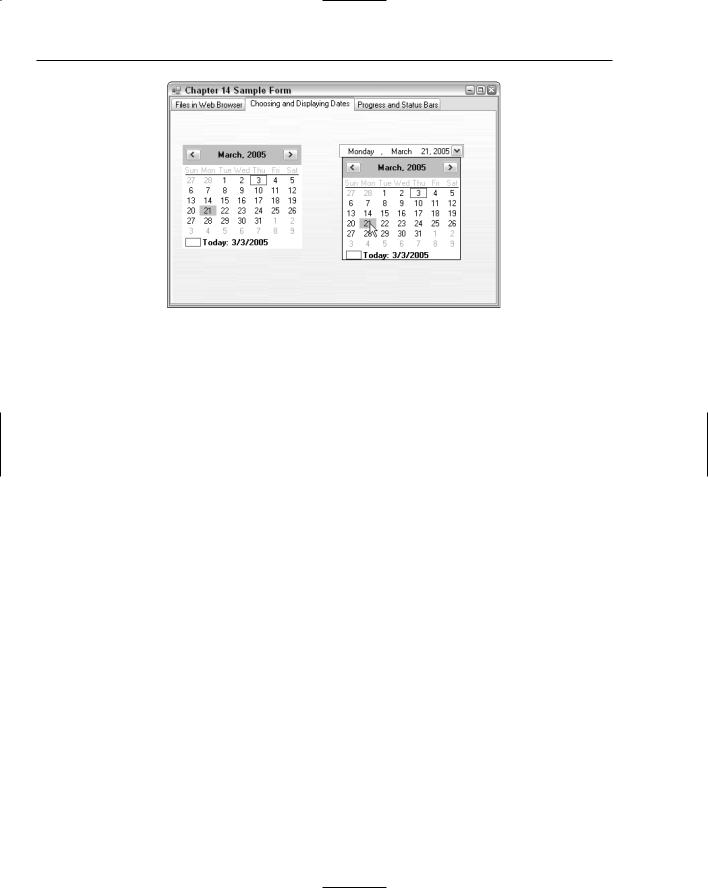
A lot of your applications will utilize dates, such as order dates for invoices or schedule dates for employee schedules. While you can input a date into a TextBox control and control how it is inputted, it is much more professional to give the user a graphic representation for the date. You can see an example of the controls in Figure 14-13.
239
Chapter 14
Figure 14-13
Before adding the two controls used for this demonstration, the MonthCalendar and DateTimePicker controls, yourself, I want to discuss a little further how you can use each of them.
Looking at the MonthCalendar Control
With the MonthCalendar control, displayed on the left in Figure 14-13, users can click a date and change the current date selected. You can move back and forth using arrows at the top of the control to change the month. The control displayed in Figure 14-13 has been placed on the form using the default properties. Using the properties provided you can set everything from the title color to whether or not to display today’s date.
The main property you will be using in the code is the SelectionStart property. Instead of just providing a single date that you can pick from the calendar, the MonthCalendar control provides the ability to select a range of dates. The other property you would use for that would be the SelectionEnd property. This is useful if you want to use the calendar for specifying To/From dates on a report. However, for this example, you will be using only the SelectionStart property. You also will set the MaxSelectionCount property to 1, because this example is only interested in one day. You can see some the properties mentioned here and more of the possible properties to use in Figure 14-14.
As with other controls, the MonthCalendar control has a number of methods (which you won’t be using) and events to use at your disposal. In this example, you will be using the DatePicked event to execute a line of code that updates the value in the DateTimePicker control.
240

Getting More Experience with Controls
Figure 14-14
Looking at the DateTimePicker Control
The DateTimePicker control enables the user to enter or choose dates a few different ways depending on how properties are set:
Text box. Using this method of input, users enter the date they are interested in as they would in a TextBox control. The data is then evaluated to make sure it matches the correct format.
Drop-down calendar. When the drop-down arrow is clicked, a MonthCalendar control is displayed and the user can pick from the displayed dates on the calendar.
Date up/down. Similar to the numeric up/down control, up and down arrows are displayed in place of the drop-down arrow. Users can then click up and down to move through dates.
Entering as a text box is included in both of the two other choices. To get the up and down arrows, you set a property called ShowUpDown. The two arrows then replace the single drop-down arrow. The drop-down calendar choice is the default use of the DateTimePicker control and the one used for this example.
The default event that used for executing code for the DateTimePicker control is the ValueChanged event. To get or set the DateTimePicker date in code, you use the Value property.
It’s time to get going creating this example.
Try It Out |
Create the Date Controls Example |
Since there are only two lines of functional code, you will have to write to create this example, you will add both controls and the code used to update each based on the other’s value all at once in this Try It Out. So with the form used for this chapter, in the design view:
1.Click the tab in the TabControl that has the text: Choosing and Displaying Dates.
241
Chapter 14
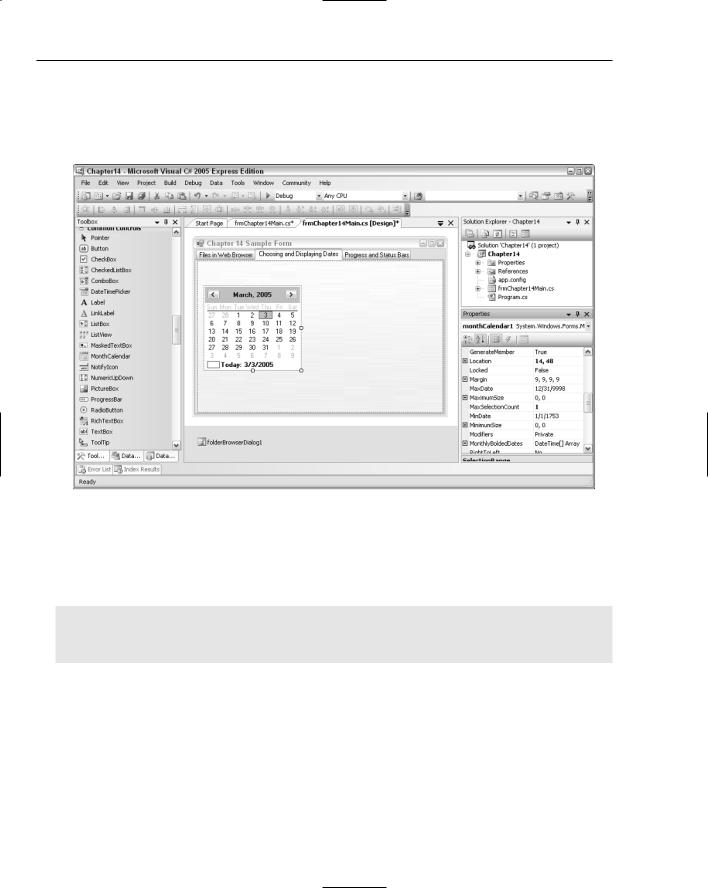
2.Drag and drop a MonthCalendar control onto the form from the Common Controls category in the Toolbox.
3.Set the MaxSelectionCount of the MonthCalendar control you added to 1, using the properties window. You can see the control added and the MaxSelection property in Figure 14-15.
Figure 14-15
4.Drag and drop a DateTimePicker control from the Common Controls category in the Toolbox, dropping it beside the MonthCalendar control you added.
5.Double-click the MonthCalendar control you added in Step 2. The code for the routine of the DateChanged is displayed as follows:
private void monthCalendar1_DateChanged(object sender, DateRangeEventArgs e)
{
}
The cursor is placed in the blank line.
6.Type the following code:
//Set the DateTimePicker value to the month calendar date. this.dateTimePicker1.Value = this.monthCalendar1.SelectionStart;
This now causes the DateTimePicker control Value property to be updated when a new date is chosen in the MonthCalendar control. The next steps will show how to add code to accomplish the opposite, having the SelectionStart control updated when the DateTimePicker value is updated.
242

Getting More Experience with Controls
7.Switch back to the form design file of the example form.
8.Double-click the DateTimePicker control to create the code for the ValueChanged event, as shown:
private void dateTimePicker1_ValueChanged(object sender, EventArgs e)
{
}
9.Type the following code in the blank line provided:
//Set the first date of the month calendar control this.monthCalendar1.SelectionStart = dateTimePicker1.Value;
10.Press F5 to build and execute the application.
11.Click the Choosing and Displaying Dates tab.
12.Play with the two date controls and see the response to the other by choosing a date from the MonthCalendar control and then from the DateTimePicker control.
This fairly straightforward demonstration has showed you how you can not only display dates in different types of date controls but also change them and have them affect other controls. In the next and final demonstration, you will be using a MonthCalendar control to set the max values on a couple of different
ProgressBar controls.
Using ProgressBar and StatusStrip Controls
ProgressBar and StatusStrip are useful controls that don’t always get covered in books. Because these controls are so easy to use, authors think you can just figure them out yourself. While this may be true, unless you have someone show you their differences, you may not see that they are both useful.
Before I go into more detail on each of these controls, take a look at the demonstration created for the purpose of introducing the ProgressBar and StatusStrip controls.
Describing the Progress and Status Bars Demo
To show you how you can use both of these controls, a demo has been created that places a
MonthCalendar control on a form with ProgressBar and StatusStrip controls. In the StatusStrip control are two other controls: StatusLabel control, which displays today’s date, and another ProgressBar control. These are discussed in the section titled “Using the StatusStrip Controls,” later in the chapter. The last control on the form is a Button control that executes the code to iterate and update the progress bar.
The purpose of the MonthCalendar control is to provide the maximum values for the progress bars. For example, if you are in February and you click the Button control, the progress bars’ Maximum will be set to the number of days in February, 28 (unless it is a leap year, of course), and a for loop is executed for the Maximum value of the first ProgressBar control.
243