


Chapter 6: Using the Validation Controls
</body>
</html>
When this form is submitted, the CustomValidator control raises the ServerValidate event, and the CheckUniqueUserName method is called as a result. At the moment, our list of usernames is limited to zak and cristian. If the new username matches either of these, e.IsValid is set to False, and the error message is displayed; otherwise, we assume that the username is valid. When our submitButton_Click event handler checks the Page.IsValid property, e.IsValid returns False if the user entered zak or cristian, and True if the new username is anything else.
Although this example shows a very simple CustomValidator, you can certainly imagine the possibilities this class makes available. For example, while we won’t explore it in this book, you could create a client-side validation function for your
CustomValidator controls by means of the ClientValidationFunction property. For details, refer to the .NET Framework SDK Documentation for the
CustomValidator control.
Validation Groups
A very useful new feature in ASP.NET 2.0, validation groups allow us to validate individual parts of a web page independently of its other sections. This capability proves particularly handy when you’re working with complex pages that contain many functional components. For example, consider the scenario of a single page that contains a login form and a quick registration form, each with its own Submit button and its own set of validation controls. Certainly we don’t want the functionality of the login form’s Submit button to be affected by the data in the registration form; nor can we allow the login form’s data to affect submission of the registration form.
The solution to this problem is to set the controls in each of the boxes within different validation groups. You can assign a control to a validation group using its ValidationGroup property, as shown in the following code:
File: ValidationGroups.aspx (excerpt)
<!DOCTYPE html PUBLIC "-//W3C//DTD XHTML 1.0 Transitional//EN" "http://www.w3.org/TR/xhtml1/DTD/xhtml1-transitional.dtd">
<html>
<head>
<title>Validation Groups Demo</title> </head>
242

Validation Groups
<body>
<form id="Form1" runat="server"> <!-- Login Controls --> <h1>Login</h1>
<!-- Username --> <p>
Username:<br />
<asp:TextBox id="usernameTextBox" runat="server" /> <asp:RequiredFieldValidator id="usernameReq"
runat="server" ControlToValidate="usernameTextBox" ErrorMessage="Username is required!" SetFocusOnError="True" ValidationGroup="Login" />
</p>
<!-- Password --> <p>
Password:<br />
<asp:TextBox id="passwordTextBox" runat="server" TextMode="Password" />
<asp:RequiredFieldValidator id="passwordReq" runat="server" ControlToValidate="passwordTextBox" ErrorMessage="Password is required!" SetFocusOnError="True" ValidationGroup="Login" />
</p>
<p>
<asp:Button ID="loginButton" runat="server" Text="Log In"
ValidationGroup="Login" />
</p>
<!-- Login Controls --> <h1>Register</h1>
<!-- Username --> <p>
Username:<br />
<asp:TextBox id="newUserNameTextBox" runat="server" /> <asp:RequiredFieldValidator id="newUserNameReq"
runat="server" ControlToValidate="newUserNameTextBox" ErrorMessage="Username is required!" SetFocusOnError="True" ValidationGroup="Register" />
</p>
<!-- Password --> <p>
Password:<br />
<asp:TextBox id="newPasswordTextBox" runat="server" TextMode="Password" />
<asp:RequiredFieldValidator id="newPasswordReq" runat="server" ControlToValidate="newPasswordTextBox" ErrorMessage="Password is required!"
243
Chapter 6: Using the Validation Controls
SetFocusOnError="True" ValidationGroup="Register" />
</p>
<p>
<asp:Button ID="registerButton" runat="server" Text="Register" ValidationGroup="Register" />
</p>
</form>
</body>
</html>
Executing this page reveals the two sets of controls: one for logging in an existing user, and another for registering a new user. To keep things simple, the only validation we’ve implemented in this example is achieved through
RequiredFieldValidator controls.
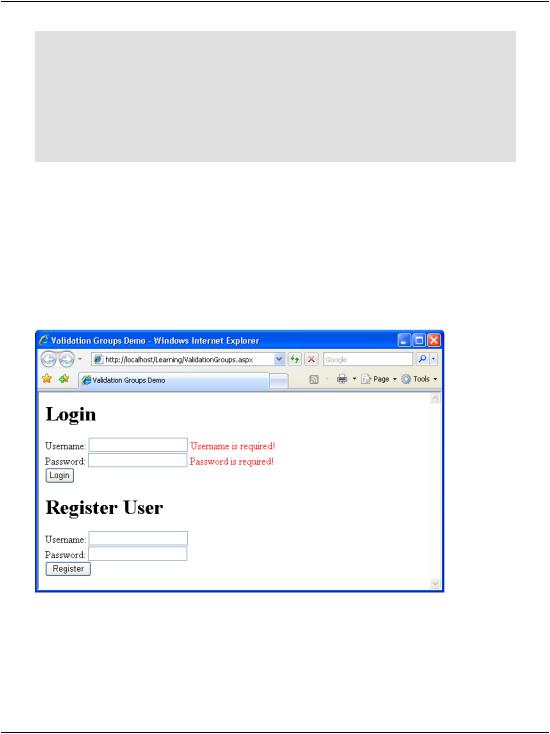
Clicking the Log In button triggers only those validators that share that button’s ValidationGroup setting, as Figure 6.10 indicates.
Figure 6.10. Triggering the Login ValidationGroup
Likewise, clicking the Register button triggers the second set of validators, and deactivates the first, as Figure 6.11 shows.
244
Updating Dorknozzle
Default Validation Groups
Controls that aren’t specifically assigned to any validation group are aggregated into a default validation group. In other words, a button that isn’t assigned to any validation group will trigger only those validation controls that aren’t assigned to any groups.
Finally, remember that Page.IsValid returns the results of the current validation group (i.e. the one that caused the server-side event). To verify the validity of another group on the page, we use the Page.Validate method, which can receive as parameter the name of the validation group to be validated.
Figure 6.11. Activating the RegisterValidationGroup
Updating Dorknozzle
Now that you’ve spent some time with validation controls, let’s use them to update Dorknozzle’s Help Desk page. The following rules must be met before the user can submit a new help desk request:
The station number text box cannot be empty.
The station number must be a valid number.
245

Chapter 6: Using the Validation Controls
The station number must be a numeral between 1 and 50.
A description of the problem must be entered.
To make changes to the help desk page, you first need to load the Dorknozzle project in Visual Web Developer. Go to File > Open Web Site… and select the Dorknozzle project.
Loading Multiple Projects
Did you know that you can work with multiple projects at the same time? You can launch multiple instances of Visual Web Developer and load a different web application in each of them.
After Dorknozzle loads, open HelpDesk.aspx in the editor and make the following changes to the file:
File: HelpDesk.aspx (excerpt)
<%@ Page Language="VB" MasterPageFile="~/Dorknozzle.master" AutoEventWireup="false" CodeFile="HelpDesk.aspx.vb" Inherits="HelpDesk" title="Dorknozzle Help Desk" %>
<asp:Content ID="Content1" ContentPlaceHolderID="ContentPlaceHolder1" Runat="Server">
<h1>Employee Help Desk Request</h1> <p>
Station Number:<br />
<asp:TextBox id="stationTextBox" runat="server" CssClass="textbox" />
<asp:RequiredFieldValidator id="stationNumReq" runat="server" ControlToValidate="stationTextBox"
ErrorMessage="<br />You must enter a station number!" Display="Dynamic" />
<asp:CompareValidator id="stationNumCheck" runat="server" ControlToValidate="stationTextBox" Operator="DataTypeCheck" Type="Integer" ErrorMessage="<br />The value must be a number!" Display="Dynamic" />
<asp:RangeValidator id="stationNumRangeCheck" runat="server" ControlToValidate="stationTextBox"
MinimumValue="1" MaximumValue="50" Type="Integer" ErrorMessage="<br />Number must be between 1 and 50." Display="Dynamic" />
</p>
<p>
Problem Category:<br />
246

Updating Dorknozzle
<asp:DropDownList id="categoryList" runat="server" CssClass="dropdownmenu" />
</p>
<p>
Problem Subject:<br />
<asp:DropDownList id="subjectList" runat="server" CssClass="dropdownmenu" />
</p>
<p>
Problem Description:<br />
<asp:TextBox id="descriptionTextBox" runat="server" CssClass="textbox" Columns="40" Rows="4" TextMode="MultiLine" />
<asp:RequiredFieldValidator id="descriptionReq" runat="server" ControlToValidate="descriptionTextBox"
ErrorMessage="<br />You must enter a description!" Display="Dynamic" />
</p>
<p>
<asp:Button id="submitButton" runat="server" CssClass="button" Text="Submit Request" />
</p>
</asp:Content>
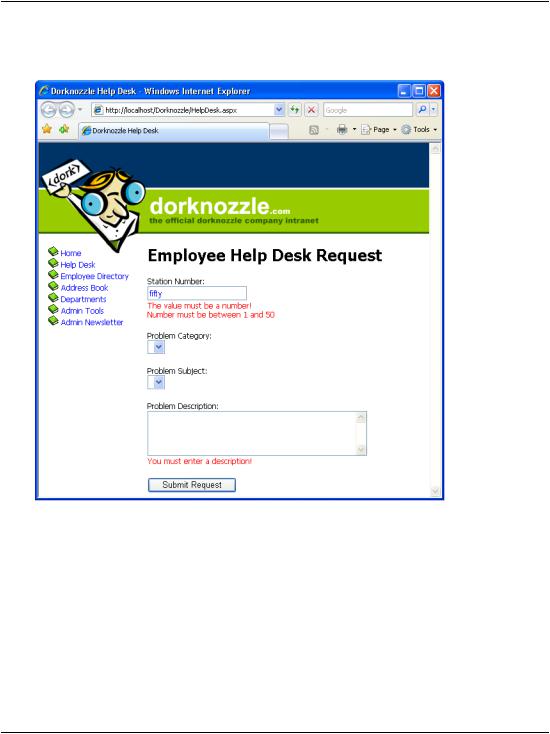
Now execute the project, and select the Help Desk page from the menu. Clicking
Submit without entering valid data triggers the validation controls, as Figure 6.12 shows.
247
Chapter 6: Using the Validation Controls
Figure 6.12. Validation controls in action on the Dorknozzle Help Desk
Right now, we’re not doing anything with the data that’s been entered, but we’ll take care of that in following chapters. When we finally do something with this data, we don’t want our server-side code to try to work with invalid data. Let’s add the safety check to the server side as well, to make sure we have a solid foundation from which to start developing our server-side functionality in the next chapters.
Stop the project from within Visual Web Developer, and open HelpDesk.aspx in Design View. There, double-click the Submit Request button to have its Click event handler generated for you.
248
Updating Dorknozzle
Complete the automatically generated code as shown below:
Visual Basic File: HelpDesk.aspx.vb (excerpt)
Protected Sub submitButton_Click(ByVal sender As Object, _
|
ByVal e As System.EventArgs) Handles submitButton.Click |
|
If Page.IsValid Then |
|
' Code that uses the data entered by the user |
|
End If |
End Sub |
|
C# |
File: HelpDesk.aspx.cs (excerpt) |
protected void submitButton_Click(object sender, EventArgs e)
{
if (Page.IsValid)
{
// Code that uses the data entered by the user
}
}
Up to this point, we’ve only discussed one way of tying a control’s event to an event handler method. This approach involves setting a property, such as OnClick, on the control, as shown here:
C# File: HelpDesk.aspx (excerpt)
<asp:Button id="submitButton" runat="server" CssClass="button" Text="Submit Request" OnClick="submitButton_Click" />
This property causes ASP.NET to call a method named submitButton_Click whenever this button is clicked. If you’re using C#, you’ll see that Visual Web
Developer added this property to submitButton when it generated your event handler, as is shown above.
However, if you’re using VB, this property is not added. Instead, Visual Web Developer uses the VB-specific keyword Handles, followed by the name of the control that’s responsible for raising the event, and finally the name of the event that’s being handled (in our case, submitButton.Click). This generated code is shown below:
Visual Basic |
File: HelpDesk.aspx.vb (excerpt) |
|
|
Protected |
Sub submitButton_Click(ByVal sender As Object, _ |
ByVal |
e As System.EventArgs) Handles submitButton.Click |
|
|
This is simply an alternative way of tying this method to the submitButton control’s Click event.
249