


Enforcing Validation on the Server
JavaScript can be disabled in any browser, so client-side validation cannot be relied upon—we must always validate any submitted data on the server.
A nice feature of ASP.NET 2.0 is that we can make it set the focus automatically to the first input control that causes a validation error. We activate this feature by setting the SetFocusOnError property of the validation control to True. Our simple example offers two RequiredFieldValidation controls that we can update. Let’s do that now:
File: Login.aspx (excerpt)
<!-- Username --> <p>
Username:<br />
<asp:TextBox id="usernameTextBox" runat="server" /> <asp:RequiredFieldValidator id="usernameReq" runat="server"
ControlToValidate="usernameTextBox" ErrorMessage="Username is required!"
SetFocusOnError="True" />
</p>
<!-- Password --> <p>
Password:<br />
<asp:TextBox id="passwordTextBox" runat="server" TextMode="Password" />
<asp:RequiredFieldValidator id="passwordReq" runat="server" ControlToValidate="passwordTextBox" ErrorMessage="Password is required!"
SetFocusOnError="True" />
</p>
If you make the changes highlighted in bold above, and load the page again, pressing the Submit button when a text box is empty will cause the empty text box to gain focus. If both text boxes are empty, the first one will receive focus.
Enforcing Validation on the Server
Validation is critical in circumstances in which users’ submission of invalid data could harm your application. There are many circumstances where processing bad input data could have negative effects—for instance, it could produce runtime errors, or cause bad data to be stored in your database.
To get a clear idea of these implications, let’s add to the login page some serverside code that uses the data input by the visitor. The typical point at which visitor data is used in a login page is the Click event handler of the Submit button. Add
223
Chapter 6: Using the Validation Controls
the OnClick property to the Button control, and give it the value submitButton_Click. This mimics what Visual Web Developer would do if you doubleclicked the button in Design View.
<!-- Submit Button --> <p>
<asp:Button id="submitButton" runat="server" Text="Submit"
OnClick="submitButton_Click" />
</p>
Next, create the submitButton_Click subroutine. You can add this between
<script runat="server"> and </script> tags in the head of the web form, or place it in a code-behind file. If Visual Web Developer generates these stubs for you, they may appear a little differently than they’re presented here:
Visual Basic |
File: Login.aspx (excerpt) |
Protected Sub submitButton_Click(s As Object, e As EventArgs) submitButton.Text = "Clicked"
End Sub
C# |
File: Login.aspx (excerpt) |
protected void submitButton_Click(object sender, EventArgs e)
{
submitButton.Text = "Clicked";
}
Now, if you’re trying to submit invalid data using a browser that has JavaScript enabled, this code will never be executed. However, if you disable your browser’s
JavaScript, you’ll see the label on the Button control change to Clicked! Obviously, this is not an ideal situation—we’ll need to do a little more work to get validation working on the server side.
Disabling JavaScript in Firefox
To disable JavaScript in Firefox, go to Tools > Options…, click the Content tab and uncheck the Enable JavaScript checkbox.
Disabling JavaScript in Opera
To disable JavaScript in Opera, go to Tools > Preferences…, click the Advanced tab, select Content in the list on the left, and uncheck the Enable JavaScript checkbox.
224
Enforcing Validation on the Server
Disabling JavaScript in Internet Explorer
To disable JavaScript in Internet Explorer, go to Tools > Internet Options… and click the Security tab. There, select the zone for which you’re changing the settings (the zone will be shown on the right-hand side of the browser’s status bar—it will likely be Local Intranet Zone if you’re developing on the local machine) and press Custom Level…. Scroll down to the Scripting section, and check the Disable radio button for Active Scripting.
ASP.NET makes it easy to verify on the server side if the submitted data complies to the validator rules without our having to write very much C# or VB code at all. All we need to do is to check the Page object’s IsValid property, which only returns True if all the validators on the page are happy with the data in the controls they’re validating. This approach will always work, regardless of which web browser the user has, or the settings he or she has chosen.
Let’s add this property to our Click event handler:
Visual Basic |
File: Login.aspx (excerpt) |
Protected Sub submitButton_Click(s As Object, e As EventArgs) If Page.IsValid Then
submitButton.Text = "Valid" Else
submitButton.Text = "Invalid!" End If
End Sub
C# |
File: Login.aspx (excerpt) |
protected void submitButton_Click(object s, EventArgs e)
{
if(Page.IsValid)
{
submitButton.Text = "Valid";
}
else
{
submitButton.Text = "Invalid!";
}
}
Load the page again after disabling JavaScript, and press the Submit button without entering any data in the text boxes. The text label on the button should change, as shown in Figure 6.2.
225

Chapter 6: Using the Validation Controls
Figure 6.2. Server validation failed
As you can see, the text on the button changed to a message that reflects the fact that Page.IsValid returned False. The validator controls also display the error messages, but only after a round-trip with the server. If JavaScript were enabled, the validator controls would prevent the page from submitting, so the code that changes the Button’s text wouldn’t execute.
If you use validation controls, and verify on the server that Page.IsValid is True before you use any of the validated data, you have a bulletproof solution that’s guaranteed to avoid bad data entering your application through any browser. JavaScript-enabled browsers will deliver an improved user experience by allowing client-side validation to take place, but server-side validation ensures that, ultimately, the functionality is the same regardless of your users’ browser settings.
Using CausesValidation
There are cases in which you might decide to disable validation when a certain event is triggered. For example, imagine you have a registration page that contains two buttons: Submit, and Cancel. You’d probably want the Cancel button to work regardless of whether valid data has been entered, otherwise users won’t be able to cancel the process before typing in some valid data! You can make Cancel work at all times by setting the CausesValidation property of the button to False.
One thing to note about validator controls is that, by default, they take up space in your web form. To illustrate this point, let’s add a password confirmation text box just after the password text box’s RequiredFieldValidator:
226
Enforcing Validation on the Server
File: Login.aspx (excerpt)
<p>
Username:<br />
<asp:TextBox id="usernameTextBox" runat="server" /> <asp:RequiredFieldValidator id="usernameReq" runat="server"
ControlToValidate="usernameTextBox" ErrorMessage="Username is required!" SetFocusOnError="True" />
</p>
<!-- Password --> <p>
Password and Confirmation:<br />
<asp:TextBox id="passwordTextBox" runat="server" TextMode="Password" />
<asp:RequiredFieldValidator id="passwordReq" runat="server" ControlToValidate="passwordTextBox" ErrorMessage="Password is required!" SetFocusOnError="True" />
<asp:TextBox id="confirmPasswordTextBox" runat="server" TextMode="Password" />
<asp:RequiredFieldValidator id="confirmPasswordReq" runat="server" ControlToValidate="confirmPasswordTextBox" ErrorMessage="Password confirmation is required!" SetFocusOnError="True" />
</p>
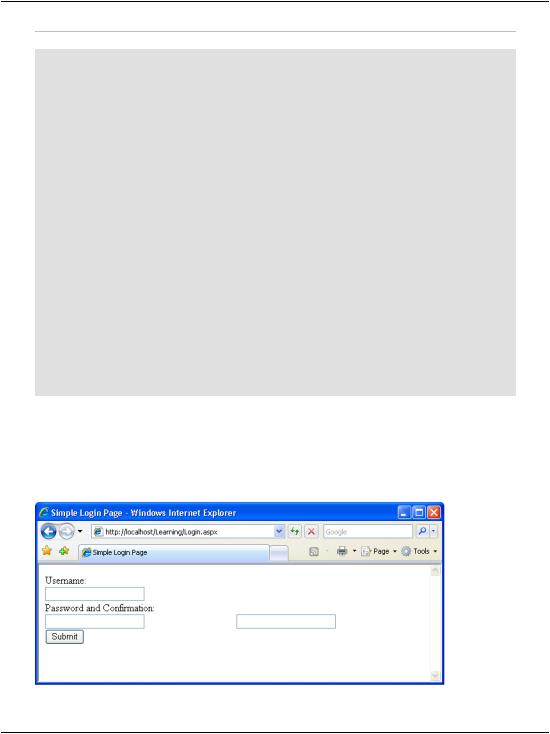
Load this page and you’ll see that the new confirmPasswordTextBox control appears after the space that’s reserved for the RequiredFieldValidator control, as Figure 6.3 illustrates.
Figure 6.3. The RequiredValidatorControl taking up space
227

Chapter 6: Using the Validation Controls
As you can see, ASP.NET reserves space for its validator controls by default. However, we can change this using the Display property, which can take any one of the values None, Static, or Dynamic:
None
None makes the validator invisible—no space is reserved, and the error message is never shown. You may want to set this option when using the ValidationSummary control (which we’ll cover later) to display a list of validation errors for the entire page, in which case you won’t want each validation control to display its own error message separately.
Static
Static is the default display mode. With this mode, the validator occupies space on the generated form even if it doesn’t display anything.
Dynamic
The Dynamic mode causes the validation control to display if any validation errors occur, but ensures that it doesn’t generate any output (including the white space shown in Figure 6.3) if the validation is passed.
In the code below, the Display property is set to Dynamic. If we set this property for all of the validation controls in our page, the two password TextBox controls will appear side by side until one of them fails validation.
File: Login.aspx (excerpt)
<!-- Password --> <p>
Password and Confirmation:<br />
<asp:TextBox id="passwordTextBox" runat="server" TextMode="Password" />
<asp:RequiredFieldValidator id="passwordReq" runat="server" ControlToValidate="passwordTextBox" ErrorMessage="Password is required!" SetFocusOnError="True" Display="Dynamic" />
<asp:TextBox id="confirmPasswordTextBox" runat="server" TextMode="Password" />
<asp:RequiredFieldValidator id="confirmPasswordReq" runat="server" ControlToValidate="confirmPasswordTextBox" ErrorMessage="Password confirmation is required!" SetFocusOnError="True" Display="Dynamic" />
</p>
228