
- •Table of Contents
- •Preface
- •What is ASP.NET?
- •Installing the Required Software
- •Installing the Web Server
- •Installing Internet Information Services (IIS)
- •Installing Cassini
- •Installing the .NET Framework and the SDK
- •Installing the .NET Framework
- •Installing the SDK
- •Configuring the Web Server
- •Configuring IIS
- •Configuring Cassini
- •Where do I Put my Files?
- •Using localhost
- •Virtual Directories
- •Using Cassini
- •Installing SQL Server 2005 Express Edition
- •Installing SQL Server Management Studio Express
- •Installing Visual Web Developer 2005
- •Writing your First ASP.NET Page
- •Getting Help
- •Summary
- •ASP.NET Basics
- •ASP.NET Page Structure
- •Directives
- •Code Declaration Blocks
- •Comments in VB and C# Code
- •Code Render Blocks
- •ASP.NET Server Controls
- •Server-side Comments
- •Literal Text and HTML Tags
- •View State
- •Working with Directives
- •ASP.NET Languages
- •Visual Basic
- •Summary
- •VB and C# Programming Basics
- •Programming Basics
- •Control Events and Subroutines
- •Page Events
- •Variables and Variable Declaration
- •Arrays
- •Functions
- •Operators
- •Breaking Long Lines of Code
- •Conditional Logic
- •Loops
- •Object Oriented Programming Concepts
- •Objects and Classes
- •Properties
- •Methods
- •Classes
- •Constructors
- •Scope
- •Events
- •Understanding Inheritance
- •Objects In .NET
- •Namespaces
- •Using Code-behind Files
- •Summary
- •Constructing ASP.NET Web Pages
- •Web Forms
- •HTML Server Controls
- •Using the HTML Server Controls
- •Web Server Controls
- •Standard Web Server Controls
- •Label
- •Literal
- •TextBox
- •HiddenField
- •Button
- •ImageButton
- •LinkButton
- •HyperLink
- •CheckBox
- •RadioButton
- •Image
- •ImageMap
- •PlaceHolder
- •Panel
- •List Controls
- •DropDownList
- •ListBox
- •RadioButtonList
- •CheckBoxList
- •BulletedList
- •Advanced Controls
- •Calendar
- •AdRotator
- •TreeView
- •SiteMapPath
- •Menu
- •MultiView
- •Wizard
- •FileUpload
- •Web User Controls
- •Creating a Web User Control
- •Using the Web User Control
- •Master Pages
- •Using Cascading Style Sheets (CSS)
- •Types of Styles and Style Sheets
- •Style Properties
- •The CssClass Property
- •Summary
- •Building Web Applications
- •Introducing the Dorknozzle Project
- •Using Visual Web Developer
- •Meeting the Features
- •The Solution Explorer
- •The Web Forms Designer
- •The Code Editor
- •IntelliSense
- •The Toolbox
- •The Properties Window
- •Executing your Project
- •Using Visual Web Developer’s Built-in Web Server
- •Using IIS
- •Using IIS with Visual Web Developer
- •Core Web Application Features
- •Web.config
- •Global.asax
- •Using Application State
- •Working with User Sessions
- •Using the Cache Object
- •Using Cookies
- •Starting the Dorknozzle Project
- •Preparing the Sitemap
- •Using Themes, Skins, and Styles
- •Creating a New Theme Folder
- •Creating a New Style Sheet
- •Styling Web Server Controls
- •Adding a Skin
- •Applying the Theme
- •Building the Master Page
- •Using the Master Page
- •Extending Dorknozzle
- •Debugging and Error Handling
- •Debugging with Visual Web Developer
- •Other Kinds of Errors
- •Custom Errors
- •Handling Exceptions Locally
- •Summary
- •Using the Validation Controls
- •Enforcing Validation on the Server
- •Using Validation Controls
- •RequiredFieldValidator
- •CompareValidator
- •RangeValidator
- •ValidationSummary
- •RegularExpressionValidator
- •Some Useful Regular Expressions
- •CustomValidator
- •Validation Groups
- •Updating Dorknozzle
- •Summary
- •What is a Database?
- •Creating your First Database
- •Creating a New Database Using Visual Web Developer
- •Creating Database Tables
- •Data Types
- •Column Properties
- •Primary Keys
- •Creating the Employees Table
- •Creating the Remaining Tables
- •Executing SQL Scripts
- •Populating the Data Tables
- •Relational Database Design Concepts
- •Foreign Keys
- •Using Database Diagrams
- •Diagrams and Table Relationships
- •One-to-one Relationships
- •One-to-many Relationships
- •Many-to-many Relationships
- •Summary
- •Speaking SQL
- •Reading Data from a Single Table
- •Using the SELECT Statement
- •Selecting Certain Fields
- •Selecting Unique Data with DISTINCT
- •Row Filtering with WHERE
- •Selecting Ranges of Values with BETWEEN
- •Matching Patterns with LIKE
- •Using the IN Operator
- •Sorting Results Using ORDER BY
- •Limiting the Number of Results with TOP
- •Reading Data from Multiple Tables
- •Subqueries
- •Table Joins
- •Expressions and Operators
- •Transact-SQL Functions
- •Arithmetic Functions
- •String Functions
- •Date and Time Functions
- •Working with Groups of Values
- •The COUNT Function
- •Grouping Records Using GROUP BY
- •Filtering Groups Using HAVING
- •The SUM, AVG, MIN, and MAX Functions
- •Updating Existing Data
- •The INSERT Statement
- •The UPDATE Statement
- •The DELETE Statement
- •Stored Procedures
- •Summary
- •Introducing ADO.NET
- •Importing the SqlClient Namespace
- •Defining the Database Connection
- •Preparing the Command
- •Executing the Command
- •Setting up Database Authentication
- •Reading the Data
- •Using Parameters with Queries
- •Bulletproofing Data Access Code
- •Using the Repeater Control
- •More Data Binding
- •Inserting Records
- •Updating Records
- •Deleting Records
- •Using Stored Procedures
- •Summary
- •DataList Basics
- •Handling DataList Events
- •Editing DataList Items and Using Templates
- •DataList and Visual Web Developer
- •Styling the DataList
- •Summary
- •Using the GridView Control
- •Customizing the GridView Columns
- •Styling the GridView with Templates, Skins, and CSS
- •Selecting Grid Records
- •Using the DetailsView Control
- •Styling the DetailsView
- •GridView and DetailsView Events
- •Entering Edit Mode
- •Using Templates
- •Updating DetailsView Records
- •Summary
- •Advanced Data Access
- •Using Data Source Controls
- •Binding the GridView to a SqlDataSource
- •Binding the DetailsView to a SqlDataSource
- •Displaying Lists in DetailsView
- •More on SqlDataSource
- •Working with Data Sets and Data Tables
- •What is a Data Set Made From?
- •Binding DataSets to Controls
- •Implementing Paging
- •Storing Data Sets in View State
- •Implementing Sorting
- •Filtering Data
- •Updating a Database from a Modified DataSet
- •Summary
- •Security and User Authentication
- •Basic Security Guidelines
- •Securing ASP.NET 2.0 Applications
- •Working with Forms Authentication
- •Authenticating Users
- •Working with Hard-coded User Accounts
- •Configuring Forms Authentication
- •Configuring Forms Authorization
- •Storing Users in Web.config
- •Hashing Passwords
- •Logging Users Out
- •ASP.NET 2.0 Memberships and Roles
- •Creating the Membership Data Structures
- •Using your Database to Store Membership Data
- •Using the ASP.NET Web Site Configuration Tool
- •Creating Users and Roles
- •Changing Password Strength Requirements
- •Securing your Web Application
- •Using the ASP.NET Login Controls
- •Authenticating Users
- •Customizing User Display
- •Summary
- •Working with Files and Email
- •Writing and Reading Text Files
- •Setting Up Security
- •Writing Content to a Text File
- •Reading Content from a Text File
- •Accessing Directories and Directory Information
- •Working with Directory and File Paths
- •Uploading Files
- •Sending Email with ASP.NET
- •Configuring the SMTP Server
- •Sending a Test Email
- •Creating the Company Newsletter Page
- •Summary
- •The WebControl Class
- •Properties
- •Methods
- •Standard Web Controls
- •AdRotator
- •Properties
- •Events
- •BulletedList
- •Properties
- •Events
- •Button
- •Properties
- •Events
- •Calendar
- •Properties
- •Events
- •CheckBox
- •Properties
- •Events
- •CheckBoxList
- •Properties
- •Events
- •DropDownList
- •Properties
- •Events
- •FileUpload
- •Properties
- •Methods
- •HiddenField
- •Properties
- •HyperLink
- •Properties
- •Image
- •Properties
- •ImageButton
- •Properties
- •Events
- •ImageMap
- •Properties
- •Events
- •Label
- •Properties
- •LinkButton
- •Properties
- •Events
- •ListBox
- •Properties
- •Events
- •Literal
- •Properties
- •MultiView
- •Properties
- •Methods
- •Events
- •Panel
- •Properties
- •PlaceHolder
- •Properties
- •RadioButton
- •Properties
- •Events
- •RadioButtonList
- •Properties
- •Events
- •TextBox
- •Properties
- •Events
- •Properties
- •Validation Controls
- •CompareValidator
- •Properties
- •Methods
- •CustomValidator
- •Methods
- •Events
- •RangeValidator
- •Properties
- •Methods
- •RegularExpressionValidator
- •Properties
- •Methods
- •RequiredFieldValidator
- •Properties
- •Methods
- •ValidationSummary
- •Properties
- •Navigation Web Controls
- •SiteMapPath
- •Properties
- •Methods
- •Events
- •Menu
- •Properties
- •Methods
- •Events
- •TreeView
- •Properties
- •Methods
- •Events
- •HTML Server Controls
- •HtmlAnchor Control
- •Properties
- •Events
- •HtmlButton Control
- •Properties
- •Events
- •HtmlForm Control
- •Properties
- •HtmlGeneric Control
- •Properties
- •HtmlImage Control
- •Properties
- •HtmlInputButton Control
- •Properties
- •Events
- •HtmlInputCheckBox Control
- •Properties
- •Events
- •HtmlInputFile Control
- •Properties
- •HtmlInputHidden Control
- •Properties
- •HtmlInputImage Control
- •Properties
- •Events
- •HtmlInputRadioButton Control
- •Properties
- •Events
- •HtmlInputText Control
- •Properties
- •Events
- •HtmlSelect Control
- •Properties
- •Events
- •HtmlTable Control
- •Properties
- •HtmlTableCell Control
- •Properties
- •HtmlTableRow Control
- •Properties
- •HtmlTextArea Control
- •Properties
- •Events
- •Index

Chapter 4: Constructing ASP.NET Web Pages
Web User Controls
As you build real-world projects, you’ll frequently encounter pieces of the user interface that appear in multiple places—headers or footers, navigation links, and login boxes are just a few examples. Packaging their forms and behaviors into your own controls will allow you to reuse these components just as you can reuse ASP.NET’s built-in controls.
Building your own web server controls involves writing advanced VB or C# code, and is not within the scope of this book, but it’s good to know that it’s possible. Creating customized web server controls makes sense when you need to build more complex controls that provide a high level of control and performance, or you want to create controls that can be integrated easily into many projects.
Those of us without advanced coding skills can develop our own controls by creating web user controls. These are also powerful and reusable within a given project; they can expose properties, events, and methods, just like other controls; and they’re easy to implement.
A web user control is represented by a class that inherits from System.Web.UI.UserControl, and contains the basic functionality that you need to extend to create your own controls. The main drawback to using web user controls is that they’re tightly integrated into the projects in which they’re implemented. As such, it’s more difficult to distribute them, or include them in other projects, than it is to distribute or reuse web server controls.
Web user controls are implemented very much like normal web forms—they’re comprised of other controls, HTML markup, and server-side code. The file extension of a web user control is .ascx.
Creating a Web User Control
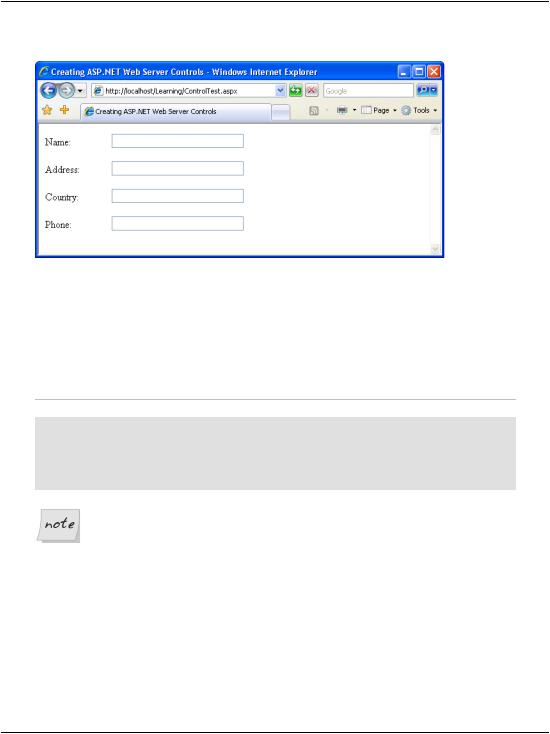
Let’s get a feel for web user controls by stepping through a simple example. Let’s say that in your web site, you have many forms consisting of pairs of Label and TextBox controls, like the one shown in Figure 4.10.
All the labels must have a fixed width of 100 pixels, and the text boxes must accept a maximum of 20 characters.
Rather than adding many labels and text boxes to the form, and then having to set all their properties, let’s make life easier by building a web user control that
126

Creating a Web User Control
Figure 4.10. A simple form
includes a Label of the specified width, and a TextBox that accepts 20 characters; you’ll then be able to reuse the web user control wherever it’s needed in your project.
In your Learning folder, create a new file named SmartBox.ascx. Then, add the control’s constituent controls—a Label control and a TextBox control—as shown below:
File: SmartBox.ascx (excerpt)
<p>
<asp:Label ID="myLabel" runat="server" Text="" Width="100" /> <asp:TextBox ID="myTextBox" runat="server" Text="" Width="200"
MaxLength="20" />
</p>
Label Widths in Firefox
Unfortunately, setting the Width property of the Label control doesn’t guarantee that the label will appear at that width in all browsers. The current version of Firefox, for example, will not display the above label in the way it appears in Internet Explorer.
To get around this, you should use a CSS style sheet and the CssClass property, which we’ll take a look at later in this chapter.
In Chapter 3 we discussed properties briefly, but we didn’t explain how you could create your own properties within your own classes. So far, you’ve worked with
127

Chapter 4: Constructing ASP.NET Web Pages
many properties of the built-in controls. For example, you’ve seen a lot of code that sets the Text property of the Label control.
As a web user control is a class, it can also have methods, properties, and so on. Our SmartBox control extends the base System.Web.UI.UserControl class by adding two properties:
LabelText is a write-only property that allows the forms using the control to set the control’s label text.
Text is a read-only property that returns the text typed by the user in the text box.
Let’s add a server-side script element that will give our control two properties
— one called Text, for the text in the TextBox, and one called LabelText, for the text in the Label:
Visual Basic |
File: SmartBox.ascx (excerpt) |
<script runat="server" language="VB">
Public WriteOnly Property LabelText() As String Set(ByVal value As String)
myLabel.Text = value End Set
End Property
Public ReadOnly Property Text() As String Get
Text = myTextBox.Text End Get
End Property </script>
C# |
File: SmartBox.ascx (excerpt) |
<script runat="server" language="C#"> public string LabelText
{
set
{
myLabel.Text = value;
}
}
public string Text
{
get
{
128

Creating a Web User Control
return myTextBox.Text;
}
}
</script>
Just like web forms, web user controls can work with code-behind files, but, in an effort to keep our examples simple, we aren’t using them here. You’ll meet more complex web user controls in the chapters that follow.
When you use the SmartBox control in a form, you can set its label and have the text entered by the user, like this:
Visual Basic
mySmartBox.LabelText = "Address:" userAddress = mySmartBox.Text
C#
mySmartBox.LabelText = "Address:"; userAddress = mySmartBox.Text;
Let’s see how we implemented this functionality. In .NET, properties can be read-only, write-only, or read-write. In many cases, you’ll want to have properties that can be both read and write, but in this case, we want to be able to set the text of the inner Label, and to read the text from the TextBox.
To define a write-only property in VB, you need to use the WriteOnly modifier. Write-only properties need only define a special block of code that starts with the keyword Set. This block of code, called an accessor, is just like a subroutine that takes as a parameter the value that needs to be set. The block of code uses this value to perform the desired action—in the case of the LabelText property, that action sets the Text property of our Label control, as shown below:
Visual Basic |
File: SmartBox.ascx (excerpt) |
|
|
Public WriteOnly Property LabelText() As String |
|
Set(ByVal value As String) |
|
myLabel.Text = value |
|
End Set |
|
End Property |
|
Assuming that a form uses a SmartBox object called mySmartBox, we could set the Text property of the Label like this:
Visual Basic
mySmartBox.LabelText = "Address:"
129

Chapter 4: Constructing ASP.NET Web Pages
When this code is executed, the Set accessor of the LabelText property is executed with its value parameter set to Address:. The Set accessor uses this value to set the Text property of the Label.
The other accessor you can use when defining properties is Get; this allows us to read values instead of writing them. Obviously, you aren’t allowed to add a Get accessor to a WriteOnly property, but one is required for a ReadOnly property, such as Text:
Visual Basic |
File: SmartBox.ascx (excerpt) |
|
|
Public ReadOnly Property Text() As String |
|
Get |
|
Text = myTextBox.Text |
|
End Get |
|
End Property |
|
|
|
The Text property is ReadOnly, but it doesn’t need to be. If you wanted to allow the forms using the control to set some default text to the TextBox, you’d need to add a Set accessor, and remove the ReadOnly modifier.
When defining a property in C#, you don’t need to set any special modifiers, such as ReadOnly or WriteOnly, for read-only or write-only properties. A property that has only a get accessor will, by default, be considered read-only:
C# |
File: SmartBox.ascx (excerpt) |
public string Text
{
get
{
return myTextBox.Text;
}
}
Likewise, a property that has only a set accessor will be considered to be writeonly:
C# |
File: SmartBox.ascx (excerpt) |
public string LabelText
{
set
{
myLabel.Text = value;
}
}
130