

C++ For Mathematicians (2006) [eng]
.pdf386 C++ for Mathematicians
}
void Polygon::move_vertex(int j, Point P) {
// If the index is invalid, no action is taken if ( (j<0) || (j >= np) ) return;
vertices[j] = P;
}
double Polygon::perimeter() const {
// The perimeter is zero unless we have at least two points if (np <= 1) return 0.;
double ans = 0.; // place to accumulate the distances
//add up the distances between successive vertices for (int k=0; k<np-1; k++) {
ans += dist(vertices[k],vertices[k+1]);
}
//Add in the distance between the first and last points ans += dist(vertices[0], vertices[np-1]);
return ans;
}
The only Doxygen comments in Polygon.cc are to document the file. Other, ordinary comments are included to clarify the code to a human reader.
B.2 Using Doxygen
If Doxygen is not already installed on your computer, download it from its Web site (www.doxygen.org) and install it according the instructions found there.
You should also collect all the files for your project into a single folder (directory) on your computer. You probably have done this already.
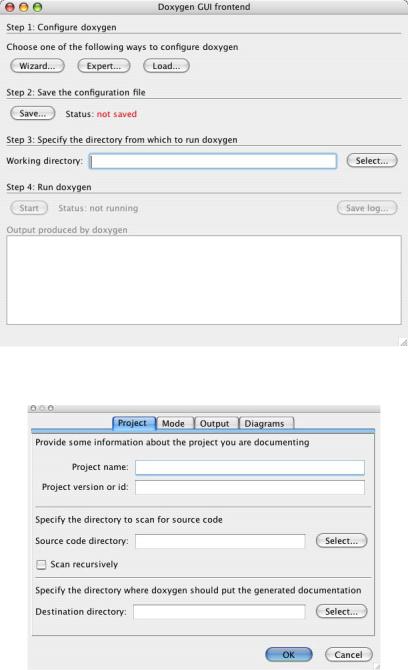
Now launch the Doxygen tool. You are presented with a graphical user interface (“GUI”) window that specifies the easy steps for you to follow. See Figure B.1.
B.2.1 Configuring Doxygen
The first step is to configure Doxygen. In the configuration process you set various options (and I’ll give you recommendations on what to select) and then save the configuration as a file named Doxyfile.
To begin the configuration process, click the Wizard. . . button. A new window opens with four tabs. See Figure B.2. The four tabs are named Project, Mode, Output, and Diagrams. Here’s how to complete each of these pages.
388 |
C++ for Mathematicians |
•On the Project page, type in a name for your project in the first field. If you desire, you can specify a project version in the second field.
Next you specify the location of the source code (i.e., the full path name of the folder containing your .cc and .h files). Either type in the full path to your source folder in the text field, or use the first Select. . . button to navigate to the directory (and the Wizard fills in the field for you).
If your source code is organized into various subfolders, check the Scan recursively box. Otherwise, you can leave this unchecked.
Finally, specify the destination directory. This is the directory in which the beautifully formatted documentation is to reside. If you wish, this can be the same directory as the source code. As needed, Doxygen creates subdirectories in which it places the documentation. For example, it creates an html subfolder for the Web pages.
•Now click to the Mode page. In the top portion, select the All entities button. This tells Doxygen to create documentation for all parts of your program including private data members, and so on.
Check the Include cross-referenced source code in the output box. This causes Doxygen to create Web pages that show your source code. (You can click on the documentation to look at the source code and click inside the source code to go back to the documentation. This is a handy feature.)
Finally, click the Optimize for C++ output button.
•Now click to the Output page. Check the HTML box. Under that box either select plain HTML or with frames and navigation tree. If you are only building documentation for one procedure or a small class, then the plain HTML option is sufficient. However, if the project has more than one source file, select the with frames option.
For now, leave the other options (LaTeX, Man pages, Rich Text Format, and XML) unchecked. Later, if you wish to explore these other output formats, you can change your selection.
•Finally, click to the Diagrams page. For now, select the No diagrams option. Later, you can explore the different kinds of diagrams that Doxygen can create for you.
You are now finished using the Wizard, so click OK to return to the main Doxygen GUI window.
You now proceed to Step 2 on the GUI: save the configuration file. When you click Save. . . you will be prompted to save the configuration in a directory. Choose the same directory as your code and use the file name Doxyfile.
Doxygen is now configured for your project. All of Doxygen’s settings are saved in the file named Doxyfile in the same directory as your source code.
Documentation with Doxygen |
389 |
If, after you have saved the Doxyfile, you wish to modify your settings, select Load. . . in the Doxygen GUI to select the Doxyfile you wish to modify, and then use Wizard. . . to choose the new options. If you want finer control, you may modify the settings using the Expert. . . button.
You are now ready to run Doxygen to generate the Web pages.
B.2.2 Running Doxygen
Continuing in the Doxygen GUI, Step 3 asks for a directory in which Doxygen is to run. Use the Select. . . button to navigate to the same directory that holds the code and holds the Doxyfile configuration file.
Finally, press the Start button in Step 4. If all is well, a subfolder is created named html into which the Web pages for your documentation are deposited. Open this folder and double-click on index.html. You are greeted by a main page from which you can explore all the documented files, classes, procedures (functions), methods, and so forth.
If there are mistakes in the formatting of your Doxygen comments, error messages appear in the box labeled Output produced by doxygen in the main GUI window.
B.2.3 More features
In this brief introduction to Doxygen we presented just a few of the documentation tags available. Reviewing tersely, we have seen:
•@file and @brief document the overall purpose of a file, and
•@param and @return to document the inputs and outputs of procedures and methods.
Doxygen provides many other tags and we mention just a few of them here.
•Cross references. Doxygen provides a tag named @see that you can use to insert a cross-reference to another procedure or method.
•Sample code. It is useful to include a snippet of C++ code to illustrate how a procedure is used. To do this, enclose the code fragment between @code and @endcode, like this:
/// Find the median /**
*This procedure finds the median value in an array of numbers.
*@code
*double* values;
*// allocate and populate the values array
*m = median(values, n);
*@endcode
*@param vals array of real numbers
*@param nels number of elements in the array
*@return the median value in the array

392 |
C++ for Mathematicians |
Character strings are handled most conveniently using the standard string class (see Chapter 14); use the header #include <string>.
There is a variety of standard classes for input/output (see Chapter 14) and to serve as containers (see Chapter 8).
C.1.3 Declaring variables
The simplest declaration statement specifies the type of a variable: int j;. Two or more variables of the same type may be declared in a single statement:
long a,b;.
A variable may be given an initial value when it is declared: double x = 3.5;. A variable declared using a template class should include the type parameters
between < and > symbols, like this: complex<double> z;.
Class variables often take arguments (sent to the constructor methods) when declared: Mod a(3,10);.
There are three natural locations for a variable declaration.
• Inside the body of a procedure (such as main or a class method). For example,
int main() { double x;
...
}
• Inside the declaration of a procedure or method. For example,
long gcd(long a, long b) {
...
}
• Inside a looping control structure. For example,
for (int k=0; k<10; k++) { cout << k << endl;
}
C.1.4 Static variables and scope
Variables are created when they are declared and are lost when the section of the program in which they are declared finishes. Two different procedures (say, alpha and beta) may both declare a variable named x, but alpha’s x and beta’s x have nothing to do with each other. All variables are local to the procedure in which they are declared. (It is possible, but ill advised, to create global variables in C++. We don’t discuss how.)
When a procedure finishes, the values held in its variables are lost unless the variables are declared static. In this case, the value held in the variable is retained between calls to the procedure.

C++ Reference |
395 |
C.2.5 Bit operators
The individual bits in an integer variable can be manipulated using the following operators,
& | ˜ ˆ << >>
These are (bitwise) and, or, not, exclusive or, left shift, and right shift.
C.2.6 Potpourri
Square brackets are the subscript operator, used to access elements of an array. The first element of an array has index 0.
Parentheses are used for grouping, but also indicate the invocation of a procedure or method: y = alpha(x,n);.
Dot (.) is the member-of operator used to specify a data member of method of a class: x.size() or thing.first.
The question mark/colon trigraph is an abbreviated if/then statement. The statement a=q?b:c; assigns the value of b to a if q is true; otherwise (q is false) it assigns the value of c to a.
The keyword sizeof is an operator that returns the number of bytes required to hold a type; for example, sizeof(double).
The comma is used for separating procedure arguments and when declaring more than one variable of a given type (e.g., double x,y;). It also has the obscure purpose of combining two (or more) expressions into a single statement. For example, in a for loop, if we want to initialize two counters, we may have a code such as this:
int a, b;
for (a=N,b=0; a-b>0; a--,b++) { // stuff to do
}
This initializes a with the value held in N and b with 0.
The following operators are for working with pointers.
Ampersand is the address-of operator. If x is an int variable, then &x returns a pointer to x of type int*. The ampersand is also used to specify call-by-reference semantics in procedures.
Asterisk is the pointer dereferencing operator. If p is a pointer to an integer value, then *p is the value held in the location pointed to by p.
The arrow operator, ->, combines the action of . and *. For example, if p is a pointer to an object, then p->x is equivalent to (*p).x (the data element x of the object p points to) and p->alpha() is equivalent to (*p).alpha() (invoke method alpha on the object pointed to by p).