

20411B-ENU-TrainerHandbook
.pdfAdministering Windows Server® 2012 7-19
Lesson 3 |
MCT |
|
Overview of Network Policies |
||
|
Network policies determine whether a connection attempt is successful. If the connection attempt is USE successful, then the network policy also defines connection characteristics, such as day and time
restrictions, session idle-disconnect times, and other settings.
Understanding how to configure network policies is essential if you are to successfully implement VPNs based on the Network Policy and Access Services server role within your organization.
Lesson Objectives
After completing this lesson, you will be able to: |
ONLY |
||||
|
|
|
|||
• Describe what a network policy is. |
|
|
|||
• Describe network policy processing. |
. |
||||
• Describe the process for creating a new network policy. |
|||||
• Explain how to create a network policy for VPN connections. |
|
STUDENT |
|||
What Is a Network Policy? |
|
||||
A network policy is a set of conditions, constraints, |
|
|
|||
|
|
||||
and settings that enable you to designate who is |
|
|
|||
authorized to connect to the network, and the |
|
|
|||
circumstances under which they can or cannot |
|
|
|||
connect. Additionally, when you deploy NAP, |
|
|
|||
health policy is added to the network policy |
|
|
|||
configuration so that NPS performs client health |
|
|
|||
checks during the authorization process. |
|
|
|||
|
|
|
|||
You can view network policies as rules: each |
|
|
|
||
rule has a set of conditions and settings. NPS |
|
|
|
||
compares the rule’s conditions to the properties |
|
|
|
||
of connection requests. If a match occurs between |
|
USE |
|||
the rule and the connection request, then the settings that you define in the rule are applied to the |
|||||
PROHIBITED |
|||||
connection. |
|||||
|
|
|
|||
|
|
|
|||
When you configure multiple network policies in NPS, they are an ordered set of rules. NPS checks each connection request against the list’s first rule, then the second, and so on, until a match is found.
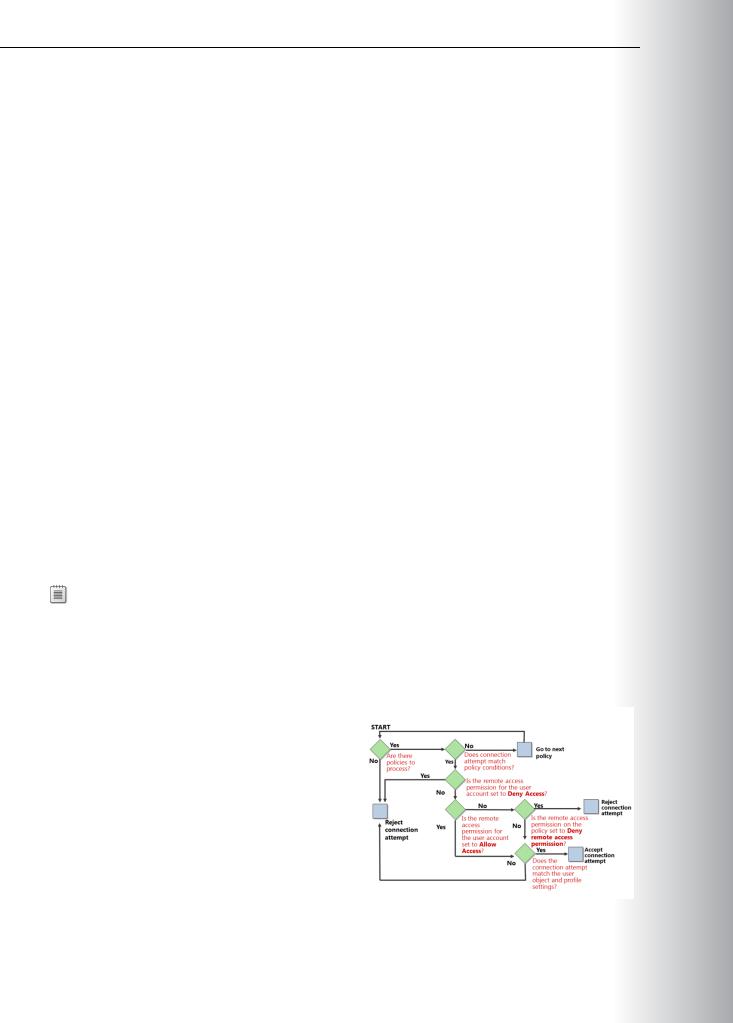

•If the dial-in properties of the user account are set to deny access, NPS rejects the connection request.MCT
Process for Creating and Configuring a Network Policy
NPS uses network policies and the dial-in |
|
|
USE |
|
|
|
|||
properties of user accounts to determine |
|
|
||
whether to authorize a connection request to your |
|
|
||
network. You can configure a new network policy |
|
|
.ONLY |
|
in either the NPS MMC snap-in, or the Routing |
|
|
||
and Remote Access Service MMC snap-in. |
|
|
||
Creating Your Policy |
|
|
||
When you use the New Network Policy Wizard |
|
|
||
to create a network policy, the value that you |
|
|
||
specify as the network connection method is |
|
|
||
used automatically to configure the Policy |
|
|
||
|
|
|
||
|
|
|
||
Type condition. If you keep the default value of |
|
|
||
Unspecified, NPS evaluates the network policy that you create for all network connection types through |
|
|
||
any type of network access server. If you specify a network connection method, NPS evaluates the |
|
|
||
network policy only if the connection request originates from the type of network access server that you |
||||
specify. |
STUDENT |
|||
For example, if you specify Remote Desktop Gateway, NPS evaluates the network policy only for |
||||
|
|
|||
connection requests that originate from Remote Desktop Gateway servers.
On the Specify Access Permission page, you must select Access granted if you want the policy to allow users to connect to your network. If you want the policy to prevent users from connecting to your network, select Access denied. If you want user account dial-in properties in AD DS to determine access permission, you can select the Access is determined by User Dial-in properties check box. This setting overrides the NPS policy.
Configuring Your Policy
•
•
• Access Permission. Designate whether the policy grants or denies access. Also, specify whether NPS should ignore the dial-in properties of user accounts in AD DS when using the policy to perform the connection attempt’s authorization.
•
Once you have created your network policy, you can use the network policy’s Properties dialog box to |
USE |
|
view or modify its settings. |
||
Network Policy Properties - Overview Tab |
||
|
||
From the Overview tab of the network policy’s Properties dialog box, or while running the New Network |
||
Policy Wizard, you can configure the following settings: |
PROHIBITED |
|
|
||
o Unspecified. If you select Unspecified, NPS evaluates the network policy for all connection requests that originate from any type of network access server, and for any connection method.

7-22 Configuring and Troubleshooting Remote Access |
MCT |
||
|
|
||
|
|
|
|
o Remote Access Server (VPN-Dial-up). If you specify Remote Access Server (VPN-Dial-up), |
|
|
|
NPS evaluates the network policy for connection requests that originate from a computer that |
|
|
|
is running Routing and Remote Access service configured as a dial-up or VPN server. If another |
USE |
||
dial-up or VPN server is used, the server must support both the RADIUS protocol and the |
|||
authentication protocols that NPS provides for dial-up and VPN connections. |
|||
|
|
||
o DHCP Server. If you specify DHCP Server, NPS evaluates the network policy for connection |
|
|
|
requests that originate from servers that are running DHCP. |
|
|
|
o Health Registration Authority. If you specify Health Registration Authority, NPS evaluates |
.ONLY |
||
the network policy for connection requests that originate from servers that are running Health |
|||
|
|
||
Registration Authority. |
|
|
|
o HCAP server. If you specify HCAP server, NPS evaluates the network policy for connection |
|
|
|
requests that originate from servers that are running HCAP. |
|
|
|
Network Policy Properties - Conditions Tab |
|
|
|
You must configure at least one condition for every network policy. You do this on the network policy’s |
|
|
|
Properties dialog box Conditions tab. From this tab, NPS provides many condition groups, which allow |
|
|
|
•Groups. These specify user or computer groups that you configure in AD DS and to which you want STUDENT the other rules of the network policy to apply, when group members attempt to connect to the
network.
•Host Credential Authorization Protocol (HCAP). These conditions are used only when you want to integrate your NPS NAP solution with Cisco Network Admission Control. To use these conditions, you must deploy Cisco Network Admission Control and NAP. You also must deploy a HCAP server that is running Internet Information Services (IIS) and NPS.
•Day and Time Restrictions. The Day and Time Restrictions condition allows you to specify, at a weekly interval, whether to allow connections on a specific set of days and times.
•NAP. Settings include Identity Type, MS-Service Class, NAP-Capable Computers, Operating System, USE and Policy Expiration.
•Connection Properties. Settings include Access Client IPv4 Address, Access Client IPv6 Address, Authentication Type, Allowed EAP Types, Framed Protocol, Service Type, and Tunnel Type.
•RADIUS Client Properties. Settings include Calling Station ID, Client Friendly Name, Client IPv4
•Address, Client IPv6 Address, Client Vendor, and MS RAS Vendor. PROHIBITED Gateway. Settings include Called Station ID, NAS Identifier, NAS IPv4 Address, NAS IPv6 Address, and
NAS Port Type.


Administering Windows Server® 2012 7-25
Lesson 4 |
MCT |
|
Troubleshooting Routing and Remote Access |
||
|
Troubleshooting the Routing and Remote Access Service can be a time-consuming task. The issues might be varied and not easily identifiable. Given that you might be using dial-up, dedicated, leased, or public-
based networks to satisfy your remote connectivity solution, you must perform troubleshooting in a |
USE |
|||||
methodical, systematic process. |
|
|
||||
|
|
|
||||
In some cases, you can identify and resolve the problem quickly, while other cases might test your |
|
|
|
|||
understanding of all the available tools to help you determine the issue’s source and resolve it in a timely |
||||||
fashion. |
|
|
ONLY |
|||
Lesson Objectives |
|
|
||||
After completing this lesson, you will be able to: |
||||||
|
|
|
||||
• Describe how to configure remote access logging. |
. |
|||||
• Describe how to configure remote access tracing. |
||||||
|
|
|
||||
• Explain how to resolve general VPN connectivity problems. |
|
|
|
|||
• Explain how to troubleshoot other common remote access issues. |
|
|
|
|||
Configuring Remote Access Logging |
|
|
|
|||
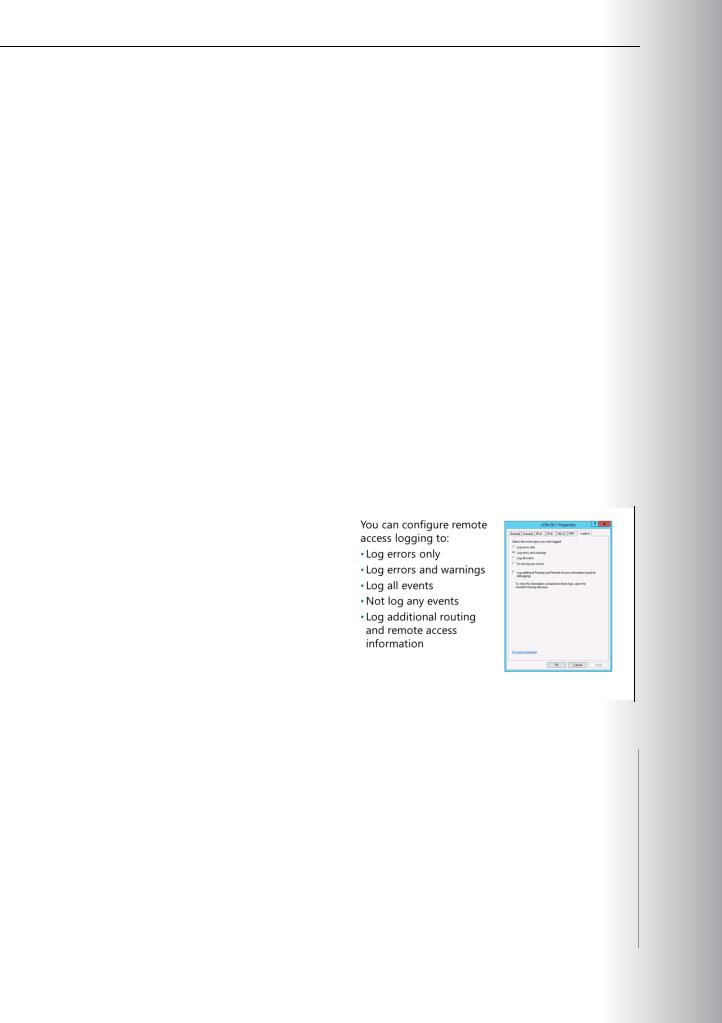
To configure remote-access logging, open the |
|
|
|
|
||
|
|
STUDENT |
||||
Routing and Remote Access console, right-click |
|
|
||||
servername, and then click Properties. Click the |
|
|
||||
Logging tab to view the available options for, and |
|
|
||||
the location of the tracing log. |
|
|
|
|||
|
|
|
|
|||
Initially, it might be best to specify more logging |
|
|
USE |
|||
options than you might necessarily need, rather |
|
|
||||
than specifying too few options. Once you |
|
|
||||
determine the logging level that is most useful |
|
|
||||
for troubleshooting your infrastructure, you can |
|
|
||||
change the options and/or level of logging at |
|
|
||||
|
|
|
|
|||
your discretion. |
|
|
|
|
|
|
|
|
|
|
|
||
Four logging levels are available on the Logging tab, as described in the following table. |
|
|
|
|||
|
|
|
|
|
||
Dialogue box option |
Description |
|
|
|
||
|
|
|
||||
|
|
|
|
|
|
|
Log Errors Only |
Specifies that only errors are logged in the system log in Event |
|
|
|
||
|
Viewer. |
|
|
|
||
|
|
|
||||
Log Errors and Warnings |
Specifies that errors and warnings are both logged in the system log |
|
||||
|
in Event Viewer. |
|
|
|
||
|
|
|
|
|
||
Log all events |
Specifies that the maximum amount of information is logged in the |
|
|
|
||
|
system log in Event Viewer. |
|
|
|
||
|
|
|
||||
Do not log any events |
Specifies that no events are logged in the system log in Event Viewer. |
|
||||
|
|
|
PROHIBITED |
|||
|
|
|
|
|
||

Administering Windows Server® 2012 |
MCT |
|
7-27 |
|
|
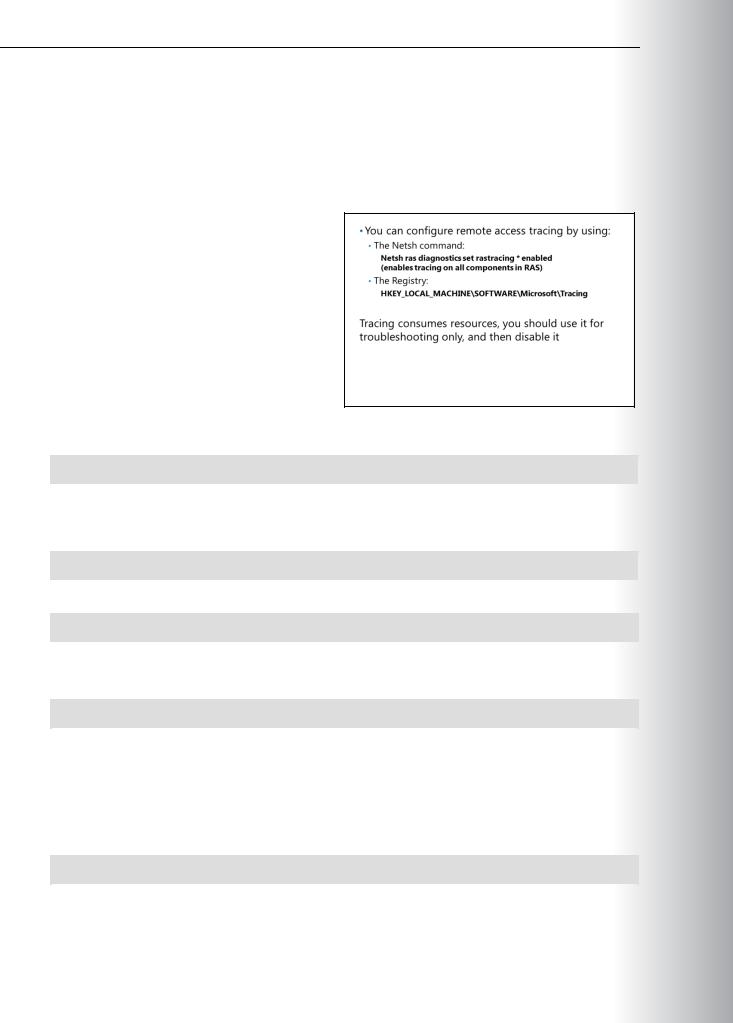
You can change the default location of the tracing files by setting FileDirectory to the path that you want. The log file’s file name is the component name for which tracing is enabled. By default, log files are placed in the SystemRoot\Tracing folder. USEONLY
STUDENT .
•Use the ping command to verify that the USE host name is being resolved to its correct
IP address. The ping itself might not be successful due to packet filtering that is
preventing the delivery of Internet Control
Message Protocol (ICMP) messages to and PROHIBITED from the VPN server.
•Verify that the credentials of the VPN client— which consist of user name, password, and
domain name—are correct and that the VPN server can validate them.
•Verify that the user account of the VPN client is not locked out, expired, disabled, or that the time that the connection is being made does not correspond to the configured logon hours. If the
password on the account has expired, verify that the remote access VPN client is using MS-CHAP v2. MS-CHAP v2 is the only authentication protocol that Windows Server 2012 provides that allows you to change an expired password during the connection process.
•Reset expired administrator-level account passwords by using another administrator-level account.
•Verify that the user account has not been locked out due to remote access account lockout.
•Verify that the Routing and Remote Access service is running on the VPN server.
7-28 Configuring and Troubleshooting Remote Access
• Verify that the VPN server is enabled for remote access from the VPN server Properties dialog box |
MCT |
||||
|
General tab. |
||||
|
|
|
|
||
• Verify that the WAN Miniport (PPTP) and WAN Miniport (L2TP) devices are enabled for inbound |
USE |
||||
|
remote access from the properties of the Ports object in the Routing and Remote Access snap-in. |
||||
• Verify that the VPN client, the VPN server, and the network policy that correspond to VPN |
|||||
|
connections are configured to use at least one common authentication method. |
||||
• |
|
|
|
||
Verify that the VPN client and the network policy that correspond to VPN connections are configured |
|||||
|
to use at least one common encryption strength. |
.ONLY |
|||
• Verify that the connection’s parameters have permission through network policies. |
|||||
Troubleshooting Other Issues |
|||||
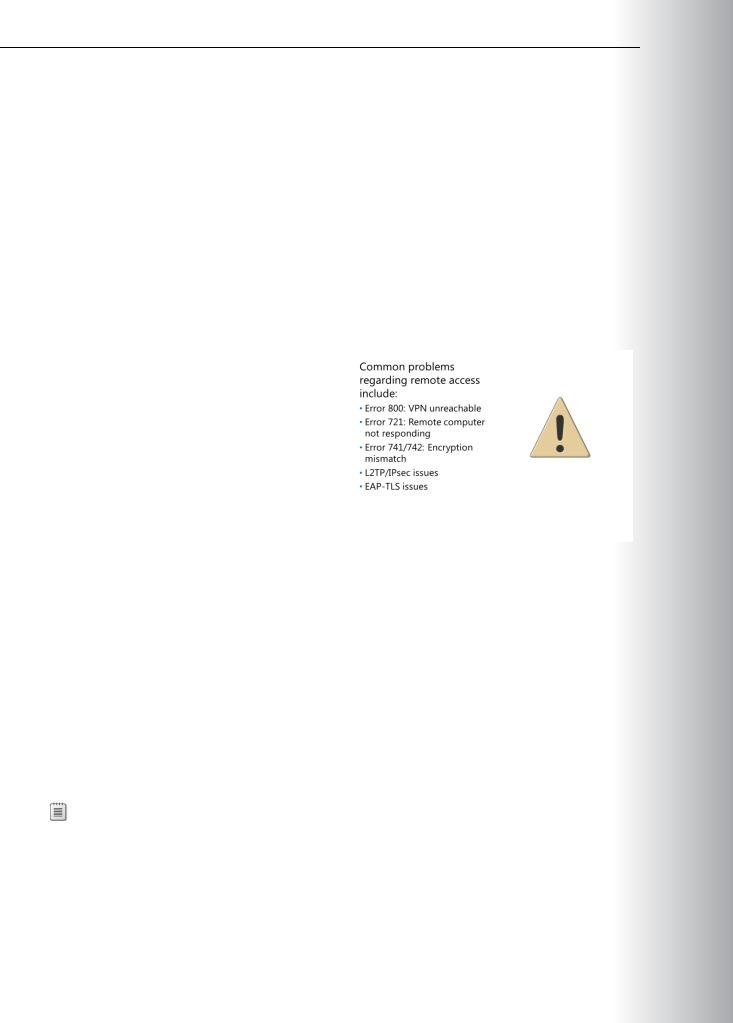
This topic lists other common issues that you |
|
||||
|
|||||
might encounter when using Remote Access in |
|
||||
|
|
||||
Windows Server 2012. |
|
|
|||
Error 800: VPN Server is Unreachable |
|
|
|||
• Cause: PPTP/L2TP/SSTP packets from the VPN |
|
|
|||
|
client cannot reach the VPN server. |
|
|
||
• Solution: Ensure that the appropriate ports |
|
|
|||
|
are open on the firewall. |
|
|
||
|
o PPTP. For PPTP traffic, configure the |
|
|
||
|
|
network firewall to open TCP port 1723, |
|
|
|
|
|
|
STUDENT |
||
|
|
and to forward IP protocol 47 for GRE |
|||
|
|
traffic to the VPN server. |
|||
|
o |
L2TP. For L2TP traffic, configure the network firewall to open UDP port 1701, and to allow IPsec |
|||
|
USE |
||||
|
|
ESP–formatted packets (IP protocol 50). |
|||
|
o SSTP. For SSTP, enable TCP port 443. |
||||
Error 721: Remote Computer is Not Responding |
|||||
• |
Cause: This issue can occur if the network firewall does not permit GRE traffic (IP protocol 47). PPTP |
||||
PROHIBITED |
|||||
|
uses GRE for tunneled data. |
||||
• Solution: Configure the network firewall between the VPN client and the server to permit GRE. |
|||||
|
Additionally, make sure that the network firewall permits TCP traffic on port 1723. Both of these |
||||
|
conditions must be met to establish VPN connectivity by using PPTP. |
||||
|
|
Note: The firewall might be on or in front of the VPN client, or in front of the VPN server. |
|||
|
|
||||
Error 741/742: Encryption Mismatch Error |
|||||
• Cause: These errors occur if the VPN client requests an invalid encryption level or if the VPN server |
|||||
|
does not support an encryption type that the client requests. |
||||
|
|
|
|
||