

Ä |
|
LAMPS 8L - 19 |
|
Fig. 6 Center High Mounted Stop LampÐAJ Body
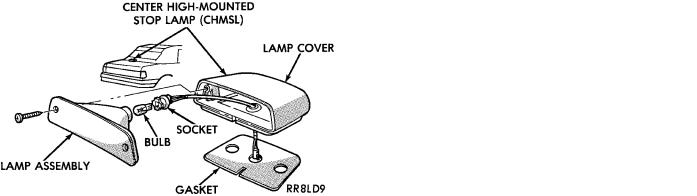
Fig. 7 Center High Mounted Stop Lamp
AJ/27-Body
EXTERIOR LAMPSÐAP BODY
INDEX
|
page |
Center High-Mounted Stop Lamp (CHMSL)Ð |
|
AP/24-44-Body . . . . . . . . . . . . . . . . . . . . . |
. . . . 21 |
Center High-Mounted Stop Lamp BulbÐ |
|
AP/24-44-Body . . . . . . . . . . . . . . . . . . . . . . |
. . . 21 |
Center High-Mounted Stop Lamp BulbÐ |
|
AP/27-Body . . . . . . . . . . . . . . . . . . . . . . . . |
. . . 21 |
Center High-Mounted Stop LampÐAP/27-Body |
. . . 21 |
Fog Lamp Bulb . . . . . . . . . . . . . . . . . . . . . . . |
. . . 21 |
Fog Lamps . . . . . . . . . . . . . . . . . . . . . . . . . . |
. . . 21 |
Front Side Marker Lamp or Bulb . . . . . . . . . . . |
. . . 20 |
|
page |
Headlamp Bulb . . . . . . . . . . . . . . . . . . . . . . . . . |
. 19 |
Headlamp Diagnosis . . . . . . . . . . . . . . . . . . . . . |
. 19 |
Headlamp Housing . . . . . . . . . . . . . . . . . . . . . . . |
. 19 |
License Plate Lamp or Bulb . . . . . . . . . . . . . . . . |
. 20 |
Park and Turn Signal Lamp or Bulb . . . . . . . . . . |
. 20 |
Tail, Stop, Turn Signal, Back-Up and Side Marker |
|
Lamp . . . . . . . . . . . . . . . . . . . . . . . . . . . . . . . |
. 20 |
Tail, Stop, Turn Signal, Back-Up and Side Marker |
|
Lamp Bulbs . . . . . . . . . . . . . . . . . . . . . . . . . . |
. 20 |
HEADLAMP DIAGNOSIS
For headlamp diagnosis, refer to the headlamp diagnosis chart at the beginning of this group. Refer to Wiring Diagrams manual for circuit and component locations.
HEADLAMP BULB
REMOVAL (FIG. 1)
(1)Left front bulb removal: Remove the windshield washer reservoir upper mounting screw and position reservoir rearward.
(2)Disconnect wire connector from back of headlamp behind radiator closure panel.
CAUTION: Do not touch the bulb glass with fingers or other oily surface, reduced bulb life will result.
(3) Rotate the bulb retaining ring counterclockwise one quarter turn and remove the ring, bulb holder and bulb from the lens assembly. The bulb holder has alignment notches.
INSTALLATION
Reverse the preceding operation.
HEADLAMP HOUSING
RIGHT HEADLAMP REMOVAL (FIG. 1)
To remove the aero headlamp housing, perform steps 1, 2 and 3 of bulb removal operation and proceed with the following steps.
(1)From in the engine compartment, remove the three headlamp assembly to body attaching nuts and separate the lamp from the body.
(2)Pull headlamp/lens assembly forward.
(3)Pull the lower section of the headlamp adjuster cable from the lamp adjuster screw.
(4)Remove headlamp/lens assembly.
(5)Remove the four lamp/lens to headlamp bucket screws.
(6)Remove headlamp/lens.
INSTALLATION
Reverse the preceding operation.
LEFT HEADLAMP REMOVAL (FIG. 1)
(1) Disconnect battery cables, negative first, and remove battery.