

OS_EXIT_CRITICAL();
*err = OS_MEM_NO_FREE_BLKS; return ((void *)0);
}
}
Listing 7.4, OSMemGet()
You should note that you can call this function from an ISR because if a memory block is not available, there is no waiting. The ISR would simply receive a NULL pointer if no memory blocks are available.
7.03 Returning a memory block, OSMemPut()
When your application is done using a memory block, it must return it to the appropriate partition. This is accomplished by calling OSMemPut(). You should note that OSMemPut()has no way of knowing whether
the memory block returned to the partition belongs to that partition. In other words, if you allocated a memory block from a partition containing blocks of 32 bytes then you should not return this block to a memory partition containing blocks of 120 bytes. The next time an application request a block from the 120 bytes partition, it will actually get 32 ‘valid’bytes and the remaining 88 bytes may belong to some other task(s). This could certainly make your system crash.
Listing 7.5 shows the code for OSMemPut(). You simply pass OSMemPut() the address of the memory control block for which the memory block belongs to L7.5(1). We then check to see that the memory partition is not already full L7.5(2). This situation would certainly indicate that something went wrong during the allocation/de-allocation process. If the memory partition can accept another memory block, it is inserted in the linked list of free blocks L7.5(3). Finally, the number of memory blocks in the memory partition is incremented L7.5(4).
INT8U OSMemPut (OS_MEM |
*pmem, void *pblk) |
(1) |
{ |
|
|
OS_ENTER_CRITICAL(); |
|
|
if (pmem->OSMemNFree >= pmem->OSMemNBlks) { |
(2) |
|
OS_EXIT_CRITICAL(); |
|
|
return (OS_MEM_FULL); |
|
|
} |
|
|
*(void **)pblk |
= pmem->OSMemFreeList; |
(3) |
pmem->OSMemFreeList = pblk; |
|
|
pmem->OSMemNFree++; |
|
(4) |
OS_EXIT_CRITICAL(); |
|
|
return (OS_NO_ERR); |
|
|
} |
|
|
Listing 7.5, OSMemPut()
7.04 Obtaining status about memory partition, OSMemQuery()
OSMemQuery() is used to obtain information about a memory partition. Specifically, your application can determine how many memory blocks are free, how many memory blocks have been used (i.e. allocated), the size of each memory block (in bytes), etc. This information is placed in a data structure called OS_MEM_DATA as shown in listing 7.6.
typedef struct { |
|
|
|
void |
*OSAddr; |
/* Points to beginning address of the memory partition |
*/ |
void |
*OSFreeList; |
/* Points to beginning of the free list of memory blocks |
*/ |

INT32U |
OSBlkSize; |
/* Size (in bytes) of each memory block |
*/ |
INT32U |
OSNBlks; |
/* Total number of blocks in the partition |
*/ |
INT32U |
OSNFree; |
/* Number of memory blocks free |
*/ |
INT32U |
OSNUsed; |
/* Number of memory blocks used |
*/ |
} OS_MEM_DATA;
Listing 7.6, Data structure used to obtain status from a partition.
The code for OSMemQuery() is shown in listing 7.7. As you can see, all the fields found in OS_MEM are copied to the OS_MEM_DATA data structure with interrupts disabled L7.7(1). This ensures that the fields will not be altered until they are all copied. You should also notice that computation of the number of blocks used is performed outside of the critical section because it’s done using the local copy of the data L7.7(2).
INT8U OSMemQuery (OS_MEM *pmem, OS_MEM_DATA *pdata)
{
OS_ENTER_CRITICAL(); |
|
|
pdata->OSAddr |
= pmem->OSMemAddr; |
(1) |
pdata->OSFreeList = pmem->OSMemFreeList; |
|
|
pdata->OSBlkSize |
= pmem->OSMemBlkSize; |
|
pdata->OSNBlks |
= pmem->OSMemNBlks; |
|
pdata->OSNFree |
= pmem->OSMemNFree; |
|
OS_EXIT_CRITICAL(); |
|
|
pdata->OSNUsed |
= pdata->OSNBlks - pdata->OSNFree; |
(2) |
return (OS_NO_ERR); |
|
|
}
Listing 7.7, OSMemQuery()
7.05 Using memory partitions
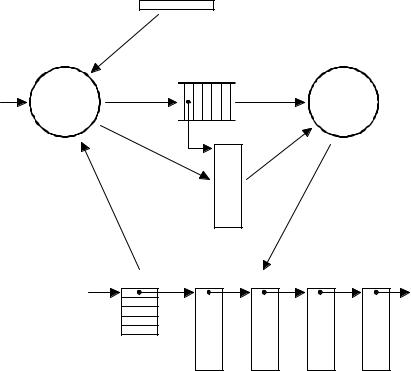
Figure 7-5 shows an example of how you can use the dynamic memory allocation feature of µC/OS -II as well as its message passing capability (see chapter 6). Also, refer to listing 7.8 for the pseudo-code of the two tasks shown. The numbers in parenthesis in figure 7-5 correspond to the appropriate action in listing 7.8.
The first task reads and checks the value of analog inputs (pressures, temperatures, voltages, etc.) and sends a message to the second task if any of the analog inputs exceed a threshold. The message sent contains a time stamp, information about which channel had the error, an error code, an indication of the severity of the error and any other information you can think of.
Error handling in this example is centralized. This means that other tasks or even ISRs can post error messages to the error handling task. The error handling task could be responsible for displaying error messages on a monitor (i.e. a display), logging errors to a disk, dispatching other task(s) which would take corrective action(s) based on the error, etc.
OSTime
|
OSTimeGet() |
|
|
|
|
(3) |
|
|
|
|
|
|
ErrMsgQ |
|
Analog |
AI |
OSQPost() |
OSQPend() |
Error |
Inputs |
Task |
(5) |
(6) |
Handler |
(1) |
|
|
|
|
|
|
(4) |
(7) |
|
|
OSMemGet() |
|
|
OSMemPut() |
|
(2) |
|
|
(8) |
ErrMsgPart |
0 |
Figure 7-5, Using dynamic memory allocation.

AnalogInputTask()
{
for (;;) { |
|
for (all analog inputs to read) { |
|
Read analog input; |
(1) |
if (analog input exceed threshold) { |
(2) |
Get memory block; |
|
Get current system time (in clock ticks); |
(3) |
Store the following items in the memory block: |
(4) |
System time (i.e. a time stamp); |
|
The channel that exceeded the threshold; |
|
An error code; |
|
The severity of the error; |
|
Etc. |
|
Post the error message to error queue; |
(5) |
(A pointer to the memory block containing the data) |
|
} |
|
} |
|
Delay task until it’s time to sample analog inputs again; |
|
} |
|
} |
|
ErrorHandlerTask() |
|
{ |
|
for (;;) { |
|
Wait for message from error queue; |
(6) |
(Gets a pointer to a memory block containing information |
|
about the error reported) |
|
Read the message and take action based on error reported; |
(7) |
Return the memory block to the memory partition; |
(8) |
} |
|
} |
|
Listing 7.8, Scanning analog inputs and reporting errors.
7.06 Waiting for memory blocks from a partition
Sometimes it’s useful to have a task wait for a memory block in case a partition runs out of blocks. µC/OS-II doesn’t support ‘pending’on a partitions, but you can support this requirement by adding a counting semaphore (see section 6.05, Semaphores) to guard the memory partition. To obtain a memory block, you simply need to obtain a semaphore then call OSMemGet(). The whole process is shown in listing 7.9.
First we declared our system objects L7.9(1). You should note that I used hard -coded constants for clarity. You would certainly create #define constants in a real application. We initialize µC/OS-II by calling OSInit()
L7.9(2). We then create a semaphore with an initial count corresponding to the number of blocks in the partition L7.9(3). We then create the partition L7.9(4) and one of the tasks L7.9(5) that will be accessing the partition. Bynow, you should be able to figure out what you need to do to add the other tasks. It would obviously not make much sense to use a semaphore if only one task is using memory blocks –there would be no need to ensure mutual exclusion! In
fact, it wouldn’t event make sense to use partitions unless you intend to share memory blocks with other tasks. Multitasking is then started by calling OSStart() L7.9(6). When the task gets to execute, it obtains a memory
block L7.9(8) only if a semaphore is available L7.9(7). Once the semaphore is available, the memory block is obtained. There is no need to check for returned error code ofOSSemPend() because the only way µC/OS-II will
return to this task is if a memory block is released. Also, you don’t need the erro r code for OSMemGet()for the
same reason –you must have at least one block in the partition in order for the task to resume. When the task is done using a memory block, it simply needs to return it to the partition L7.9(9) and signal the semaphore L7.9(10).
OS_EVENT |
*SemaphorePtr; |
(1) |
OS_MEM |
*PartitionPtr; |
|
INT8U |
Partition[100][32]; |
|
OS_STK |
TaskStk[1000]; |
|
void main (void) |
|
|
{ |
|
|
INT8U err; |
|
|
OSInit(); |
(2) |
|
. |
|
|
. |
|
(3) |
SemaphorePtr = OSSemCreate(100); |
||
PartitionPtr = OSMemCreate(Partition, 100, 32, &err); |
(4) |
|
. |
|
|
OSTaskCreate(Task, (void *)0, &TaskStk[999], &err); |
(5) |
|
. |
|
(6) |
OSStart(); |
||
} |
|
|
void Task (void *pdata) |
|
|
{ |
|
|
INT8U |
err; |
|
INT8U *pblock; |
|
|
for (;;) { |
|
|
OSSemPend(SemaphorePtr, 0, &err); |
(7) |
|
pblock = OSMemGet(PartitionPtr, &err); |
(8) |
|
. |
|
|
. /* Use the memory block */ |
|
|
. |
|
|
OSMemPut(PartitionPtr, pblock); |
(9) |
|
OSSemPost(SemaphorePtr); |
(10) |
|
} |
|
|
} |
|
|
Listing 7.9, Waiting for memory blocks from a partition.
Chapter 8
Porting µC/OS-II
This chapter describes in general terms what needs to be done in order to adapt µC/OS-II to different processors. Adapting a real-time kernel to a microprocessor or a microcontroller is called a port. Most of µC/OS-II is written in C for portability, however, it is still necessary to write some processor specific code in C and assembly language. Specifically, µC/OS-II manipulates processor registers which can only be done through assembly language. Porting µC/OS -II to different processors is relatively easy because µC/OS -II was designed to be portable. If you already have a port for the processor you are intending to use then you don’t need to read this chapter, unless of course you want to know how µC/OS-II’s processor specific code works.
A processor can run µC/OS-II if it satisfies the following general requirements:
1.You must have a C compiler for the processor and the C compiler must be able to produce reentrant code.
2.You must be able to disable and enable interrupts from C.
3.The processor must support interrupts and you need to provide an interrupt that occurs at regular intervals (typically between 10 to 100 Hz).
4.The processor must support a hardware stack, and the processor must be able to store a fair amount of d ata on the stack (possibly many Kbytes).
5.The processor must have instructions to load and store the stack pointer and other CPU registers either on the stack or in memory.
Processors like the Motorola 6805 series do not satisfy requirements #4 and #5 so µC/OS-II cannot run on such processors.

Application Software
/OS-II
(Processor Independent Code)
OS_CORE.C uCOS_II.C OS_MBOX.C uCOS_II.H OS_MEM.C
OS_Q.C OS_SEM.C OS_TASK.C OS_TIME.C
/OS-II Configuration
(Application Specific)
OS_CFG.H
INCLUDES.H
/OS-II Port
(Processor Specific Code)
OS_CPU.H
OS_CPU_A.ASM
OS_CPU_C.C
Software
Hardware
CPU |
|
Timer |
|
|
|
Figure 8-1, µC/OS-II Hardware/Software Architecture
Figure 8-1 shows µC/OS-II’s architecture and its relationship with the hardware. When you use µC/OS-II in an application, you are responsiblefor providing theApplication Software and theµC/OS-II Configuration sections. This books (and diskette) contains all the source code for the Processor Independent Code section as well as the Processor Specific Code for the Intel 80x86, Real Mode, LargeModel. If you intend to use µC/OS-II on a different processor, you will need to either obtain a copy of a port for the processor you intend to use or, write one yourself if the desired processor port is not available. Check the official µC/OS-II WEB site at www.uCOS-II.com for a list of available ports.
Porting µC/OS-II is actually quite straightforward once you understand the subtleties of the target processor and the C compiler you will be using. If your processor and compiler satisfy µC/OS-II’s requirements, and you have all the necessary tools at your disposal, porting µC/OS-II consists of:
1.Setting the value of 1 #define constants (OS_CPU.H)
2.Declaring 10 data types (OS_CPU.H)
3.Declaring 3 #define macros (OS_CPU.H)
4.Writing 6 simple functions in C (OS_CPU_C.C)