

B737-NG-600-7-8-9-BBJ-Cockpit Guide-Compacn (19-7-10).pdf
.pdf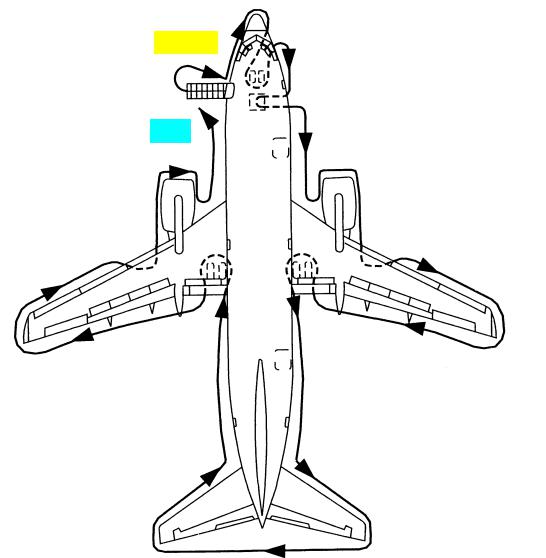
EXTERIOR INSPECTION B737-800 |
|
PART 1 |
|
|
|
START
END
Copyright ♥ Smartcockpit.com / Ludovic ANDRE 2001
Prior to each flight, the flight crew must accomplish or verify that the maintenance crew has accomplished the following checks :
•ELECTRIC HYDRAULIC PUMP SWITCHES ………………………………….……. ON
-Alert ground personnel before pressurizing hydraulic system
-System A & B pressure 2800 PSI minimum
•PARKING BRAKE ……………………………………………………..………………. SET
-Parking brake warning light (red) illuminated
•EXTERIOR LIGHTS ……………………………………………………..………. STEADY
•WHELL WELL LIGHT ……………………………………………….…………………. ON
-Do not forget to take a flashlight during night time inspection.
|
|
EXTERIOR INSPECTION B737-800 |
|
PART 2 |
||||
|
|
|
|
|
|
|
|
|
|
|
|
|
|
|
|
|
|
STEP 1 |
|
|
|
|
|
|
|
|
|
|
|
STEP 3 |
|
|
|||
|
|
|
||||||
|
|
|
|
|
|
|
|
|
|
|
|
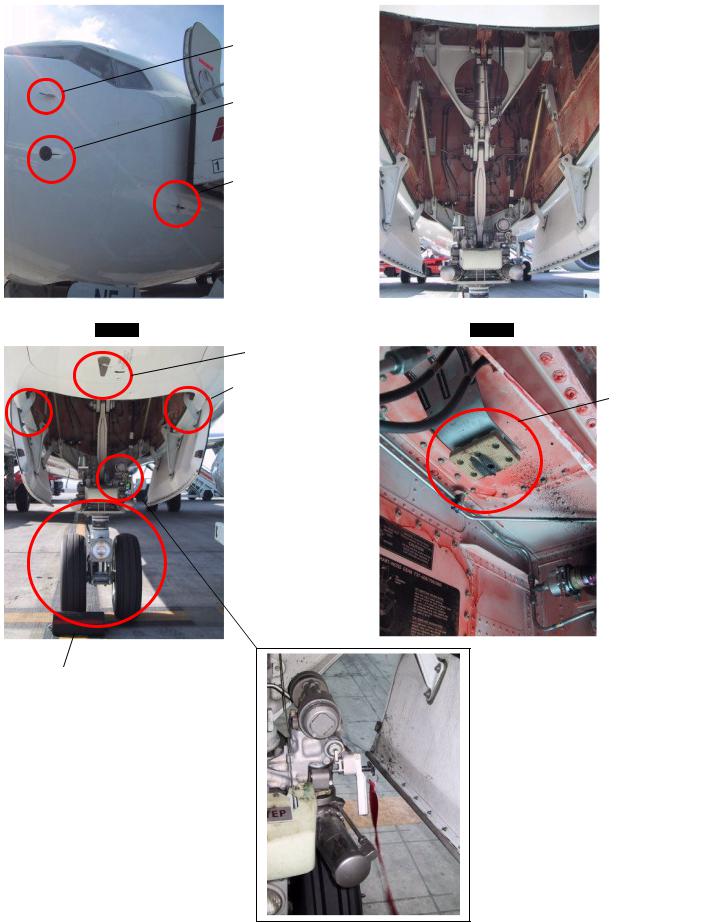
Check Captain Pitot probe |
|
|
|
|
Check no fluid |
|
|
|
OK & unobstructed |
|
|
|
|
|
|
|
|
|
|
|
|
|
Leakage & no |
|
|
|
|
|
|
|
|
damage |
|
|
|
Check Alpha Vane OK |
|||||
|
|
|
|
|
||||
|
|
|
& unobstructed |
|
|
|||
Check TAT probe OK & unobstructed
Check no damage
STEP 2 |
STEP 4 |
Check lower nose compartment door closed
Check doors mechanism & linkage OK (both sides)
Check Steering Pin lockout IN or OUT
Check :
1)No hydraulic fluid leakage on gear strut (strut not fully compressed)
2)Taxi light OK
3)Nose-wheel tire
4)Shocks in place
Check snubbers in place
(Left & Right)
2001 ANDRE Ludovic / com.Smartcockpit © Copyright
|
|
EXTERIOR INSPECTION B737-800 |
|
|
PART 3 |
|
|
5 |
|
|
|
|
|
|
|
|
|
|
|
|
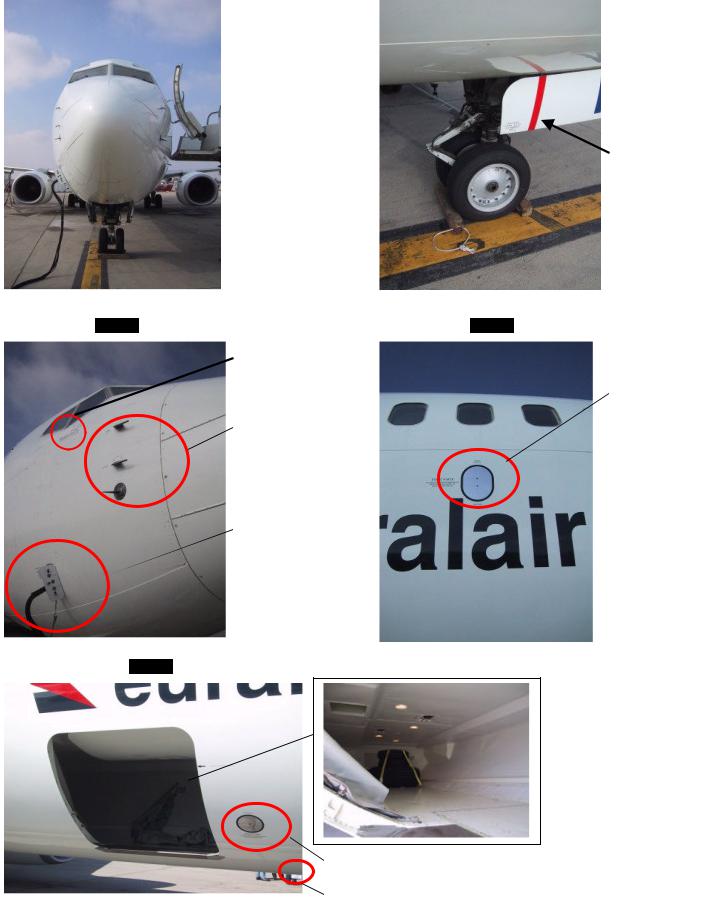
STEP 5 |
|
|
|
|
||
|
STEP 7 |
|
|
|||
|
|
|
||||
|
|
Check no damage |
|
Check no fluid |
||
|
|
on dome (conductor |
|
Leakage & no |
||
|
|
strip in good condition) |
|
Damage |
||
|
|
Both wipers in place |
|
Tire in good |
||
|
|
|
condition |
|||
|
|
Windshield in good |
|
|
||
|
|
condition |
|
Max tow angle |
||
|
|
|
|
|
|
|
|
|
|
|
|
|
sticker for tug |
|
|
|
|
|
|
driver. |
STEP 6
STEP 9
Check antenna in place under the fuselage (not visible on this picture)
STEP 8
Check F/O emergency handle in position.
Check Pitot Probes
&Alpha Vanes OK
&unobstructed.
Check GPU correctly connected.
If not used, check door is properly closed.
Check alternate static port (clean & no damage)
Check Oxygen pressure relief green disc in place (not visible on this picture)
Check CAPT & F/O Static ports (Clean & no
damage)
2001 ANDRE Ludovic / com.Smartcockpit ♥ Copyright
Check Cargo compartments (no leakage, no damage, no suspect luggage, lights operating normally)
Check door operating normally
Copyright ♥ Smartcockpit.com / Ludovic ANDRE 2001
EXTERIOR INSPECTION B737-800 |
|
PART 4 |
|
||
|
|
|
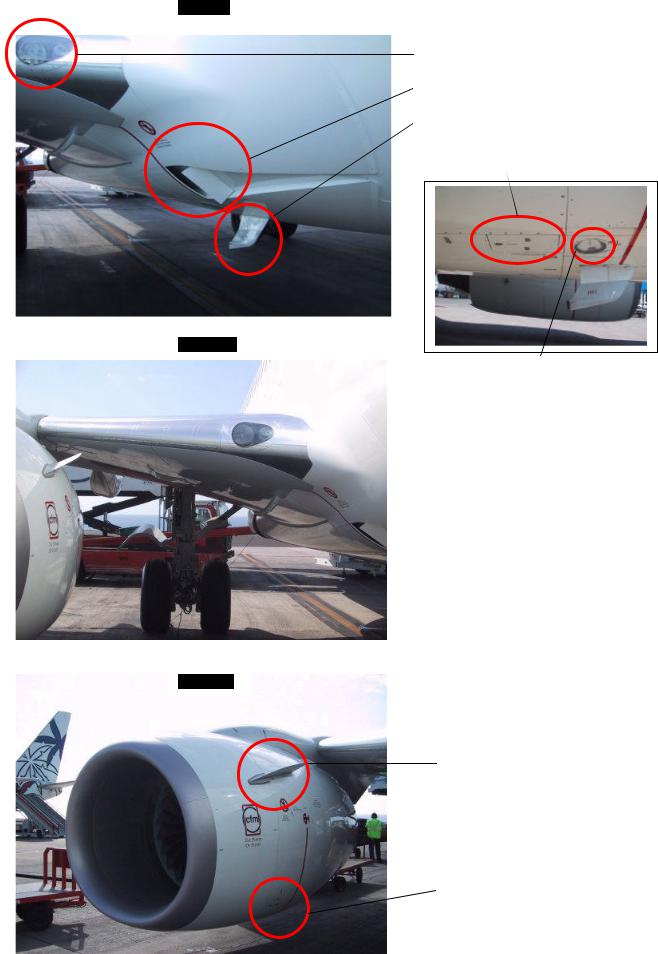
STEP 10
Check Turn off & Fixed Landing lights in good condition
Check Ram air deflector door extended & not obstructed
Check Drain mast
Check equipment cooling exhaust door under the fuselage (closed)
STEP 11 2
Check Landing light in good condition
Check Wing surfaces are clear of ice, snow or frost.
Check Leading edge flaps
Check Gear strut not fully compressed & door in place.
Check tire in good condition
No structural damage.
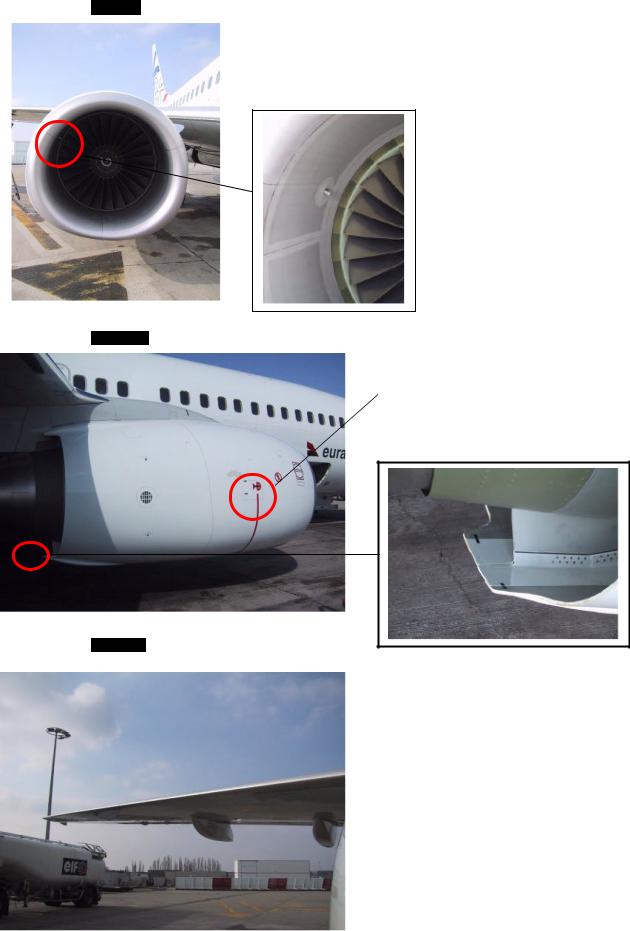
STEP 12 2
Check Vortex in place
No structural damage on engine.
Check IDG access door fully closed + Engine cowl latch
EXTERIOR INSPECTION B737-800 |
|
PART 5 |
|
|
|
STEP 13
Check fan blades in good condition (no fan blade damaged) & turning normally (anticlockwise)
Check no suspect leakage under the engine
STEP 14 2
Check no structural damage.
Check maintenance door fully closed
Check reverse sleeves in position (black stickers in front of each other)
STEP 15 2
2001 ANDRE Ludovic / com.Smartcockpit ♥ Copyright
Check Wing surfaces are clear of ice, snow or frost. Visually inspect the lower wing surface. If there is frost or ice on the lower surface outboard of measuring stick 4, there may also be frost or ice on the upper surface. The distance that frost extends outboard of measuring stick 4 can be used as an indication of the extent of frost on the upper surface.
Note : Takeoff with light coating of frost, up to 3 mm (1/8 inch) in thickness on lower wing surfaces due to cold fuel is permissible. However, all leading edge devices, all control surfaces, tab surfaces, upper wing surfaces and balance panel cavities must be free of snow or ice.
Check Leading Edge slats in good condition
Check Vortex in place
No structural damage.

EXTERIOR INSPECTION B737-800 |
|
PART 6 |
|
|
|
STEP 16
Check refuelling panel access door in position (defueling panel should be closed)
Fuel measuring sticks retracted & agree with alignment marks
STEP 14 2
Check wingtip
White Strobe lights & Green position lights
OK & cover in place.
Check aileron & tab
Check 4 static dischargers in good condition
STEP 15 2
Check trailing edge flaps (no structural damage ).
Check Ram air vent scoop non obstructed
2001 ANDRE Ludovic / com.Smartcockpit ♥ Copyright
|
|
EXTERIOR INSPECTION B737-800 |
|
PART 7 |
|
STEP 17 |
|||||
|
|||||
|
|
|
|
|
Check aileron & tab in good condition
Check Flaps in good condition
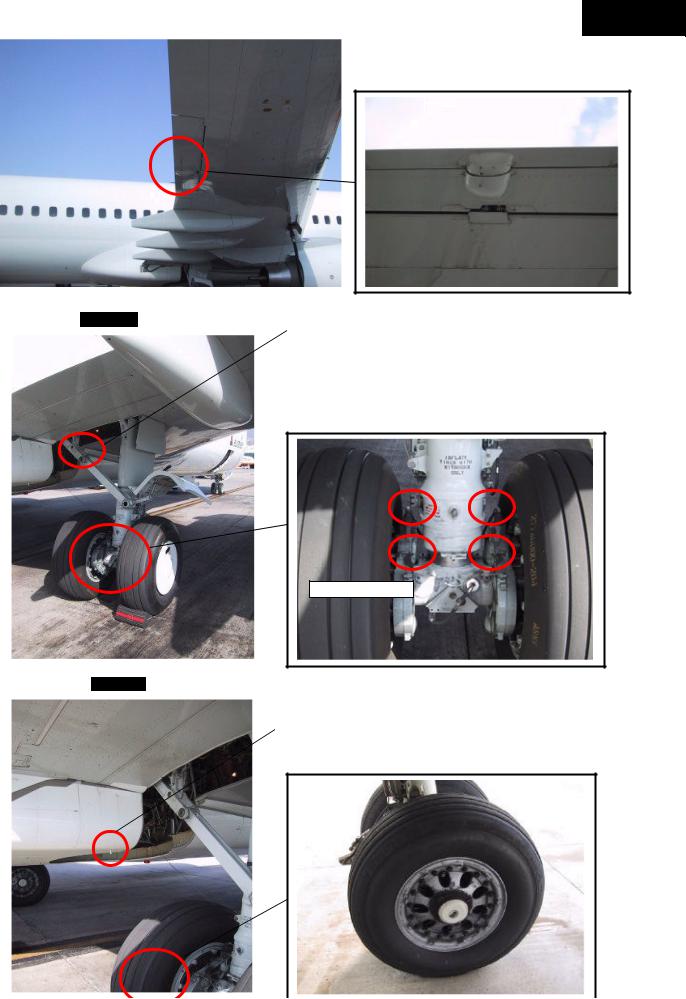
STEP 18 2
Check Ground locking pin
Check :
-Tire condition
-Check strut extension (not fully compressed) = approx. 3 fingers
Check all 4 brake wear pins
Brake wear pins
2001 ANDRE Ludovic / com.Smartcockpit ♥ Copyright
STEP 19 2
Check no structural damage.
Check damaged tread impact fitting (in place)
Check Main Landing Gear Pin lockout OUT
Check all tire bolts in place
STEP 20
EXTERIOR INSPECTION B737-800 |
|
PART 8 |
|
|
|
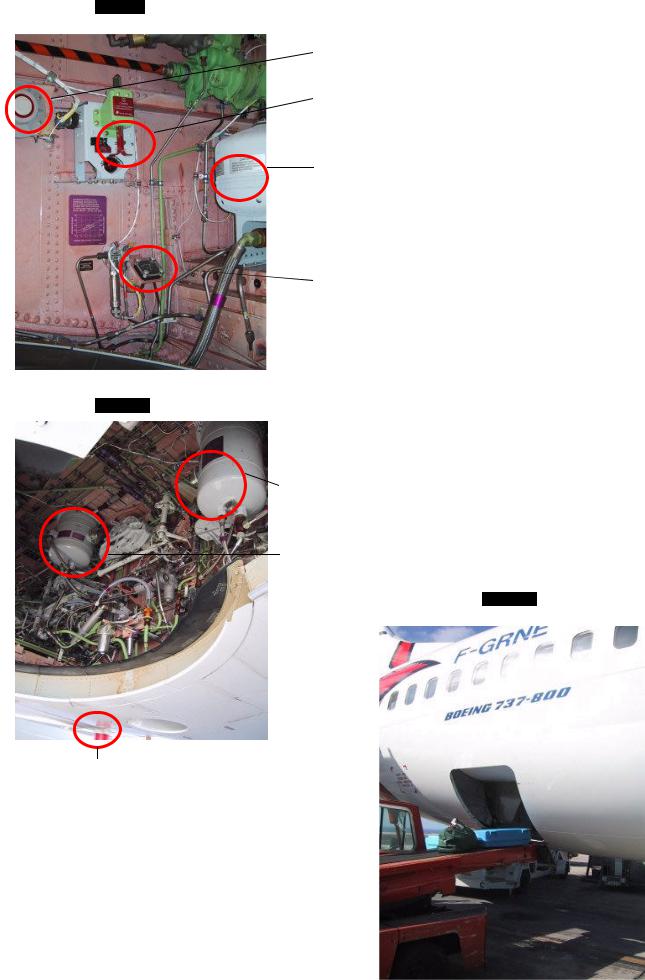
Check APU Fire Warning Horn in place
Check APU Fire Warning Handle (sealed & UP)
Check Standby hydraulic system reservoir (no leakage)
Check Brake accumulator indicator (2800 PSI minimum)
STEP 21 2
Check System B hydraulic reservoir (no leakage)
Check System B hydraulic reservoir quantity indicator (RF or above)
Check System A hydraulic reservoir (no leakage)
Check System A hydraulic reservoir quantity indicator (RF or above)
STEP 22 2
Check lower beacon in good condition
Check Aft Cargo Compartment
(no leakage, no damage, no suspect luggage, lights operating normally)
2001 ANDRE Ludovic / com.Smartcockpit ♥ Copyright
Check door operating normally

|
|
|
EXTERIOR INSPECTION B737-800 |
|
|
|
PART 9 |
|
||
|
|
|
|
|
|
|
|
|
||
|
|
|
|
|
|
|
|
|
||
STEP 23 |
Check APU Air Inlet Door in good condition (OPEN) |
|
|
|
||||||
|
|
|
|
|
|
|
||||
|
|
|
|
Check Negative Pressure Relief Valves (CLOSED) |
|
com.Smartcockpit ♥ Copyright |
||||
|
|
|
|
|
|
|
|
|
||
|
|
|
|
|
|
|
|
|
||
|
|
|
|
|
|
|
|
|
Ludovic / |
|
|
|
|
|
|
|
|
|
|
||
|
|
|
|
|
|
|
|
|
2001ANDRE |
|
|
|
|
|
|
Check Pressure Relief Valves in good condition (UPPER & LOWER) |
|||||
|
|
|
|
|
|
|
|
Check Outflow Valve in |
||
|
|
|
|
|
|
|
|
good condition |
||
|
|
|
|
|
|
|
|
(FULL OPEN) |
||
|
|
|
|
|
|
|
|
|||
Check Aft Water Drain
Mast in good condition.
Check Tail Skid (Green Warning Decal in view. If not, call maintenance crew)
STEP 24
Check Rudder Static Dischargers (total of 4)
Check Elevators Static Dischargers (3 LEFT + 3 RIGHT = 6)
Check Elevators & Tabs (LEFT &
RIGHT)
Check :
-APU Cooling Air Inlet (UPPER)
-APU Exhaust Air Outlet (LOWER)
-APU access door closed
-Tail cone strobe light in place
-Water service door closed
Check Elevator Pitot Probes (LEFT + RIGHT)
Not visible on this picture