

C# Bible - Jeff Ferguson, Brian Patterson, Jason Beres
.pdf
|
|
|
|
|
Name |
|
Type |
|
Purpose |
|
|
|
|
|
BaseStream |
|
Property |
|
Allows access to the BinaryWriter's underlying stream |
|
|
|
|
|
Close |
|
Method |
|
Closes the BinaryWriter class and the underlying stream, |
|
|
|
|
flushing out all pending write operations |
|
|
|
|
|
Flush |
|
Method |
|
Flushes out all data to the underlying stream and then clears |
|
|
|
|
the buffers |
|
|
|
|
|
Seek |
|
Method |
|
Sets the current position within the current stream |
|
|
|
|
|
Write |
|
Method |
|
This overloaded method writes a value out to the current |
|
|
|
|
stream. Write currently supports 18 data type variations. |
|
|
|
|
|
To write binary data to a file, first you must create a file stream. You can then instantiate a new BinaryWriter class, passing it your stream. After you create the BinaryWriter class, simply call its Write() method and pass it the data to be written, as shown in Listing 24-1.
Listing 24-1: Write String Data to a File Stream Using the BinaryWriter Class
static void Main(string[] args)
{
FileStream myFStream = new FileStream ("c:\\TestFile.dat", FileMode.OpenOrCreate, FileAccess.ReadWrite);
BinaryWriter binWrit = new BinaryWriter(myFStream); string testString = "This is a test string."; binWrit.Write(testString);
binWrit.Close();
myFStream.Close();
}
Ensure that when you finish with the BinaryWriter class, you close it and the stream. Failure to close the BinaryWriter or FileStream class can result in a loss of data.
BinaryReader
The BinaryReader class, much like the BinaryWriter class, relies on a FileStream object for accessing files.
To demonstrate the BinaryReader class, examine the application in Listing 24-2, which reads the binary header information from a bitmap file. From this header information, you can determine both the horizontal and vertical size of the image file as well as the color depth in bits.
Listing 24-2: BitmapSize Application
using System; using System.IO;
namespace BitmapSize
{
class Class1
{

static void Main(string[] args)
{ |
= 0; |
long bmpWidth |
|
long bmpHeight |
= 0; |
int bmpPlanes |
= 0; |
int bmpBitCount |
= 0; |
string [] cma |
= Environment.GetCommandLineArgs(); |
if (cma.GetUpperBound(0) >= 1)
{
FileStream myFStream = new FileStream(cma[1],FileMode.Open,FileAccess.Read);
BinaryReader binRead = new BinaryReader(myFStream); binRead.BaseStream.Position=0x12;
bmpWidth = binRead.ReadInt32(); bmpHeight= binRead.ReadInt32(); bmpPlanes= binRead.ReadInt16(); bmpBitCount = binRead.ReadInt16();
Console.WriteLine("[{0}] {1}x{2} {3}- bit",cma[1],bmpWidth,bmpHeight,bmpBitCount);
binRead.Close();
myFStream.Close();
}
}
}
}
The first thing you must do in this application is declare some variables to hold the information you read from the bitmap file, and then you store all the command-line arguments within a string array. In the preceding example, you store the command-line arguments within an array, because one of these arguments determines which file to process.
Element one of the string array should contain the name of the file to process. After you determine whether there is a command-line argument, you can create a FileStream object by passing the filename and the mode you want to use to open the file, as shown here:
FileStream myFStream = new FileStream( cma[1], FileMode.Open, FileAccess.Read);
As with the BinaryWriter class, you create your BinaryReader object and pass it the FileStream object that you want to use. At this point, you are ready to read a file using binary mode. After examining the layout of a bitmap file, you know that the information you want to obtain begins at position 18 (hex position 12) within the file. By using the BaseStream object of your BinaryReader class, you can directly access the FileStream object. From here, you set the Position property of the object to 0x12, which seeks into the file, to the position from which you want to read.
When your file pointer is in position, you need to read two long values from the file, followed by two integer values. A long value consumes four bytes, so you use the ReadInt32 method twice to retrieve the values. Following this, you use the ReadInt16 method to retrieve the two integer files from the file. See Table 24-2 for a list of the most commonly used methods within the BinaryReader class.
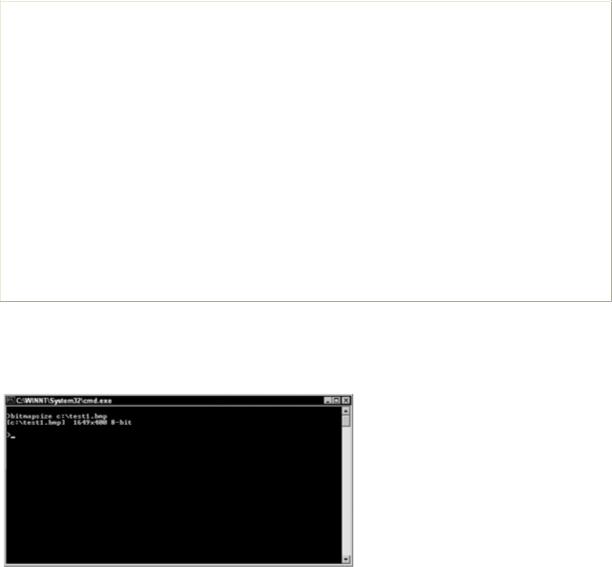
Table 24-2: Commonly Used Methods Within the BinaryReader Class
Method |
|
Description |
|
|
|
Close |
|
Closes the BinaryReader object and the base stream |
|
|
|
PeekChar |
|
Reads the next available byte from the stream but does not advance the |
|
|
byte or character position within the file |
|
|
|
ReadBoolean |
|
Reads a Boolean (True/False) value from the stream |
|
|
|
ReadByte |
|
Reads a single byte from the stream. There is also a ReadBytes method |
|
|
for specifying the number of bytes to read. |
|
|
|
ReadChar |
|
Reads a single Char value from the stream. There is also a ReadChars |
|
|
method for specifying the number of Chars to read. |
|
|
|
ReadInt16 |
|
Reads an integer value (2 bytes) |
|
|
|
ReadIn32 |
|
Reads a long value (4 bytes) |
|
|
|
ReadInt64 |
|
Reads an eight-byte signed integer |
After the information has been retrieved from the file, you simply out put your stored values to the console. After you compile this application, go to a console window and test it with a bitmap image, as shown in Figure 24-1.
Figure 24-1: Using BinaryReader, you can view the image size of a bitmap file.
Monitoring file changes
Monitoring file changes with C# has become increasingly easier with the use of the FileSystemWatcher object. This object enables you to watch a particular file, a group of files, a directory, or the entire drive for a variety of events, including file changes, file deletions, file creations, and file renaming.
You can begin to use the FileSystemWatcher object in one of two ways. You can create a FileSystemWatcher object using code and then build methods to handle the various events, or you can take the easier approach. The toolbox in the Visual Studio.NET IDE also contains a FileSystemWatcher object that you can insert into your project by double-clicking.
Applications, such as Microsoft Word and Microsoft Excel, both monitor the files you are currently using in case external changes are made to the files. You are then presented with an option to reload the file so you can view all changes made to it. To explore the features of the FileSystemWatcher object, you build an application that monitors all text files on the root of the C: drive and displays relevant information in the application window.

Using File monitor
To begin this sample application, you need to start a new C# Windows application. When the new project window opens up, add two buttons and a list box. After you add the components to Form1, change the names of the buttons to btnStart and btnStop. Change the Text properties of these buttons to Start and Stop, respectively. Now that the controls are in place, arrange them in a fashion similar to Figure 24-2.
Figure 24-2: Drag and drop controls onto the File monitor interface as shown here.
You need to add one additional object to the project: the FileSystemWatcher. Select the Components tab within the toolbox, as shown in Figure 24-3. Double-click the FileSystemWatcher to add an instance of this object to the project.
Figure 24-3: The Components tab within the toolbox contains the FileSystemWatcher object.
Select the fileSystemWatcher1 component just below Form1 in the Form Designer. The EnableRaisingEvents property activates the object and allows it to begin watching for file system events. Because you have a Start and Stop button to accomplish this, you need to ensure that the object doesn't activate when the application runs. Change the

EnableRaisingEvents property to False. The Filter property enables you to set a file mask of files to watch. You want to watch all text files, so set the Filter property to *.txt. Finally, you need to define the folder in which you want to monitor files. Set the Path property to C:\. to ensure that you are watching only files in the root of the C: drive. It is possible to monitor the entire drive by setting the IncludeSubdirectories property to True, but this is likely to degrade system performance.
Double-click the Start button on Form1, and add the code in Listing 24-3 to the Click event handler.
Listing 24-3: Start Button Click Event
private void btnStart_Click(object sender, System.EventArgs e)
{
fileSystemWatcher1.EnableRaisingEvents = true; btnStop.Enabled = true;
btnStart.Enabled = false;
}
The preceding code sets the EnableRaisingEvents property to True, which activates the FileSystemWatcher object. You then disable the Start button, so it cannot be clicked again, and enable the Stop button. Now you must add some code to your Stop button to disable the FileSystemWatcher. Add the code in Listing 24-4 to the Click event of the Stop button.
Listing 24-4: Stop Button Click Event
private void btnStop_Click(object sender, System.EventArgs e)
{
fileSystemWatcher1.EnableRaisingEvents = false; btnStop.Enabled = false;
btnStart.Enabled = true;
}
The FileSystemWatcher is now functional, but you need to add the event handlers to capture all file events. Return to the Form Editor by double-clicking Form1 in the Solution Explorer, and then click the fileSystemWatcher1 object. In the Properties window, click the Events icon on the toolbar. When you click the events listed in the window, you are taken to the code editor to modify those event handlers. Listing 24-5 contains the code that you should enter into the four events.
Listing 24-5: FileSystemWatcher Event Handlers
private void fileSystemWatcher1_Deleted(object sender, System.IO.FileSystemEventArgs e)
{
listBox1.Items.Add( "[" + e.Name + "] Deleted" );
}
private void fileSystemWatcher1_Renamed(object sender, System.IO.RenamedEventArgs e)
{
listBox1.Items.Add( "[" + e.OldName + "] Renamed to " + e.Name );
}
private void fileSystemWatcher1_Changed(object sender, System.IO.FileSystemEventArgs e)
{
listBox1.Items.Add( "[" + e.Name + "] Changed" );
}
private void fileSystemWatcher1_Created(object sender, System.IO.FileSystemEventArgs e)
{
listBox1.Items.Add( "[" + e.Name + "] Created");
}
These event handlers are simplistic; they merely display a message within the list box when a file operation has occurred. Before you test this application, it's important to realize a few things. As you can see by each of these functions, the Changed, Created, and Deleted events all expose the same data; therefore, they have the same signature. The odd one here is the Renamed event. Because three of the four events pass the same data into the event procedure, you could use one event handler to handle all three of these, but you still need a separate handler to take care of the Renamed event.
Press F5 to run the program so you can begin testing it as follows:
1.When the program opens, click the Start button. The application is monitoring the root of the C: drive for changes to text files.
2.Open Windows Explorer; right-click in the Explorer window, and choose New → Text Document to open a new document.
3.In the new document, you note an entry in the list box of your File Monitor application, indicating that a file has been created. Open this new text file; add some text to it, and save it. Again, you see entries in the log window of your application.
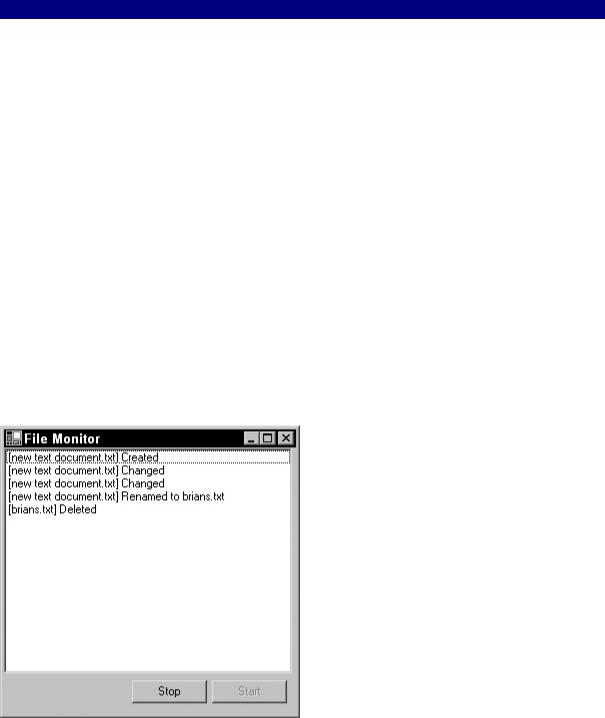
4.Now try renaming the file and then deleting it. The results should resemble those shown in Figure 24-4.
Figure 24-4: Your File monitor in action displays file activity in real time.

Understand that the Changed event might fire several times, because the FileSystemWatcher is watching several characteristics of the file. If the file size changes, the Changed event fires. If the modification date and time stamp of the file change, the Changed event fires again, and so on. Don't be discouraged if an event fires more than once. It's generally not an application problem, but insurance that the correct NotifyFilters are set.
Coding the FileSystemWatcher
You can add a FileSystemWatcher to your C# project without using the Visual Studio toolbox. To accomplish this, add a declaration for the object just below your class declaration, as shown in Listing 24-6.
Listing 24-6: Add a FileSystemWatcher Instance to Your Class Declarations
public class Form1 : System.Windows.Forms.Form
{
private FileSystemWatcher MyFileWatcher = new FileSystemWatcher();
Because you are creating the control at runtime, you can't go to the Properties window and set the various properties as needed. Instead, you handle these tasks within the Click event of the Start button. After you set the properties as you did in the previous example in Listing 24-6, you need to create event handlers and point them to the proper functions. Listing 24-7 shows the updated listing for your Start button's Click event.
Listing 24-7: Create the Event Handler Declarations in Your Start Button's Click Event
private void btnStart_Click(object sender, System.EventArgs e)
{
MyFileWatcher.Path = "c:\\"; MyFileWatcher.Filter = "*.txt"; MyFileWatcher.IncludeSubdirectories = false; MyFileWatcher.EnableRaisingEvents = true;
this.MyFileWatcher.Renamed += new System.IO.RenamedEventHandler( this.MyFileWatcher_Renamed );
this.MyFileWatcher.Changed += new System.IO.FileSystemEventHandler( this.MyFileWatcher_Changed );
btnStart.Enabled = false; btnStop.Enabled = true;
}
You can continue by adding some code for the Stop button and then creating your event handlers for the FileSystemWatcher. The function names for these event handlers must match the declaration you placed in the Start buttons click event. Listing 24-8 contains the Stop Click event and the event handlers for your Changed and Renamed events.
Listing 24-8: Create the Event Handlers for the FileSystemWatcher Object
private void btnStop_Click(object sender, System.EventArgs e)
{

MyFileWatcher.EnableRaisingEvents = false; btnStop.Enabled = false;
btnStart.Enabled = true;
}
private void MyFileWatcher_Changed(object sender, System.IO.FileSystemEventArgs e)
{
listBox1.Items.Add ("[" + e.FullPath + "] Changed");
}
private void MyFileWatcher_Renamed(object sender, System.IO.RenamedEventArgs e)
{
listBox1.Items.Add("[" + e.OldName + "] renamed to " + e.Name);
}
Manipulating files
File manipulation is file access that manipulates only the file and not the contents. Manipulating the file might include copying the file, deleting the file, or moving it. .NET provides a class called FileInfo within the System.IO namespace for just such actions. This section describes some of the manipulation methods and how to use them properly.
Copying files
The FileInfo class contains, among other things, a method for copying files. This method, CopyTo, is overloaded and has two variations. Variation one simply takes the destination filename. If a file already exists with that name, the method dies. Variation two accepts a destination filename and a Boolean value indicating whether files should be over written.
To demonstrate the CopyTo method, this section shows you how to build a console application for copying files. Because Windows already comes equipped with a Copy command, you name this cp, which is the copy command for the UNIX world.
Listing 24-9 shows the C# implementation of the Copy command in its entirety. Create a new C# console application named cp, and enter the following code.
Listing 24-9: C# Implementation of the File Copy Command
using System; using System.IO; namespace cp
{
class Class1
{
static void Main(string[] args)
{
string [] cla = Environment.GetCommandLineArgs(); if (cla.GetUpperBound(0) == 2)
{
FileInfo fi = new FileInfo(cla[1]); fi.CopyTo(cla[2],true);

Console.WriteLine("Copied " + fi.Length + " bytes.");
}
else
Console.WriteLine ("Usage: cp <input file> <output file>");
}
}
}
This code uses the GetCommandLineArgs method of the Environment class to retrieve the command-line arguments that are passed to the application. If the number of arguments is not equal to 2, you simply display a usage message, as shown in the bottom of Listing 24-9, and exit. Otherwise, the command-line arguments are stored within your cla string array for later use.
When using the FileInfo class, you must first create a FileInfo object and pass it the name of the file you are dealing with. When using this application, the first command-line argument is the name of the source file. Because this is stored in element 1 of the string array, simply pass this to your FileInfo object.
To copy a file using this class, simply call its CopyTo method along with the destination filename (which is in element 2 of the string array), and a Boolean value indicating whether a file with the same name should be overwritten. Go to a command prompt to test this program after compiling, as shown in Figure 24-5.
Figure 24-5: Using CopyTo, you can copy a file and display additional information.
You added a bit of a twist on this program, as you can see. After the CopyTo method has completed, you display a message on the console indicating that the operation has completed; and you display the number of bytes that you copied, thanks to the Length property of the FileInfo class.
Deleting files
Deleting files with the FileInfo class is as simple as calling the Delete() method. If the file you want to delete has its Read-Only attribute set, you receive an exception. The example shown in Listing 24-10 creates a C# implementation of the file's Delete command. After the file is deleted, the utility displays the name of the file that was deleted, as well as its attributes.
Create a new C# console application project named rm and enter in the code contained in Listing 24-10.

Listing 24-10: Use the FileInfo Class to Delete Files with Ease
using System; using System.IO; namespace rm
{
class Class1
{
static void Main(string[] args)
{
string [] cla = Environment.GetCommandLineArgs(); if (cla.GetUpperBound(0) == 1)
{
FileInfo fi = new FileInfo(cla[1]); fi.Delete();
Console.WriteLine("File : " + cla[1]); Console.WriteLine("Attributes: " + fi.Attributes.ToString()); Console.WriteLine("File Deleted...");
}
else
Console.WriteLine ("Usage: rm <filename>");
}
}
}
As with the previous examples, you are storing the command-line arguments within a string array. If that array does not contain the correct number of elements, you simply display a usage message and exit.
Tip By using the Delete() method of the FileSystemInfo class, you can delete directories as well as files.
After calling the Delete() method of the FileInfo class, you can display the filename and its attributes to the user, indicating that it was deleted. Using the Attributes property, you can safely determine, before the file is deleted, if it has a Read-Only attribute set. If so, you can prompt the user and/or remove the Read-Only attribute using the Attributes property along with the FileAttributes enumerator.
After your program is compiled, go to a command prompt and test it. Simply type rm followed by the filename to delete. The results should resemble those in Figure 24-6.
Moving files
The MoveTo() method of the FileInfo class actually encapsulates two different methods: CopyTo() and Delete(). After a file is copied to the appropriate filename or directory, MoveTo() simply deletes the file much as the Delete() method does.
The following sample application accepts two command-line arguments: Source Filename and Destination Filename. After the file is moved, the program displays when the file was actually created and where the file was moved to. Neither of these outputs has a practical use except to demonstrate how the certain attributes can be obtained, such as the creation time using the CreationTime property.