

C# Bible - Jeff Ferguson, Brian Patterson, Jason Beres
.pdfTo understand how the Table, TableRow, and TableCell controls are related to one another, add a Table control to your WebForm (drag it from Solution Explorer) and perform the following steps to add rows and cells to the table:
1.In the Properties window, click the ellipsis button for the Rows property of the Table control. The TableRow Collection Editor dialog box opens.
2.In the TableRow Collection Editor dialog box, which represents the TableRow control, click Add to create a new row. A new row is created and its properties are displayed at the right side of the dialog box.
3.Verify that the row is selected in the Members list, and then click the ellipsis button for the Cells property to add a cell for the row. The TableCell Collection Editor dialog box opens.
4.In the TableCell Collection Editor dialog box, which represents the TableCell control, click Add to create a new cell. A new cell is created and its properties are displayed at the right side of the dialog box.
5.Specify the text to be displayed in the cell and click OK to close the TableCell Collection Editor dialog box.
6.Click OK to close the TableRow Collection Editor dialog box.
Notice that after you perform the preceding steps, a 1 x 1 table is added to your form.
Table 22-1 describes some of the properties of the Table, TableRow, and TableCell controls.
Table 22-1: Properties of the Table, TableRow, and TableCell Controls
|
Property |
|
Available with |
|
Description |
|
|
|
|
|
|
|
|
|
ID |
|
Table |
|
Represents the unique ID of the control. |
|
|
|
|
|
|
|
|
|
Rows |
|
Table |
|
Represents a collection of TableRow objects. A |
|
|
|
|
|
|
TableRow control represents a row in the table. |
|
|
|
|
|
|
|
|
|
Cells |
|
TableRow |
|
Represents a collection of TableCell objects. A |
|
|
|
|
|
|
TableCell control represents a cell in a row in a |
|
|
|
|
|
|
table. |
|
|
|
|
|
|
|
|
|
VerticalAlign |
|
TableCell |
|
Represents the vertical alignment, such as the |
|
|
|
|
|
|
top and bottom of the cell. |
|
|
|
|
|
|
|
|
|
HorizontalAlign |
|
TableCell |
|
Represents the horizontal alignment, such as |
|
|
|
|
|
|
left align and right align, of the cell. |
|
|
|
|
|
|
|
|
|
ImageButton control |
|
|
|
|
|
The ImageButton control enables programmers to display images in a WebForm and manage these images at design time or runtime. This control represents a graphical button, which enhances the appearance of the WebForm. You can set the ImageUrl property to point to a specific image.
Button and LinkButton controls
The Button control on a WebForm is used to submit the page to the server. Three types of server control buttons can be added to a WebForm:

•Button: Represents a standard button.
•LinkButton: Represents a button that causes the page to be submitted to the server. In addition, it can also act as a hyperlink to another Web page or WebForm.
•ImageButton: This control is covered in the previous section.
Creating and Configuring a Web Application
Visual C# provides the ASP.NET Web Application template to create ASP.NET Web applications. The ASP.NET Web Application template contains the necessary information for building, processing, and deploying ASP applications.
Before you create a Web application project, you need to ensure that the following basic requirements for your Web application are fulfilled on the development platform:
•You should have access to a computer running Microsoft IIS Server
•You should install the IIS Server on an NTFS partition. An NTFS partition improves the security and performance of the server.
After fulfilling these requirements, you can use Visual Studio .NET to create an ASP.NET Web application. To create a Web application, perform the following steps:
1.Add an ASP.NET Web application project for your application.
2.Create the user interface of the Web application.
3.Code the application logic.
The steps to create a new project are given in the following section.
Creating a new project
You use the ASP.NET Web Application template to create Web application projects. The steps for creating a new Web application by using this template are as follows:
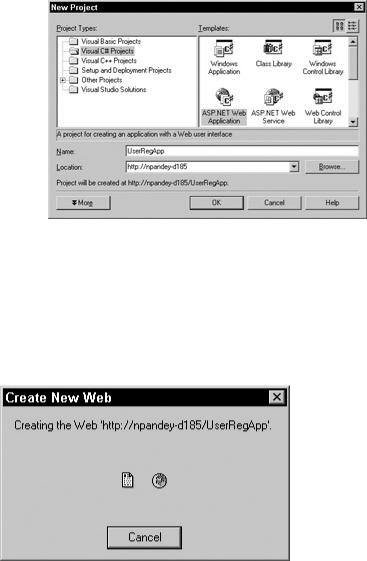
1.Select File → New → Project to open the New Project dialog box, which is shown in Figure 22-1.
Figure 22-1: You can select one or more enterprise templates from the New Project dialog box.
Tip You can also press Ctrl+Shift+N to open the New Project dialog box.
2.Select Visual C# Projects from the Project Types list.
3.Select ASP.NET Web Application from the Templates list of the New Project dialog box.
4.Type the project name in the Name box.
5.Type the name of the IIS Server in the Location box, or accept the default location. The completed New Project dialog box is shown in Figure 22-2.
Figure 22-2: Select a template and specify the name of the application in the New Project dialog box.
Tip If the Web server is installed on your computer, you can also type http://localhost in the Location box.
6.Click OK. A dialog box displays briefly while Visual Studio .NET creates the new ASP.NET Web application. The dialog box is shown in Figure 22-3.
Figure 22-3: Visual Studio .NET creates the new project.
Note You may have to wait for some time while ASP.NET creates the project. You should also ensure that the Web server is turned on, before you create your application. To turn the Web server on, select Start → Run. In the Run dialog box, type net start iisadmin and press Enter.
After you create a new Web Application Project, necessary project files - such as AssemblyInfo.cs, Config.Web, and Global.asax - are created automatically by the Web Application Wizard, along with the main page file, WebForm1.aspx. Figure 22-4 shows these files in the Solution Explorer.
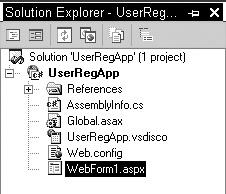
Figure 22-4: The Project window shows all the files created by the Web Application Wizard. A WebForm in Visual Studio .NET has two views - Design view and HTML view:
•Design view: You design the user interface of a WebForm in Design view. Design view provides two layouts for the WebForm: grid layout and flow layout:
o Grid layout: In grid layout, you can arrange controls on the WebForm based
on the coordinates of each control.
oFlow layout: In flow layout, a WebForm can be designed linearly, as you design a Microsoft Word document, from top to bottom.
You can switch between different layouts by right-clicking the WebForm and selecting Properties. On the Property pages, you can select the appropriate layout.
•HTML view: This view represents the corresponding ASP.NET syntax for the WebForm. You need to click the HTML tab to open HTML view. If the HTML tab is not visible, you can right-click and select View HTML Source from the shortcut menu.
Adding controls to the WebForm
You can add controls to a WebForm in two ways:
•Using the toolbox: You can add controls in Design view of the WebForm (the .aspx file) by using the toolbox included in Visual Studio .NET. Within the toolbox, different types of controls are categorized under separate tabs, such as WebForms, HTML, and Data. For example, you can use the HTML tab to create HTML server controls, and the WebForms tab to create the ASP.NET server controls. All controls discussed previously belong to the Windows Forms tab of the toolbox. When you use the toolbox to add Web controls in Design view, the corresponding C# syntax is automatically generated.
Tip When you use HTML controls, you need to convert them to server controls to make them available for coding at the server end. You can do so by right-clicking the required HTML control and selecting the Run As Server Control option from the shortcut menu. This method enables you to create complex WebForms conveniently and quickly.

•Using Visual C# syntax to add the controls programmatically: You can also add Web controls to a WebForm by using the Visual C# syntax. You can use the C# syntax only in the HTML view of the page (.aspx file). The actual syntax depends on the type of control that you want to add. For example, the syntax used to add an HTML textbox control is as follows:
<input id=Text1 Type=text runat="server">
Note Visual Studio .NET enables you to add ASP.NET server controls by using an Extensible Markup Language (XML) tag. The syntax you use to add an ASP.NET TextBox control is as follows:
<asp:TextBox id=TextBox1 runat="server"></asp:TextBox>
Every control has an ID property that is used to uniquely identify the control. To set the property of a control at runtime, you need to use the following syntax:
Control_ID.Property=Value
In the preceding syntax:
•Control_ID represents the ID property of the control.
•Property represents the property of the control.
•Value represents the value assigned to the control's property.
Figure 22-5 displays a WebForm that contains common Web controls, such as labels, text boxes, hyperlinks, radio buttons, check boxes, and buttons. As you can see, the WebForm is a user registration form. The form is designed to accept user input in various controls. After filling out the form, a user can click the Submit button to complete the registration process. The Submit button opens another WebForm displaying a message along with the user name entered in the name TextBox control. If the user clicks the Reset button, information filled in by the user is removed from the controls on the form.
Figure 22-5: The user registration form displays the common controls that can be added to WebForms.
To create the form displayed in Figure 22-5, follow these steps:

1.Select the WebForm1.aspx form, and press F4 to view the Properties window.
2.In the Properties window, click the Ellipsis button for the bgColor property, and select Properties. The Color Picker dialog box opens.
3.In the Color Picker dialog box, select a shade of pink and click OK. The color of the WebForm changes to the color that you specified.
4.Add controls to the form and change their properties, as shown in Table 22-2.
Table 22-2: Controls to Add to the WebForm
Control |
|
Properties |
|
Placement |
|
|
|
|
|
Label |
|
Text=Registration Form |
|
To be placed on the top, |
|
|
Font |
|
center of the form |
|
|
|
|
|
|
|
Bold=True |
|
|
|
|
Size=Larger |
|
|
|
|
|
|
|
Labels for Name, E-Mail, |
|
The text for each label should be |
|
One below the other on |
State, Subscription |
|
the same as the caption desired. |
|
the left side of the screen |
|
|
|
|
|
TextBox |
|
ID=txtName |
|
Next to the Name label |
|
|
|
|
|
TextBox |
|
ID=txtEmail |
|
Next to the E-Mail label |
|
|
|
|
|
DropDownList |
|
ID=lstState |
|
Next to the State label |
|
|
Items=Arizona, |
|
|
|
|
California, Florida |
|
|
|
|
|
|
|
CheckBoxList |
|
ID=lstOptions |
|
Next to the Subscription |
|
|
Items=Books, Magazines |
|
label |
|
|
|
|
|
|
|
|
|
|
Button |
|
ID=BtnSubmit |
|
Below the Subscription |
|
|
Text=Reset |
|
label |
|
|
|
|
|
|
|
|
|
|
Button |
|
ID=BtnReset |
|
Next to the Submit button |
|
|
Text=Reset |
|
|
The interface of your WebForm, shown in Figure 22-6, is ready.
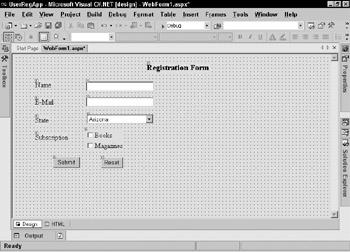
Figure 22-6: Your WebForm should look like this after it is complete.
You add the functionality of the Submit and Reset buttons in the next section. However, before proceeding, add another form, which displays details about the registered user when he or she clicks Submit, to the Web application. To add the WebForm, follow these steps:
1. Select Project → Add WebForm. The Add New Item dialog box opens.
Tip If you do not find the Add WebForm menu option under the Project menu, click anywhere in the Form window and then select the menu option.
2.Select WebForm from the Templates list, specify a name for the WebForm (or retain the default name), and click Open to create a new WebForm.
You can use the newly added WebForm to display a message to the user. Therefore, you need to add a Label control to the form. Name the label lblMessage.
Having added controls to the form, you need to respond to the events generated by the controls on the form to handle user interaction. For example, if a user clicks a Submit button, the form might need to be processed and the data updated in a database.
The next section describes the procedure to handle events that are generated by controls on a WebForm.
Handling events
When users interact with different Web controls on a page, events are raised. An event is an action that can occur on an object or control, which can either be generated by a user action or by the system. For example, when you click a mouse button or press a key, an event is generated.
In traditional client forms or client-based Web applications, events are raised and handled on the client side. In Web applications, events are raised either on the client or on the server. However, the events generated are always handled on the server. ASP.NET server controls support only server-side events, whereas HTML server controls support both server-side and client-side events.

Understanding round-trips
WebForms are processed on the server. For example, consider a user registration form. When a new user specifies a value for the registration name, the server must ensure that the registration name supplied by the user is unique. You can ensure that the registration name is unique by trapping the Click event of a button and querying the user name against a data source. Whenever a user interaction requires processing on the server, the WebForm is submitted to the server and processed, and then the output is returned to the client through a browser. This sequence of processing information on the server is called the round-trip process, as shown in Figure 22-7.
Figure 22-7: The round-trip process
Most user interactions with the server controls result in round-trips. Because a round-trip involves sending the WebForm to the server and then displaying the processed form in the browser, the server control events affect the response time in the WebForm. Therefore, the number of events available in a WebForm's server controls should be as few as possible.
Usually, these are limited to the Click events.
Note Events that occur quite often in scripting languages, such as OnMouseOver, are not supported by server controls. However, some server controls support events that occur when the value of the control changes.
Table 22-3 describes the commonly occurring events associated with different ASP.NET server controls.
Table 22-3: Events Associated with ASP.NET Server Controls
Control(s) |
|
Event |
|
Description |
|
|
|
|
|
TextBox |
|
TextChanged |
|
Occurs when the focus moves out |
|
|
|
|
of the control. |
|
|
|
|
|
RadioButton and CheckBox |
|
CheckedChanged |
|
Occurs when you click the |
|
|
|
|
control. |
|
|
|
|
|
RadioButtonList, |
|
SelectedIndexChanged |
|
Occurs when you change the |
CheckBoxList, ListBox, and |
|
|
|
selection in the list. |
DropDownList |
|
|
|
|
|
|
|
|
|
Button, LinkButton, and |
|
Click |
|
Occurs when you click the |
|
Table 22-3: Events Associated with ASP.NET Server Controls |
||||
|
|
|
|
|
|
Control(s) |
|
|
Event |
|
Description |
|
|
|
|
|
|
ImageButton |
|
|
|
|
button. This event causes the |
|
|
|
|
|
form to be submitted to the |
|
|
|
|
|
server. |
|
|
|
|
|
|
In a WebForm, by default, only the Click event of Button, LinkButton, and ImageButton server controls can cause the form to be submitted to the server for processing. In this scenario, the WebForm is posted back to the server. When the change events are generated by other controls, they are captured and cached. They do not cause the form to be submitted immediately. It is only when the form is posted back due to a button-click that all cached events are raised and processed. There is no particular sequence for processing these change events on the server. However, the Click event is processed only after all the other change events are processed.
Understanding event handlers
When an event is raised, it needs to be handled for further processing. The procedures that are executed when an event occurs are known as event handlers. Event handlers can be created automatically or manually.
When you handle events automatically, double-clicking a control in Design view of the WebForm (.aspx file) creates an event handler. For example, the following code is generated when a button, btnSubmit, is double-clicked. You can then write the code in the event handler in the function that's generated by Visual Studio .NET:
Public void btnSubmit_Click(Object sender, System.EventArgs e)
{
}
In the preceding code, the procedure btnSubmit_Click is the event handler for the Click event of the button. The procedure takes two arguments. The first argument contains the event sender. An event sender is an object, such as a form or a control, that can generate events. The second argument contains additional information associated with an event, such as the x and y coordinates of the position at which a mouse button is clicked.
To create an event handler manually, you select it from the drop-down list in the Properties window.
You are now ready to implement event handling for the WebForm shown in Figure 22-7.
When you click the Submit button, a new page (WebForm2.aspx, in our case) should be displayed, which shows a welcome message along with the name of the registered user. To implement this functionality, you need to write the following code in the Click event of the Submit button of the WebForm1.aspx WebForm:
private void BtnSubmit_Click(object sender, System.EventArgs e)
{
Response.Redirect("WebForm2.aspx?strName="+ txtName.Text);

}
Tip To code the event for the Submit button, double-click the button in Design view.
In the preceding code, the Redirect method of the HttpResponse class redirects the user to the WebForm2.aspx page and passes the value of the txtName parameter to the destination page.
After passing the value of the text box txtName, you need to initialize WebForm2 to handle the string passed from the registration form. To do so, WebForm2.aspx should have following code in the Load event:
private void Page_Load(object sender, System.EventArgs e)
{
lblMessage.Text="Hi! " + Request.QueryString.Get("strName");
}
Tip To code the Load event for the WebForm2.aspx form, double-click the form in Design view.
In the preceding code, the value stored in the strName variable is set as the caption of the label lblMessage in the WebForm2.aspx file. When the user clicks the Submit button on WebForm1.aspx, he or she is redirected to the WebForm2.aspx page, as shown in Figure 22- 8.
Figure 22-8: When a user is redirected to another page, the name of the user is passed in the query string.
When the user clicks the Reset button, an event must be generated that removes all the controls filled in by the user in WebForm1.aspx. To implement this functionality, you code the Click event of the Reset button as follows:
private void BtnReset_Click(object sender, System.EventArgs e)
{
txtName.Text="";
txtEmail.Text="";
lstState.ClearSelection();
lstOptions.ClearSelection();
}
In the preceding code, when the Reset button in the registration form is clicked, the form is reinitialized to its original state.