

HTML 4_01 Weekend Crash Course - G. Perry
.pdf334 |
Sunday Morning |
they would like for their Web site to appear inside search engine listings if possible. Although a family Web site usually does not warrant payment to a firm to advertise among many search engines, and although such a Web site often does not even warrant registering with a single search engine if the registration costs money, you’re free to use meta tags in your site’s HTML code so that the site’s content can be picked up and indexed by any search engine that notices the site.
To get the site seen by roaming search engines and inform them of its content, the Barkleys embedded the meta tags (<meta>) shown in Listing 25-1 into their home page at the top of their site. The meta tags appear after the </title> end tag but before the header table begins, as Listing 25-1 shows.
Listing 25-1
Creating meta tags to get the site noticed by roaming search engines
<!---------------------------- |
> |
<!-- The header begins here -- |
> |
<!---------------------------- |
> |
<head> |
|
<title>The Barkley Family Web Page</title>
<!-- The search engine tags appear next --> <meta name=”description”
content=”Barkley Family Web Site”> <meta name=”keywords”
content=”Barkley, Barkleys, Scott Barkley, Gail Barkley, Rachel Barkley, Annie Barkley, new home, we’ve moved,
Kid’s Playground”>
<table width=100% cellpadding=0 cellspacing=0 border=0 bgcolor=#009900>
The search engines, if they locate the Barkley Web site, will list the site as Barkley Family Web Site due to the meta tag name and content attributes (meta name=”description” content). The meta tag keyword attributes (<meta name=”keywords”) and the keywords themselves, such as Scott Barkley and Annie Barkley, will help move the site up in the ranks of the search engine.

Session 25—Creating and Connecting the Web Site’s Pages |
335 |
Turning the Logo into a Hyperlink
Should the site’s logo appear over a hyperlink that takes users to the home page? In other words, if a user clicks the logo on the home page, should the home page reload, or should the link be dead and nothing happen? Likewise, if the user clicks the logo in subsequently linked pages, should the link return the user to the home page? This concept is similar to that of the Home link covered in Session 23. As with home-page links, the answer is debatable; some think that same-page references are a waste of the user’s time. Others feel that by making the logo a link back to the home page on every one of the site’s pages, you train the user to notice that a quick jump back to the home page is simple and available on every page bearing the logo.
The Barkleys decided to turn the logo into a hyperlink to the home page. To help the user get back to the home page, they will retain this hyperlink everywhere they use the header. Listing 25-2 shows the modified header code that links the logo appropriately.
Listing 25-2
Allowing the logo to always link back to the home page
<tr align=left> <!-- Logo -->
<td align=left width=”179” height=”24”> <!-- The logo links to the home page -->
<a href=”http://www.BarkleyFamilyPage.com/”> <img src=”barkleys.gif” width=149 height=66 align=”absmiddle” border=0 alt=”Family Home Page”>
</a>
</td> <!-- Rest of header follows -->
The <a href> and <img src> tags that follow the <!-- The logo links to the home page --> comment turn the image into a link back to the home page. Therefore, if the user clicks the logo, on any Barkley page on which the logo appears, the home page will display.
You have not created any of the Barkleys’ linked pages so the links on the home page won’t work yet. You will need to adjust the links to point to your own disk drive to try these examples. In addition, you will need to change the location of the images. Load this text’s files from the CD-ROM, locate the image files used in this example, such as the thumbnail image named ourhousT.jpg, and substitute that pathname for the references in the HTML code listings.
Morning Sunday—V Part
25 Session
336 |
Sunday Morning |
Linking the Thumbnails to Larger Images
The Barkley Web site’s home page contains two thumbnail pictures: a family photo and a home photo. Those thumbnails produce larger images that will take longer to load if the user chooses to view the larger pictures. The Barkleys loaded their digital camera with film and captured the photos they use on their site directly to their hard disk.
|
When you locate photos for your Web site, you can either use |
|
a digital camera or scan regular pictures. A quick scan of any |
Tip |
search engine for stock, royalty-free photographs produces sev- |
eral sites from which you can purchase any of thousands of pho- |
|
|
tos or download free photos. |
Given the site’s nature, the Barkley home page benefits especially from personal photographs that are fresh. A corporate home page, however, may use a single photo of the business or primary product and not always use many other pictures throughout the site.
When you place image thumbnails on your page, your users decide, by clicking the thumbnails or not, whether they want to wait for the larger image downloads. You should provide accurate loading information for the user by listing the picture’s file size below the thumbnail or in the alternative text of the thumbnail.
When the user clicks the thumbnail, it can produce a larger image in one of three ways:
1.It can open a new window that displays the larger picture. The title bar doesn’t display a nice title, and when the user finishes viewing the picture, the user must close the new window to return to your Web page.
2.It can hyperlink to display the picture inside the same window. When the user finishes viewing the picture, the user can press the Back button to return to the thumbnail page.
3.In thumbnail pages such as the Barkley home page, it can hyperlink to a new page inside the browser, showing the Web site’s usual navigation bar and header with the picture in the content area. The user can then press the Back button to return to the thumbnail page or click any other link to go elsewhere on the site.
Usability studies show that the Back button is vital to the beginning, intermediate, and advanced Internet user. HTML programmers generally agree that by opening a new window and so leaving the source page on the screen, they leave

Session 25—Creating and Connecting the Web Site’s Pages |
337 |
the user less tempted to go elsewhere once done with the new window. Yet, with the second window on the screen at the same time as the first, the user cannot press the Back button to close the second and return to the first; the user must instead close the new window to see the first one that launched the new window. Little is more frustrating than pressing Back and having nothing happen.
Therefore, you are more likely to keep your users at ease if you link to new content within the current window (option #2 in the preceding list) than if you open a new window for the thumbnail (option #1). The question then becomes, do you show only the larger image, or do you wrap the header and navigation bar around the larger image so that your user views just another page on your site when looking at the picture (option #3)?
By wrapping the header and navigation bar around the picture, you increase the window’s load time and the amount of work you must perform every time you create the new page that’s linked from a thumbnail picture. You must not only add the picture but also the header and navigation bar to the page. Because of this, the Barkleys decided to link only to pictures within the same browser window. Listing 25-3 shows the added hyperlink code needed to display the large photo (outfam.jpg) from the thumbnail (outfamT.jpg). The comments will help you pinpoint the hyperlink.
Listing 25-3
Adding the hyperlink for the first thumbnail picture
<td width=114 height=1 bgcolor=white valign=top align=right> <p align=right>
<font face=Arial size=3 color=#CC9900> <b>Welcome to o</b>
<!-- The thumbnail image links to a larger photo --> <a href=”http://www.BarkleyFamilyPage.com/ourfam.jpg”> <img border=0 src=”ourfamT.jpg” align=top width=105
height=82 alt=”Our Family (24Kb)”> </a>
</font>
</p>
</td>
Notice that the alternative text attribute in the <a href> tag (the attribute alt=”Our Family”) enables the user to see the size of the pictures before clicking the thumbnail. Because the larger photos are not opened in a new window, the user can press the Back button to return to the Barkley home page cleanly.
Morning Sunday—V Part
25 Session

338 |
Sunday Morning |
Listing 25-4 shows the hyperlink for the second photo (ourhouse.jpg) from the thumbnail (ourhousT.jpg).
Both Listing 25-3 and Listing 25-4 contain new code as well as code you entered in previous sessions.
Note
Listing 25-4
Adding the hyperlink for the second thumbnail picture
<td width=”114” height=80 bgcolor=white valign=top align=right> <font face=Arial size=3 color=#CC9900>
<b>We’re movin</b>
<!-- The thumbnail image links to a larger photo -->
<a href=” http://www.BarkleyFamilyPage.com/ourhouse.jpg”> <img border=”0” src=”ourhousT.jpg” align=top
width=105 height=82 alt=”Our New Home (33 Kb)”> </a>
</font>
</td>
Linking the Navigation Bar and Creating Subsequent Pages
When do you add the hyperlinks to your home page’s navigation bar? After each individual Web page is created? Perhaps you omit the links completely until after you create the home page and the subsequent pages that link to the home page.
The latter option is actually the best. To put up a Web site with bad links invites trouble. Your users will think the site is incomplete because it is incomplete. You will lose trust among users. Although trust is not as important for a family Web site like the Barkleys’, good HTML and Web page design habits are always appreciated by users and rewarded by more frequent returns to your sites. In creating a session-by-session Web site, as this Weekend Crash Course does,
the rules must be broken somewhat. At the end of the previous session, you saw the Barkleys’ entire home page in its final form, sans links, and without the subsequent Web pages created yet. If this book had waited for the subsequent pages to be developed, you wouldn’t have seen the home page in its entirety early on, and its production would not have made as much sense. In this session, I continue this

Session 25—Creating and Connecting the Web Site’s Pages |
339 |
approach and first show you how to link the entire home page’s navigation bar before creating any subsequent pages for those links.
Adding the links
Listing 25-5 shows the start of the home page’s HTML code where the navigation bar links need to reside. You’ve seen most of this code already without the embedded hyperlinks. The navigation bar links are simple hyperlinks anchored with the <a> and </a> anchor tag pair. The navigation bar items (as outlined in Session 21) are linked to the subsequent Web pages.
Substitute your own hard disk location for the Web page addresses that you create here so that the Barkley site works as you follow along.
Note
Listing 25-5
Creating the navigation bar links
<!-------------------------- |
> |
<!-- The body begins here -- |
> |
<!-------------------------- |
> |
<body bgcolor=009900> |
|
<table border=0 width=2000 height=3 cellspacing=0 cellpadding=0> <tr>
<td width=140 height=382 bgcolor=#009900 align=center valign=top rowspan=3>
<font face=Arial size=2 color=#FFFFFF> <b><i>Welcome</i>
<hr>
<a href=”http://www.BarkleyFamilyPage.com/Mom.htm/”> Mom’s Corner
</a><br>
<a href=”http://www.BarkleyFamilyPage.com/Dad.htm/”> Dad’s Corner
</a><br>
<a href=”http://www.BarkleyFamilyPage.com/Kids.htm/”>
Morning Sunday—V Part
25 Session
Continued

340 |
Sunday Morning |
Listing 25-5 |
Continued |
Kid’s Playground </a><br>
<a href=”http://www.BarkleyFamilyPage.com/Pics.htm/”> Family Pictures
</a><br>
<a href=”http://www.BarkleyFamilyPage.com/Movies.htm/”> Favorite Movies
</a><br>
<hr><hr>
<i>Special
<br>Bulletins</i>
<hr>
<a href=”http://www.BarkleyFamilyPage.com/Travels.htm/”> Family Travels</b>
</a>
</font>
</td>
As soon as you load the home page, you will notice that the page looks the same as before except that the navigation bar’s links now appear. The problem is that the links’ default color is blue, which does not look good on the page’s green background. White text looks much better. Change the color of the unvisited links on the page by changing the single <body> tag as follows:
<body bgcolor=009900 link=white>
All the links now appear in white, and their underlining makes it clear that they are links to other places. The initial home page is now finished. If this were a true home page to load onto a Web server, you would name the home page index.htm or index.html (your Web host will tell you the preferred name for that host’s servers).
You will have to create each linked page in a separate .html file. Once you upload such linked files to the Web, your home page can access them by their addresses. To follow along here, you can create each page and store the page on your hard disk or copy the CD-ROM’s completed Web pages to your hard disk and connect the links to them. A Web site is often little more than several HTML text files and graphic images located on the same server, referencing each other through hyperlinks.
Session 25—Creating and Connecting the Web Site’s Pages |
341 |
Making Mom’s Corner
Now that you’ve completed the home page, try your hand at one of the secondary pages. The first link, Mom’s Corner, is a good place to start. Keep the following considerations in mind that the Barkleys made when they designed their site:
The header and navigation bar are to appear on most of the site’s pages for consistency.
Only the large white content area changes from page to page.
The best way to begin creating Mom’s page is to make a copy of the home page because the home page serves as a good prototype for the remaining pages. Call the copy Mom.htm and save the file in the same folder as the home page. If the Barkley site was a registered domain name, you would upload the mother’s HTML file onto the server in the same directory as the home page. Given that your sample files are not on a Web server, adjust the links in the code mentioned here. The adjustments are simple to make because you change them to refer to your own hard disk.
Most of Mom’s Web page follows the pattern of the home page. After making the copy, edit Mom.htm and change the comments (<!>) and the title (<title>) to reflect the new page. Leave the meta tags the same for all the site’s pages. The meta tags (<meta>) are general for the site, and the higher the number of Web pages on which they appear, the more attention a search engine will give your site. Listing 25-6 shows the first part of the HTML file with the comments and title and a place for the meta tags.
Listing 25-6
Creating the comments and title for Mom’s Web page
<!------------------------------------------ |
|
> |
<!-- |
Mom’s Page |
--> |
<!-- |
Linked to www.BarkleyFamilyPage.com |
--> |
<!-- |
Created: June 9, 2003 |
--> |
<!-- |
Last modified: June 30, 2003 |
--> |
<!-- |
Write Barkley@ourweb.net if |
--> |
<!-- |
you have questions. |
--> |
<!------------------------------------------ |
|
> |
<!---------------------------- |
> |
|
<!-- |
The header begins here --> |
|
<!---------------------------- |
> |
|
Morning Sunday—V Part
25 Session
Continued
342 |
Sunday Morning |
Listing 25-6 |
Continued |
<head>
<title>Mom’s Home Page</title>
<!-- The search engine tags appear next -->
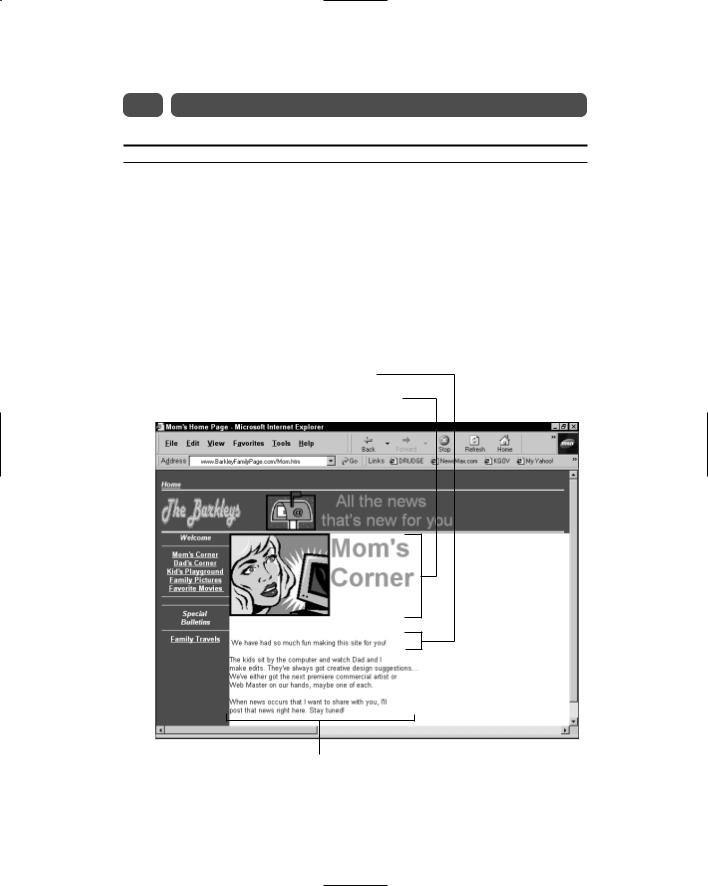
The next step is to create the content portion of Mom’s Web page. Figure 25-1 shows that Mom prefers a simple content area that she can quickly update with notes and messages to friends and with her news of the family. She doesn’t want to put pictures on her page. The entire page looks and acts just as the home page does except for the white content area.
two-cell row three-cell row
this cell spans two columns
Figure 25-1
Mom’s Corner holds a simple content area.
Session 25—Creating and Connecting the Web Site’s Pages |
343 |
The content area is part of the lower table that includes the navigation bar in its first column. Only the first row with the picture contains all three columns. The first row holds the navigation bar, Mom’s graphic image (located on this tutorial’s CD-ROM just as all the site’s images are), and her large welcome message (“Mom’s Corner”). The cell below is large and spans two column widths. This large area holds all the text that Mom wants to add, making it easier for Mom to add, edit, and remove text from inside her HTML page. As Mom adds to the text, the white content area grows without affecting the rest of the page. If Mom adds enough content to fill the entire page and more, the page lengthens and scroll bars appear to the right of the browser window so that users can scroll to read more.
Listing 25-7 shows the HTML section of Mom’s page that holds the content. All the other code matches that of the home page with the exception of the title and comment modifications made in Listing 25-6. Look through the code to see how Figure 25-1’s content appears.
Listing 25-7
Creating the content table for Mom’s Web page
<!-- Mom’s logo and Welcome message -->
<td width=114 height=1 bgcolor=white valign=top align=right> <img border=0 src=”Mom.jpg” align=top width=190
height=157 alt=”Our Dear Mom”>
</td>
<td width=2000 height=1 bgcolor=white valign=top align=left> <p>
<font face=Arial size=7 color=#CC9900> <b>Mom’s
<br>Corner</b>
</font>
</td>
</tr>
<!-- The final row spans both columns and falls vertically as long as Mom has something to write -->
<td width=2000 height=80 bgcolor=white valign=top align=left colspan=2>
Morning Sunday—V Part
25 Session
Continued