

The List
For a standard herald’s tabard, you will need:
2m of 120 or 150cm wide mid green fabric, or 3m of 90cm wide
0.5m of golden yellow for trumpets
Optional 0.65 m of bondweb for trumpets (the easiest option!)
2m of 120cm green or gold lining fabric
(neat finish, better hang and wear, essential if using fringe or joining main pieces)
Optional 0.75m of cord-edged braid (piping cord) to finish the neck (neat, hard-wearing finish)
Optional 7m of braid/cord to outline trumpets (well worth the effort)
Optional 6.5m of fringing (expensive but fabulous – the thick furnishing variety is best).
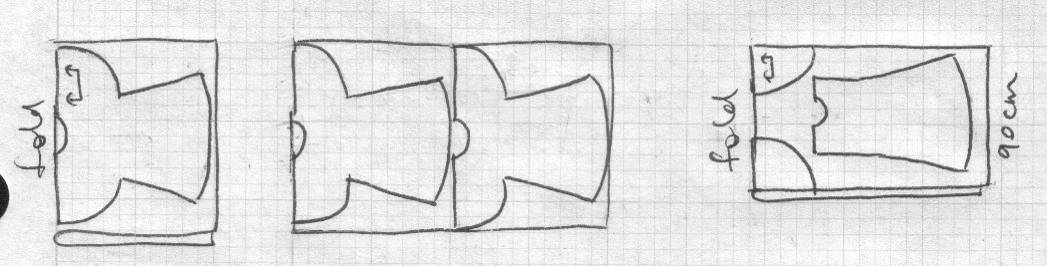
Fig 18 Cutting diagram for tabard.: 120/150cm without nap, 120/150 with nap, 90cm without nap
For a Group Herald tabard, the materials will obviously depend on your design. Refer to your full-scale patterns to work out how much fabric and cord etc you will need. The piping cord, fringing and lining will be the same as above.
If you plan to wash your tabard, make sure all the components are washable before you buy them. Overcast the edges first to avoid fraying, then wash it all before you cut anything out. You should also wash your braids too, since they can shrink more than fabric! Again, make sure then ends are finished, oversewn or knotted first.
If you plan to dry clean only, make sure everything can be dry-cleaned (especially any braids) before you buy anything.
Putting it together
As with designing a device, you start with the field and work up the layers.
Field
For a standard herald’s tabard, this is simply a matter of cutting it out, and perhaps sewing on separate sleeves, if you have used narrow fabric to provide your field. The same applies to a Group tabard if the field is a single colour.
If you have a divided field or ordinaries, the simplest approach is to treat the front, back and sleeves as separate units until each is complete, then sew them together at the end.
If the field is divided along a simple line of division, join the pieces of the field and press the seams flat.
For a complicated line of division, the best approach is appliqué. Allow enough extra fabric to have a full overlap for the line of division. Draw the line on the top fabric with tailor’s chalk or water soluble marker and follow the instructions under Charges.
Once you have completed your ‘field’, check that your completed tabard or sections still match your overall pattern and adjust if needed.
Ordinaries
Some ordinaries can be sewn into the field – this works well if you have a fess, bend or chief with a straight line of division. In this case, press both seam allowances to the ordinary side, so it stands out above the field.
If your ordinaries are complex, follow the same technique as Charges.
Mark hems
Once your ordinaries are in place, mark your hems with tailor’s chalk, so you can see the limits of your field.
Charges
The easiest approach for charges is Bondweb, or equivalent. Draw the charges onto the top fabric with tailors chalk, then iron the Bondweb to the back of the fabric, following the instructions. Cut out the charges and peel off the backing paper. Iron the charges onto the field fabric and let cool. For a simple finish, machine a close, wide zigzag over the edges to form a satin stich edge. Alternately, use a more basic zigzag, and then cover the join with braid, or couch down a decorative cord by hand or machine (see below).
Alternately, draw the charges on the top fabric, then cut out, leaving a margin of fabric. Pin very well, ensuring there are no ripples. For a satin stitched edge, straight stitch around the line, trim close to the stitching, then machine a close, wide zigzag over the edges for a satin stich edge. Alternately, use a basic zigzag, trim and then braid or cord as above.