

Практическая работа № 4
Walking Movie Clip
Using Flash MX2004 program, open the file called “T4-walk.fla”. Watch “T4-sample.swf”.
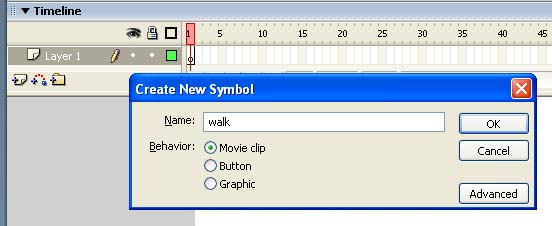
2. Point to the pull down menu, Insert > New Symbol (or press (Ctrl + F8). Name it as “walk” and give it the behavior of a movie clip.
3. Now you are at the work space within the “walk” movie clip
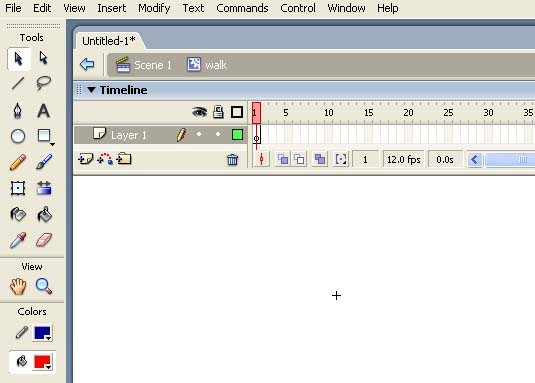


From here we know we are at the work space within the “walk” movie clip
4. Using move tools (press “v”) and line tool (press “n”), draw the following character:

Use these two tools for drawing and adjusting the character
5. Group the character by pressing Ctrl + G
6. Use your move tool (press “v”) to click frame 2. Press F7 to insert a blank
key frame. Draw the following character in the frame 2:

Group this character by pressing Ctrl + G
7. Use your move tool (press “v”) to click frame 3. Press F7 to insert a blank key frame. Draw the following character in the frame 3:

Group this character by pressing Ctrl + G
8. Use your move tool (press “v”) to click frame 4. Press F7 to insert a blank key frame. Draw the following character in the frame 4:

Group this character by pressing Ctrl + G
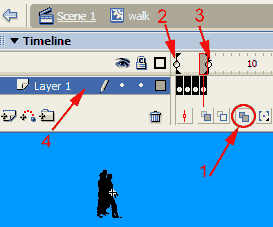
9. Click the button at the bottom of the layers palette (1) to edit multiple frames. Set the sliders (2 and 3) to cover all frames. Click just to the right of the layer name (4) to select the entire layer.
10. Open your align panel from the pull down menu (by clicking Window > Design Panels > align). Click the to stage button. Click align vertical centers. Click align horizontal centers.

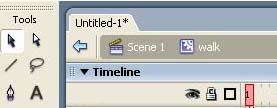
11. Deselect edit multiple frames (by clicking on the stage) and click the scene 1 on the info bar to return to your main stage.


Click this one
12. Open your library (Ctrl + L). Drag a copy of your walk movie clip onto your stage and position it on the walk path in the foreground.
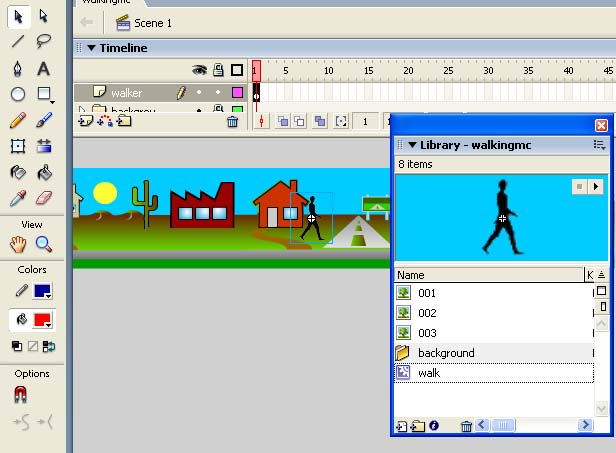


13. Now press (Ctrl+Enter) to view your walking man.
THE END
Exercise:
Draw a flying butterfly and lay it on the background so that what we see now is not only the walking man but also the butterfly.
Практическая работа № 5
Using FRAMES with LAYERS in the timeline
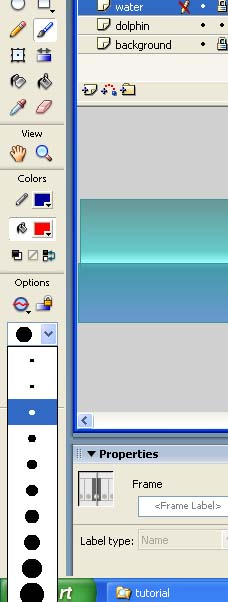
Using Flash MX2004 program, open the file called “T5-dolphin.fla”. View “T5-dolphin-sample.swf” too to know what you are going to create.
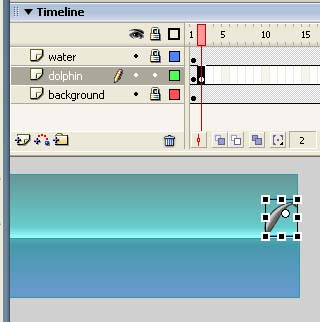
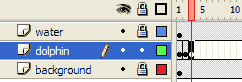
Observe the 3 layers.
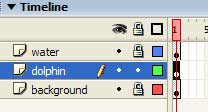
"background" layer - This layer is locked so it can not be manipulated
"dolphin" layer - not locked, is editable. There is one dolphin in this layer. If you click on this layer a square forms around the dolphin. That means the dolphin is saved as a movie clip
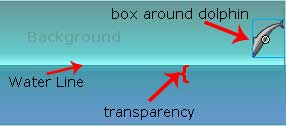
"water" is also locked. If you move the dolphin up and down (using
 or press “v”), you will see the upper edge of the water layer is
at about halfway down the stage. The upper edge of the water
is semi transparent.
or press “v”), you will see the upper edge of the water layer is
at about halfway down the stage. The upper edge of the water
is semi transparent.
Click somewhere off the stage where there is no contents to deselect the dolphin.
Press ctrl + F3 to open your properties inspector.

From the inspector, we know the frame rate is 12. Since the frame rate is 12 frames per second, we will build a movie that is 5 seconds long. 12 frames per second times 5 seconds gives us 60 frames.
![]()
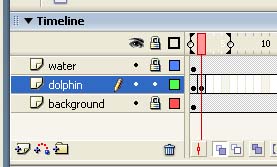
Click in frame 60 of the "background" layer and press F5 key to extend the frames to 60.
Click in frame 60 of the "water" layer and press F5 key to extend the frames to 60. Now your timeline will look like this:

Click back on frame 1 of the “dolphin” layer.
Select your transform tool
 from the toolbox (or press “q”), handles will form on the
dolphin symbol box as shown below:
from the toolbox (or press “q”), handles will form on the
dolphin symbol box as shown below:
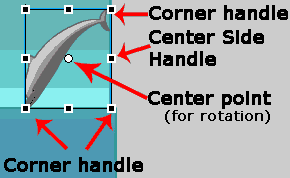
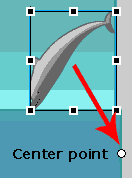
Click the center point and drag it to the right of the symbol and down below the lower right corner handle. This is the point of rotation when you rotate the dolphin. Moving the center point will make the rotation easier so the dolphin will make a nice arc.
Click on frame 2.
Press F6 to insert a new keyframe. Make sure your transform tool is still selected so that we still can see the bounding boxes with handles and centers right away.
Mouse over a corner handle and rotate the dolphin counter clockwise so it is about 1/2 under the water.

At this point you may want to turn onion skin to track the frame by frame animation.
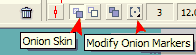
Modify Onion Marker to 5 frames or Onion 5
Move this marker to cover 5 frames

Click on frame 3 of the dolphin layer. Press F6 to insert a keyframe. This keyframe will be identical to the one just to its left.
Mouse over the corner handle until you see the bend double headed arrow and rotate another eighth of a circle so that the tail is just showing above the water.
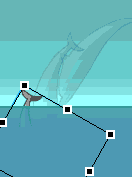
Click in frame 4 and press F6 to insert a new keyframe. Use your transform tool to rotate the dolphin around so the bottlenose just beaks the surface.
Click in frame 5 and press F6. Using the move tool , drag the dolphin left across the stage to a new location to start his jump.


Move the whole dolphin to new location
Rotate your dolphin about an eighth of a rotation clockwise so you see the dolphin coming up out of the water. Continue inserting keyframes and rotating until your dolphin is nearly gone. Below you see a progression across frames 4-10.

21. Repeat 18 - 20 again but this time moving your dolphin to a new location on the waterline, filling in frames 11-17; repeat again for frames 18-24, repeat again for frames 25-31; repeat again for 32-38, 39-45; 46-52; 53-59. Possible frame changes are as follows:

11st
18th
25th
32nd
39th
46th
53rd
12nd
19th
26th
33rd
40th
47th
54th
13rd
20th
27th
34th
41st
48th
55th
14th
21st
28th
35th
42nd
49th
56th
15th
22nd
29th
36th
43rd
50th
57th
16th
23rd
30th
37th
44th
51st
58th
17th
24th
31st
38th
45th
52nd
59th
Livening up your movie: the splash
22 Right click on the dolphin layer. Select insert layer. A blank layer will appear above the dolphin called “layer 4”.
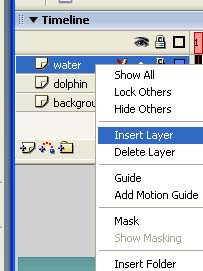
23. Double click the name “layer 4” to change the name to “splash”. Make sure the “splash” layer sits on top of all the layers.


2 4.
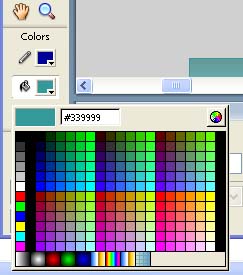
Click in frame 4 of splash and press F6. Set the fill to #339999
blue. Select your brush tool set to a small round brush.
4.
Click in frame 4 of splash and press F6. Set the fill to #339999
blue. Select your brush tool set to a small round brush.


25. Sketch some drops of a splash around the tail on frame 4.

26. Click in frame 5 and press F6. Automatically the fill from frame 4 is copied into 4 and highlighted.
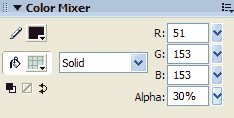
27. Go to your colour mixer panel (from pull down panel: Window>Design Panels>Colour Mixer) and select fill color. Set the alpha value to 30% by clicking the fly out menu and dragging the slider down to 30.

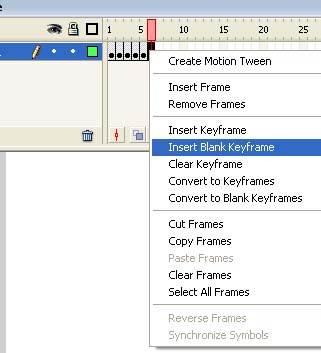
28. Click in frame 6 of the splash layer. Right click and select Insert blank keyframe.
29. Repeat 26-28 again but this time adding a keyframe to 11 (press F6); placing the splash over the visible tail in frame 11, then duplicating the frame for frame 12, and alpha the fill. Repeat 15 and 16 again for the following frames 25; 32; 39; 46; 53, 60.
30. Now press (Ctrl+Enter) to view your animation.