

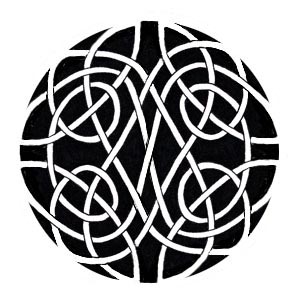
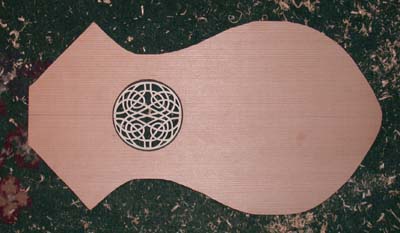
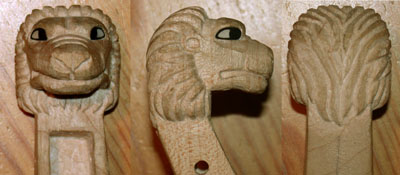
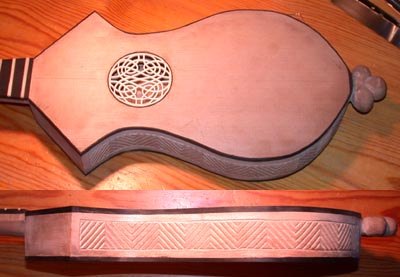
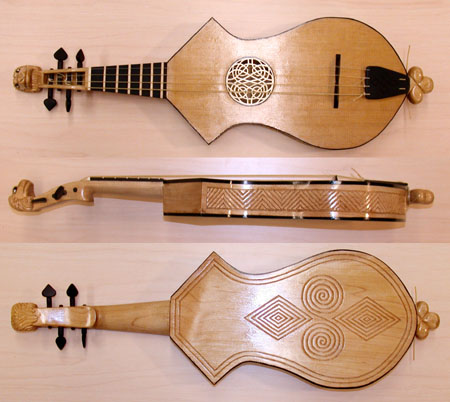
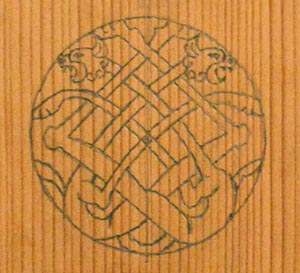
It will also have a carved pegbox with an animal head, only this time the animal will be a lion, based roughly on Celtic designs.
 The
rosette will be carved into a knotwork pattern, based on a knotwork
from the Book of Kells. The idea was to have it echo somewhat the
diamond and circle pattern that appears on the back of the
instrument.
The
rosette will be carved into a knotwork pattern, based on a knotwork
from the Book of Kells. The idea was to have it echo somewhat the
diamond and circle pattern that appears on the back of the
instrument.
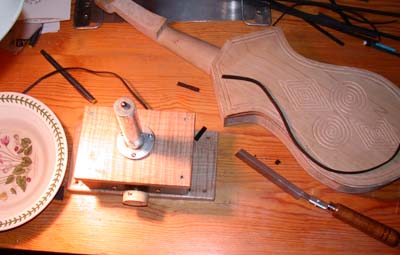
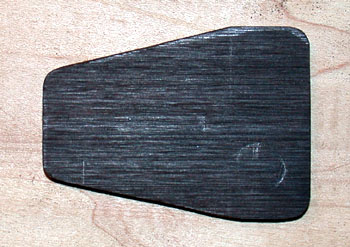
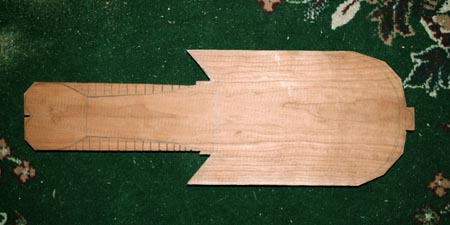
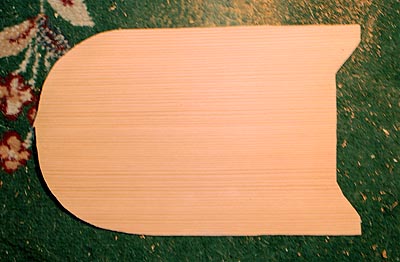
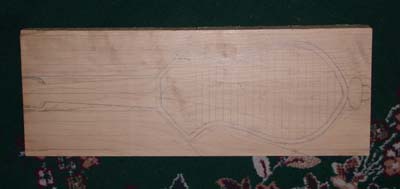 So
we begin. This is a nice, resonent piece of 2" thick eastern
maple that is already somewhat aged, having been in the house now for
at least a year (this was the backup piece for Citole #3 originally).
One of the most common questions I get whenever people look at Citole
one is "How long did it take you to make that?" While I
randomly guess at least several hundred hours, I actually couldn't
give people a known figure. So one of the things I decided to do with
this one is to actually calculate the amount of time it takes to do
each step. Here we've drawn the pattern carefully onto the wood. The
centerline has been marked (and will continually be re-marked to
maintain it clearly as we go along), and the area to be drilled out
eventually gridded. Total time under an hour.
So
we begin. This is a nice, resonent piece of 2" thick eastern
maple that is already somewhat aged, having been in the house now for
at least a year (this was the backup piece for Citole #3 originally).
One of the most common questions I get whenever people look at Citole
one is "How long did it take you to make that?" While I
randomly guess at least several hundred hours, I actually couldn't
give people a known figure. So one of the things I decided to do with
this one is to actually calculate the amount of time it takes to do
each step. Here we've drawn the pattern carefully onto the wood. The
centerline has been marked (and will continually be re-marked to
maintain it clearly as we go along), and the area to be drilled out
eventually gridded. Total time under an hour.
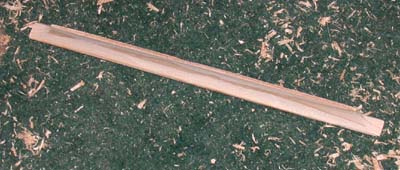
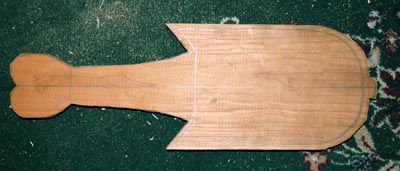
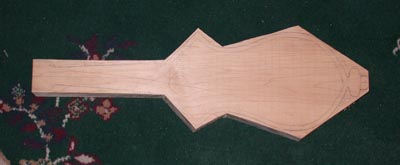 The
first wave of cutting. This is done with the larger manual saw - not
done extremely exactly, more just a gross removal of wood. The maple
is again rather harder than the cherrywood, and is a little difficult
to saw through. Total sawing time was about five hours, spread out
over a couple of nights (as my arm fatigues after about an hour).
The
first wave of cutting. This is done with the larger manual saw - not
done extremely exactly, more just a gross removal of wood. The maple
is again rather harder than the cherrywood, and is a little difficult
to saw through. Total sawing time was about five hours, spread out
over a couple of nights (as my arm fatigues after about an hour).
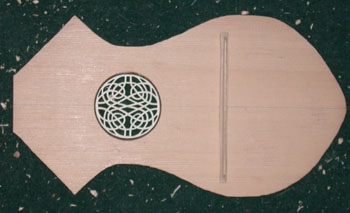
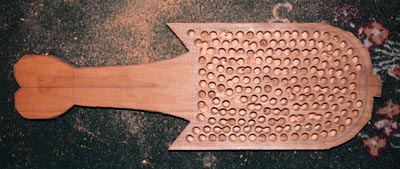
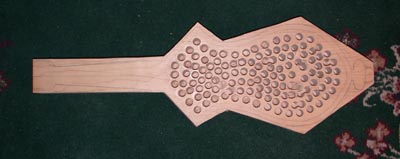 The
body cavity clearing is started by drilling a bunch of holes with a
1/2" bit. Like before (see above) I used the "stopper"
method to keep from drilling too deeply, but otherwise all this is
done with a hand drill (power, but not a drill press). The drilling
itself took about an hour or so, but had to be done over an evening's
time, as the drill starts to overheat if used too continuously. The
maple is, as already noted, fairly hard and the drill really has to
work to get through it. I also learned (from working on the other
citoles) that it's easier to carve out the cavity before cutting the
outer walls close - it makes the wood stronger for the harder chisel
hacking that has to be done to clear the cavity, and gives a little
possible leeway should a mistake occur.
The
body cavity clearing is started by drilling a bunch of holes with a
1/2" bit. Like before (see above) I used the "stopper"
method to keep from drilling too deeply, but otherwise all this is
done with a hand drill (power, but not a drill press). The drilling
itself took about an hour or so, but had to be done over an evening's
time, as the drill starts to overheat if used too continuously. The
maple is, as already noted, fairly hard and the drill really has to
work to get through it. I also learned (from working on the other
citoles) that it's easier to carve out the cavity before cutting the
outer walls close - it makes the wood stronger for the harder chisel
hacking that has to be done to clear the cavity, and gives a little
possible leeway should a mistake occur.
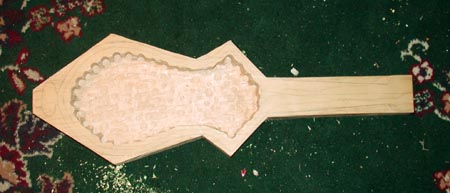
 Starting
the "hacking out" of the body cavity, using the scoop
chisel and a mallet. The maple clears slower than the cherry, but
still cut pretty quickly.
Starting
the "hacking out" of the body cavity, using the scoop
chisel and a mallet. The maple clears slower than the cherry, but
still cut pretty quickly.
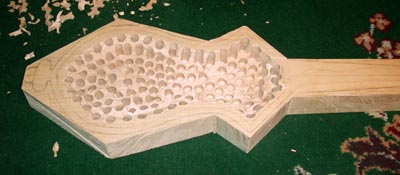
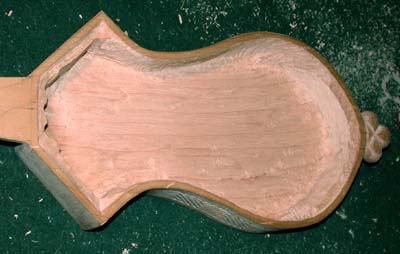
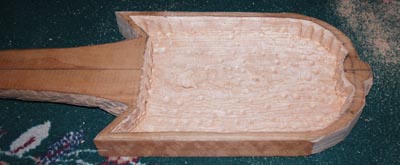
 Finished
the first pass of clearing out the body cavity, all done with the
simple scoop chisel and mallet. This took a total of about four
hours. Now need to take the smaller chisels (and potentially the
dremel) to smooth out the walls and basically level the floor.
Neither will be finally finished until the outside carving is done,
as the thicknessing will be done from the inside.
Finished
the first pass of clearing out the body cavity, all done with the
simple scoop chisel and mallet. This took a total of about four
hours. Now need to take the smaller chisels (and potentially the
dremel) to smooth out the walls and basically level the floor.
Neither will be finally finished until the outside carving is done,
as the thicknessing will be done from the inside.
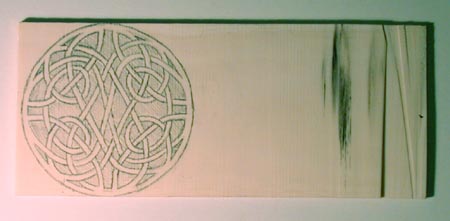 Was
finally (after much searching, as many of my regular sources have
dried up) able to secure a piece of ivory for the rosette. This nice
BIG piece came from Cue
Components, which sells billard cue making supplies.
Seemed an odd source, but they were very helpful, rather inexpensive,
and very quick. Took about 1/2 hour to transfer the pattern from
paper to the ivory and clean it up for drilling. Obviously I have
enough on this one piece to probably make another rosette!
Was
finally (after much searching, as many of my regular sources have
dried up) able to secure a piece of ivory for the rosette. This nice
BIG piece came from Cue
Components, which sells billard cue making supplies.
Seemed an odd source, but they were very helpful, rather inexpensive,
and very quick. Took about 1/2 hour to transfer the pattern from
paper to the ivory and clean it up for drilling. Obviously I have
enough on this one piece to probably make another rosette!
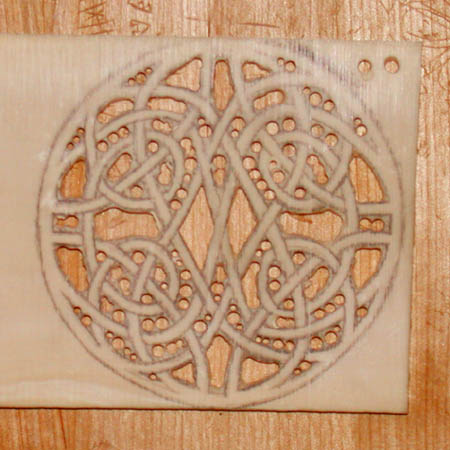
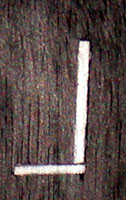
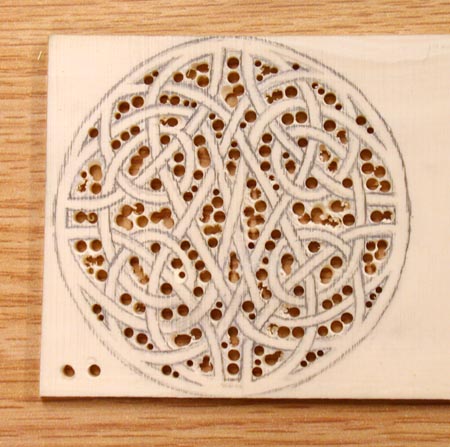 The
drilling has been done on the rosette - this took about two hours
with the dremel drill-press. Lots of little holes (no, I haven't
counted). The two holes off to the side were tests to prep lining up
the depth and targeting of the little press so I didn't damage the
primary pattern.
The
drilling has been done on the rosette - this took about two hours
with the dremel drill-press. Lots of little holes (no, I haven't
counted). The two holes off to the side were tests to prep lining up
the depth and targeting of the little press so I didn't damage the
primary pattern.
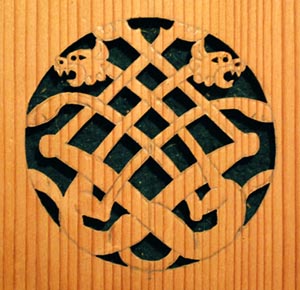
 About
another two or three hours of chipping away (carefully) at the larger
spaces with the mini-chisels has basically opened up the large
spaces. The smaller spaces will then be done with the micro-chisels,
and then all of them cleaned up with the mini-files. The ivory color
is actually pretty white - it tends to look creamy or almost brown
because of the slightly odd lightening of the photos, and to help
make it more clear.
About
another two or three hours of chipping away (carefully) at the larger
spaces with the mini-chisels has basically opened up the large
spaces. The smaller spaces will then be done with the micro-chisels,
and then all of them cleaned up with the mini-files. The ivory color
is actually pretty white - it tends to look creamy or almost brown
because of the slightly odd lightening of the photos, and to help
make it more clear.
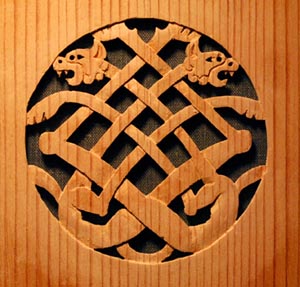
 And
another two hours or so have working with the micro-chisels opens up
the remaining space. From here on out the rest of the work is done
with the mini-files to shape the holes. After that the chisels come
back to do the "knotworking" pattern.
And
another two hours or so have working with the micro-chisels opens up
the remaining space. From here on out the rest of the work is done
with the mini-files to shape the holes. After that the chisels come
back to do the "knotworking" pattern.
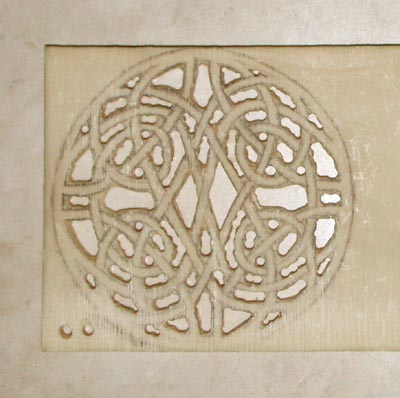
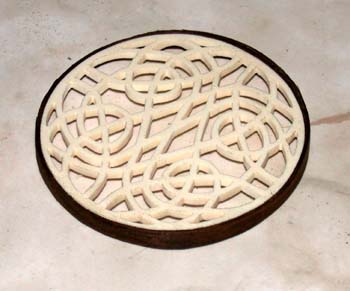
 About
10 more hours and we have the filing done, so the sillouette is
complete. It has also been cut out (using a jeweler's saw) from the
slab and the edges evened out with the files. All that remains here
now is the over-under patterning and the ebony edging.
About
10 more hours and we have the filing done, so the sillouette is
complete. It has also been cut out (using a jeweler's saw) from the
slab and the edges evened out with the files. All that remains here
now is the over-under patterning and the ebony edging.
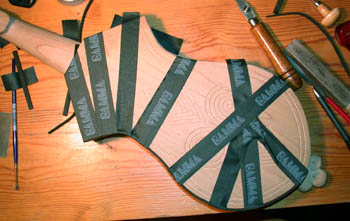
 Back
on the body block, the outer edge shape has been brought closely into
line. This was done with two techniques - the first is to use a small
saw to cut a series of notches and then to chip out the spaces
between the notches (fairly quick, but risks cracking the wood). The
closer work is done with simple small chisels - see below.
Back
on the body block, the outer edge shape has been brought closely into
line. This was done with two techniques - the first is to use a small
saw to cut a series of notches and then to chip out the spaces
between the notches (fairly quick, but risks cracking the wood). The
closer work is done with simple small chisels - see below.
 Cutting
out the neck - start by lining it out, and then cutting a notch (two
vertical cuts, with the inner space chipped out), and then using that
slot to fit in the coping saw to undercut the rest.
Cutting
out the neck - start by lining it out, and then cutting a notch (two
vertical cuts, with the inner space chipped out), and then using that
slot to fit in the coping saw to undercut the rest.
 Here
you can see the technique of slowly chiseling down the surface of the
sides to bring them to just the point I want. The chisels are still
faster than filing it down, and throw a lot less dust in the air
(since I mostly work on my living room floor, this is a fairly major
consideration). You can also see here that the neck has been cut down
by this point.
Here
you can see the technique of slowly chiseling down the surface of the
sides to bring them to just the point I want. The chisels are still
faster than filing it down, and throw a lot less dust in the air
(since I mostly work on my living room floor, this is a fairly major
consideration). You can also see here that the neck has been cut down
by this point.
 The
body has now been fully roughed out on the outside. That took about
eight hours of work. Next will be the cleanup of that, so I can do
the decorative carving on the outer side of the body. Once that is
down, the walls and floor will be thinned down from the inside. You
can also see the sketch of the scrollhead on the block.
The
body has now been fully roughed out on the outside. That took about
eight hours of work. Next will be the cleanup of that, so I can do
the decorative carving on the outer side of the body. Once that is
down, the walls and floor will be thinned down from the inside. You
can also see the sketch of the scrollhead on the block.
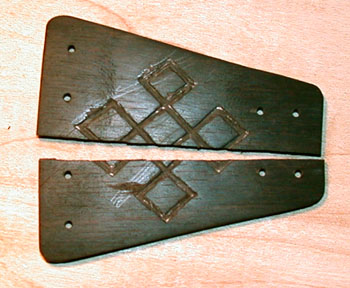
 The
sides, with a combination of chisels, files and the scrapers have
been smoothed out, ready to have the drawings of the patterning done
on them. This again took about 2-3 hours per side.
The
sides, with a combination of chisels, files and the scrapers have
been smoothed out, ready to have the drawings of the patterning done
on them. This again took about 2-3 hours per side.
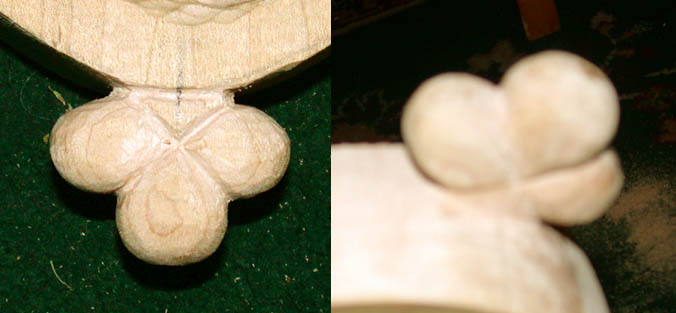 The
tail trefoil is carved out into its more or less final form. Not
finished - still need to final filing and sanding, but the shape is
done.
The
tail trefoil is carved out into its more or less final form. Not
finished - still need to final filing and sanding, but the shape is
done.
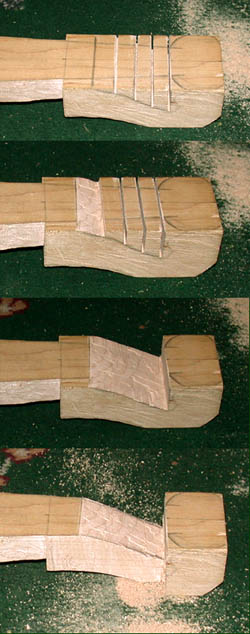 Starting
the shaping of the scrollbox. This sequence shows the rough steps I
use to work it down (similar to what I did on the sides). Use a saw
to slot the section, then a chisel to chisel out the sections between
the slots, and then saw down the sides. The area for the lion head
has been left large until I do the sculpture to see its exact
dimensions.
Starting
the shaping of the scrollbox. This sequence shows the rough steps I
use to work it down (similar to what I did on the sides). Use a saw
to slot the section, then a chisel to chisel out the sections between
the slots, and then saw down the sides. The area for the lion head
has been left large until I do the sculpture to see its exact
dimensions.
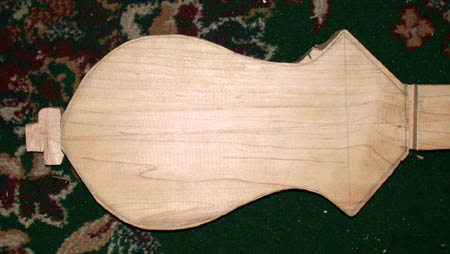
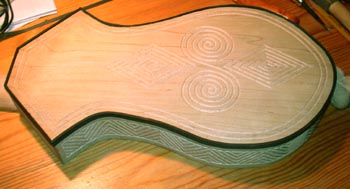
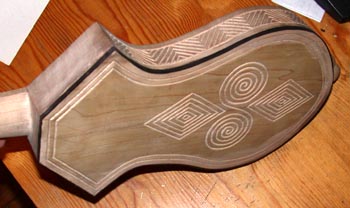
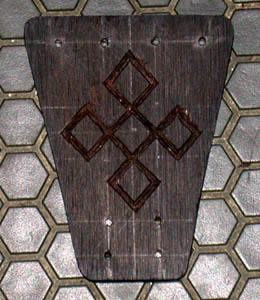
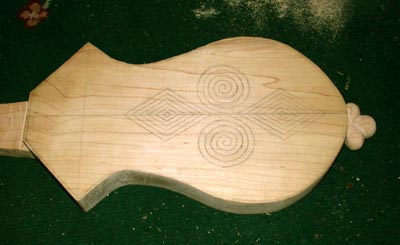 The
basic structural carving being done, I now start the surface
detailing. Here the pattern has been drawn onto the back of the
instrument.
The
basic structural carving being done, I now start the surface
detailing. Here the pattern has been drawn onto the back of the
instrument.
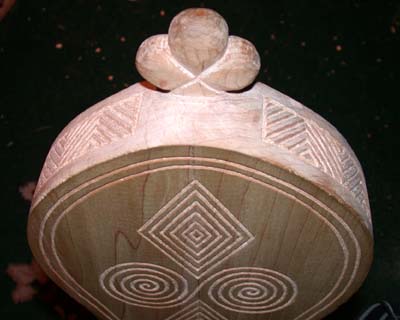
 About
3/4ths of the way done the back pattern. The initial line is "traced"
with a sharp knife, creating an incision about 1/8 inch deep. Then a
"V" channel is chipped out using the small chisels to
either side of the line, and cleaned up with a V-chisel and the
files. I tried on some scrap using the V-chisel directly on the line,
but the changing direction of the grain, coupled especially with the
sharp curves of the spiral design, made that very awkward, and I
ended up with more mistakes than I could readily clean up. So went
with this technique instead. After the full pattern is complete,
there will be a double line done ringing the edge of the whole back,
which will be then further edged with the ebony edge-binding.
About
3/4ths of the way done the back pattern. The initial line is "traced"
with a sharp knife, creating an incision about 1/8 inch deep. Then a
"V" channel is chipped out using the small chisels to
either side of the line, and cleaned up with a V-chisel and the
files. I tried on some scrap using the V-chisel directly on the line,
but the changing direction of the grain, coupled especially with the
sharp curves of the spiral design, made that very awkward, and I
ended up with more mistakes than I could readily clean up. So went
with this technique instead. After the full pattern is complete,
there will be a double line done ringing the edge of the whole back,
which will be then further edged with the ebony edge-binding.
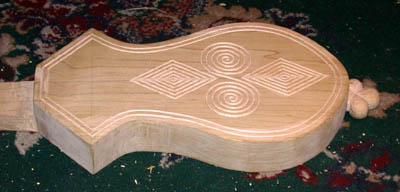 The
finished back carvings, though before the back has had a final
scrapping/sanding. The sides have also been finished being prepped
for having the designs drawn onto them, though still have to clean up
the neck (which will be done once I've worked out the peghead
design).
The
finished back carvings, though before the back has had a final
scrapping/sanding. The sides have also been finished being prepped
for having the designs drawn onto them, though still have to clean up
the neck (which will be done once I've worked out the peghead
design).
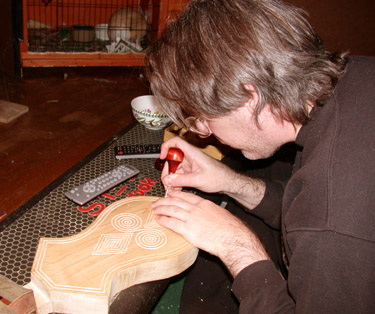 This
is mostly an amusement image. I sometimes get comments about how
people would like to do this kind of project, but don't have a good
workshop like I supposedly have. Well, the simple truth is I do most
of my work on my living room floor, usually while watching (or rather
mostly listening to) television. It's a nice time to catch up on all
those commentary tracks of the various DVD's I have. The 'table' is
actually my wife's Rebok Step, which I plop down in front of and work
away. My usual "live studio audience" as my wife puts it,
consists of our pet rabbits, the male Apricot of which you can see in
the background here (happily shreading the newspaper in his cage).
Peebs (our female, on the other side of the room behind the camera
from this angle) also likes to help by chewing on my projects, or
most often chewing on the tools. Apparently there is nothing more
fascinating to a rabbit than a fast moving hand saw cutting maple
wood...
This
is mostly an amusement image. I sometimes get comments about how
people would like to do this kind of project, but don't have a good
workshop like I supposedly have. Well, the simple truth is I do most
of my work on my living room floor, usually while watching (or rather
mostly listening to) television. It's a nice time to catch up on all
those commentary tracks of the various DVD's I have. The 'table' is
actually my wife's Rebok Step, which I plop down in front of and work
away. My usual "live studio audience" as my wife puts it,
consists of our pet rabbits, the male Apricot of which you can see in
the background here (happily shreading the newspaper in his cage).
Peebs (our female, on the other side of the room behind the camera
from this angle) also likes to help by chewing on my projects, or
most often chewing on the tools. Apparently there is nothing more
fascinating to a rabbit than a fast moving hand saw cutting maple
wood...
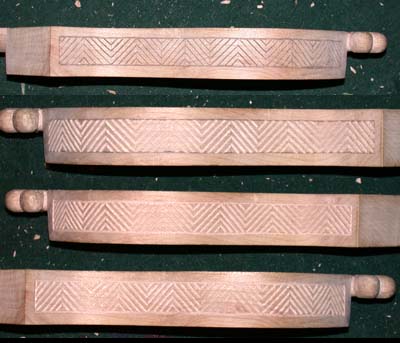
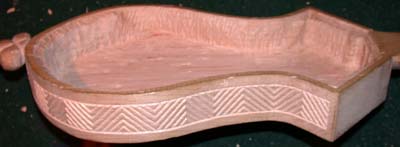
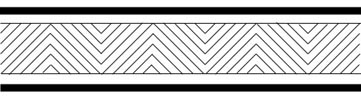 The
side carvings will be a simple matrix of alternating diagonals, lined
top and bottom with the ebony edge binding. Here is the design drawn
out before worked onto the sides of the instrument. This pattern will
run from the tailpiece to the tip of the wing on each side.
The
side carvings will be a simple matrix of alternating diagonals, lined
top and bottom with the ebony edge binding. Here is the design drawn
out before worked onto the sides of the instrument. This pattern will
run from the tailpiece to the tip of the wing on each side.
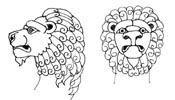 Slight
reworking of the lionhead, based on a 14th century bronze aquamarile
sculpture from the Cloisters in NYC. The person who this citole is
for preferred a closed mouth lion to an open mouthed one. Not wildly
different from the first idea, but probably in the end easier to
carve, as I won't have to do the interior of the mouth.
Slight
reworking of the lionhead, based on a 14th century bronze aquamarile
sculpture from the Cloisters in NYC. The person who this citole is
for preferred a closed mouth lion to an open mouthed one. Not wildly
different from the first idea, but probably in the end easier to
carve, as I won't have to do the interior of the mouth.
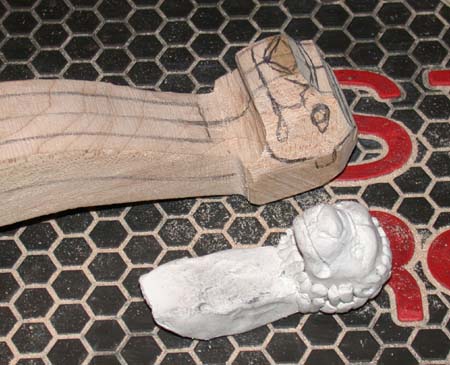
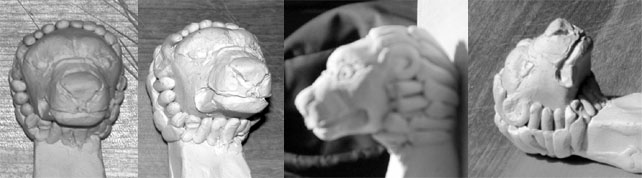 The
clay model of the lionhead, done to actual scale. As with the
greyhound head, I find it easier to carve from a 3-D model rather
than from 2-D sketches, so I make a scratch version of the carving in
clay. Obviously the detail level is rough and the mane here is merely
"suggested" rather than the actual mane, which will be a
bit fuller (I just didn't feel like wasting time building up the full
mane - was more concerned with the form of the head). The corners of
the mouth will be cut more deeply in the wood, and at this point the
intention is to inlay the eyes with ivory whites and ebony pupils.
The
clay model of the lionhead, done to actual scale. As with the
greyhound head, I find it easier to carve from a 3-D model rather
than from 2-D sketches, so I make a scratch version of the carving in
clay. Obviously the detail level is rough and the mane here is merely
"suggested" rather than the actual mane, which will be a
bit fuller (I just didn't feel like wasting time building up the full
mane - was more concerned with the form of the head). The corners of
the mouth will be cut more deeply in the wood, and at this point the
intention is to inlay the eyes with ivory whites and ebony pupils.
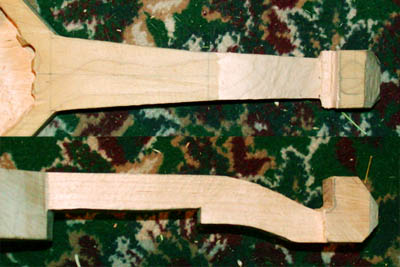
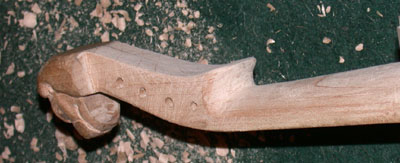
 Working
on the neck and pegbox. This is the neck and pegbox now chiseled down
into the appropriate block size. Next is rounding out the neck and
drilling the peg holes.
Working
on the neck and pegbox. This is the neck and pegbox now chiseled down
into the appropriate block size. Next is rounding out the neck and
drilling the peg holes.
 The
neck is then rounded and given a distal taper (narrows both side to
side and top to bottom as it approaches the pegbox). The point where
the neck joins the body is also smoothed out and made more crisp.
The
neck is then rounded and given a distal taper (narrows both side to
side and top to bottom as it approaches the pegbox). The point where
the neck joins the body is also smoothed out and made more crisp.
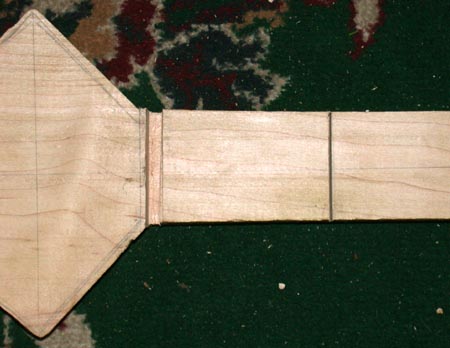
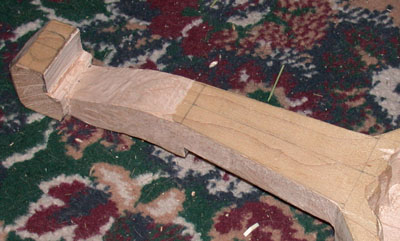
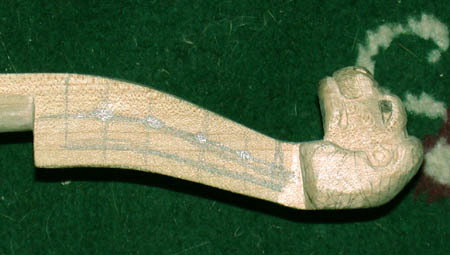
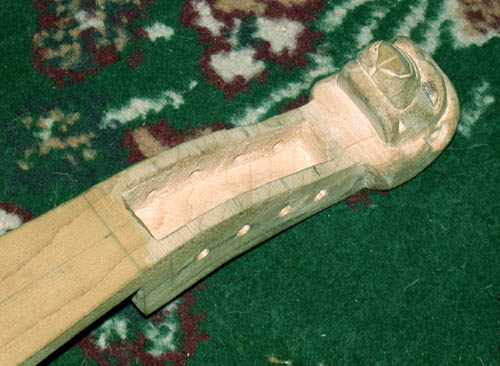
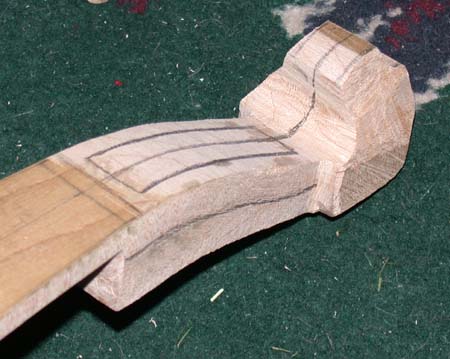 Next
I turn to the pegbox. The basic guidelines are penciled in where the
peg holes will be drilled, where the box will be hollowed, and the
centerlines for the head. The double line at the base of the pegbox
is where the nut will be going.
Next
I turn to the pegbox. The basic guidelines are penciled in where the
peg holes will be drilled, where the box will be hollowed, and the
centerlines for the head. The double line at the base of the pegbox
is where the nut will be going.
 Starting
off with the head, I penciled the block design for reference from the
slightly smaller sculptural model.
Starting
off with the head, I penciled the block design for reference from the
slightly smaller sculptural model.
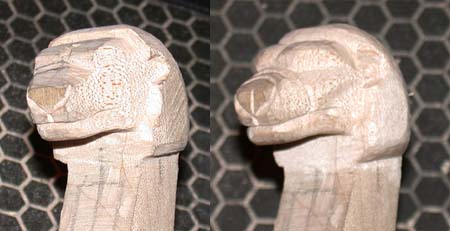 Carving
the headpiece. The right hand side shows where it will remain until I
do the inlay for the eyes. Some final texturing and the mane will be
detailed when I do the sanding and finishing pass after the pegbox
has been completed. Next drilling the holes and carving out the box.
Carving
the headpiece. The right hand side shows where it will remain until I
do the inlay for the eyes. Some final texturing and the mane will be
detailed when I do the sanding and finishing pass after the pegbox
has been completed. Next drilling the holes and carving out the box.
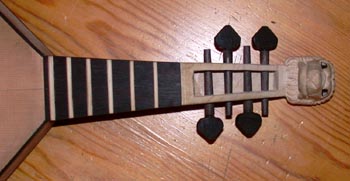
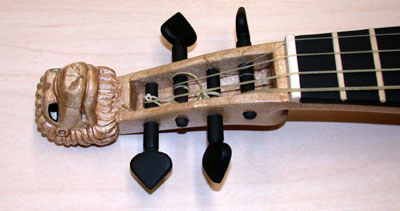
 Marking
where the peg holes will be. The spacing is taken from a traditional
violin pegbox. Always makes me nervous, as I don't have a drill
press, so I'm drilling straight by eyeballing it, which doesn't leave
a lot of room for error.
Marking
where the peg holes will be. The spacing is taken from a traditional
violin pegbox. Always makes me nervous, as I don't have a drill
press, so I'm drilling straight by eyeballing it, which doesn't leave
a lot of room for error.
 But
all turns out fine. Here is the finished pegbox, awaiting final
sanding and surfacing. The hollowing channel has been carved out, and
the sides thinned and straightened.
But
all turns out fine. Here is the finished pegbox, awaiting final
sanding and surfacing. The hollowing channel has been carved out, and
the sides thinned and straightened.
 With
the pegbox done, it's back to the main body cavity to thin out the
walls in preparation for the fitting to the soundboard. Here you can
see the chisel-work chopping happily away at the side.
With
the pegbox done, it's back to the main body cavity to thin out the
walls in preparation for the fitting to the soundboard. Here you can
see the chisel-work chopping happily away at the side.
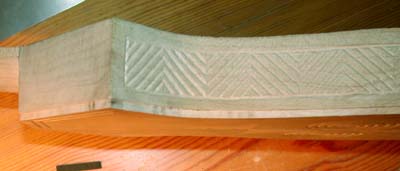
 Before
finally thinning the walls down from the inside, I needed to do the
outer decorative carving to verify how deep it would go. The design
continues with the parallel line patterning done on the back. First
the pattern is drawn on the side, the lines of the drawing are then
cut into the wall. The lines are they chisel/chipped in so form a
cross-section V cut. And the edging is finally cut. Then I ran a
triangular small file through all the groves to smooth out as many
irregularities as I could. This process is repeated on the other
side. The design follows the curve of the body (so the grain is
constantly changing direction, making the chiseling a little
difficult). They do not "meet" in the back, as the tail
trefoil interrupts the pattern. They are skewed a little higher than
vertical center, as the soundboard will add a little thickness at the
top.
Before
finally thinning the walls down from the inside, I needed to do the
outer decorative carving to verify how deep it would go. The design
continues with the parallel line patterning done on the back. First
the pattern is drawn on the side, the lines of the drawing are then
cut into the wall. The lines are they chisel/chipped in so form a
cross-section V cut. And the edging is finally cut. Then I ran a
triangular small file through all the groves to smooth out as many
irregularities as I could. This process is repeated on the other
side. The design follows the curve of the body (so the grain is
constantly changing direction, making the chiseling a little
difficult). They do not "meet" in the back, as the tail
trefoil interrupts the pattern. They are skewed a little higher than
vertical center, as the soundboard will add a little thickness at the
top.
 The
side carving done, the cavity walls can now be properly thinned down.
The gross wood removal is done with the chisels, with the final pass
(especially in the wings) using the dremel. The walls are thinned
down to about 3/16th inch thickness (to allow for the cutting in of
the sidewalls with the design). The floor has a little smoothing out
yet to do, but that will done shortly.
The
side carving done, the cavity walls can now be properly thinned down.
The gross wood removal is done with the chisels, with the final pass
(especially in the wings) using the dremel. The walls are thinned
down to about 3/16th inch thickness (to allow for the cutting in of
the sidewalls with the design). The floor has a little smoothing out
yet to do, but that will done shortly.
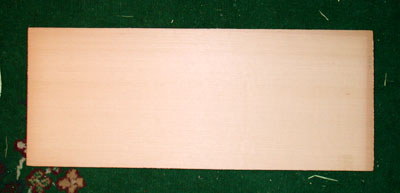
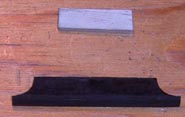
 Other
bits coming together. The top image is the soundboard piece of cedar.
It will end up a bit redder when any finish is applied. The lower
piece is the bit of black (lots of glare in photo) ebony that will be
the tailpiece, fingerboard, bridge, and nut.
Other
bits coming together. The top image is the soundboard piece of cedar.
It will end up a bit redder when any finish is applied. The lower
piece is the bit of black (lots of glare in photo) ebony that will be
the tailpiece, fingerboard, bridge, and nut.
 The
rough cuts of the fingerboard and tailpiece.
The
rough cuts of the fingerboard and tailpiece.
 The
fingerboard has to be thinned down. The very hard ebony wood is
chiseled down (as the brightened photo here shows) and then planed
and filed smooth again to about 3/16th inch thickness.
The
fingerboard has to be thinned down. The very hard ebony wood is
chiseled down (as the brightened photo here shows) and then planed
and filed smooth again to about 3/16th inch thickness.
 The
fingerboard is then centerlined, and cut to more exact shape and
length to fit the precise space of the neck of the instrument. (as
you can see, this was done before the thinning of the walls)
The
fingerboard is then centerlined, and cut to more exact shape and
length to fit the precise space of the neck of the instrument. (as
you can see, this was done before the thinning of the walls)
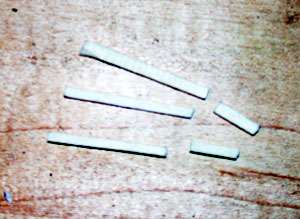
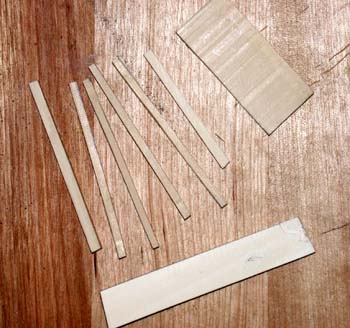 I
decided to use contrasting ivory for the frets and nut. This image
shows the frets having been rough cut (from the piece in the upper
right corner) and the chunk of ivory (old piano key rough) that will
be used for the nut.
I
decided to use contrasting ivory for the frets and nut. This image
shows the frets having been rough cut (from the piece in the upper
right corner) and the chunk of ivory (old piano key rough) that will
be used for the nut.
The vibrating string length will be 13.5 inches (34.3cm). Using the (now standard) six frets and the fret calculator (see above), this generates frets at 1.93cm, 3.74cm, 5.46cm, 7.08cm, 8.60cm and 10.05cm from the nut edge respectively. Next up will be to cut the grooves using the fret saw at those point, and then add in the frets.
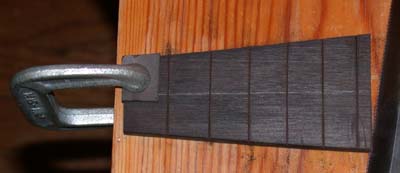 The
distances from the nut are carefully marked on the fingerboard, and
starting slots cut into the piece with a fret saw (seen partially on
the right). The slots are then widened into a deep V shape with files
to admit the square cross-section frets (set into the fingerboard at
a 45 degree angle, so that the cross section would like like a
diamond).
The
distances from the nut are carefully marked on the fingerboard, and
starting slots cut into the piece with a fret saw (seen partially on
the right). The slots are then widened into a deep V shape with files
to admit the square cross-section frets (set into the fingerboard at
a 45 degree angle, so that the cross section would like like a
diamond).
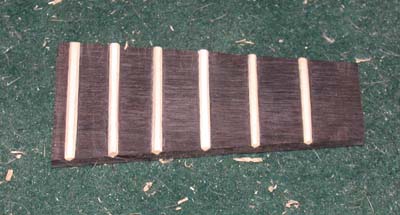 The
frets are then evened out using the files, and then set and glued
into the slots. Overlapping end material is sawn off (using the fret
saw), and thus we have the basic fretboard.
The
frets are then evened out using the files, and then set and glued
into the slots. Overlapping end material is sawn off (using the fret
saw), and thus we have the basic fretboard.
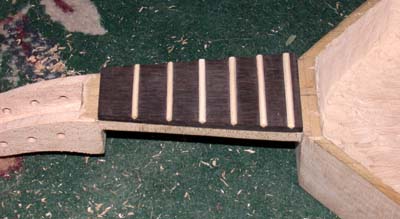 This
is then fit and finally shaped to the actual neck of the instrument,
and is ready to be glued into place.
This
is then fit and finally shaped to the actual neck of the instrument,
and is ready to be glued into place.
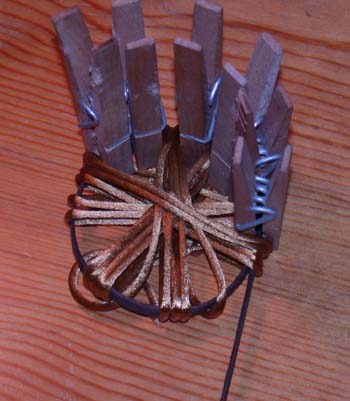
 Adding
the edging ring around the rosette. A strip of ebony is soaked and
steam bent into a circle just a hair smaller than the outer edge of
the ivory rosette, and allowed to dry and set in that shape (see the
mess on top). The ring is then glued together, the overlap scraped
down to a skive joint, and the inner edge filed to just admit the
ivory rosette, as shown here.
Adding
the edging ring around the rosette. A strip of ebony is soaked and
steam bent into a circle just a hair smaller than the outer edge of
the ivory rosette, and allowed to dry and set in that shape (see the
mess on top). The ring is then glued together, the overlap scraped
down to a skive joint, and the inner edge filed to just admit the
ivory rosette, as shown here.
 Working
on the soundboard, the soundboard is rough cut to shape, and then
thinned down to appropriate thickness using a planing tool (I've
found that the scraper plane works better on the thin soundboard than
the finger plane I have). The piece is then scraped smooth with the
scaper, and the long sanding block is run over it to make sure that
it is flat and even along the edges where it meets the body.
Working
on the soundboard, the soundboard is rough cut to shape, and then
thinned down to appropriate thickness using a planing tool (I've
found that the scraper plane works better on the thin soundboard than
the finger plane I have). The piece is then scraped smooth with the
scaper, and the long sanding block is run over it to make sure that
it is flat and even along the edges where it meets the body.
 The
rough plate is then trimmed to almost exact size and lined up on the
body (it has to be matched against the fingerboard to closely seal
the top. Here you can see the slotted fingerboard (sans frets). All
of the pictures of this type of citole place the soundhole at more or
less the thinnest part of the body, so that is where I centered the
hole. The actual circle is traced around the finished edged rosette.
The
rough plate is then trimmed to almost exact size and lined up on the
body (it has to be matched against the fingerboard to closely seal
the top. Here you can see the slotted fingerboard (sans frets). All
of the pictures of this type of citole place the soundhole at more or
less the thinnest part of the body, so that is where I centered the
hole. The actual circle is traced around the finished edged rosette.
 The
soundhole is then cut out (using a minature hand saber saw) and filed
to match the shape of the rosette as exactly as possible (mostly by
fitting it against the hole, seeing where there is overlap, filing
out the overlap, refitting it, etc.). When the hole is finally as
close as I can get it, the rosette is glued into place.
The
soundhole is then cut out (using a minature hand saber saw) and filed
to match the shape of the rosette as exactly as possible (mostly by
fitting it against the hole, seeing where there is overlap, filing
out the overlap, refitting it, etc.). When the hole is finally as
close as I can get it, the rosette is glued into place.
 The
soundboard brace is then set. This is fit under the soundboard
between the soundhole and the bridge. Generally I've found that the
body is small enough that it really only needs the single brace at
the widest part of the lower bout just to avoid sag in the soundboard
from the pressure of the bridge. The brace is cut from a piece of
spruce, and is shaped to a tapered T intersection. It is then test
fitted (to make sure it doesn't bump the inner walls of the body),
and then glued into place.
The
soundboard brace is then set. This is fit under the soundboard
between the soundhole and the bridge. Generally I've found that the
body is small enough that it really only needs the single brace at
the widest part of the lower bout just to avoid sag in the soundboard
from the pressure of the bridge. The brace is cut from a piece of
spruce, and is shaped to a tapered T intersection. It is then test
fitted (to make sure it doesn't bump the inner walls of the body),
and then glued into place.
 Back
to the main body. Now that the basics of the body are done, the
edging of the lower side should be done before the top is assembled,
as I will have to have the instrument upsidedown for most of that
process, and didn't want to damage the rosette or fingerboard in the
process. The edge binding is done in black ebony strips about 1/4
inch wide and 1/8 thick. First step is to cut a channel around the
bottom to accept the edgeing. This is done with a routing attachment
on the dremel (see above).
Back
to the main body. Now that the basics of the body are done, the
edging of the lower side should be done before the top is assembled,
as I will have to have the instrument upsidedown for most of that
process, and didn't want to damage the rosette or fingerboard in the
process. The edge binding is done in black ebony strips about 1/4
inch wide and 1/8 thick. First step is to cut a channel around the
bottom to accept the edgeing. This is done with a routing attachment
on the dremel (see above).
 Next
the strips are bent into shape using a bending iron (seen here more
or less center). The wood is wet down and slowly pressured under heat
to accept the new shape. Unfortunately this edging is quite thick.
The curves aren't really hard (like in the citoles one and three,
both of which had sharp curves), but the thicker wood was harder to
bend and required a bit of practice to get to work. The fret saw is
also visible here as I trimmed excess length from the strips to get
them to fit together more exactly.
Next
the strips are bent into shape using a bending iron (seen here more
or less center). The wood is wet down and slowly pressured under heat
to accept the new shape. Unfortunately this edging is quite thick.
The curves aren't really hard (like in the citoles one and three,
both of which had sharp curves), but the thicker wood was harder to
bend and required a bit of practice to get to work. The fret saw is
also visible here as I trimmed excess length from the strips to get
them to fit together more exactly.
 In
the "it's never as easy as it looks" concept - these are
the failed attempts to bend the wood. Most of the little pieces are
the bits that snapped off as I was trying to bend the first curve.
The long strips made it past the first curve, but tended to crack or
snap in the second curve or in fine tuning of the shape. Some of the
longer straight bits were able to be salvaged for the straight lines
of the edges. Most however were too short. Ah, practice makes
perfect. Or at least workable.
In
the "it's never as easy as it looks" concept - these are
the failed attempts to bend the wood. Most of the little pieces are
the bits that snapped off as I was trying to bend the first curve.
The long strips made it past the first curve, but tended to crack or
snap in the second curve or in fine tuning of the shape. Some of the
longer straight bits were able to be salvaged for the straight lines
of the edges. Most however were too short. Ah, practice makes
perfect. Or at least workable.
 Gluing
the bottom edge binding into place. This involves a lot of cloth-tape
and "citole bondage" as my wife calls it. The edge binding
pieces are actually first fitted carefully all into place, and the
edges trimmed and shaped so that they all fit as exactly as possible.
(the brush, by the way, is for rapid spreading of the glue into the
corners of the edging shelf - my fingers are too thick to fit into
the small space).
Gluing
the bottom edge binding into place. This involves a lot of cloth-tape
and "citole bondage" as my wife calls it. The edge binding
pieces are actually first fitted carefully all into place, and the
edges trimmed and shaped so that they all fit as exactly as possible.
(the brush, by the way, is for rapid spreading of the glue into the
corners of the edging shelf - my fingers are too thick to fit into
the small space).
 The
binding bits all glued into place. They are taller and thicker than
necessary, and need to be trimmed down. This is done with chisels and
files.
The
binding bits all glued into place. They are taller and thicker than
necessary, and need to be trimmed down. This is done with chisels and
files.
 Bottom
binding is now done. The dark "staining" is actually ebony
dust that needs to be cleaned off. Otherwise we're good to go for
assembly.
Bottom
binding is now done. The dark "staining" is actually ebony
dust that needs to be cleaned off. Otherwise we're good to go for
assembly.
 Working
on the pegbox and figurehead. First the neck (now that the
fingerboard has been fitted against it) was a little thick, so it was
thinned down and the angle readjusted. Then the pegbox itself was
softened and shaped. The wedge-space where the box meets the neck is
rounded sort of into the shape like a violin neck, and the sweep of
the box is cleaned up.
Working
on the pegbox and figurehead. First the neck (now that the
fingerboard has been fitted against it) was a little thick, so it was
thinned down and the angle readjusted. Then the pegbox itself was
softened and shaped. The wedge-space where the box meets the neck is
rounded sort of into the shape like a violin neck, and the sweep of
the box is cleaned up.
 Doing
the final carving on the figurehead. The rough-carved lion's face is
smoothed out and rounded where needed. Shown here is working on the
mane- the penciled in guidelines for cutting and shaping.
Doing
the final carving on the figurehead. The rough-carved lion's face is
smoothed out and rounded where needed. Shown here is working on the
mane- the penciled in guidelines for cutting and shaping.
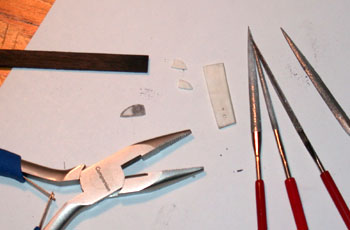 The
figurehead carving done, I had decided to do inlay for the eyes. The
idea was to have a base ebony piece and inlay the "white"
of the eye with a small piece of ivory. Shown here are the little
chunks of ivory and the scrap bit they were cut from, the strip of
ebony I was using for the bases, the micro-needle files, the little
pencil plan, and a tiny pair of needle-pliers to hold things while I
was working on them. For scale, the ebony strip is 1/4" across.
The
figurehead carving done, I had decided to do inlay for the eyes. The
idea was to have a base ebony piece and inlay the "white"
of the eye with a small piece of ivory. Shown here are the little
chunks of ivory and the scrap bit they were cut from, the strip of
ebony I was using for the bases, the micro-needle files, the little
pencil plan, and a tiny pair of needle-pliers to hold things while I
was working on them. For scale, the ebony strip is 1/4" across.
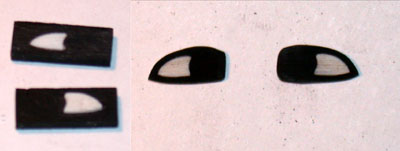 The
little tiny bits of ivory were shaped with the microfiles, and then
very small shallow holes were cut into the ebony strip. The blocks
were then cut from the strip, and the micro-files shaped the outside
of the ebony into the rough eye-shapes. The outer edge was left
larger in this picture than it finally ended up.
The
little tiny bits of ivory were shaped with the microfiles, and then
very small shallow holes were cut into the ebony strip. The blocks
were then cut from the strip, and the micro-files shaped the outside
of the ebony into the rough eye-shapes. The outer edge was left
larger in this picture than it finally ended up.
 The
final figurehead with the eyes inlaid, from front side and back
views. Came out rather well I think.
The
final figurehead with the eyes inlaid, from front side and back
views. Came out rather well I think.
 Now
that all the bottom binding is on and the peghead finished, most of
the "rough" handling of the body block is done. I didn't
want to add on the rather delicate soundboard until I was done with
the twisting and turning and such of the body block necessary to do
the bottom binding and the carving of the figurehead, etc. With that
all finished, the soundboard and fingerboard are carefully test fit
and any issues of that cleaned up, and then both are glued down in
succession (soundboard first, as it is easier to read the placement
off the light soundboard wood rather than the dark ebony). Once again
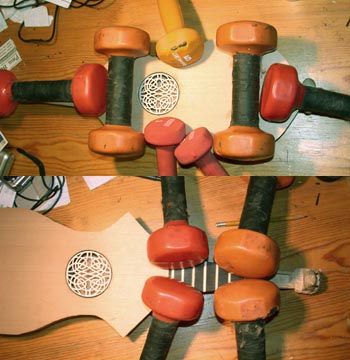
I used the standard "handweight press" method of gluing.
Now
that all the bottom binding is on and the peghead finished, most of
the "rough" handling of the body block is done. I didn't
want to add on the rather delicate soundboard until I was done with
the twisting and turning and such of the body block necessary to do
the bottom binding and the carving of the figurehead, etc. With that
all finished, the soundboard and fingerboard are carefully test fit
and any issues of that cleaned up, and then both are glued down in
succession (soundboard first, as it is easier to read the placement
off the light soundboard wood rather than the dark ebony). Once again
I used the standard "handweight press" method of gluing.
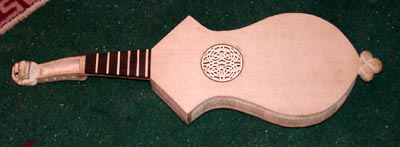 Once
the glue has set, the soundboard is cleaned up around the edges (I'd
just changed the gerbil cages with cedar wood, and the filing of the
aged cedarwood top filled the whole room with cedar smell) and the
fingerboard is likewise cleaned up with the already thinned down
neck. The only thing left now on the body block is the top
edgebinding.
Once
the glue has set, the soundboard is cleaned up around the edges (I'd
just changed the gerbil cages with cedar wood, and the filing of the
aged cedarwood top filled the whole room with cedar smell) and the
fingerboard is likewise cleaned up with the already thinned down
neck. The only thing left now on the body block is the top
edgebinding.
 Not
to be too repetitive here, but this is the top bit edge binding
channel cut, and then the bent side pieces roughly in set. Since I
had such a hard time bending the bottom pieces, which when placed
turned out to be twice as thick as they needed to be, I decided to
sand these down to about the right thickness BEFORE I bent them,
which made the bending process much, much easier this time around.
The top has five pieces - the two straight sides at the front, the
two long bent sides, and the end saddle piece (a little thicker than
the simple edgebinding to hold the stress of the tailgut).
Not
to be too repetitive here, but this is the top bit edge binding
channel cut, and then the bent side pieces roughly in set. Since I
had such a hard time bending the bottom pieces, which when placed
turned out to be twice as thick as they needed to be, I decided to
sand these down to about the right thickness BEFORE I bent them,
which made the bending process much, much easier this time around.
The top has five pieces - the two straight sides at the front, the
two long bent sides, and the end saddle piece (a little thicker than
the simple edgebinding to hold the stress of the tailgut).
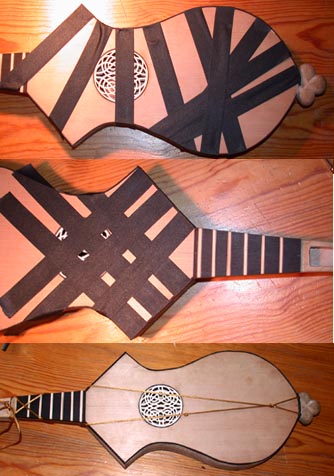 What
my wife likes to refer to as "citole bondage." The
edgebinding put on - top shows the top edge going on. The nice
cross-hatch pattern is the two front straight pieces, and the last
image shows the saddle piece being held in place. For the last I used
tension similar to the way it will actually be stressed by the
tailgut to hold it in place.
What
my wife likes to refer to as "citole bondage." The
edgebinding put on - top shows the top edge going on. The nice
cross-hatch pattern is the two front straight pieces, and the last
image shows the saddle piece being held in place. For the last I used
tension similar to the way it will actually be stressed by the
tailgut to hold it in place.
 The
top edge binding is then cut and filed down to be flush with the
body, and the saddle shaped and filed as well. That completes the
construction of the body block.
The
top edge binding is then cut and filed down to be flush with the
body, and the saddle shaped and filed as well. That completes the
construction of the body block.
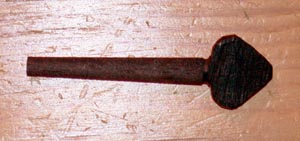 However
one more part must be done before can delve into final sanding, and
that is cleaning up and finishing the pegbox. For that I need the
pegs. Here is a roughed out peg (technically after shaving, they
start out more straight edged and less tapered) in ebony. Using the
triangular shaped heads to continue to match the angular designs
covering most of the instrument.
However
one more part must be done before can delve into final sanding, and
that is cleaning up and finishing the pegbox. For that I need the
pegs. Here is a roughed out peg (technically after shaving, they
start out more straight edged and less tapered) in ebony. Using the
triangular shaped heads to continue to match the angular designs
covering most of the instrument.
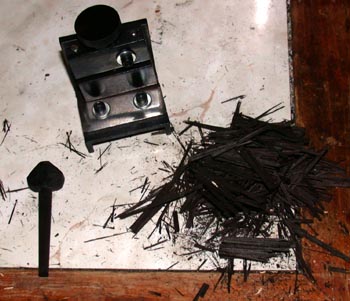 There
are two specialized tools used when doing the peg shaping - one is
called a peg reamer and other a peg shaver. They both have to match
rather exactingly in angle for the pegs to fit well into the holes.
The reamer creates a tapered hole, and the shaver carves down the peg
shaft to match that taper. Here is shown the peg shaver (and lots of
shavings) with a peg.
There
are two specialized tools used when doing the peg shaping - one is
called a peg reamer and other a peg shaver. They both have to match
rather exactingly in angle for the pegs to fit well into the holes.
The reamer creates a tapered hole, and the shaver carves down the peg
shaft to match that taper. Here is shown the peg shaver (and lots of
shavings) with a peg.
 Fitting
the pegs correctly is a kind of back and forth process between
fitting and then shaving, until they sit at the desired depth. The
holes are cut as wide as tolerable to the pegbox without weakening
the walls too much. As each hole is not exactly the same (they tend
to get narrower toward the lionhead), and each peg length isn't
identicle (the pegs get shorter toward the lionhead as the pegbox
gets narrower), each peg is fit specifically to it's individual hole.
Here are the pegs (still haven't been finally finished) in place. The
overhanging shafts will be trimmed down so that they don't stick as
much out of the opposite side when I finish each peg.
Fitting
the pegs correctly is a kind of back and forth process between
fitting and then shaving, until they sit at the desired depth. The
holes are cut as wide as tolerable to the pegbox without weakening
the walls too much. As each hole is not exactly the same (they tend
to get narrower toward the lionhead), and each peg length isn't
identicle (the pegs get shorter toward the lionhead as the pegbox
gets narrower), each peg is fit specifically to it's individual hole.
Here are the pegs (still haven't been finally finished) in place. The
overhanging shafts will be trimmed down so that they don't stick as
much out of the opposite side when I finish each peg.
 The
body block is now done, and final sanding smooths out all the
scratches and such. There are a couple of small imperfections which
are cleaned up with wood putty or little grafts, to maintain the
clean lines.
The
body block is now done, and final sanding smooths out all the
scratches and such. There are a couple of small imperfections which
are cleaned up with wood putty or little grafts, to maintain the
clean lines.
 Doing
the lacquer finishing on the instrument. Like with my own instrument
(the highly carved one up above), I'm using a violin oil varnish from
the International Violin Company for the finish (as I liked the way
it worked on both the rebec and the other citole, and has held up
well on both unlike the linseed oil finish which really needs
retouching on the dog-headed citole). The oil varnish dries rather
slowly. This has the advantage that it makes it easier to apply (the
spirit varnish is drying practically as you are using it), but has
the disadvantage that it takes a day or two between each coat for it
to dry, making the multiple coats a very slow process. The local
weather here (suddenly very cold and damp) has slowed that even more
(as it doesn't dry as quickly in the cold damp air, and I have to
leave windows open in the room as I don't have any real ventilation
equipment and don't particularly feel like having my entire apartment
smell like oil paint!). The maple, like with my other instrument,
came out a very nice golden color. The Cedar is a little darker and
redder, and I think will probably redden to almost a cherry color as
soon as it sees sunlight. The ivory rosette now stands out VERY
brightly.
Doing
the lacquer finishing on the instrument. Like with my own instrument
(the highly carved one up above), I'm using a violin oil varnish from
the International Violin Company for the finish (as I liked the way
it worked on both the rebec and the other citole, and has held up
well on both unlike the linseed oil finish which really needs
retouching on the dog-headed citole). The oil varnish dries rather
slowly. This has the advantage that it makes it easier to apply (the
spirit varnish is drying practically as you are using it), but has
the disadvantage that it takes a day or two between each coat for it
to dry, making the multiple coats a very slow process. The local
weather here (suddenly very cold and damp) has slowed that even more
(as it doesn't dry as quickly in the cold damp air, and I have to
leave windows open in the room as I don't have any real ventilation
equipment and don't particularly feel like having my entire apartment
smell like oil paint!). The maple, like with my other instrument,
came out a very nice golden color. The Cedar is a little darker and
redder, and I think will probably redden to almost a cherry color as
soon as it sees sunlight. The ivory rosette now stands out VERY
brightly.
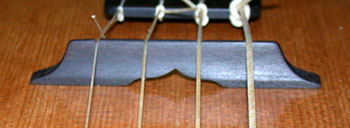
 While
the finishing is going on, working on the small bits so that the
strings can go on right as that part is done. Here are the nut and
bridge roughed out. The nut is ivory (to match the frets), and the
bridge ebony. The bridge also has a tapered T cross-section. I will
also probably carve out some of the middle (making two "feet")
to lighten it up a bit as it is a little heavy.
While
the finishing is going on, working on the small bits so that the
strings can go on right as that part is done. Here are the nut and
bridge roughed out. The nut is ivory (to match the frets), and the
bridge ebony. The bridge also has a tapered T cross-section. I will
also probably carve out some of the middle (making two "feet")
to lighten it up a bit as it is a little heavy.
 The
last piece (short of the strings themselves) is the tailpiece, which
has been roughed out here. Clearly visible on this picture are the
guidelines for drilling the holes. The holes are initially drilled
with tiny manual finger drills to place them as exactingly as
possible (I don't have a drill press), and then widened first with
bigger finger drills, and then with files until the string that needs
to go through them can slip through without any snagging. The
tailpiece will also get a bit of ivory inlay design.
The
last piece (short of the strings themselves) is the tailpiece, which
has been roughed out here. Clearly visible on this picture are the
guidelines for drilling the holes. The holes are initially drilled
with tiny manual finger drills to place them as exactingly as
possible (I don't have a drill press), and then widened first with
bigger finger drills, and then with files until the string that needs
to go through them can slip through without any snagging. The
tailpiece will also get a bit of ivory inlay design.
 The
tailpiece prepped for the ivory inlay - the channels for the ivory
have been cut into the thin piece using the small chisels and are now
ready for the application of the little ivory bits.
The
tailpiece prepped for the ivory inlay - the channels for the ivory
have been cut into the thin piece using the small chisels and are now
ready for the application of the little ivory bits.
 The
little ivory bits! These are about 1/16 of an inch wide and very
thin. The LONG pieces here are about 3/4th of an inch. I actually
have to use mini-pliers to handle them, as my fingers are too big to
hold them and work on them.
The
little ivory bits! These are about 1/16 of an inch wide and very
thin. The LONG pieces here are about 3/4th of an inch. I actually
have to use mini-pliers to handle them, as my fingers are too big to
hold them and work on them.
 The
idea was to cut square channels and pressure fit the ivory inlays
into them. Unfortunately, during one of the pressure fits, the
tailpiece itself snapped in half. While rather annoying, I imagine
it's better this happened now than when I was tightening up the
strings and it trashed the face of the instrument. Ah well, back to
the drawing board...
The
idea was to cut square channels and pressure fit the ivory inlays
into them. Unfortunately, during one of the pressure fits, the
tailpiece itself snapped in half. While rather annoying, I imagine
it's better this happened now than when I was tightening up the
strings and it trashed the face of the instrument. Ah well, back to
the drawing board...
The little ivory bits! These are about 1/16 of an inch wide and very thin. The LONG pieces here are about 3/4th of an inch. I actually have to use mini-pliers to handle them, as my fingers are too big to hold them and work on them.
 The
new tailpiece. Presently this is about 1/4 of an inch thick (rather
than the 1/8 that the other tailpiece was). I'll probably leave it a
little thicker overall, and will add the inlay in first before I thin
it down.
The
new tailpiece. Presently this is about 1/4 of an inch thick (rather
than the 1/8 that the other tailpiece was). I'll probably leave it a
little thicker overall, and will add the inlay in first before I thin
it down.
 Even
so, don't want a repeat of the previous disaster. So decided to try a
different method - this time cutting V-grooves and inserting the
diamond cross-sectioned ivory rods into the grooves, much like
miniature versions of the frets. This little test sample (long side
is 1/2 inch) worked very well and was quite a bit faster as I did not
have to get the width of the ivory as exact (the wedge shape just
fills the V-groove as far down as it can - the width of the groove
determines the width of the sanded down piece). In any event, I'll
proceed to do the inlay on the new tailpiece using that method.
Even
so, don't want a repeat of the previous disaster. So decided to try a
different method - this time cutting V-grooves and inserting the
diamond cross-sectioned ivory rods into the grooves, much like
miniature versions of the frets. This little test sample (long side
is 1/2 inch) worked very well and was quite a bit faster as I did not
have to get the width of the ivory as exact (the wedge shape just
fills the V-groove as far down as it can - the width of the groove
determines the width of the sanded down piece). In any event, I'll
proceed to do the inlay on the new tailpiece using that method.
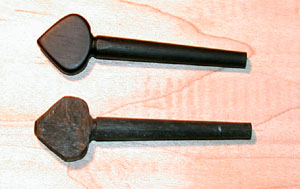
 In
the meantime, the rest of the fitting are finished. Here you can see
examples of the rough carved peg (bottom) and the finished shape. All
four pegs are now finished and oiled. They will be drilled and cut to
length during the stringing set-up. The bridge and nut likewise are
fully shaped, and merely awaiting the string set-up for fine tuning.
I decided to redesign the bridge a bit, giving it short feet with a
small cutout in the center. All of it is now just waiting on the
tailpiece, as the body block is complete - the last coat of varnish
is dry and polished.
In
the meantime, the rest of the fitting are finished. Here you can see
examples of the rough carved peg (bottom) and the finished shape. All
four pegs are now finished and oiled. They will be drilled and cut to
length during the stringing set-up. The bridge and nut likewise are
fully shaped, and merely awaiting the string set-up for fine tuning.
I decided to redesign the bridge a bit, giving it short feet with a
small cutout in the center. All of it is now just waiting on the
tailpiece, as the body block is complete - the last coat of varnish
is dry and polished.
The tailpiece inlay once again didn't work (the thin pieces kept popping out as soon as the wood was stressed. So I finally deceded to scrap the idea entirely, and carved a THIRD tailpiece, this time just carving the design into it rather than inlaying it. That done, the instrument parts were finished!

 The
finished instrument. The strings are once again natural gut strings
from Daniel
Larson at Gamut Strings from where I get all my
strings. This shows the top/side/bottom, 3/4 view, and a closeup of
how the head finally turned out. Then comes that horrible moment when
you finally get to hear the thing once it's strung up and discover
whether you made a pretty sculpture or a musical instrument. In this
case I was rather surprised. I had expected the cedar soundboard to
make a slightly more warm tone than my personal instrument (the
highly carved one above). Instead, the instrument is actually
slightly brighter, and louder than mine. Now the body cavity is
slightly smaller, and the walls and back are considerably thinner
(the relief carving on mine is much deeper - this one weighs about
half of mine), and I did redesign the bridge, so it's difficult to
tell which of those factors is the actual culprit (or combination of
all of them). In any event, it actually sounds very nice.
The
finished instrument. The strings are once again natural gut strings
from Daniel
Larson at Gamut Strings from where I get all my
strings. This shows the top/side/bottom, 3/4 view, and a closeup of
how the head finally turned out. Then comes that horrible moment when
you finally get to hear the thing once it's strung up and discover
whether you made a pretty sculpture or a musical instrument. In this
case I was rather surprised. I had expected the cedar soundboard to
make a slightly more warm tone than my personal instrument (the
highly carved one above). Instead, the instrument is actually
slightly brighter, and louder than mine. Now the body cavity is
slightly smaller, and the walls and back are considerably thinner
(the relief carving on mine is much deeper - this one weighs about
half of mine), and I did redesign the bridge, so it's difficult to
tell which of those factors is the actual culprit (or combination of
all of them). In any event, it actually sounds very nice.
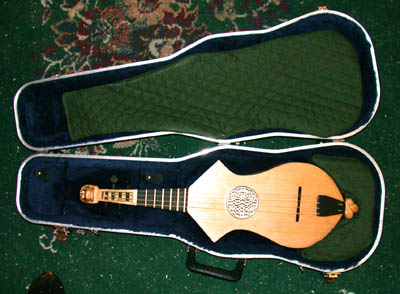 In
order to ship the instrument to its new home, it needed a case. In
brief searching, I was able to locate a 16" oblong viola
hardcase for surprisingly little money from the Sam Ash store near my
house. With the addition of a tailbit insert (made from a piece of
dense foam sewn into a covering of quilted cotton), it fits quite
nicely and snugly. It now is in the hands of its new owner!.
In
order to ship the instrument to its new home, it needed a case. In
brief searching, I was able to locate a 16" oblong viola
hardcase for surprisingly little money from the Sam Ash store near my
house. With the addition of a tailbit insert (made from a piece of
dense foam sewn into a covering of quilted cotton), it fits quite
nicely and snugly. It now is in the hands of its new owner!.
Since of course people ask "So what do these things sound like?" here's a (admittedly hasty) recording of this citole before I packed it up for shipping. The piece is Ce Fut en Mai, a 13th century French piece probably by Moniot d'Arras. Click on the sound title to hear it!
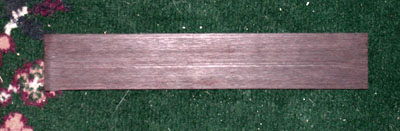
CITOLE NUMBER FIVE/SIX I decided to try to do a pair of instruments, for three reasons. First I wanted to try to copy the Parma Baptistry instrument, because it seems to be the most often copied of them. Second, I wanted to see if I could produce multiple instruments off the same pattern. And thirdly, one of the problems I've encountered with the instrument is the short string-length. The 13-14 inch scale with gut strings makes for a bright sounding higher pitched instrument. Trying to tune it as low as the low notes of a violin, for example, means that the low string is quite thick and a bit thuddy in sound. Strummed heavily with the other strings it works fine, but when plucking out individual notes, it doesn't "ring" as well as the higher pitched strings. The only way to make the string thinner would be to either raise the pitch more, or to lengthen the sounding distance (the bridge to nut length). This runs into the opposite problem on the high end of the instrument. The longer length means the string either has to be extremely thin, or have very little tension, both of which reduces the quality of the sound. Even still, I decided to try a longer sounding length, and the Parma model allows for that rather readily without making a bigger sounding box. The body size is about the same, but the bridge can me moved pretty far back on the body, making for a sounding length potentially as long as 16 inches (like a viola more than a violin). So this is that experiment. These instruments will have the parma body outline, be constructed of cherry wood, and have low bridges with inlaid fingerboards, so that the top surface of the instrument is perfectly flat, much like a renaissance lute.
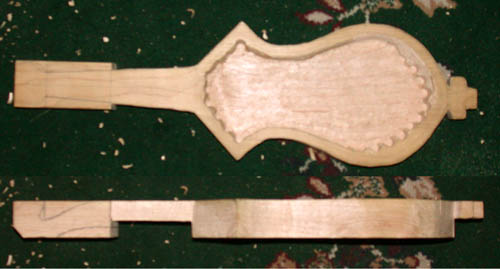
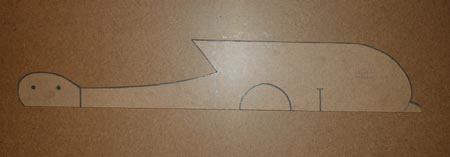 This
is the pattern. Most luthier patterns are the "half-instrument"
so that the instrument stays symmetrical down the long axis. I cut
this from a 1/8" thick piece of masonite. It shows the
approximate positions of the soundhole and bridge, though I will be
moving the bridge farther back on the instrument.
This
is the pattern. Most luthier patterns are the "half-instrument"
so that the instrument stays symmetrical down the long axis. I cut
this from a 1/8" thick piece of masonite. It shows the
approximate positions of the soundhole and bridge, though I will be
moving the bridge farther back on the instrument.
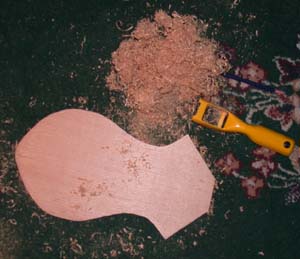
 The
block of wood used was actually the remaining bit of the long block
used for the dog-headed citole above. That piece was originally eight
feet long, so plenty left over. The pattern was traced on both sides
of the wood, so that it could be more accurately cut out. This is the
basic instrument block cut out of the wood.
The
block of wood used was actually the remaining bit of the long block
used for the dog-headed citole above. That piece was originally eight
feet long, so plenty left over. The pattern was traced on both sides
of the wood, so that it could be more accurately cut out. This is the
basic instrument block cut out of the wood.
 The
next bit of cutting. The end of the instrument has been rounded off a
bit, and the slotting where I need to chisel out the curve of the
neck has been done.
The
next bit of cutting. The end of the instrument has been rounded off a
bit, and the slotting where I need to chisel out the curve of the
neck has been done.
 A
bit of amusement - I didn't actually notice Peebs sneaking into this
picture until I looked at them. One of my rabbits deciding to "help"
Daddy "carve" the instrument block (nom nom nom!).
A
bit of amusement - I didn't actually notice Peebs sneaking into this
picture until I looked at them. One of my rabbits deciding to "help"
Daddy "carve" the instrument block (nom nom nom!).
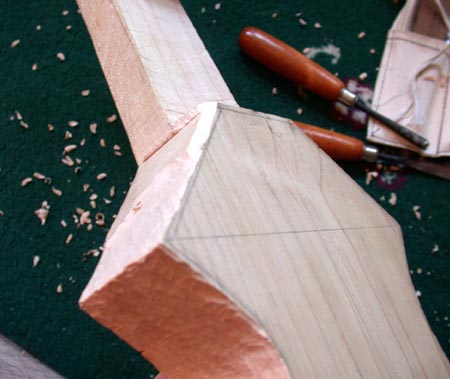
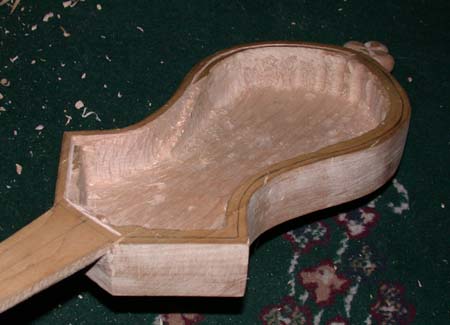
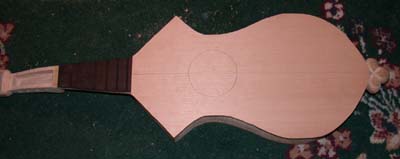
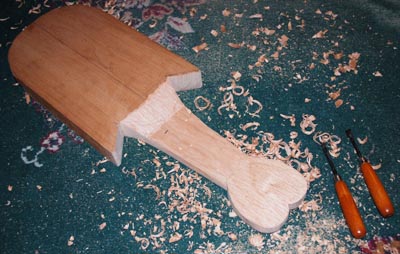
 The
basic body block shape has been established. The neck has been carved
down with the chisels to the basic shape, and the peghead rounded
out. The back end of the body has also been more rounded off, and the
tailknub softened. With the instrument's outer line more or less
established, it's time to hollow out the body. A heavy penciled line
marks the space to be carved out, and I grid the space in 1/2 inch
blocks to drill out the holes to begin the hollowing process.
The
basic body block shape has been established. The neck has been carved
down with the chisels to the basic shape, and the peghead rounded
out. The back end of the body has also been more rounded off, and the
tailknub softened. With the instrument's outer line more or less
established, it's time to hollow out the body. A heavy penciled line
marks the space to be carved out, and I grid the space in 1/2 inch
blocks to drill out the holes to begin the hollowing process.
 Using
a "stoppered" 1/2 inch drill bit, I fill the space to be
hollowed out with as many holes as I can fit. This dramatically
speeds up the hollowing process with the chisels. As this is the
softer cherry wood rather than the very hard maple, this only took an
evening to drill out. Thankfully there were no blow-throughs. The
body cavity of this instrument looks to be the largest of any of them
to date.
Using
a "stoppered" 1/2 inch drill bit, I fill the space to be
hollowed out with as many holes as I can fit. This dramatically
speeds up the hollowing process with the chisels. As this is the
softer cherry wood rather than the very hard maple, this only took an
evening to drill out. Thankfully there were no blow-throughs. The
body cavity of this instrument looks to be the largest of any of them
to date.
 Next
I take the straight and scoop chisels and roughly hack out the
hollowed space. The sidewalls can be cut fairly smoothly with the
chisels, but the front and back ends of the body cavity where the
chisel has to cut cross-grain are best done with the dremel. I've
dulled too many chisels trying to hammer my way through them. You can
also see that the neck has just been rough chiseled at this point,
and the back curve is still segmented from the sawing.
Next
I take the straight and scoop chisels and roughly hack out the
hollowed space. The sidewalls can be cut fairly smoothly with the
chisels, but the front and back ends of the body cavity where the
chisel has to cut cross-grain are best done with the dremel. I've
dulled too many chisels trying to hammer my way through them. You can
also see that the neck has just been rough chiseled at this point,
and the back curve is still segmented from the sawing.
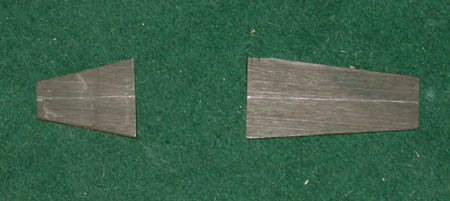
 With
the space of the hollowing established, I turned to the neck and
peghead. They started off the full thickness of the wood (about two
inches), but need to be brought down to about 1/2-3/4 of an inch. The
first part was to just saw the whole thing in half, leaving a piece
about one inch thick. The peghead is then angled a bit downward, and
the neck thinned down. Here you can see the chisel work shaving down
the peghead and neck and angling the joint between the body and the
neck.
With
the space of the hollowing established, I turned to the neck and
peghead. They started off the full thickness of the wood (about two
inches), but need to be brought down to about 1/2-3/4 of an inch. The
first part was to just saw the whole thing in half, leaving a piece
about one inch thick. The peghead is then angled a bit downward, and
the neck thinned down. Here you can see the chisel work shaving down
the peghead and neck and angling the joint between the body and the
neck.
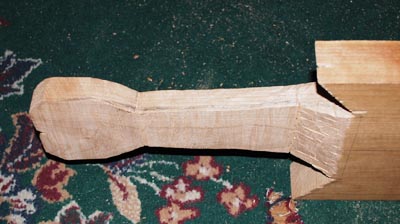 The
neck showing the thickness reduction.
The
neck showing the thickness reduction.
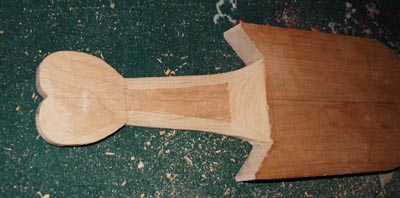 The
rough neck work finished. Here the neck has been evened out (both
sides mirrored accurately), and the sides and joint to body rounded
off with the dremel. The peghead has also been thinned and angled. In
this picture, the upper "wing" has been cleaned up but the
lower one still has some work to do.
The
rough neck work finished. Here the neck has been evened out (both
sides mirrored accurately), and the sides and joint to body rounded
off with the dremel. The peghead has also been thinned and angled. In
this picture, the upper "wing" has been cleaned up but the
lower one still has some work to do.
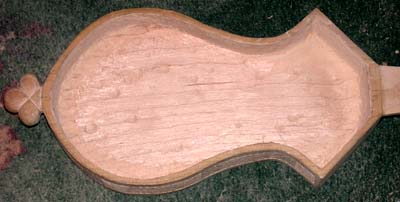
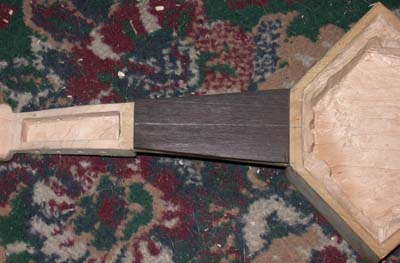
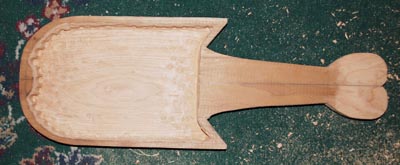 Cleaning
out the body cavity farther. The floor of the cavity has been leveled
out so that it is even across the space (except at the very back
where the back wall still needs to be cleaned up). The front wall has
been smoothed and cleaned up, and the upper wing here clean up. The
lower wing still needs final shaping and the "point" on the
inner space cleared out. I also have decided, after closer
examination of the original image, that the original instrument
didn't have a tail knub, but that the strings appear to either be
secured to pins or to a endpeg. Either way, I sliced off the tail
knub, and finished rounding off the back of the instrument.
Cleaning
out the body cavity farther. The floor of the cavity has been leveled
out so that it is even across the space (except at the very back
where the back wall still needs to be cleaned up). The front wall has
been smoothed and cleaned up, and the upper wing here clean up. The
lower wing still needs final shaping and the "point" on the
inner space cleared out. I also have decided, after closer
examination of the original image, that the original instrument
didn't have a tail knub, but that the strings appear to either be
secured to pins or to a endpeg. Either way, I sliced off the tail
knub, and finished rounding off the back of the instrument.
 Putting
together the soundboard now. This is the design for the rosette. The
person who wanted this instrument was trying to get a lion design
into it. This presented two problems - historically, most rosettes
were geometrically designed, and it is extremely rare to non-existant
to see actual figurative designs outside of the deep multi-layered
baroque parchment roses. So I compromised, and came up with this
Celtic zoomorphic of a pair of intertwined lions. It still is mostly
geometric but presents the lions anyway. Obviously it would be
unlikely to see a Celtic design on an Italian instrument, but I'll
let that one slip this time.
Putting
together the soundboard now. This is the design for the rosette. The
person who wanted this instrument was trying to get a lion design
into it. This presented two problems - historically, most rosettes
were geometrically designed, and it is extremely rare to non-existant
to see actual figurative designs outside of the deep multi-layered
baroque parchment roses. So I compromised, and came up with this
Celtic zoomorphic of a pair of intertwined lions. It still is mostly
geometric but presents the lions anyway. Obviously it would be
unlikely to see a Celtic design on an Italian instrument, but I'll
let that one slip this time.
 This
is the soundboard cut from its sheet. It is western red cedar, and
like with the carpathian spruce, there is a large differential in the
hardness between the winter and summer growth rings, so it is very
strong along the grain, but flexible perpendicular to it. This is
after it has been thinned down (using the planes) and sanded smooth
to start the rosette.
This
is the soundboard cut from its sheet. It is western red cedar, and
like with the carpathian spruce, there is a large differential in the
hardness between the winter and summer growth rings, so it is very
strong along the grain, but flexible perpendicular to it. This is
after it has been thinned down (using the planes) and sanded smooth
to start the rosette.
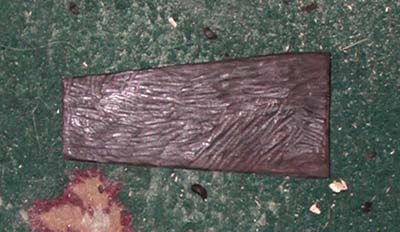
 Carving
the rosette into the soundboard. I initially had thought this would
be easy, given the inlay saw... until I realized that I couldn't use
the saw in the center of the wide board. This rosette isn't inlaid
into the soundboard (such as in Citole one or four), but cut from it
(such as in two or three). As such the process for making it didn't
change much from those instruments. The design was pencilled onto the
wood. Lots of little holes were drilled into it using the finger
drills, and the large spaces cut out with an x-acto knife. Then the
holes were shaped with the micro-files until you get the center
picture above. Unlike the others, though, this was not going to be a
flat design. So with the micro-chisels and some minor file-work, the
over/under of the knotwork was carved into the rosette, and the
structural elements of the head were carved into the wood. This was
extremely delicate work, and did result in at least one repair... The
back of the rosette itself was then coated with a thin layer of glue
to strengthen it and keep it from casually breaking while being
handled.
Carving
the rosette into the soundboard. I initially had thought this would
be easy, given the inlay saw... until I realized that I couldn't use
the saw in the center of the wide board. This rosette isn't inlaid
into the soundboard (such as in Citole one or four), but cut from it
(such as in two or three). As such the process for making it didn't
change much from those instruments. The design was pencilled onto the
wood. Lots of little holes were drilled into it using the finger
drills, and the large spaces cut out with an x-acto knife. Then the
holes were shaped with the micro-files until you get the center
picture above. Unlike the others, though, this was not going to be a
flat design. So with the micro-chisels and some minor file-work, the
over/under of the knotwork was carved into the rosette, and the
structural elements of the head were carved into the wood. This was
extremely delicate work, and did result in at least one repair... The
back of the rosette itself was then coated with a thin layer of glue
to strengthen it and keep it from casually breaking while being
handled.
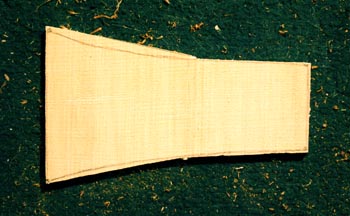 Also
different here is the way the fingerboard is being done. On the other
instruments, the fingerboard is raised above the level of the
soundboard, but on this instrument the top plane of the instrument is
perfectly flat. The fingerboard and soundboard are on the exact same
level, such as in a renaissance lute. To do this, the soundboard will
be "inset" into the body block, and then the fingerboard
will actually be inlaid into it, as the fingerboard doesn't reach to
the actual edges of the neck. This is consistant with the original
sculpture, which has raised frets that don't quite reach to the edges
of the neck, and a fingerboard flush with the face of the instrument.
Continuing with my trend of doing "reverse" colored
instruments, the fingerboard here will be made from hard maple. Here
is the basic piece cut out. It will be shaped exactly once I've
determined the final thickness of the neck.
Also
different here is the way the fingerboard is being done. On the other
instruments, the fingerboard is raised above the level of the
soundboard, but on this instrument the top plane of the instrument is
perfectly flat. The fingerboard and soundboard are on the exact same
level, such as in a renaissance lute. To do this, the soundboard will
be "inset" into the body block, and then the fingerboard
will actually be inlaid into it, as the fingerboard doesn't reach to
the actual edges of the neck. This is consistant with the original
sculpture, which has raised frets that don't quite reach to the edges
of the neck, and a fingerboard flush with the face of the instrument.
Continuing with my trend of doing "reverse" colored
instruments, the fingerboard here will be made from hard maple. Here
is the basic piece cut out. It will be shaped exactly once I've
determined the final thickness of the neck.
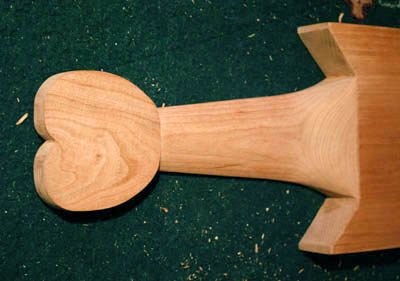 Finishing
off the shaping of the body block. Here the neck has been carved down
to its final shape, rounded and filed down. The joint between the
body and neck has been cleaned up, as have been the wings. The
peghead has been thinned down to about 3/4 of an inch and cleaned up.
Finishing
off the shaping of the body block. Here the neck has been carved down
to its final shape, rounded and filed down. The joint between the
body and neck has been cleaned up, as have been the wings. The
peghead has been thinned down to about 3/4 of an inch and cleaned up.
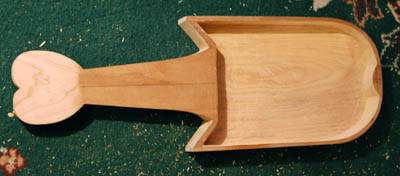 Flipping
it over, the body cavity has been cleaned up as well. The walls have
been thinned down to about 3/16 of an inch (except the front wall,
which was left a little thicker to strengthen the joint of the neck -
it's about a 1/4 of an inch thick). The floor of the cavity has been
lowered and leveled and the whole roughly smoothed. That's all the
shaping on the body block, so now it's time to add the other pieces.
Flipping
it over, the body cavity has been cleaned up as well. The walls have
been thinned down to about 3/16 of an inch (except the front wall,
which was left a little thicker to strengthen the joint of the neck -
it's about a 1/4 of an inch thick). The floor of the cavity has been
lowered and leveled and the whole roughly smoothed. That's all the
shaping on the body block, so now it's time to add the other pieces.
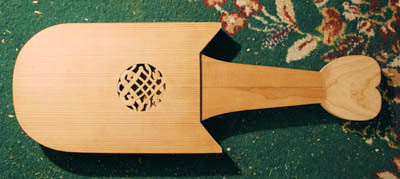 First,
the soundboard is cut down to fit as closely to the body as possible.
Of particular importance here is the line where the body meets the
neck, and how far the soundboard extends over that line. That
position is marked, and the body block will then have the walls
lowered to have the soundboard inset flush to the top.
First,
the soundboard is cut down to fit as closely to the body as possible.
Of particular importance here is the line where the body meets the
neck, and how far the soundboard extends over that line. That
position is marked, and the body block will then have the walls
lowered to have the soundboard inset flush to the top.
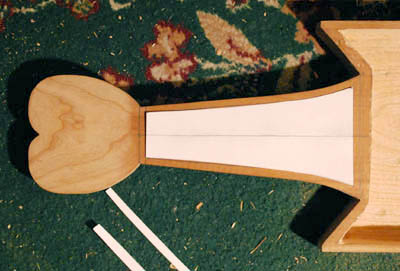 The
fingerboard will be inlaid into the body block neck. Here I make a
cardstock paper template to determine the clean dimensions and
position the piece that will be the fingerboard.
The
fingerboard will be inlaid into the body block neck. Here I make a
cardstock paper template to determine the clean dimensions and
position the piece that will be the fingerboard.
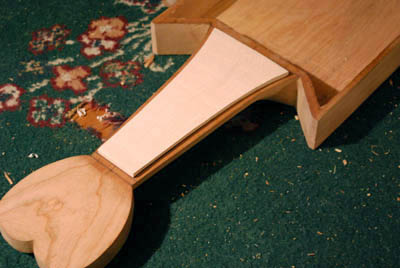 The
fingerboard piece has been cut down to the template size, and thinned
down to a little over an eighth of an inch.
The
fingerboard piece has been cut down to the template size, and thinned
down to a little over an eighth of an inch.
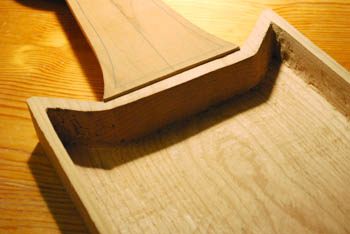 The
wall of the main sound cavity has been lowered to receive the "inset"
soundboard. This is quick cut with the dremel, and then leveled with
the block files.
The
wall of the main sound cavity has been lowered to receive the "inset"
soundboard. This is quick cut with the dremel, and then leveled with
the block files.
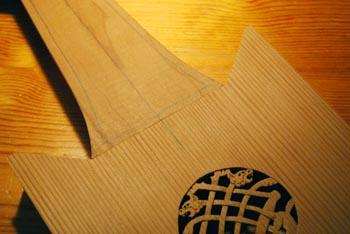 The
soundboard fits cleanly and flush at the neck joint.
The
soundboard fits cleanly and flush at the neck joint.
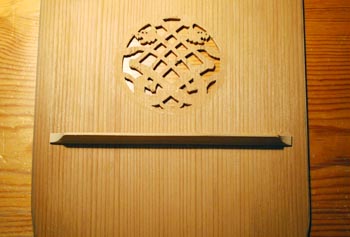 The
soundboard needed a single brace to keep it from bowing under the
pressure of the strings. This is cut from very light spruce, and has
an inverted "T" in cross-section. It is glued between where
the bridge is and the rosette.
The
soundboard needed a single brace to keep it from bowing under the
pressure of the strings. This is cut from very light spruce, and has
an inverted "T" in cross-section. It is glued between where
the bridge is and the rosette.
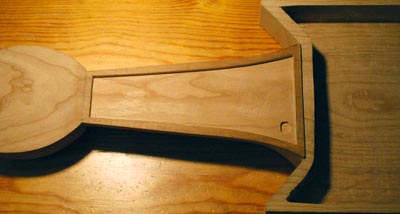 Using
the dremel router and cleaned up a bit with the mini-chisels, the
channel for the fingerboard has been carved out of the neck. The
little "divet" on the lower right side is where I set the
dremel router a little too deeply, but it won't effect anything.
Using
the dremel router and cleaned up a bit with the mini-chisels, the
channel for the fingerboard has been carved out of the neck. The
little "divet" on the lower right side is where I set the
dremel router a little too deeply, but it won't effect anything.
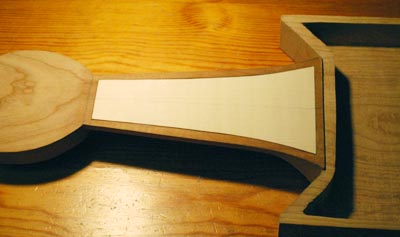 The
fingerboard is then cleaned up and fit snugly into the channel. The
level of the surface has to be set very closely, as I have to install
the frets before I do the inlay, so it has to be accurate now.
The
fingerboard is then cleaned up and fit snugly into the channel. The
level of the surface has to be set very closely, as I have to install
the frets before I do the inlay, so it has to be accurate now.
 Cutting
the fret slots. This is done with a fret-saw (pretty much a small
mitre handsaw). The scale-length has been set to 15.5 inches, and the
fret distances figured from the fret calculator program noted above.
That also makes this the longest scale for these instruments so far
(two others were 13.75, one 13.5 and the other 13.25 inches). I'm
hoping that the slight string diameter reduction will improve the
lower end of the sound.
Cutting
the fret slots. This is done with a fret-saw (pretty much a small
mitre handsaw). The scale-length has been set to 15.5 inches, and the
fret distances figured from the fret calculator program noted above.
That also makes this the longest scale for these instruments so far
(two others were 13.75, one 13.5 and the other 13.25 inches). I'm
hoping that the slight string diameter reduction will improve the
lower end of the sound.
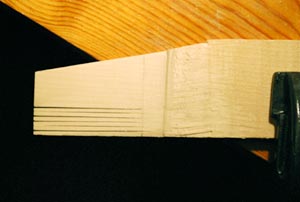 Cutting
the frets. The frets are made out of wood, as with the other ones.
Here the remainder scrap from the maple fingerboard is thinned down
to about 1/8 inch and then the frets cut as "comb" into it.
The combs teeth are then cut off to make the frets.
Cutting
the frets. The frets are made out of wood, as with the other ones.
Here the remainder scrap from the maple fingerboard is thinned down
to about 1/8 inch and then the frets cut as "comb" into it.
The combs teeth are then cut off to make the frets.
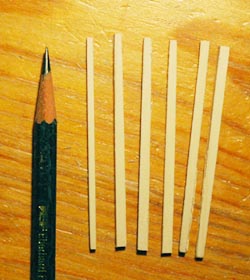 Even
cut down, then still need to be reduced farther to about 1/16 of an
inch. Here the leftmost fret has been filed down to proper thickness
(square in cross-section). The others have yet to be thinned down.
The drawing pencil is there for scale. Basically I'm making square
toothpicks.
Even
cut down, then still need to be reduced farther to about 1/16 of an
inch. Here the leftmost fret has been filed down to proper thickness
(square in cross-section). The others have yet to be thinned down.
The drawing pencil is there for scale. Basically I'm making square
toothpicks.
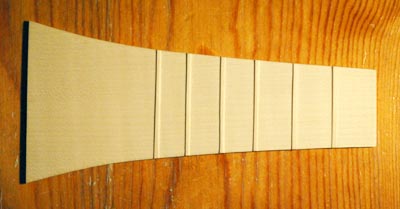 Once
the frets are small enough, the fret slots are filed into a V shape,
and the frets set diagonally into them (so that the cross-section
looks like a diamond). Once all the frets have been glued in and the
surfaces cleaned up from glue seepage, the frets are filed down to
just above the surface of the fingerboard, with the first fret
(rightmost in this picture) being the highest and the last fret being
the shortest. The fingerboard is now ready to be glued into the body
block.
Once
the frets are small enough, the fret slots are filed into a V shape,
and the frets set diagonally into them (so that the cross-section
looks like a diamond). Once all the frets have been glued in and the
surfaces cleaned up from glue seepage, the frets are filed down to
just above the surface of the fingerboard, with the first fret
(rightmost in this picture) being the highest and the last fret being
the shortest. The fingerboard is now ready to be glued into the body
block.
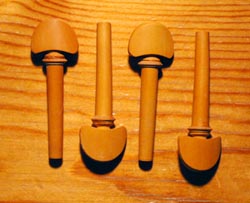 The
pegs I'll be using are modified Hill style violin pegs made from
European boxwood, which is a rich golden color. These have been taper
cut but haven't had the string holes drilled yet.
The
pegs I'll be using are modified Hill style violin pegs made from
European boxwood, which is a rich golden color. These have been taper
cut but haven't had the string holes drilled yet.
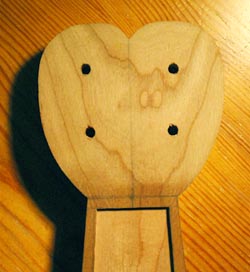 The
holes for the pegs have been drilled in the clover head of the body
block. They still need to be reamed to fit the pegs. At this point
I'm still debating whether they should be thrust up from underneath
or thrust down into the head. The original is a little unclear (could
probably be interpretted either way) and various examples go either
way. I've found that there is a little more stress on the pegs thrust
down into the head, but I personally find them easier to tune that
way then from behind (though I've been told I'm a little weird that
way). Ellis in his version thrust the pegs from behind, while
Marshall's come from above. After checking with the person who will
end up with this one, I will be thrusting the pegs in from behind.
The
holes for the pegs have been drilled in the clover head of the body
block. They still need to be reamed to fit the pegs. At this point
I'm still debating whether they should be thrust up from underneath
or thrust down into the head. The original is a little unclear (could
probably be interpretted either way) and various examples go either
way. I've found that there is a little more stress on the pegs thrust
down into the head, but I personally find them easier to tune that
way then from behind (though I've been told I'm a little weird that
way). Ellis in his version thrust the pegs from behind, while
Marshall's come from above. After checking with the person who will
end up with this one, I will be thrusting the pegs in from behind.
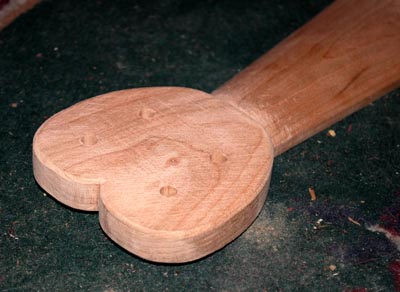 This
pair of images (only one visible now) shows what I mean by "sanding
is forever." The left image shows the peg-head after the shaping
was finished and the holes had been drilled and reamed for the pegs.
While it's basically flat and the edges have been beveled a bit, all
that work had been done with chisels and files. It still has deep
gouges and scratches and such from the shaping. Since this instrument
will be finished using only oil and beeswax, it has to be sanded to
practically glass-smooth. That is done in about four passes with
increasing grades of sandpaper, starting with about 150 to grind the
deep scratches out (which takes actually the longest - the peghead
here took about four or five hours for that pass for the peghead
alone), progressing to a 220 sandpaper to get the scratches from the
150 sandpaper out! Then I do a pass with 400 grade paper that pretty
much glasses the surface of the hardwood, such that it feels
perfectly smooth. A final pass with 3400-4800 grade buffers can
actually shine the surface so that it is almost reflective on hard
angle. The right hand picture shows where it ends up before any
finishes have been applied. This gets tedious, but it makes a big
difference in the appearance of the final instrument.
This
pair of images (only one visible now) shows what I mean by "sanding
is forever." The left image shows the peg-head after the shaping
was finished and the holes had been drilled and reamed for the pegs.
While it's basically flat and the edges have been beveled a bit, all
that work had been done with chisels and files. It still has deep
gouges and scratches and such from the shaping. Since this instrument
will be finished using only oil and beeswax, it has to be sanded to
practically glass-smooth. That is done in about four passes with
increasing grades of sandpaper, starting with about 150 to grind the
deep scratches out (which takes actually the longest - the peghead
here took about four or five hours for that pass for the peghead
alone), progressing to a 220 sandpaper to get the scratches from the
150 sandpaper out! Then I do a pass with 400 grade paper that pretty
much glasses the surface of the hardwood, such that it feels
perfectly smooth. A final pass with 3400-4800 grade buffers can
actually shine the surface so that it is almost reflective on hard
angle. The right hand picture shows where it ends up before any
finishes have been applied. This gets tedious, but it makes a big
difference in the appearance of the final instrument.
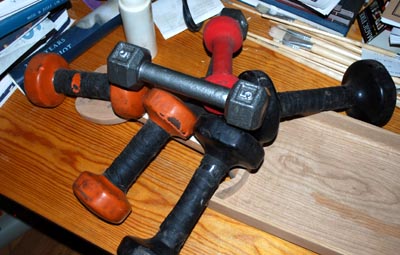 Once
the major sanding has been completed on the body block (sanded down
to the 220 range), I'm ready to attach the fingerboard and
soundboard. The fingerboard goes on first, glued into place with many
weights.
Once
the major sanding has been completed on the body block (sanded down
to the 220 range), I'm ready to attach the fingerboard and
soundboard. The fingerboard goes on first, glued into place with many
weights.
 After
that has dried, I go over the fingerboard and level it to the rest of
the neck. Unfortunately that now involves filing inbetween the frets,
so it takes a couple of hours to do. Once that has been roughly
leveled, but before any final sanding, the soundboard is glued on.
Once again the trusty handweignts act as my clamps.
After
that has dried, I go over the fingerboard and level it to the rest of
the neck. Unfortunately that now involves filing inbetween the frets,
so it takes a couple of hours to do. Once that has been roughly
leveled, but before any final sanding, the soundboard is glued on.
Once again the trusty handweignts act as my clamps.
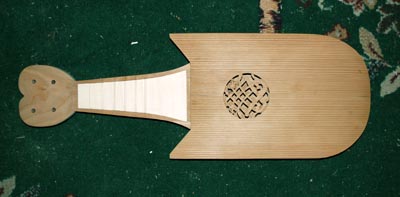 Here's
the instrument now with the fingerboard and soundboard attached. The
soundboard needs to be evened out a bit and the edges flushed with
the sides of the body block. Then the whole thing needs to be sanded
down again and glassed as best as possible.
Here's
the instrument now with the fingerboard and soundboard attached. The
soundboard needs to be evened out a bit and the edges flushed with
the sides of the body block. Then the whole thing needs to be sanded
down again and glassed as best as possible.
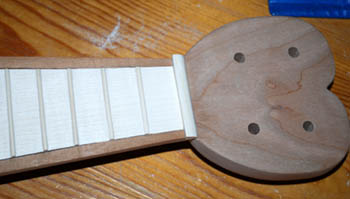 Doing
up the fittings. First is the nut. As the fingerboard is flush with
the neck, there was nothing for the nut to press up against. So I
needed to cut out a shallow channel to seat it into, and then rough
cut out the nut from the same maple piece as the fingerboard. Here is
the rough shaped piece in place.
Doing
up the fittings. First is the nut. As the fingerboard is flush with
the neck, there was nothing for the nut to press up against. So I
needed to cut out a shallow channel to seat it into, and then rough
cut out the nut from the same maple piece as the fingerboard. Here is
the rough shaped piece in place.
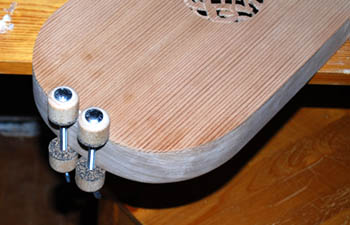 Next
is the small hardwood inlay at the tail, where the strings will come
over the edge of the soundboard. Since the soundboard is softwood, a
small saddle is placed here to keep the strings from cutting into the
wood. Here the saddle is being clamped in place.
Next
is the small hardwood inlay at the tail, where the strings will come
over the edge of the soundboard. Since the soundboard is softwood, a
small saddle is placed here to keep the strings from cutting into the
wood. Here the saddle is being clamped in place.
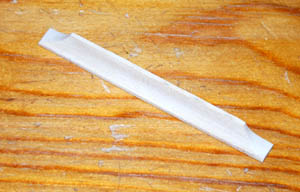 The
rough shaped bridge, also from the same maple wood.
The
rough shaped bridge, also from the same maple wood.
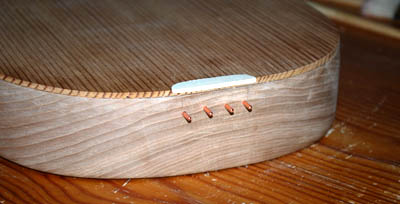 The
saddle has been filed and sanded down flush with the soundboard and
body. This instrument doesn't have a tailpiece. Instead, the strings
are directly fixed to pins that jut from the end of the body block.
The pins are relatively small and made from copper, and stand out
about 1/4" from the body. They are held in entirely by pressure.
The
saddle has been filed and sanded down flush with the soundboard and
body. This instrument doesn't have a tailpiece. Instead, the strings
are directly fixed to pins that jut from the end of the body block.
The pins are relatively small and made from copper, and stand out
about 1/4" from the body. They are held in entirely by pressure.
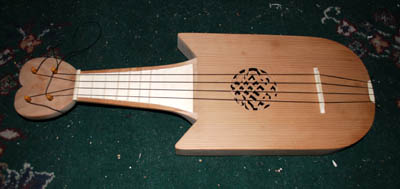 With
the fittings in place, I use some black nylon string I have to do a
mock-up stringing to set the action. This is how high the strings sit
above the fingerboard, and it involves deepening the notches in the
nut and bridge, checking the level, re-doing the notches, etc. until
the height is where you want it. The nylon strings is about as thick
as the thickest gut string that will be on this instrument.
With
the fittings in place, I use some black nylon string I have to do a
mock-up stringing to set the action. This is how high the strings sit
above the fingerboard, and it involves deepening the notches in the
nut and bridge, checking the level, re-doing the notches, etc. until
the height is where you want it. The nylon strings is about as thick
as the thickest gut string that will be on this instrument.
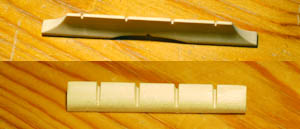 The
finished bridge and nut, with the notches at the proper depth. I've
also "footed" the bridge to make it a little lighter,
prettier, and fit more cleanly to the soundboard.
The
finished bridge and nut, with the notches at the proper depth. I've
also "footed" the bridge to make it a little lighter,
prettier, and fit more cleanly to the soundboard.
NEXT UP- final sanding and oiling/finishing, and stringing her up!
OTHER RECREATIONS Since I put up this page, I've discovered a number of people who use or make citoles, so I have included them here for people that might want to acquire one, but aren't willing to kill themselves to make one. Its also really interesting to see what other people come up with as solutions to the form of the instrument. These aren't in any particular order - mostly just added as I found them. If you know of any makers or reproductions not listed below, please drop me a line and I'll try to include it. I like to be as thorough as possible.
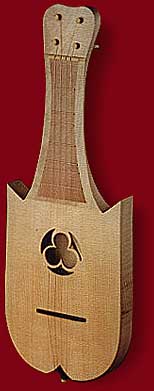
 BERNARD
ELLIS did a very nice simple recreation of the Parma
Baptistry citole, strung in wire on the left. DAVID
MARSHALL did a very similar reworking of the Parma
instrument (here posed almost like the original) also strung in wire.
Unfortunately, both of these wonderful British luthiers have now
passed on, and these instruments may only be found on the secondary
market.
BERNARD
ELLIS did a very nice simple recreation of the Parma
Baptistry citole, strung in wire on the left. DAVID
MARSHALL did a very similar reworking of the Parma
instrument (here posed almost like the original) also strung in wire.
Unfortunately, both of these wonderful British luthiers have now
passed on, and these instruments may only be found on the secondary
market.
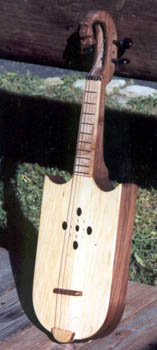 SAMUEL
COULTER of Dancing Stickmen in California also makes a
very nice version of the Parma Baptistry instrument, strung in wire
with more decorative carving (see the website for more images and
information). His are available for around $1,000.
SAMUEL
COULTER of Dancing Stickmen in California also makes a
very nice version of the Parma Baptistry instrument, strung in wire
with more decorative carving (see the website for more images and
information). His are available for around $1,000.
 WAIDLER
acquired a number of Bernard Ellis's designs, and is producing them
at their workshop in Germany. This is their reworking of his Parma
Baptistry Citole, available through the Early Music Shop in England.
Present listed price is about $850.00 with the present exchange rate.
WAIDLER
acquired a number of Bernard Ellis's designs, and is producing them
at their workshop in Germany. This is their reworking of his Parma
Baptistry Citole, available through the Early Music Shop in England.
Present listed price is about $850.00 with the present exchange rate.
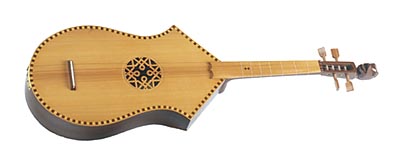 MORILLO
workshop is now making both a Parma style citole (not pictured, but
selling for about $1100) and a Cantigas de Santa Maria style "Latin
Guitar" style citole pictured here for about $1000, both through
the Early Music Shop in England.
MORILLO
workshop is now making both a Parma style citole (not pictured, but
selling for about $1100) and a Cantigas de Santa Maria style "Latin
Guitar" style citole pictured here for about $1000, both through
the Early Music Shop in England.
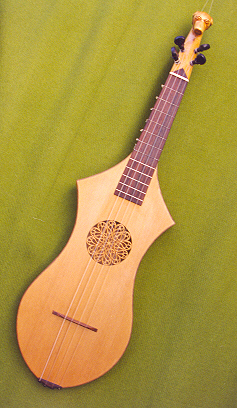
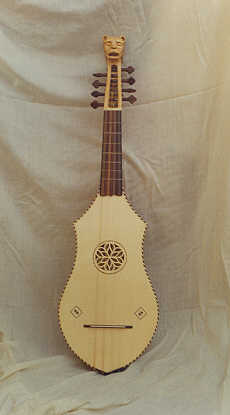 JESUS
REOLID in Spain does several variations of citole,
based very heavily on the Spanish (logically) Cantigas de Santa Maria
(see image above). His webpage is in Spanish, and he does not list
prices, so I cannot say what his availability or costs are. But the
instruments are very pretty.
JESUS
REOLID in Spain does several variations of citole,
based very heavily on the Spanish (logically) Cantigas de Santa Maria
(see image above). His webpage is in Spanish, and he does not list
prices, so I cannot say what his availability or costs are. But the
instruments are very pretty.
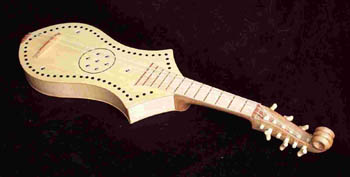 CHRIS
ELMES at Gaita Instruments in Scotland also makes a
really nice version of the Cantigas citole. It is strung in gut with
four courses, with the two courses double strung in octaves. His sell
for around $1,000.
CHRIS
ELMES at Gaita Instruments in Scotland also makes a
really nice version of the Cantigas citole. It is strung in gut with
four courses, with the two courses double strung in octaves. His sell
for around $1,000.
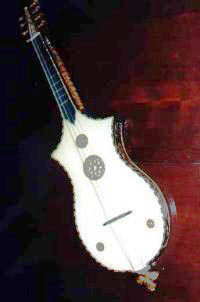 JOSE
IGNACIO FERNANDEZ from Cinco Siglos in Spain did
another very elaborately carved variation of the Cantiga citole that
came out marvelously. The picture above doesn't come close to doing
it any justice - check out his website to see the construction
process and the gorgeous final instrument, decoratively carved in
patterns along the lines of the Warwick gittern.
JOSE
IGNACIO FERNANDEZ from Cinco Siglos in Spain did
another very elaborately carved variation of the Cantiga citole that
came out marvelously. The picture above doesn't come close to doing
it any justice - check out his website to see the construction
process and the gorgeous final instrument, decoratively carved in
patterns along the lines of the Warwick gittern.
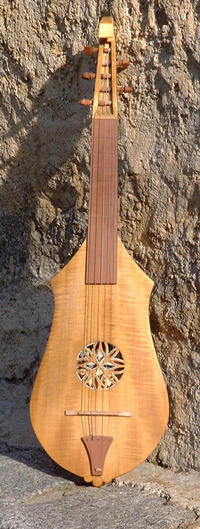
 UGO
CASALONGA (can also be found at Arte
di a Musica) from Corsica makes several variants of
the Spanish citole. They range in price from $1,000-1,300 or so,
depending on decorative elements.
UGO
CASALONGA (can also be found at Arte
di a Musica) from Corsica makes several variants of
the Spanish citole. They range in price from $1,000-1,300 or so,
depending on decorative elements.
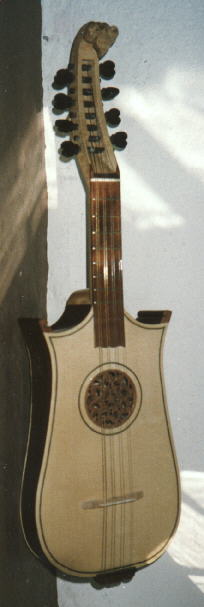 HEILIGENBERGMUSIK
also makes a nice citole variant, with a parma like body and a long
sickle head. The site is in German, but worth a look (he also makes
REALLY nice vielles...).
HEILIGENBERGMUSIK
also makes a nice citole variant, with a parma like body and a long
sickle head. The site is in German, but worth a look (he also makes
REALLY nice vielles...).
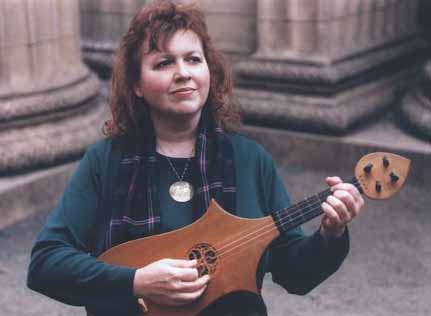 Luthier
Lyn Elder created this citole, being played by its present owner and
co-builder Deborah
White.
Luthier
Lyn Elder created this citole, being played by its present owner and
co-builder Deborah
White.
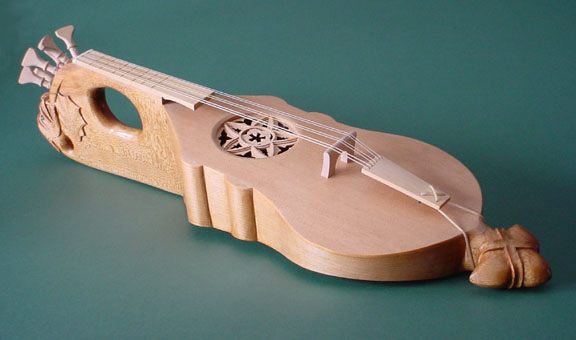 KATE
BUEHLER of Unprofitable Instruments is has made a
wonderful recreation of the Warwick Castle Gittern/citole, block
carved out of a giant chunk of maple. Amongst the most beautiful
recreations I've seen. Her webpage (click on her name) has more
details on her interpretation. This particular instrument is for sale
for $3,200 (not unreasonable) including custom case.
KATE
BUEHLER of Unprofitable Instruments is has made a
wonderful recreation of the Warwick Castle Gittern/citole, block
carved out of a giant chunk of maple. Amongst the most beautiful
recreations I've seen. Her webpage (click on her name) has more
details on her interpretation. This particular instrument is for sale
for $3,200 (not unreasonable) including custom case.
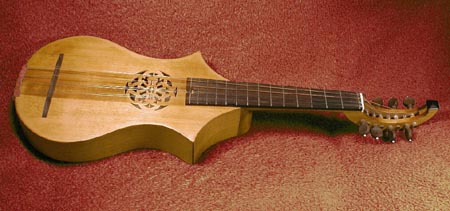 JAN
KLIMA in the Czech Republic makes some nice cantiga
style citoles. The website is in Czech, so it is rather difficult to
read, but the price on the instrument is 15,000 Koruny, which comes
out to about $600 US.
JAN
KLIMA in the Czech Republic makes some nice cantiga
style citoles. The website is in Czech, so it is rather difficult to
read, but the price on the instrument is 15,000 Koruny, which comes
out to about $600 US.