

I was happy with how it came out, and worked out the problems that I wanted to.
CITOLE NUMBER THREE Yes, there is another one. This one has a couple of different features worth exploring. First it's going to have a scroll-like pegbox more like a violin, and will have a figurehead of a dog (specifically a greyhound) on it. Next it's going to have a full-sized fleur on the tail to which the tailpiece will be attached. So a couple of experiments to work out. This one is going to be made from cherrywood, like Citole Number Two, as that is much easier to carve, especially for the more intricate fleur and pegbox.
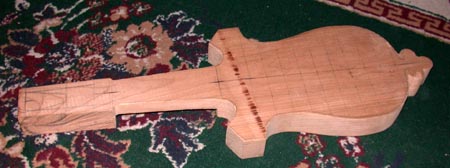
 This
is the starting plan. It is a fairly close variant of the Queen Mary
Psalter citole above, only with a dog's head rather than a horse's.
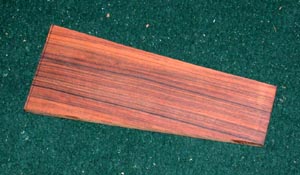
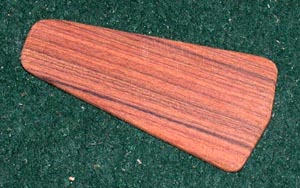
The fitting will be made from walnut.
This
is the starting plan. It is a fairly close variant of the Queen Mary
Psalter citole above, only with a dog's head rather than a horse's.
The fitting will be made from walnut.
 The
block has been roughed out with handsaws. I'm always amazed how fast
the saws go through the cherry vs. the hard maple.
The
block has been roughed out with handsaws. I'm always amazed how fast
the saws go through the cherry vs. the hard maple.
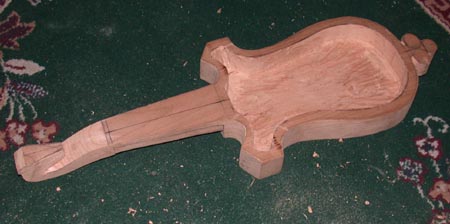
 Block
has now been cleaned up a bit on the outside. The body has been
shaped, and the fleur has been shaped for the full thickness of the
body, though it will eventually be shaped narrower. The peg-block has
been left large until I work out the exact dimensions of the dog
head. I'm doing a model of the head in clay to work from (to have a
3-D model to carve from is much easier than trying to work from 2-D
drawings), so once that has been worked out, I'll carve down the
peghead to a more reasonable size. You can also see the start of the
guide lines for the drilling out of the body.
Block
has now been cleaned up a bit on the outside. The body has been
shaped, and the fleur has been shaped for the full thickness of the
body, though it will eventually be shaped narrower. The peg-block has
been left large until I work out the exact dimensions of the dog
head. I'm doing a model of the head in clay to work from (to have a
3-D model to carve from is much easier than trying to work from 2-D
drawings), so once that has been worked out, I'll carve down the
peghead to a more reasonable size. You can also see the start of the
guide lines for the drilling out of the body.
In the interim, working on the soundboard, since carving out the rosette takes a bit of time. This is the design for the rosette.
 The
soundboard is the other half of the Carpathian white spruce (a master
grade piece, very nice, from LMII
that I got for Citole One. The guitar soundboard wood is sold in
pairs for joining to make a jumbo-sized guitar, but these little
instruments only require 1/2 the width, so one guitar soundboard
makes two citoles, or three rebecs, or two oval fiddles, etc. The
basic outline has been traced onto the board from the body block, and
the rosette has been lined up on it for cutting.
The
soundboard is the other half of the Carpathian white spruce (a master
grade piece, very nice, from LMII
that I got for Citole One. The guitar soundboard wood is sold in
pairs for joining to make a jumbo-sized guitar, but these little
instruments only require 1/2 the width, so one guitar soundboard
makes two citoles, or three rebecs, or two oval fiddles, etc. The
basic outline has been traced onto the board from the body block, and
the rosette has been lined up on it for cutting.
 The
body block now has had all the holes drilled into the area that will
be the cavity. This particular piece of cherry was a bit harder than
the one used for Citole 2.
The
body block now has had all the holes drilled into the area that will
be the cavity. This particular piece of cherry was a bit harder than
the one used for Citole 2.
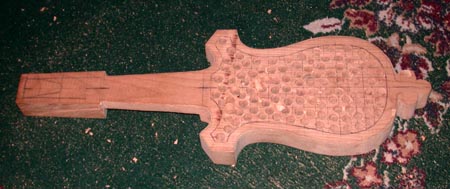
 Starting
to hack out the body cavity, though its a little hard to tell from
this image exactly how much has been removed (about half at this
point). This particular block is a little "shaggier" in
grain than the previous block, which makes me nervous about the block
splitting as I'm working on it. But so far everything has gone well.
Starting
to hack out the body cavity, though its a little hard to tell from
this image exactly how much has been removed (about half at this
point). This particular block is a little "shaggier" in
grain than the previous block, which makes me nervous about the block
splitting as I'm working on it. But so far everything has gone well.
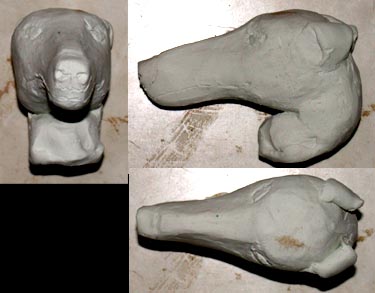 This
is the sculpted (in clay) model head for the greyhound pegbox,
showing side, top and front views. He ends up pretty small to fit
into the height of the wood for the block - about 2 1/2 inches from
nose to ears - but shouldn't be too difficult to work. This isn't an
exact version of the final appearance - mostly just a shape guide.
The eyes, nose and mouth will be cut more cleanly in the wood than
just scratched onto the surface as they are here for reference.
This
is the sculpted (in clay) model head for the greyhound pegbox,
showing side, top and front views. He ends up pretty small to fit
into the height of the wood for the block - about 2 1/2 inches from
nose to ears - but shouldn't be too difficult to work. This isn't an
exact version of the final appearance - mostly just a shape guide.
The eyes, nose and mouth will be cut more cleanly in the wood than
just scratched onto the surface as they are here for reference.
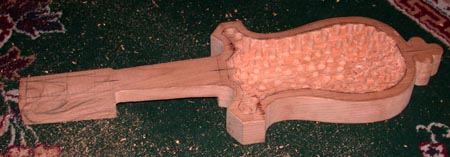
 Having
the model for how large the head will end up, I was now able to cut
the sickle peg-head into rough shape. Overall body as it stands now.
I've finished the rough-out of the body cavity, though now the walls
need to be thinned to appropriate thickness (a somewhat careful
process, as the shaggy grain of this particular block of cherry is
prone is splitting - hmm, I notice I say that alot with this piece).
Having
the model for how large the head will end up, I was now able to cut
the sickle peg-head into rough shape. Overall body as it stands now.
I've finished the rough-out of the body cavity, though now the walls
need to be thinned to appropriate thickness (a somewhat careful
process, as the shaggy grain of this particular block of cherry is
prone is splitting - hmm, I notice I say that alot with this piece).
 Side
view of the rough out of the sickle peghead, before even I rounded
off the neck. Getting into the space under the chin is going to be
annoying.
Side
view of the rough out of the sickle peghead, before even I rounded
off the neck. Getting into the space under the chin is going to be
annoying.
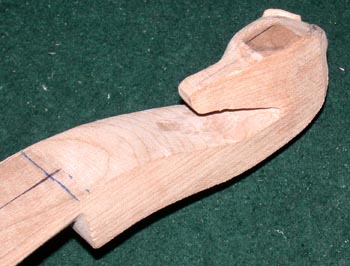
 3/4
views of the peghead being carved. The first shows the block just
starting to be shaped, the ears cut out, and the chin thinned down.
The neck of the instrument (as opposed to the dog) has be rounded off
at this point, so you can see the wide corner of the pegbox. The
second image shows the final shaping of the head, but before the
eyes, nose, and mouth have been cut into the surface. The dog's neck
has been thinned considerably, and the nose is quite narrow, though
that is a little difficult to make out from this angle. The large
ears are folded back along the back of the head. The carving was
mostly done with the mini-chisels (brown handle above), whose marks
can still be seen under the chin a bit and on the front corner of the
pegbox as I was softening the sharp front corner. Next I have to
hollow out the channel in the pegbox. I have the impression it most
likely will have to be open to the bottom of the box, as threading
the strings under the dog's nose may prove too annoying.
3/4
views of the peghead being carved. The first shows the block just
starting to be shaped, the ears cut out, and the chin thinned down.
The neck of the instrument (as opposed to the dog) has be rounded off
at this point, so you can see the wide corner of the pegbox. The
second image shows the final shaping of the head, but before the
eyes, nose, and mouth have been cut into the surface. The dog's neck
has been thinned considerably, and the nose is quite narrow, though
that is a little difficult to make out from this angle. The large
ears are folded back along the back of the head. The carving was
mostly done with the mini-chisels (brown handle above), whose marks
can still be seen under the chin a bit and on the front corner of the
pegbox as I was softening the sharp front corner. Next I have to
hollow out the channel in the pegbox. I have the impression it most
likely will have to be open to the bottom of the box, as threading
the strings under the dog's nose may prove too annoying.
 The
rest of the pegbox has been carved out now. The box has been hollowed
(done entirely with chisels) starting from the end of the nut down as
far under the dog's nose as was reasonably able to be reached. I
wanted to give the pegs as much clearance space as I could. The holes
for the pegs were initially drilled with the finger drills, and then
widened with a normal hand drill. Finally a peg reamer was used to
taper the holes to fit the pegs. The pegs themselves will be added
later. The peg diameters are slightly narrower than violin pegs, but
not by much. Overall the pegbox region is about the size of violin,
but a bit wider across, as the neck of the citole is significantly
wider than the violin neck. You can also see the prep for the final
carving of the dog features, as I mark out where the nose, eyes, and
mouth are going to be.
The
rest of the pegbox has been carved out now. The box has been hollowed
(done entirely with chisels) starting from the end of the nut down as
far under the dog's nose as was reasonably able to be reached. I
wanted to give the pegs as much clearance space as I could. The holes
for the pegs were initially drilled with the finger drills, and then
widened with a normal hand drill. Finally a peg reamer was used to
taper the holes to fit the pegs. The pegs themselves will be added
later. The peg diameters are slightly narrower than violin pegs, but
not by much. Overall the pegbox region is about the size of violin,
but a bit wider across, as the neck of the citole is significantly
wider than the violin neck. You can also see the prep for the final
carving of the dog features, as I mark out where the nose, eyes, and
mouth are going to be.
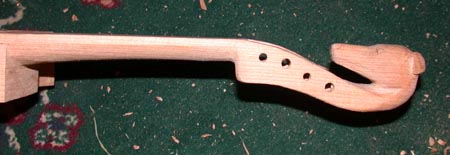 Side
view of the neck and peghead. The neck has now been thinned down to
its final thickness of about 1/2 inch at the nut. The fingerboard is
about 3/16 inch thick on top of that, which should be far more than
enough strength for the low tension gut strings that will be on the
instrument.
Side
view of the neck and peghead. The neck has now been thinned down to
its final thickness of about 1/2 inch at the nut. The fingerboard is
about 3/16 inch thick on top of that, which should be far more than
enough strength for the low tension gut strings that will be on the
instrument.
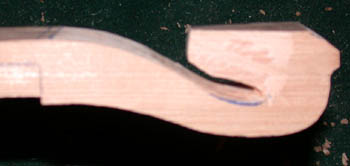
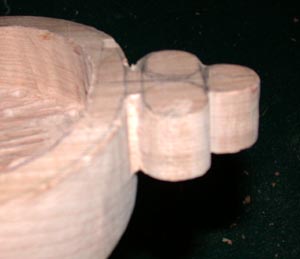 Starting
the carving of the trefoil tailpiece. The block is visible here, cut
down to about 1/2 of the thickness of the body. The three "circles"
of the tail will be each rounded off more into a ball, with the joint
to the body dramatically thinned, and around which the tail-gut will
wrap to support the tailpiece.
Starting
the carving of the trefoil tailpiece. The block is visible here, cut
down to about 1/2 of the thickness of the body. The three "circles"
of the tail will be each rounded off more into a ball, with the joint
to the body dramatically thinned, and around which the tail-gut will
wrap to support the tailpiece.
 Starting
to round off the "balls" of the tailpiece. This is done
entirely with the chisels at first, to rough shape the balls into
form, though ultimately will be smoothed down with the files.
Starting
to round off the "balls" of the tailpiece. This is done
entirely with the chisels at first, to rough shape the balls into
form, though ultimately will be smoothed down with the files.
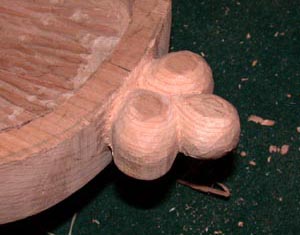
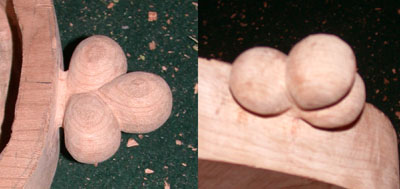 The
end trefoil has been finally shaped with the small chisels and the
medium files. These images are from top and underside behind, to give
an idea of the thickness of the endball.
The
end trefoil has been finally shaped with the small chisels and the
medium files. These images are from top and underside behind, to give
an idea of the thickness of the endball.
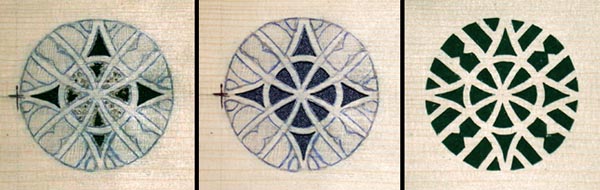 The
carving for the rosette. Many little holes are drilled in the opening
with the micro finger drills. The center block is cut out with an
exacto knife, and then the final shaping of the opening is done with
the micro diamond files. In the left image, you can see a couple of
the holes untouched, some of the inner circle with the drilled holes,
the cardinal four inner ones with the center area cut out, and the
outer three cardinals more or less finished. The rosette is about two
inches across. The second image shows the inner space fully complete.
The rightmost image shows the final rosette. The carpathian spruce
has a very large differential in hardness between its grains, so is a
little more difficult to work. But it is significantly stronger and
lighter than the sitka spruce.
The
carving for the rosette. Many little holes are drilled in the opening
with the micro finger drills. The center block is cut out with an
exacto knife, and then the final shaping of the opening is done with
the micro diamond files. In the left image, you can see a couple of
the holes untouched, some of the inner circle with the drilled holes,
the cardinal four inner ones with the center area cut out, and the
outer three cardinals more or less finished. The rosette is about two
inches across. The second image shows the inner space fully complete.
The rightmost image shows the final rosette. The carpathian spruce
has a very large differential in hardness between its grains, so is a
little more difficult to work. But it is significantly stronger and
lighter than the sitka spruce.
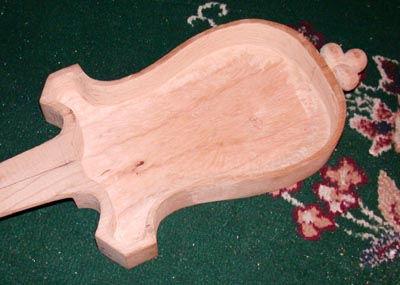 Back
to the main body cavity. The floor has been leveled and thinned down
to its final thickness. The walls have been thinned down until I
could flex them with one hand spanning the waist (the side walls are
about 1/8 inch thick plus or minus). The front wall connecting to the
neck has been left thicker to avoid the potential problem with citole
number two. In citole two, when I thinned down the front wall to the
same thickness as the others, I could actually flex the neck a bit.
It hasn't yet affected the action on the instrument, but I decided I
didn't want to take a chance with this one. Still, the whole block
weighs less than a pound at this point. The cherry is definitely much
lighter than the maple. A little sanding cleanup is necessary at the
edges where you can still see the chisel marks as I cleaned up the
floor around the newly thinned walls. I honestly have no idea what
the dark flecks are. They randomly appear in the wood as paper-thin
bits - they aren't knots. There is one knot in the body, a little off
center in the widest portion of the back area. You can just make it
out in the picture.
Back
to the main body cavity. The floor has been leveled and thinned down
to its final thickness. The walls have been thinned down until I
could flex them with one hand spanning the waist (the side walls are
about 1/8 inch thick plus or minus). The front wall connecting to the
neck has been left thicker to avoid the potential problem with citole
number two. In citole two, when I thinned down the front wall to the
same thickness as the others, I could actually flex the neck a bit.
It hasn't yet affected the action on the instrument, but I decided I
didn't want to take a chance with this one. Still, the whole block
weighs less than a pound at this point. The cherry is definitely much
lighter than the maple. A little sanding cleanup is necessary at the
edges where you can still see the chisel marks as I cleaned up the
floor around the newly thinned walls. I honestly have no idea what
the dark flecks are. They randomly appear in the wood as paper-thin
bits - they aren't knots. There is one knot in the body, a little off
center in the widest portion of the back area. You can just make it
out in the picture.
 Time
now to start the actual assembly. This is the bracing bar that goes
underneath the widest portion of the soundboard, just off the
location of the bridge. It is made from red cedar, and is shaped like
an upside-down T in cross-section. First it must be glued to the
underside of the soundboard before the soundboard is attached to the
main body.
Time
now to start the actual assembly. This is the bracing bar that goes
underneath the widest portion of the soundboard, just off the
location of the bridge. It is made from red cedar, and is shaped like
an upside-down T in cross-section. First it must be glued to the
underside of the soundboard before the soundboard is attached to the
main body.
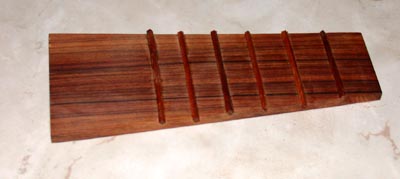
 The
start of the fingerboard. It has been cut to shape and thinned down
to appropriate thickness. Once I get a clean measurement of the nut
to bridge position on the basic body (block and soundboard), I'll add
the frets to it.
The
start of the fingerboard. It has been cut to shape and thinned down
to appropriate thickness. Once I get a clean measurement of the nut
to bridge position on the basic body (block and soundboard), I'll add
the frets to it.
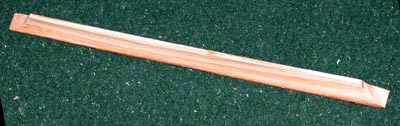
 The
tailpiece, cut to shape and thinned down to final thickness. This one
is not like the rebec or fiddle tails in that it is perfectly flat,
not arched. The holes will be drilled once I have the body together
and can space everything cleanly.
The
tailpiece, cut to shape and thinned down to final thickness. This one
is not like the rebec or fiddle tails in that it is perfectly flat,
not arched. The holes will be drilled once I have the body together
and can space everything cleanly.
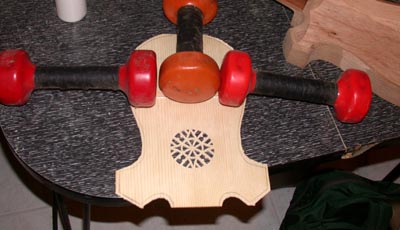
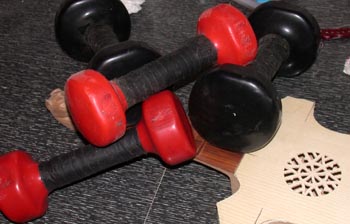
 Starting
the actual assembly now. The first piece on is the brace for the
soundboard. Back to using my handweight method to attach this to the
soundboard. The attached piece is shown next.
Starting
the actual assembly now. The first piece on is the brace for the
soundboard. Back to using my handweight method to attach this to the
soundboard. The attached piece is shown next.
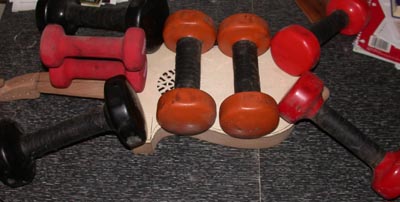
 Attaching
the soundboard to the body. Again with the trusty handweights, this
was lined up very carefully and glued down. The next picture shows
the closed body as I'm fitting the fingerboard for trimming.
Attaching
the soundboard to the body. Again with the trusty handweights, this
was lined up very carefully and glued down. The next picture shows
the closed body as I'm fitting the fingerboard for trimming.
 The
fingerboard is next. The frets are made by taking a thin sheet and
functionally turning it into a comb by cutting slots in it, and then
cutting off the teeth. The teeth then become the square frets. The
fret distances are determined by a fret calculator, such as this one
at the Manchester
Guitar Tech, though there are others. I used a 13 7/8
inch scale here. The slots are cut first with a fret saw, and then a
square file is used to broaden the cut into a V shape. The frets are
then laid into the slots and glued in place one at a time. Once all
the frets are placed and dry, the overhanging edges are trimmed off
using a coping saw, and the edges are beveled inward. In the previous
instrument I used constrasting wood for the frets, this time I
decided to keep it monochrome, as it were, and used the same wood
from which the fretboard was made.
The
fingerboard is next. The frets are made by taking a thin sheet and
functionally turning it into a comb by cutting slots in it, and then
cutting off the teeth. The teeth then become the square frets. The
fret distances are determined by a fret calculator, such as this one
at the Manchester
Guitar Tech, though there are others. I used a 13 7/8
inch scale here. The slots are cut first with a fret saw, and then a
square file is used to broaden the cut into a V shape. The frets are
then laid into the slots and glued in place one at a time. Once all
the frets are placed and dry, the overhanging edges are trimmed off
using a coping saw, and the edges are beveled inward. In the previous
instrument I used constrasting wood for the frets, this time I
decided to keep it monochrome, as it were, and used the same wood
from which the fretboard was made.
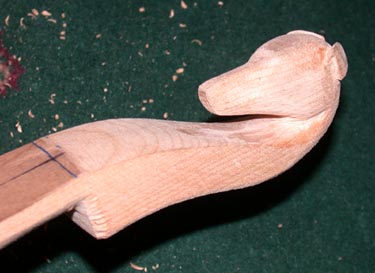
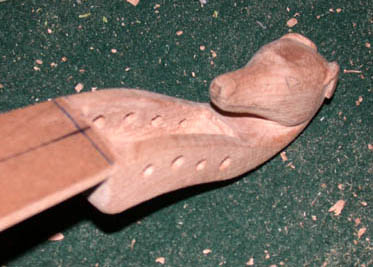
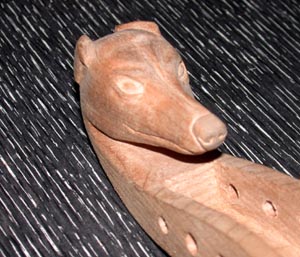 Last
bit of actual carving done on the dog's head to finish off the
features, and clean up the shape. This took several reference
pictures of greyhounds to get something akin to correct. And yes,
they really do have that line ridge all the way down their skulls.
Last
bit of actual carving done on the dog's head to finish off the
features, and clean up the shape. This took several reference
pictures of greyhounds to get something akin to correct. And yes,
they really do have that line ridge all the way down their skulls.
 The
carving done, the fingerboard is attached to the body in the typical
hand-weight clamping method and let dry. Both the bottom of the
fingerboard and the neck of the instrument are given some skuffing so
that the glue has a place to hold, and so that it is less likely to
slide around as it is drying.
The
carving done, the fingerboard is attached to the body in the typical
hand-weight clamping method and let dry. Both the bottom of the
fingerboard and the neck of the instrument are given some skuffing so
that the glue has a place to hold, and so that it is less likely to
slide around as it is drying.
 Once
the fingerboard is dry, the final sanding and shaping of the body is
done. This takes quite a while, and is probably the most tedious
portion of the whole instrument making process. I start off with the
carbide files, and work down to very fine sandpaper. This is about
halfway through the process here. Once in place, the frets are also
flattened using a fine grit long flat file to level them, and remove
any sharp edges that might cut into the gut strings. The micro files
are also used to straighten the edges a bit, and to remove any glue
that might have gotten onto the fingerboard proper.
Once
the fingerboard is dry, the final sanding and shaping of the body is
done. This takes quite a while, and is probably the most tedious
portion of the whole instrument making process. I start off with the
carbide files, and work down to very fine sandpaper. This is about
halfway through the process here. Once in place, the frets are also
flattened using a fine grit long flat file to level them, and remove
any sharp edges that might cut into the gut strings. The micro files
are also used to straighten the edges a bit, and to remove any glue
that might have gotten onto the fingerboard proper.
 All
the sanding done, the finishing is added. In this case, I used a
rubbed oil finish. Three coats of linseed oil were applied and rubbed
and cleaned between each application. This brings out the rich color
of the wood (the cherry turned a very nice golden red color, which
probably explains its brittleness - the board already had aged some,
I think, before I acquired it). It is hung from its peg holes
inbetween coats in a well ventilated area. Linseed oil doesn't run
the risk of dust settling into the finish like varnishes or laquers,
but is EXTREMELY flamable, and requires very good venting to keep
from buring (rags saturated in oil have been known to spontaneously
combust as the oil vaporizes off of them) or simply getting way too
toxic.
All
the sanding done, the finishing is added. In this case, I used a
rubbed oil finish. Three coats of linseed oil were applied and rubbed
and cleaned between each application. This brings out the rich color
of the wood (the cherry turned a very nice golden red color, which
probably explains its brittleness - the board already had aged some,
I think, before I acquired it). It is hung from its peg holes
inbetween coats in a well ventilated area. Linseed oil doesn't run
the risk of dust settling into the finish like varnishes or laquers,
but is EXTREMELY flamable, and requires very good venting to keep
from buring (rags saturated in oil have been known to spontaneously
combust as the oil vaporizes off of them) or simply getting way too
toxic.
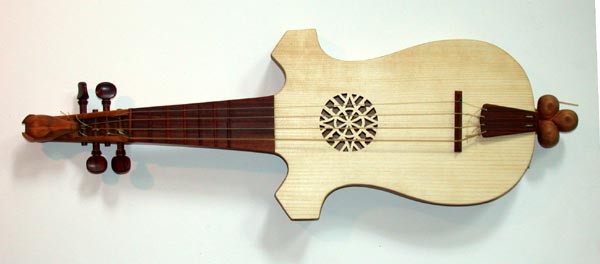
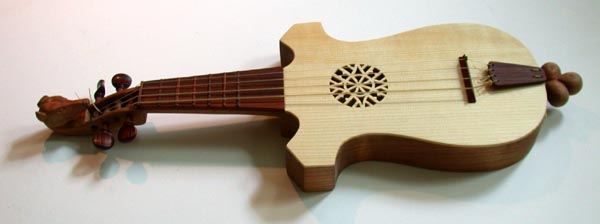
 The
body is now done. Final reaming for the pegs is done to fit the pegs
very precisely. I used unmodified rosewood violin pegs on this one as
they matched the color of the fingerboard and other fitting almost
exactly. The bridge and nut are lowered and slotted for the strings,
and adjusted until the action is satisfactory.
The
body is now done. Final reaming for the pegs is done to fit the pegs
very precisely. I used unmodified rosewood violin pegs on this one as
they matched the color of the fingerboard and other fitting almost
exactly. The bridge and nut are lowered and slotted for the strings,
and adjusted until the action is satisfactory.
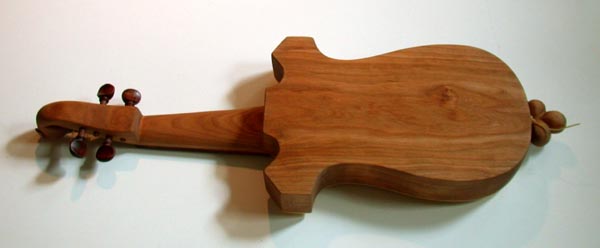
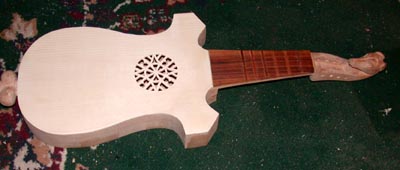
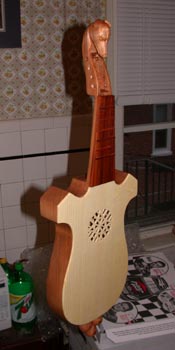
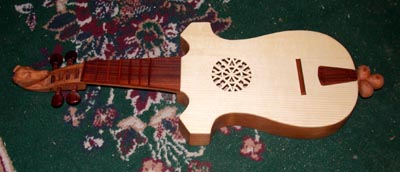
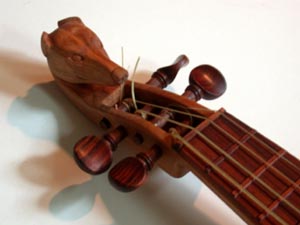 The
finished instrument, from top, 3/4 view, bottom and close-up of the
dog-head on the pegbox. Overall I'm satisfied with it, and the pegbox
was not nearly as annoying to do as I imagined it would be. It
presently is with its new owners!
The
finished instrument, from top, 3/4 view, bottom and close-up of the
dog-head on the pegbox. Overall I'm satisfied with it, and the pegbox
was not nearly as annoying to do as I imagined it would be. It
presently is with its new owners!
CITOLE NUMBER FOUR
This
one is a requested design, based more on the Cantiga style, using
older celtic geometric patterns as the carved decorations. The basic
layout design is below:
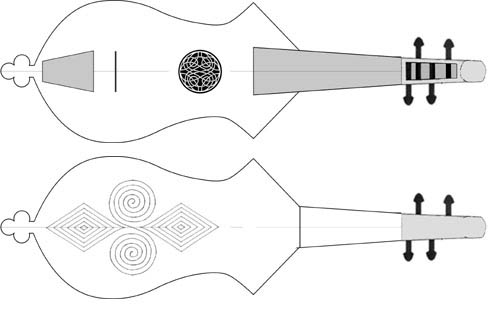 Showing
top and bottom view. This one will have a tail trefoil with loop much
like the dog-headed one above. . The idea here is to carve the
instrument out of maple (like citole one), but to have a Spanish
cedar soundboard. The back geometric design will be carved into the
body, and there will also be a carved geometric design down the sides
of the instrument, as in citole one. The top will have an edge
binding, and the intention at this point is to have an inset ivory
rosette, though I am presently having a hard time finding another
piece of ivory large enough.
Showing
top and bottom view. This one will have a tail trefoil with loop much
like the dog-headed one above. . The idea here is to carve the
instrument out of maple (like citole one), but to have a Spanish
cedar soundboard. The back geometric design will be carved into the
body, and there will also be a carved geometric design down the sides
of the instrument, as in citole one. The top will have an edge
binding, and the intention at this point is to have an inset ivory
rosette, though I am presently having a hard time finding another
piece of ivory large enough.