

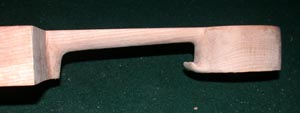
I have a mini-lathe that I then used to turn the blocks to cut two pegs out of each one. Top here is the rough block, below is the block after being through the lathe.
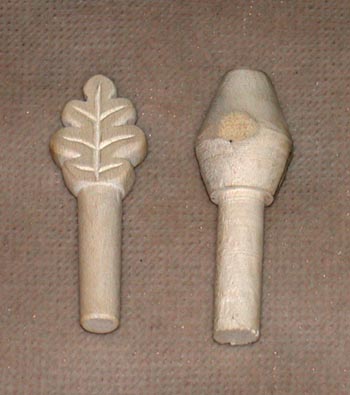 The
turned block then is cut into two pegs that look like the right one
in this image. That is then carved down into the oakleaf shape that
will be the final pegs (left) and the peg stem run through the violin
pegshaver to taper it appropriately. I had debated inlaying the lines
of the leaf in ebony, but after a small test decided that if done
correctly, they look just drawn on. And I think the 3-D effect of the
carved lines better matched the rest of the instrument. My wife
agreed.
The
turned block then is cut into two pegs that look like the right one
in this image. That is then carved down into the oakleaf shape that
will be the final pegs (left) and the peg stem run through the violin
pegshaver to taper it appropriately. I had debated inlaying the lines
of the leaf in ebony, but after a small test decided that if done
correctly, they look just drawn on. And I think the 3-D effect of the
carved lines better matched the rest of the instrument. My wife
agreed.
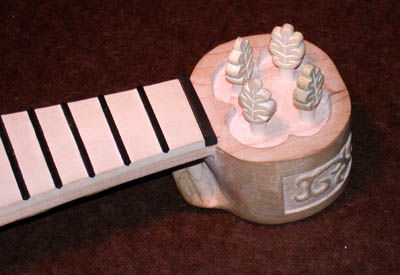 Here
are the four complete pegs in place. I had deepened the depression in
the top to allow for the strings to turn down to hold the nut in
place. The roughed out nut is also visible here.
Here
are the four complete pegs in place. I had deepened the depression in
the top to allow for the strings to turn down to hold the nut in
place. The roughed out nut is also visible here.
 Finishing
up the body. The fingerboard is finished with rubbed oil (several
coats). The body is then coated with an oil varnish, applied with a
small brush. The large number of nooks and crannies mean that each
coat took about two and a half hours, and then that has to dry for at
least 24 hours before the next coat can be applied, etc. Three coats
were applied this way, with light sanding and burnishing inbetween
each coat. The wood did not really tiger stripe, but the curling and
swirls in the grain did come out nicely. The maple turned a nice
golden color. The spruce however took several tries to get an even
coat, and even so it darkened in a slightly uneven pattern. Not sure
why. Doesn't look bad, just unexpected, as the sitka spruce I've used
in the past didn't acquire that kind of mottling.
Finishing
up the body. The fingerboard is finished with rubbed oil (several
coats). The body is then coated with an oil varnish, applied with a
small brush. The large number of nooks and crannies mean that each
coat took about two and a half hours, and then that has to dry for at
least 24 hours before the next coat can be applied, etc. Three coats
were applied this way, with light sanding and burnishing inbetween
each coat. The wood did not really tiger stripe, but the curling and
swirls in the grain did come out nicely. The maple turned a nice
golden color. The spruce however took several tries to get an even
coat, and even so it darkened in a slightly uneven pattern. Not sure
why. Doesn't look bad, just unexpected, as the sitka spruce I've used
in the past didn't acquire that kind of mottling.
 Setting
the height for the bridge and nut. Both pieces are intially cut WAY
too high, and then I file a notch into them and continually lower the
notch until the action (height of the strings above the fretboard) is
about where I want it. I use a piece of black nylon string as a
mock-up for the gut strings (rather than wasting the rather expensive
strings on such a set-up). Once the notches are set where I want
them, I carve down the nut and bridge to a level with the notch, and
add the remaining notches for the other strings at their appropriate
spacing. The nut and bridge are then given a light coating of oil to
seal them. With the gaboon ebony, this turns the dark brown wood a
serious jet black! Neither is glued into place - both are held in
place by the tension of the strings.
Setting
the height for the bridge and nut. Both pieces are intially cut WAY
too high, and then I file a notch into them and continually lower the
notch until the action (height of the strings above the fretboard) is
about where I want it. I use a piece of black nylon string as a
mock-up for the gut strings (rather than wasting the rather expensive
strings on such a set-up). Once the notches are set where I want
them, I carve down the nut and bridge to a level with the notch, and
add the remaining notches for the other strings at their appropriate
spacing. The nut and bridge are then given a light coating of oil to
seal them. With the gaboon ebony, this turns the dark brown wood a
serious jet black! Neither is glued into place - both are held in
place by the tension of the strings.
 All
the pieces are now down and ready for assembly with the strings. The
four pegs need still to be drilled, which was done with the little
finger drills. Otherwise it is ready for final set-up.
All
the pieces are now down and ready for assembly with the strings. The
four pegs need still to be drilled, which was done with the little
finger drills. Otherwise it is ready for final set-up.

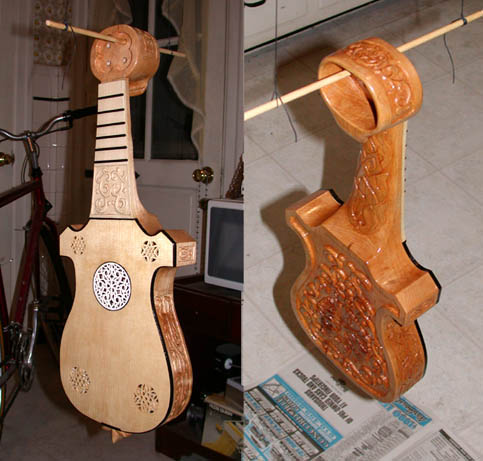
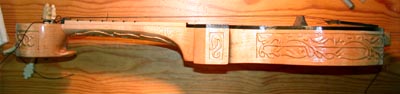
 The
completed instrument. The first image shows back, side and top, the
second image a perspective view. Overall I think it came out very
nicely, and the tone is brighter and stronger than on the other ones,
probably because of the maple versus the cherry wood (harder usually
equates to brighter). Strings are made of natural gut, acquired from
Gamut
Strings, run by Dan Larsen. I've used his strings
almost exclusively for my vielles and harp, and they have worked
really well to this point. The instrument is presently tuned G d g
d', with the lowest two strings the same notes as the lowest strings
of a violin. String diameters are (in mm) .52, .74, 1.04, and 1.50
for those that care about such things. The tail gut is some leftover
1.54 string I had from stringing the bray harp. As soon as I've had a
chance to practice it a bit and get it to sound good, I will put up a
recording of what the instrument sounds like.
The
completed instrument. The first image shows back, side and top, the
second image a perspective view. Overall I think it came out very
nicely, and the tone is brighter and stronger than on the other ones,
probably because of the maple versus the cherry wood (harder usually
equates to brighter). Strings are made of natural gut, acquired from
Gamut
Strings, run by Dan Larsen. I've used his strings
almost exclusively for my vielles and harp, and they have worked
really well to this point. The instrument is presently tuned G d g
d', with the lowest two strings the same notes as the lowest strings
of a violin. String diameters are (in mm) .52, .74, 1.04, and 1.50
for those that care about such things. The tail gut is some leftover
1.54 string I had from stringing the bray harp. As soon as I've had a
chance to practice it a bit and get it to sound good, I will put up a
recording of what the instrument sounds like.
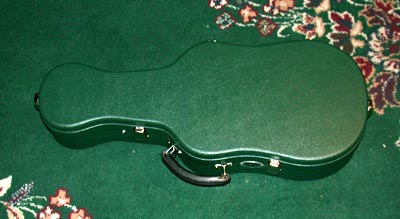
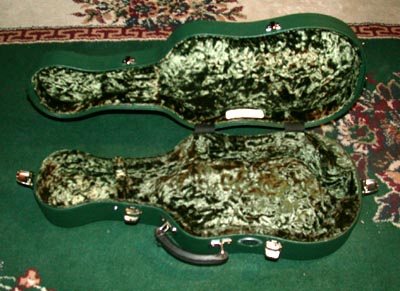
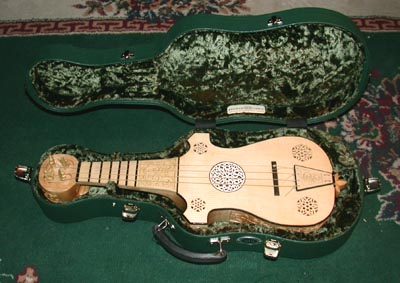 I
ordered a custom hardcase from Kingham
MTM Cases in England, which makes very nice cases for
early instruments. Got a little whacked on the exchange rate (dollar
sucks at the moment to the pound), but otherwise a very nice case.
Wooden base body, covered in leather, lined with padding and crushed
green velvet. You provide schematics to Kingham, and they build the
case to match. Took about eight weeks to arrive, but came out quite
excellently.
I
ordered a custom hardcase from Kingham
MTM Cases in England, which makes very nice cases for
early instruments. Got a little whacked on the exchange rate (dollar
sucks at the moment to the pound), but otherwise a very nice case.
Wooden base body, covered in leather, lined with padding and crushed
green velvet. You provide schematics to Kingham, and they build the
case to match. Took about eight weeks to arrive, but came out quite
excellently.
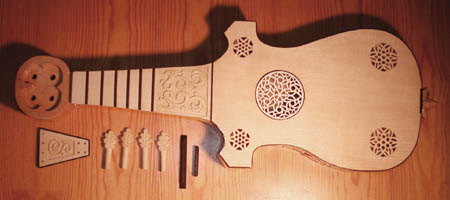
In the interim (while working on the carving of the body of Citole One) I have been having a little difficulty thinking out abstractly how I want to attach the fingerboard, how I want to do the edge binding, and such problems. So, when a friend really really wanted a citole, I decided to make one as a full-sized model to work out these issues before irrevocably damaging the body I'd spent so many hours on, esp. with all the carving. Dubbed "Citole 2" for the moment, this was going to be a much simpler instrument, with simpler lines, and practically no decoration other an a carved out central rose and some edge binding. I had a large block of cherry that was the backup piece to the eastern maple, so I decided to use that for this instrument.
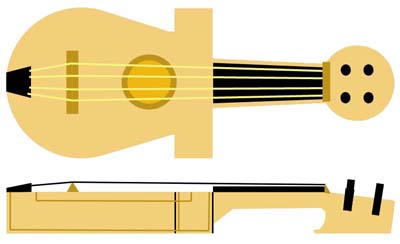

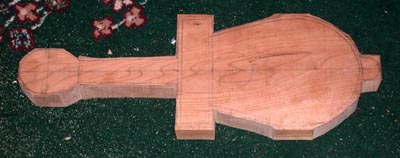

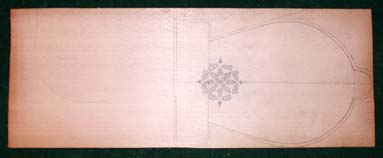
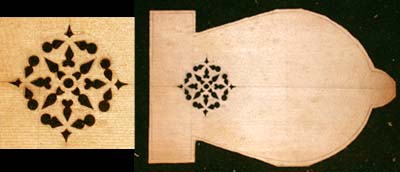
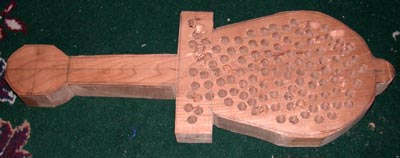 Top
is the set of drawings for this version. Next is the block with the
pattern drawn on. Third shows the body rough cut - I did this using a
scroll orbital saw I have - the cherry is much softer than the maple,
and I can use the power tools readily on it. The fourth shows the
more cleaned up body and its more or less final outline. The fifth
image shows where I did the standard drilling out of all the holes to
simplify the hollowing of the body block.
Top
is the set of drawings for this version. Next is the block with the
pattern drawn on. Third shows the body rough cut - I did this using a
scroll orbital saw I have - the cherry is much softer than the maple,
and I can use the power tools readily on it. The fourth shows the
more cleaned up body and its more or less final outline. The fifth
image shows where I did the standard drilling out of all the holes to
simplify the hollowing of the body block.
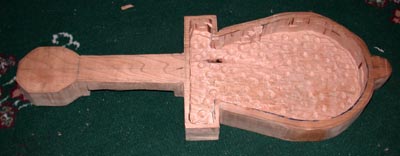
 This
is followed by using a full sized router to hollow out the body and
the peg-head, which took only a couple of hours one afternoon, and
then I used the saw and chisels above to rough out the neck. It is
truly amazing the difference in the ease of working with the softer
cherry - the wood removal is very quick and simple. And the block
already weighs half what the maple does, even though it has a lot
more wood in it - the difference in density is VERY obvious here. It
also resonates really loudly, especially with the hammered chisels.
The third picture is the floor of the body thinned down to
appropriate thickness using the mid-sized chisels above. Still has to
be finally smoothed out, but is getting there.
This
is followed by using a full sized router to hollow out the body and
the peg-head, which took only a couple of hours one afternoon, and
then I used the saw and chisels above to rough out the neck. It is
truly amazing the difference in the ease of working with the softer
cherry - the wood removal is very quick and simple. And the block
already weighs half what the maple does, even though it has a lot
more wood in it - the difference in density is VERY obvious here. It
also resonates really loudly, especially with the hammered chisels.
The third picture is the floor of the body thinned down to
appropriate thickness using the mid-sized chisels above. Still has to
be finally smoothed out, but is getting there.
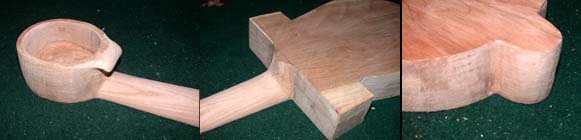
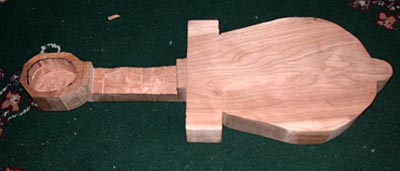
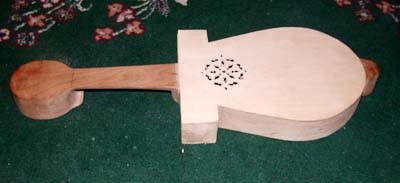
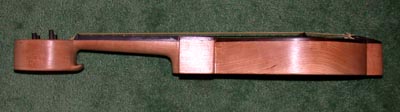
 Here
you see the body block more or less completed (little bit of cleaning
up on the inside to do, but the shaping is done). The neck has been
thinned down and rounded off. The pegbox has been rounded off
cleanly, the hollowing smoothed out and cleaned up, and the little
backward hook carved out. The heel (where the neck meets the body)
has been shaped, and seems sturdy enough to hold the string pressure,
though I'll probably change the joining point to a crisper line
rather than soft slope it is now. And the little tail stub has been
cleaned up and rounded off smoothly. Obviously the final sanding pass
hasn't been done, but that will be done once the soundboard and
fingerboard are on. Mostly this was all done with files, and some
dremel work, especially to shape the hook. There a little more clean
up off the primary cavity (to thin the walls and floor down a little
more), but next is the soundboard, tail and fingerboard.
Here
you see the body block more or less completed (little bit of cleaning
up on the inside to do, but the shaping is done). The neck has been
thinned down and rounded off. The pegbox has been rounded off
cleanly, the hollowing smoothed out and cleaned up, and the little
backward hook carved out. The heel (where the neck meets the body)
has been shaped, and seems sturdy enough to hold the string pressure,
though I'll probably change the joining point to a crisper line
rather than soft slope it is now. And the little tail stub has been
cleaned up and rounded off smoothly. Obviously the final sanding pass
hasn't been done, but that will be done once the soundboard and
fingerboard are on. Mostly this was all done with files, and some
dremel work, especially to shape the hook. There a little more clean
up off the primary cavity (to thin the walls and floor down a little
more), but next is the soundboard, tail and fingerboard.

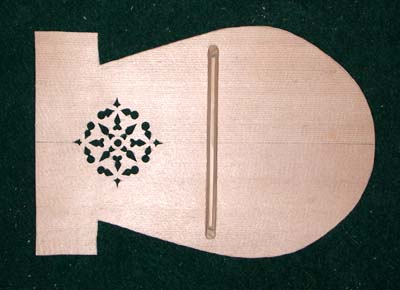
 Here
is the soundboard, made from a sitka spruce board (1/2 of a jumbo
guitar soundboard piece about 8" wide). First image shows
penciling out the piece (tracing the shape off the actual body). Next
I rough-cut the soundboard out of the wood with a coping saw. After
this, I drilled out the holes of the rosette, and then filed them
into shape with the mini and micro files. Last image shows the board
with the finished rosette. There were gouges on one side where the
drill had chopped rather than sliced into the soft spruce, so that
will become the underside. The top then took a number of passes
through my handheld belt-sander to thin it down to about 1/8 inch or
so thick.
Here
is the soundboard, made from a sitka spruce board (1/2 of a jumbo
guitar soundboard piece about 8" wide). First image shows
penciling out the piece (tracing the shape off the actual body). Next
I rough-cut the soundboard out of the wood with a coping saw. After
this, I drilled out the holes of the rosette, and then filed them
into shape with the mini and micro files. Last image shows the board
with the finished rosette. There were gouges on one side where the
drill had chopped rather than sliced into the soft spruce, so that
will become the underside. The top then took a number of passes
through my handheld belt-sander to thin it down to about 1/8 inch or
so thick.
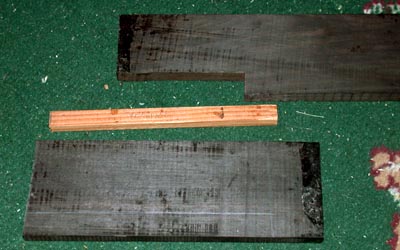
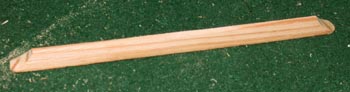 Still
on citole number two. These are the chunks of wood that are making
the other parts of the citole. On top is a piece of scrap ebony that
the tailpiece, nut and bridge will be cut out of. Next is the piece
of red cedar that will be used (already cut to length before this
picture) as the support brace for the soundboard (at its widest
point, more or less). On bottom is the piece of ebony that will be
cut into the fingerboard. The globby stuff on it is sealing wax to
keep the ebony from absorbing moisture, which it tends to do in long
storage. The second picture shows the finished brace, roughly a soft
upside-down T in cross-section, with tapering ends. This was carved
with knives, and evened out with the long file.
Still
on citole number two. These are the chunks of wood that are making
the other parts of the citole. On top is a piece of scrap ebony that
the tailpiece, nut and bridge will be cut out of. Next is the piece
of red cedar that will be used (already cut to length before this
picture) as the support brace for the soundboard (at its widest
point, more or less). On bottom is the piece of ebony that will be
cut into the fingerboard. The globby stuff on it is sealing wax to
keep the ebony from absorbing moisture, which it tends to do in long
storage. The second picture shows the finished brace, roughly a soft
upside-down T in cross-section, with tapering ends. This was carved
with knives, and evened out with the long file.
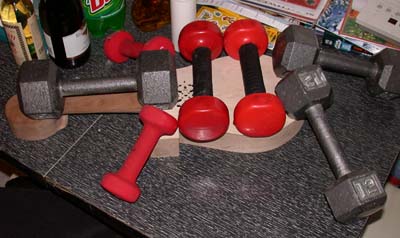 Yet
more citole number two. The finished back-brace has been glued onto
the soundboard. It is just a tiny bit narrower than the body cavity,
though I initially centered it off a little, and had to correct that
with files after it had been glued. The edges of the soundboard are
cleaned up a bit more with dremel and files, and then it is attached
to the body of the citole. As in the past, I've found that
hand-weights work very well as clamps for this purpose... this is my
kitchen table. The glue is luthier glue I acquired from LMII.
Yet
more citole number two. The finished back-brace has been glued onto
the soundboard. It is just a tiny bit narrower than the body cavity,
though I initially centered it off a little, and had to correct that
with files after it had been glued. The edges of the soundboard are
cleaned up a bit more with dremel and files, and then it is attached
to the body of the citole. As in the past, I've found that
hand-weights work very well as clamps for this purpose... this is my
kitchen table. The glue is luthier glue I acquired from LMII.
 This
is the tailpiece of citole number two. It has been cut out of a bit
of the ebony with the coping saw, and shaped with files and the
little chisels. It will fit over the tail nubby of the body. The
string holes hadn't been added when I took this picture (see below).
This
is the tailpiece of citole number two. It has been cut out of a bit
of the ebony with the coping saw, and shaped with files and the
little chisels. It will fit over the tail nubby of the body. The
string holes hadn't been added when I took this picture (see below).
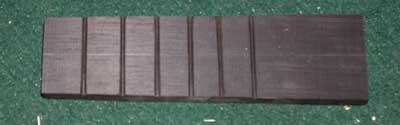
 This
is the fingerboard construction for citole number two. First, I cut
out the fingerboard from a chunk of the ebony with the coping saw,
then leveled it and straightened the edges with the belt-sander.
There will only be six frets (short fingerboard only played in first
position, as generally was true for medieval instruments). The
functional string length will be 13.25 inches, and I used a fret
calculator to set the spacing. The frets were carved
from holly wood, originally from 1x1 inch block down to 1/8 inch by
1/8 inch, starting with coping saw and ending up with carving knives
and files. The slots on the ebony were first cut with an Exacto mitre
saw, then broadened to a wide V with the medium files. The last image
shows the frets glued onto the fingerboard. Each had to be separately
glued and clamped, which I did with the 15 lb. handweight. The shiny
bits are some excess glue that got wiped onto the board - it was
removed (eventually) with an Exacto knife and a little file work.
This
is the fingerboard construction for citole number two. First, I cut
out the fingerboard from a chunk of the ebony with the coping saw,
then leveled it and straightened the edges with the belt-sander.
There will only be six frets (short fingerboard only played in first
position, as generally was true for medieval instruments). The
functional string length will be 13.25 inches, and I used a fret
calculator to set the spacing. The frets were carved
from holly wood, originally from 1x1 inch block down to 1/8 inch by
1/8 inch, starting with coping saw and ending up with carving knives
and files. The slots on the ebony were first cut with an Exacto mitre
saw, then broadened to a wide V with the medium files. The last image
shows the frets glued onto the fingerboard. Each had to be separately
glued and clamped, which I did with the 15 lb. handweight. The shiny
bits are some excess glue that got wiped onto the board - it was
removed (eventually) with an Exacto knife and a little file work.
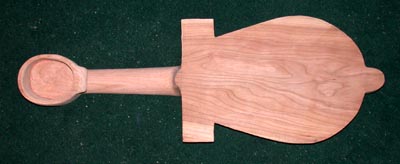
 Citole
Number Two as it stands to this point. The soundboard is now
attached, and I've clean up the edges so that they are flush with the
body, done mostly with files. I also cleaned up the neck joint a
little more, and the tail joint a little more. At this point I
brought it and the fingerboard to its soon-to-be owner, to make sure
that she could get her fingers around the neck (she has rather small
hands). After testing, I decided I needed to thin the fingerboard
some more, and thin the neck just a little bit. The neck was thinned
(top to bottom) with the heavy file a little bit; the fingerboard was
thinned (top to bottom, or thickness)down to about 1/4 an inch with
the belt-sander.
Citole
Number Two as it stands to this point. The soundboard is now
attached, and I've clean up the edges so that they are flush with the
body, done mostly with files. I also cleaned up the neck joint a
little more, and the tail joint a little more. At this point I
brought it and the fingerboard to its soon-to-be owner, to make sure
that she could get her fingers around the neck (she has rather small
hands). After testing, I decided I needed to thin the fingerboard
some more, and thin the neck just a little bit. The neck was thinned
(top to bottom) with the heavy file a little bit; the fingerboard was
thinned (top to bottom, or thickness)down to about 1/4 an inch with
the belt-sander.
 Citole
Number Two - attaching the fingerboard. First, I cut off the frets
flush with the fingerboard (so they didn't stick out too far), and
lined up the fingerboard with the centerlines drawn on the body. The
fingerboard was clamped (I used folded bristol board to cushion
against the marks of the clamps on the wood of the neck and
fingerboard/frets). When that was dry, I refinished the edges of the
neck and fingerboard so they were flush, and bevel-edged the frets.
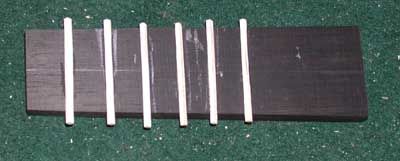
Citole
Number Two - attaching the fingerboard. First, I cut off the frets
flush with the fingerboard (so they didn't stick out too far), and
lined up the fingerboard with the centerlines drawn on the body. The
fingerboard was clamped (I used folded bristol board to cushion
against the marks of the clamps on the wood of the neck and
fingerboard/frets). When that was dry, I refinished the edges of the
neck and fingerboard so they were flush, and bevel-edged the frets.

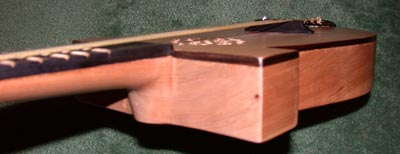
 Citole
Number Two - attaching the tailpiece. The angle of the tailpiece
proved a challenge to clamp - I tried bracing it with the bristol
board, but that didn't work. In the end, I just used the tried &
true 15 lb. handweight to clamp it. Seemed to work fine. You can see
the string-holes in the tailpiece now, spaced about 1/4" apart.
Like with the fingerboard, when that was dry, I refinished the tail
stub so that all the sides were flush with the tailpiece, and the
joint-point of the tail to the body was edged rather than
soft-blended.
Citole
Number Two - attaching the tailpiece. The angle of the tailpiece
proved a challenge to clamp - I tried bracing it with the bristol
board, but that didn't work. In the end, I just used the tried &
true 15 lb. handweight to clamp it. Seemed to work fine. You can see
the string-holes in the tailpiece now, spaced about 1/4" apart.
Like with the fingerboard, when that was dry, I refinished the tail
stub so that all the sides were flush with the tailpiece, and the
joint-point of the tail to the body was edged rather than
soft-blended.

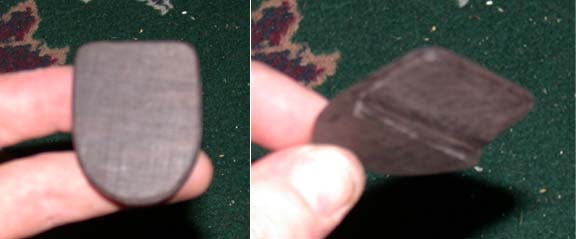
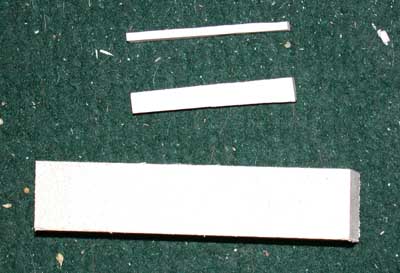
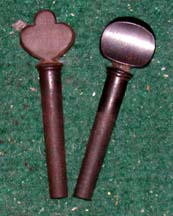 Citole
Number Two - small bits. Here are shown the little pieces of ebony
that will become the end nut (the piece at the end of the fingerboard
that the strings sit in), and the bridge. Obviously they haven't been
finished yet at this point. The other picture shows what is happening
with the pegs. I don't have a lathe, so turning the pegs is difficult
(I have used a drill in the past, but it is rather awkward). So
instead of scratch making them, I got a set of four ebony violin pegs
from a music shop, and have decided to reshape them into more
appropriate medieval shape. I cut out notches of the corners with a
coping saw, and then used the dremel to flatten the surface of the
peg, and then used the files to shape it into a kind of tapered club.
This picture shows the starting and finishing points. The pegs
finally with oiled with artist quality linseed oil.
Citole
Number Two - small bits. Here are shown the little pieces of ebony
that will become the end nut (the piece at the end of the fingerboard
that the strings sit in), and the bridge. Obviously they haven't been
finished yet at this point. The other picture shows what is happening
with the pegs. I don't have a lathe, so turning the pegs is difficult
(I have used a drill in the past, but it is rather awkward). So
instead of scratch making them, I got a set of four ebony violin pegs
from a music shop, and have decided to reshape them into more
appropriate medieval shape. I cut out notches of the corners with a
coping saw, and then used the dremel to flatten the surface of the
peg, and then used the files to shape it into a kind of tapered club.
This picture shows the starting and finishing points. The pegs
finally with oiled with artist quality linseed oil.
 Citole
Number Two - the edge binding. Here was one of the bigger logistical
problems - how to cut the ledge for the edge-binding? I had acquired
some nice ebony binding strips from LMII,
about 1/4 inch tall, 1/16 inch thick. My first thought was to try to
use the dremel router to route out the space, but tests proved to be
difficult to control. Rigging up the dremel base to try to control
the depth proved impossible to maintain around the curves, and was
entirely impossible to reach into the acute corners (I tested on
scrap wood). So, instead I resorted to what I did in the test above -
I used the mini-chisels to actually carve it out. I wedged a line
around the instrument, and then chipped off the wood down to that
line, and filed it smooth. It isn't extremely efficient (took about
four hours to get all the way around the instrument), but it was
controlled, and seemed to work. Next the edge binding is glued on.
Citole
Number Two - the edge binding. Here was one of the bigger logistical
problems - how to cut the ledge for the edge-binding? I had acquired
some nice ebony binding strips from LMII,
about 1/4 inch tall, 1/16 inch thick. My first thought was to try to
use the dremel router to route out the space, but tests proved to be
difficult to control. Rigging up the dremel base to try to control
the depth proved impossible to maintain around the curves, and was
entirely impossible to reach into the acute corners (I tested on
scrap wood). So, instead I resorted to what I did in the test above -
I used the mini-chisels to actually carve it out. I wedged a line
around the instrument, and then chipped off the wood down to that
line, and filed it smooth. It isn't extremely efficient (took about
four hours to get all the way around the instrument), but it was
controlled, and seemed to work. Next the edge binding is glued on.
Okay, I had a slight problem with the camera, so we lost the intermediate photos, and only have the photos of the finished instrument of Citole Number Two. I'll try to go through the final stages as best I might.
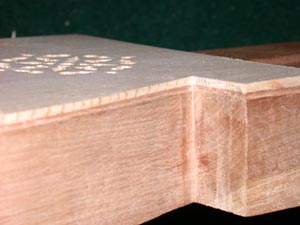
 These
images show the edge binding fairly cleanly as it ended up. The edge
binding was made up of thin strips about 30" long of ebony. I
cut very exacting lengths for each of the straight sections around
the "wings" of the citole and beveled the meeting points so
that they met flush on the corners. The curved sides of the
instrument each had one long piece that was bent into shape by
soaking the piece in warm water, and then steaming it (over a
teakettle) and finally taping the softened strip to the body to mold
it. When it dried it held the shape pretty well, and didn't crack.
The binding was glued to the ridges, held in place by tape. When that
had dried overnight, using sandpaper and my "Mouse" powered
handsander, I sanded the binding flush to the sides and to the top of
the body. Then the hold body was sanded down, corners rounded a
little softer, and the top and bottom plates sanded smooth.
These
images show the edge binding fairly cleanly as it ended up. The edge
binding was made up of thin strips about 30" long of ebony. I
cut very exacting lengths for each of the straight sections around
the "wings" of the citole and beveled the meeting points so
that they met flush on the corners. The curved sides of the
instrument each had one long piece that was bent into shape by
soaking the piece in warm water, and then steaming it (over a
teakettle) and finally taping the softened strip to the body to mold
it. When it dried it held the shape pretty well, and didn't crack.
The binding was glued to the ridges, held in place by tape. When that
had dried overnight, using sandpaper and my "Mouse" powered
handsander, I sanded the binding flush to the sides and to the top of
the body. Then the hold body was sanded down, corners rounded a
little softer, and the top and bottom plates sanded smooth.
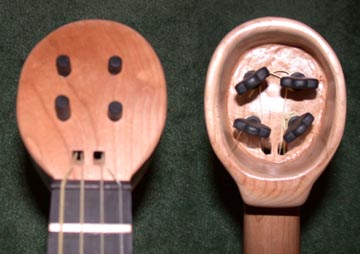 The
last actual bit of carving was the peghead. I spaced the four holes
for the pegs by making little paper circles that were slightly larger
in diameter than the pegs were wide, and making sure there was
clearance space for the pegs to turn completely and still have some
space between them. Then a pilot hole was drilled with a powered hand
drill slightly smaller than the narrowest end of the tapered peg. I
have a violin peg hole reamer, so that was used then to ream the hole
to the appropriate taper of the violin pegs. I also have a violin peg
shaver (I've played violin a long time) and used that to make sure
the pegs were of the same appropriate taper. The pegs, once fitted
basically to the holes, were way too long, so I cut the excess ends
off, and sanded and re-oiled the pegs. The next part was a new
experiment. The strings had to pass over the endnut, and then somehow
to the pegs on the other side of the peg-head. I had seen several
historical re-creations use the methods of pass-through holes, so I
wanted to see if they indeed were practical. For the gut strings I
think they work pretty well (though I think wire strings would carve
into the wood too badly - they would have had to have been braced
with ebony or other really hard wood). So there are two rectangular
holes that are just beyond the nut, cutting diagonally forward into
the underside of the peghead, so that the strings can then be
attached to the pegs there. The holes were first drilled, and then
shaped using the mini- and micro-files. The peghead was then sanded
and smoothed down.
The
last actual bit of carving was the peghead. I spaced the four holes
for the pegs by making little paper circles that were slightly larger
in diameter than the pegs were wide, and making sure there was
clearance space for the pegs to turn completely and still have some
space between them. Then a pilot hole was drilled with a powered hand
drill slightly smaller than the narrowest end of the tapered peg. I
have a violin peg hole reamer, so that was used then to ream the hole
to the appropriate taper of the violin pegs. I also have a violin peg
shaver (I've played violin a long time) and used that to make sure
the pegs were of the same appropriate taper. The pegs, once fitted
basically to the holes, were way too long, so I cut the excess ends
off, and sanded and re-oiled the pegs. The next part was a new
experiment. The strings had to pass over the endnut, and then somehow
to the pegs on the other side of the peg-head. I had seen several
historical re-creations use the methods of pass-through holes, so I
wanted to see if they indeed were practical. For the gut strings I
think they work pretty well (though I think wire strings would carve
into the wood too badly - they would have had to have been braced
with ebony or other really hard wood). So there are two rectangular
holes that are just beyond the nut, cutting diagonally forward into
the underside of the peghead, so that the strings can then be
attached to the pegs there. The holes were first drilled, and then
shaped using the mini- and micro-files. The peghead was then sanded
and smoothed down.
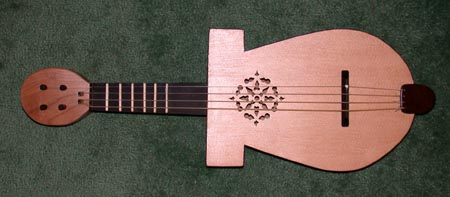

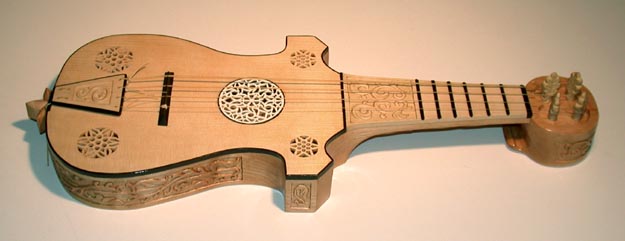
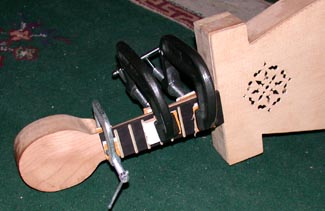
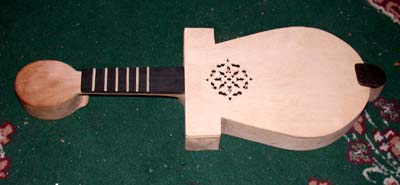
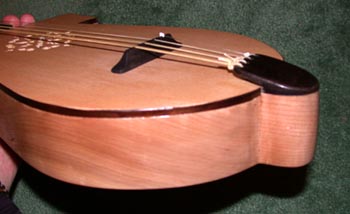
 This
is the completed instrument, from top, side, bottom and angled views.
After final sanding, the body, neck, and peghead were lacquered using
a polymer lacquer, given about three/four coats. The cherry wood
darkened slightly to a dull reddish color (I used no dyes), and the
spruce to a pale golden yellow. The ebony of course ended up nearly
black. I lacquered the tailpiece, but the endnut, bridge and
fingerboard are only oiled with artist linseed oil (I just started
doing oil painting, so I have it around the house now). The bridge is
a floating bridge (meaning it's only held in place by the tension of
the strings, not glued to the soundboard), as is the nut. The
instrument was strung with natural gut strings acquired from Gamut
Strings, where I get my vielle strings, and have been
very satisfied with them. They are a little longer than violin
strings (sounding length about the same, but the tail is set farther
back). I filed the notches in the bridge and endnut with the
microfiles, and strung her up. The end result was quite nice - it has
more volume than I was expecting, a little louder than a lute. It is
tuned Gdgd' (the first two strings same as a violin, the upper two
one note lower than a violin), to make a nice open chord strum.
Presently it is with its happy new owner Wendy Gash, who is slowly
trying to learn it!
This
is the completed instrument, from top, side, bottom and angled views.
After final sanding, the body, neck, and peghead were lacquered using
a polymer lacquer, given about three/four coats. The cherry wood
darkened slightly to a dull reddish color (I used no dyes), and the
spruce to a pale golden yellow. The ebony of course ended up nearly
black. I lacquered the tailpiece, but the endnut, bridge and
fingerboard are only oiled with artist linseed oil (I just started
doing oil painting, so I have it around the house now). The bridge is
a floating bridge (meaning it's only held in place by the tension of
the strings, not glued to the soundboard), as is the nut. The
instrument was strung with natural gut strings acquired from Gamut
Strings, where I get my vielle strings, and have been
very satisfied with them. They are a little longer than violin
strings (sounding length about the same, but the tail is set farther
back). I filed the notches in the bridge and endnut with the
microfiles, and strung her up. The end result was quite nice - it has
more volume than I was expecting, a little louder than a lute. It is
tuned Gdgd' (the first two strings same as a violin, the upper two
one note lower than a violin), to make a nice open chord strum.
Presently it is with its happy new owner Wendy Gash, who is slowly
trying to learn it!