

Chapter 2 Control of the Tractor and the Automobile
2.1. Automobile Controls
The automobile and its engine are controlled and the operation of their mechanisms is monitored by means of controls and instruments located in the cab in front of the driver's seat (Fig.3).
Tо start the engine and control its operation, use is made of throttle (accelerator, or gas) pedal 5, radiator shutter control handle 6, choke button 10, ignition/starter switch 21, and throttle hand lever 24. The ignition/starter switch is operated by a key which may be placed in one of the following four positions: the central position - all current consumers are switched off; the first position clockwise - ignition is switched on; the second position clockwise - ignition and the starter motor are switched on; the first position counterclockwise - it is possible to actuate the horn, windshield wiper, and heater blower with the ignition circuit switched off. Before starting the engine, it is necessary to check the radiator coolant level, the engine crankcase oil level, and the fuel level in the fuel tank.
To start a warm engine, place gear shift lever 27 in neutral and switch on the ignition and the starter motor by turning the ignition key clockwise as far as it will go.
To start a cold engine (at ambient temperature of 0°C and upwards), it is recommended to do the following. Pump up gasoline (petrol) by using the fuel pump hand primer. Close the carburetor choke by pulling choke button 10 outward full distance. Place the gear shift lever in neutral. Disengage the clutch by depressing clutch pedal 3 all the way down to the cab floor, which will decrease drag on the engine and thus ease the operation of the starter motor, for in this case the transmission gears will not revolve in thickened oil during starting. Switch on the ignition and the starter motor by turning the ignition key fully clockwise; limit the time the starter motor is energized to 5 s. Once the engine has started, switch off the starter motor by releasing the ignition key, open the choke by pushing its button inward one-half its full stroke, increase somewhat the engine speed by slightly depressing accelerator pedal 5, and then engage the clutch by releasing its pedal. An engine in good repair usually starts after the first or second attempt. In the case of a false start, wait at least 30 s before attempting another start. If the engine has failed to start after the third attempt, check the ignition and fuel systems. If the trouble is with the starter motor or if the battery is discharged, the engine can be cranked up by hand. When cranking up, do not grasp the crank handle, but keep your fingers on its one side only, so that the hand may not get hurt if the engine kicks back (in the case of the early ignition).
Before starting the engine in low-temperature conditions, shut off the oil cooler, fill the cooling system with hot water and the engine crankcase with hot oil or use the starting preheater (if available). Prior to turning on the ignition switch, close the radiator shutter by pulling handle 6 outward full distance and crank the engine three to five revolutions with the crank handle. Then perform all the rest operations as recommended for starting the cold engine.
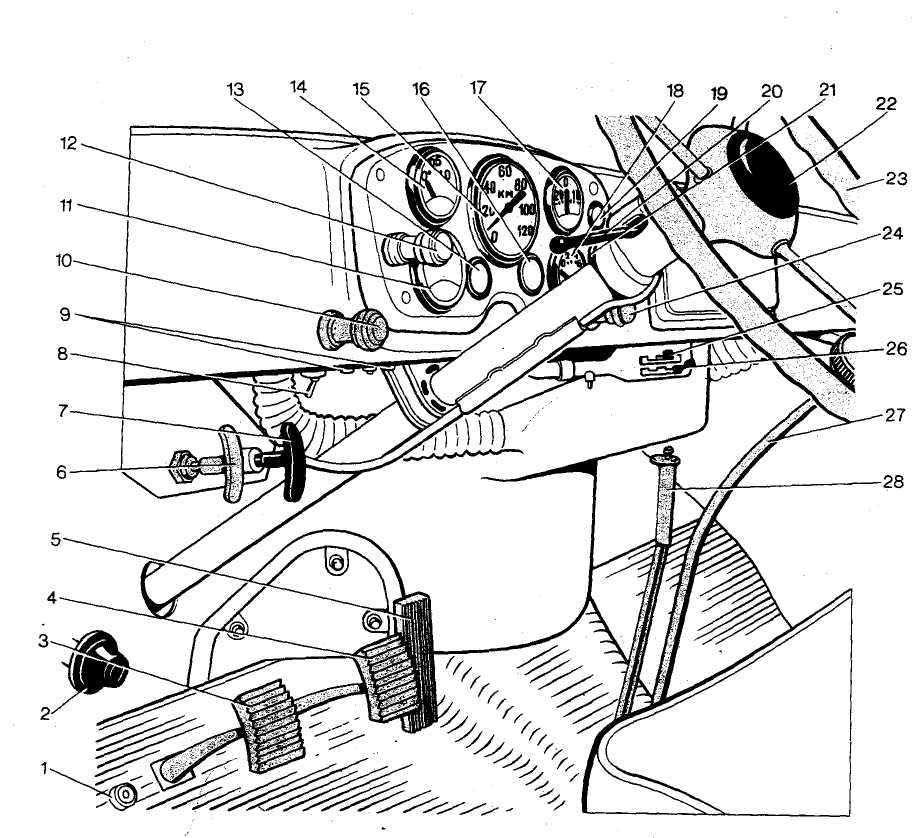
Fig.3. Controls of the ГАЗ-53А Model truck
1 - foot dimmer (beam selector) switch; 2 - windshield washer pump; 3 - clutch pedal; 4 - brake pedal; 5 - throttle pedal; 6 - radiator shutter control handle;
7 - hood catch handle; 8 - dome light switch; 9 - circuit breakers; 10 - choke button; 11 - temperature gauge; 12 - main light switch; 13 - temperature warning lamp; 14 - fuel gauge; 15 - speedometer; 16 - oil pressure warning lamp;
17 - ammeter; 18 - oil pressure gauge; 19 - turn signal indicator lamp; 20 - turn signal switch; 21 - ignition/starter switch; 22 - horn button; 23 - steering wheel;
24 - throttle hand lever; 25 - cowl ventilator handle; 26 - ventilator air intake control handle; 27 - gear shift lever; 28 - parking brake lever
Automobile controls include clutch pedal 3, brake pedal 4, and throttle (accelerator) pedal 5, steering wheel 23, gear shift lever 27, and parking brake lever 28.
Before starting to drive, warm up the engine at a moderate speed until the coolant temperature reaches 60°C. As the engine gets warmer, gradually open the choke and decrease the engine speed. A warm engine must run stably at a low speed with the choke fully open. Read the dashboard instruments to check on the operation of the engine.
To monitor the operation of the engine and the automobile itself, use is made of the following instruments and indicators mounted on the instrument panel (dashboard) in front of the driver's seat: temperature gauge 11 and temperature warning lamp 13, fuel gauge 14, speedometer 15, oil pressure warning lamp 16, ammeter 17, and oil pressure gauge 18.
Signaling is effected by means of horn button 22 and turn signal switch 20 mounted on the left-hand side of the steering column. Turning the directional signal switch handle downwards causes the left-hand side and tail lights to flash, thus giving indication of a left turn, and turning it upwards actuates the right-hand side and tail lights to indicate a right turn. Whenever either of the turn signal lights is switched on, turn signal indicator lamp 19 on the instrument panel starts flashing. The turn signal lights are switched off automatically when the automobile is straightened after turning.
On the left-hand side of the cab floor there is foot dimmer (beam selector) switch 1 which is used to switch over the head lights from high to low beam and vice versa (with the main light switch in the third position). Main light switch 12 has three positions: I - all lights are off; II - side lights, license plate light, tail marker lights, and instrument panel light are switched on; III - side lights, head lights (high or low, depending on the position of the foot dimmer switch), tail marker lights, instrument panel light, and license plate light are switched on.
Mounted on the instrument panel are windshield wiper and heater blower switches (not shown in the figure). The wiper and heater blower are switched on by turning their respective switches clockwise. The wiper switch has three positions: off, slow, and fast. That of the heater blower also has three positions: off, low air delivery, and high air delivery.
Mounted under the instrument panel are radiator shutter control handle 6 and hood catch handle 7. Pulling back on handle 6 will close the radiator shutter, and pulling back on handle 7 will release the hood catch. There are also two circuit breaker buttons 9, cowl ventilator handle 25, and ventilator air intake control handle 26. With handle 25 in the extreme left-hand position, the cowl ventilator is fully open, and with the handle in the extreme right-hand position, it is fully closed. When handle 26 is in the extreme left-hand position, the air intake (outer ventilator) door is fully open, and when the handle is in the extreme right-hand position, it is fully closed.
To stop the engine, switch off ignition. Before stopping, let the engine run idle for one or two minutes at a slow speed, so that the engine components may cool down uniformly.
All automobiles and wheeled tractors equipped with battery starting systems have similar controls, and their engines are started and stopped in nearly one and the same manner.