
- •Brief contents
- •Contents
- •Foreword
- •Preface
- •Acknowledgments
- •About this book
- •How to use this book
- •Who should read this book
- •Roadmap
- •Code conventions and downloads
- •Software requirements
- •Author Online
- •About the cover illustration
- •1 The basics of unit testing
- •Unit testing—the classic definition
- •1.1.1 The importance of writing “good” unit tests
- •1.1.2 We’ve all written unit tests (sort of)
- •Properties of a good unit test
- •Integration tests
- •1.3.1 Drawbacks of integration tests compared to automated unit tests
- •Good unit test—a definition
- •A simple unit test example
- •Test-driven development
- •Summary
- •2 A first unit test
- •Frameworks for unit testing
- •2.1.2 The xUnit frameworks
- •Introducing the LogAn project
- •First steps with NUnit
- •2.3.1 Installing NUnit
- •2.3.2 Loading up the solution
- •2.3.3 Using the NUnit attributes in your code
- •Writing our first test
- •2.4.1 The Assert class
- •2.4.2 Running our first test with NUnit
- •2.4.3 Fixing our code and passing the test
- •2.4.4 From red to green
- •More NUnit attributes
- •2.5.1 Setup and teardown
- •2.5.2 Checking for expected exceptions
- •2.5.3 Ignoring tests
- •2.5.4 Setting test categories
- •Indirect testing of state
- •Summary
- •3 Using stubs to break dependencies
- •Introducing stubs
- •Identifying a filesystem dependency in LogAn
- •Determining how to easily test LogAnalyzer
- •Refactoring our design to be more testable
- •3.4.1 Extract an interface to allow replacing underlying implementation
- •3.4.2 Inject stub implementation into a class under test
- •3.4.3 Receive an interface at the constructor level (constructor injection)
- •3.4.4 Receive an interface as a property get or set
- •3.4.5 Getting a stub just before a method call
- •Variations on refactoring techniques
- •3.5.1 Using Extract and Override to create stub results
- •Overcoming the encapsulation problem
- •3.6.1 Using internal and [InternalsVisibleTo]
- •3.6.2 Using the [Conditional] attribute
- •3.6.3 Using #if and #endif with conditional compilation
- •Summary
- •4 Interaction testing using mock objects
- •State-based versus interaction testing
- •The difference between mocks and stubs
- •A simple manual mock example
- •Using a mock and a stub together
- •One mock per test
- •Stub chains: stubs that produce mocks or other stubs
- •The problems with handwritten mocks and stubs
- •Summary
- •5 Isolation (mock object) frameworks
- •Why use isolation frameworks?
- •Dynamically creating a fake object
- •5.2.1 Introducing Rhino Mocks into your tests
- •5.2.2 Replacing a handwritten mock object with a dynamic one
- •Strict versus nonstrict mock objects
- •5.3.1 Strict mocks
- •5.3.2 Nonstrict mocks
- •Returning values from fake objects
- •Creating smart stubs with an isolation framework
- •5.5.1 Creating a stub in Rhino Mocks
- •5.5.2 Combining dynamic stubs and mocks
- •Parameter constraints for mocks and stubs
- •5.6.1 Checking parameters with string constraints
- •5.6.2 Checking parameter object properties with constraints
- •5.6.3 Executing callbacks for parameter verification
- •Testing for event-related activities
- •5.7.1 Testing that an event has been subscribed to
- •5.7.2 Triggering events from mocks and stubs
- •5.7.3 Testing whether an event was triggered
- •Arrange-act-assert syntax for isolation
- •Current isolation frameworks for .NET
- •5.9.1 NUnit.Mocks
- •5.9.2 NMock
- •5.9.3 NMock2
- •5.9.4 Typemock Isolator
- •5.9.5 Rhino Mocks
- •Advantages of isolation frameworks
- •Traps to avoid when using isolation frameworks
- •5.11.1 Unreadable test code
- •5.11.2 Verifying the wrong things
- •5.11.3 Having more than one mock per test
- •5.11.4 Overspecifying the tests
- •Summary
- •6 Test hierarchies and organization
- •Having automated builds run automated tests
- •6.1.1 Anatomy of an automated build
- •6.1.2 Triggering builds and continuous integration
- •6.1.3 Automated build types
- •Mapping out tests based on speed and type
- •6.2.1 The human factor of separating unit from integration tests
- •6.2.2 The safe green zone
- •Ensuring tests are part of source control
- •Mapping test classes to code under test
- •6.4.1 Mapping tests to projects
- •6.4.2 Mapping tests to classes
- •6.4.3 Mapping tests to specific methods
- •Building a test API for your application
- •6.5.1 Using test class inheritance patterns
- •6.5.2 Creating test utility classes and methods
- •6.5.3 Making your API known to developers
- •Summary
- •Writing trustworthy tests
- •7.1.1 Deciding when to remove or change tests
- •7.1.2 Avoiding logic in tests
- •7.1.3 Testing only one thing
- •7.1.4 Making tests easy to run
- •7.1.5 Assuring code coverage
- •Writing maintainable tests
- •7.2.1 Testing private or protected methods
- •7.2.2 Removing duplication
- •7.2.3 Using setup methods in a maintainable manner
- •7.2.4 Enforcing test isolation
- •7.2.5 Avoiding multiple asserts
- •7.2.6 Avoiding testing multiple aspects of the same object
- •7.2.7 Avoiding overspecification in tests
- •Writing readable tests
- •7.3.1 Naming unit tests
- •7.3.2 Naming variables
- •7.3.3 Asserting yourself with meaning
- •7.3.4 Separating asserts from actions
- •7.3.5 Setting up and tearing down
- •Summary
- •8 Integrating unit testing into the organization
- •Steps to becoming an agent of change
- •8.1.1 Be prepared for the tough questions
- •8.1.2 Convince insiders: champions and blockers
- •8.1.3 Identify possible entry points
- •Ways to succeed
- •8.2.3 Getting an outside champion
- •8.2.4 Making progress visible
- •8.2.5 Aiming for specific goals
- •8.2.6 Realizing that there will be hurdles
- •Ways to fail
- •8.3.1 Lack of a driving force
- •8.3.2 Lack of political support
- •8.3.3 Bad implementations and first impressions
- •8.3.4 Lack of team support
- •Tough questions and answers
- •8.4.1 How much time will this add to the current process?
- •8.4.2 Will my QA job be at risk because of this?
- •8.4.3 How do we know this is actually working?
- •8.4.4 Is there proof that unit testing helps?
- •8.4.5 Why is the QA department still finding bugs?
- •8.4.6 We have lots of code without tests: where do we start?
- •8.4.7 We work in several languages: is unit testing feasible?
- •8.4.8 What if we develop a combination of software and hardware?
- •8.4.9 How can we know we don’t have bugs in our tests?
- •8.4.10 My debugger shows that my code works: why do I need tests?
- •8.4.11 Must we do TDD-style coding?
- •Summary
- •9 Working with legacy code
- •Where do you start adding tests?
- •Choosing a selection strategy
- •Writing integration tests before refactoring
- •Important tools for legacy code unit testing
- •9.4.1 Isolate dependencies easily with Typemock Isolator
- •9.4.2 Find testability problems with Depender
- •9.4.3 Use JMockit for Java legacy code
- •9.4.4 Use Vise while refactoring your Java code
- •9.4.5 Use FitNesse for acceptance tests before you refactor
- •9.4.6 Read Michael Feathers’ book on legacy code
- •9.4.7 Use NDepend to investigate your production code
- •9.4.8 Use ReSharper to navigate and refactor production code
- •9.4.9 Detect duplicate code (and bugs) with Simian
- •9.4.10 Detect threading issues with Typemock Racer
- •Summary
- •Appendix A
- •Design and testability
- •Design goals for testability
- •A.2.1 Make methods virtual by default
- •A.2.2 Use interface-based designs
- •A.2.3 Make classes nonsealed by default
- •A.2.4 Avoid instantiating concrete classes inside methods with logic
- •A.2.5 Avoid direct calls to static methods
- •A.2.6 Avoid constructors and static constructors that do logic
- •A.2.7 Separate singletons and singleton holders
- •Pros and cons of designing for testability
- •A.3.1 Amount of work
- •A.3.2 Complexity
- •A.3.3 Exposing sensitive IP
- •A.3.4 Sometimes you can’t
- •Alternatives to designing for testability
- •Appendix B
- •Extra tools and frameworks
- •Isolation frameworks
- •B.1.2 Rhino Mocks
- •B.1.3 Typemock Isolator
- •B.1.4 NMock
- •B.1.5 NUnit.Mocks
- •Test frameworks
- •B.2.1 Microsoft’s Unit Testing Framework
- •B.2.2 NUnit
- •B.2.3 MbUnit
- •B.2.4 Gallio
- •B.2.5 xUnit
- •IoC containers
- •B.3.1 StructureMap
- •B.3.2 Microsoft Unity
- •B.3.3 Castle Windsor
- •B.3.4 Autofac
- •B.3.5 Common Service Locator Library
- •B.3.6 Spring.NET
- •B.3.7 Microsoft Managed Extensibility Framework
- •B.3.8 Ninject
- •B.4.1 Use integration tests for your data layer
- •B.4.2 Use rollback attributes
- •B.4.3 Use TransactionScope to roll back
- •B.5.1 Ivonna
- •B.5.2 Team System Web Test
- •B.5.3 NUnitAsp
- •B.5.4 Watir
- •B.5.5 WatiN
- •B.5.6 Selenium
- •B.6.1 NUnitForms
- •B.6.2 Project White
- •B.6.3 Team System UI Tests
- •Thread-related testing
- •B.7.1 Typemock Racer
- •B.7.2 Microsoft CHESS
- •B.7.3 Osherove.ThreadTester
- •Acceptance testing
- •B.8.1 FitNesse
- •B.8.2 StoryTeller
- •Index
- •Symbols

34 |
CHAPTER 2 |
A first unit test |
2.5 More NUnit attributes
Now that you’ve seen how easy it is to create unit tests that run automatically, we’ll look at how to set up the initial state for each test, and how to remove any garbage that’s left by your test.
A unit test has specific points in its lifecycle that you’ll want to have control over. Running the test is only one of them, and there are special setup methods that run before each test run, as we’ll see in the next section.
2.5.1Setup and teardown
For unit tests, it’s important that any leftover data or instances from previous tests are destroyed and that the state for the new test is recreated as if no tests have been run before. If you have leftover state from a previous test, you might find that your test fails, but only if it’s run after a different test, and it passes other times. Locating that kind of dependency bug between tests is difficult and time-consuming, and I don’t recommend it to anyone. Having tests that are totally independent of each other is one of the best practices I will be covering in part 2 of this book.
In NUnit, there are special attributes that allow easier control of setting up and clearing out state before and after tests. These are the [SetUp] and [TearDown] action attributes. Figure 2.4 shows the process of running a test with setup and teardown actions.
For now, make sure that each test you write uses a new instance of the class under test, so that no leftover state will mess up your tests.
Figure 2.4 NUnit performs setup and teardown actions
before each and every test method.

More NUnit attributes |
35 |
We can take control of what happens in the setup and teardown steps by using two NUnit attributes:
[SetUp]—This attribute can be put on a method, just like a [Test] attribute, and it causes NUnit to run that setup method each time it runs any of the tests in your class.
[TearDown]—This attribute denotes a method to be executed once after each test in your class has executed.
Listing 2.1 shows how we can use the [SetUp] and [TearDown] attributes to make sure that each test receives a new instance of LogAnalyzer, while also saving some repetitive typing.
Listing 2.1 Using [SetUp] and [TearDown] attributes
using NUnit.Framework;
namespace AOUT.LogAn.Tests
{
[TestFixture]
public class LogAnalyzerTests
{
private LogAnalyzer m_analyzer=null;
[SetUp]
public void Setup()
{
m_analyzer = new LogAnalyzer();
}
[Test]
public void IsValidFileName_validFileLowerCased_ReturnsTrue()
{
bool result = m_analyzer.IsValidLogFileName("whatever.slf");
Assert.IsTrue(result, "filename should be valid!");
}
[Test]
public void IsValidFileName_validFileUpperCased_ReturnsTrue()
{

36 |
CHAPTER 2 |
A first unit test |
bool result = m_analyzer.IsValidLogFileName("whatever.SLF");
Assert.IsTrue(result, "filename should be valid!");
}
[TearDown]
public void TearDown()
{
m_analyzer = null;
}
}
}
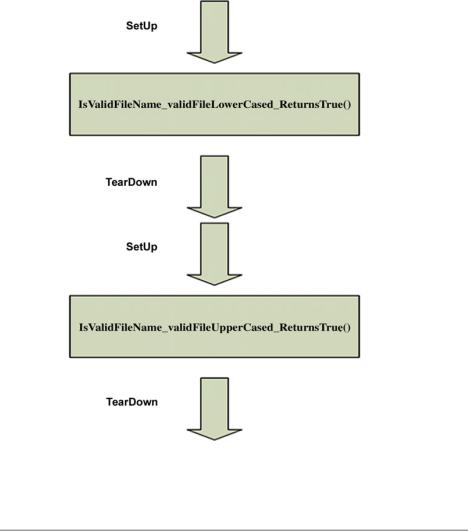
You can think of the setup and teardown methods as constructors and destructors for the tests in your class. You can only have one of each in any test class, and each one will be performed once for each test in your class. In listing 2.1 we have two unit tests, so the execution path for NUnit will be something like that shown in figure 2.5.
NUnit contains several other attributes to help with setup and cleanup
of state. For example, [TestFixtureSetUp]and [TestFixtureTearDown]
allow setting up state once before all the tests in a specific class run, and once after all the tests have been run (once per test fixture). This is useful when setting up or cleaning up takes a long time, and you want to only do it once per fixture. You’ll need to be cautious about using these attributes. You may find that you’re sharing state between tests if you’re not careful.
Next, we’ll look at how we can test that an exception is thrown by our code when it should be.
2.5.2Checking for expected exceptions
One common testing scenario is making sure that the correct exception is thrown from the tested method when it should be.
Let’s assume that our method should throw an ArgumentException when we send in an empty filename. If our code doesn’t throw an exception, it means our test should fail. We’re going to test the method logic in listing 2.2.

More NUnit attributes |
37 |
Figure 2.5 How NUnit calls SetUp and TearDown with multiple unit tests in the same class: each test is preceded by running SetUp and followed by a TearDown method run.
Listing 2.2 The LogAnalyzer filename-validation logic we’d like to test
public class LogAnalyzer
{
public bool IsValidLogFileName(string fileName)
{
if(String.IsNullOrEmpty(fileName))
{
throw new ArgumentException("No filename provided!");
}
if(!fileName.EndsWith(".SLF"))
{