
- •Brief contents
- •Contents
- •Foreword
- •Preface
- •Acknowledgments
- •About this book
- •How to use this book
- •Who should read this book
- •Roadmap
- •Code conventions and downloads
- •Software requirements
- •Author Online
- •About the cover illustration
- •1 The basics of unit testing
- •Unit testing—the classic definition
- •1.1.1 The importance of writing “good” unit tests
- •1.1.2 We’ve all written unit tests (sort of)
- •Properties of a good unit test
- •Integration tests
- •1.3.1 Drawbacks of integration tests compared to automated unit tests
- •Good unit test—a definition
- •A simple unit test example
- •Test-driven development
- •Summary
- •2 A first unit test
- •Frameworks for unit testing
- •2.1.2 The xUnit frameworks
- •Introducing the LogAn project
- •First steps with NUnit
- •2.3.1 Installing NUnit
- •2.3.2 Loading up the solution
- •2.3.3 Using the NUnit attributes in your code
- •Writing our first test
- •2.4.1 The Assert class
- •2.4.2 Running our first test with NUnit
- •2.4.3 Fixing our code and passing the test
- •2.4.4 From red to green
- •More NUnit attributes
- •2.5.1 Setup and teardown
- •2.5.2 Checking for expected exceptions
- •2.5.3 Ignoring tests
- •2.5.4 Setting test categories
- •Indirect testing of state
- •Summary
- •3 Using stubs to break dependencies
- •Introducing stubs
- •Identifying a filesystem dependency in LogAn
- •Determining how to easily test LogAnalyzer
- •Refactoring our design to be more testable
- •3.4.1 Extract an interface to allow replacing underlying implementation
- •3.4.2 Inject stub implementation into a class under test
- •3.4.3 Receive an interface at the constructor level (constructor injection)
- •3.4.4 Receive an interface as a property get or set
- •3.4.5 Getting a stub just before a method call
- •Variations on refactoring techniques
- •3.5.1 Using Extract and Override to create stub results
- •Overcoming the encapsulation problem
- •3.6.1 Using internal and [InternalsVisibleTo]
- •3.6.2 Using the [Conditional] attribute
- •3.6.3 Using #if and #endif with conditional compilation
- •Summary
- •4 Interaction testing using mock objects
- •State-based versus interaction testing
- •The difference between mocks and stubs
- •A simple manual mock example
- •Using a mock and a stub together
- •One mock per test
- •Stub chains: stubs that produce mocks or other stubs
- •The problems with handwritten mocks and stubs
- •Summary
- •5 Isolation (mock object) frameworks
- •Why use isolation frameworks?
- •Dynamically creating a fake object
- •5.2.1 Introducing Rhino Mocks into your tests
- •5.2.2 Replacing a handwritten mock object with a dynamic one
- •Strict versus nonstrict mock objects
- •5.3.1 Strict mocks
- •5.3.2 Nonstrict mocks
- •Returning values from fake objects
- •Creating smart stubs with an isolation framework
- •5.5.1 Creating a stub in Rhino Mocks
- •5.5.2 Combining dynamic stubs and mocks
- •Parameter constraints for mocks and stubs
- •5.6.1 Checking parameters with string constraints
- •5.6.2 Checking parameter object properties with constraints
- •5.6.3 Executing callbacks for parameter verification
- •Testing for event-related activities
- •5.7.1 Testing that an event has been subscribed to
- •5.7.2 Triggering events from mocks and stubs
- •5.7.3 Testing whether an event was triggered
- •Arrange-act-assert syntax for isolation
- •Current isolation frameworks for .NET
- •5.9.1 NUnit.Mocks
- •5.9.2 NMock
- •5.9.3 NMock2
- •5.9.4 Typemock Isolator
- •5.9.5 Rhino Mocks
- •Advantages of isolation frameworks
- •Traps to avoid when using isolation frameworks
- •5.11.1 Unreadable test code
- •5.11.2 Verifying the wrong things
- •5.11.3 Having more than one mock per test
- •5.11.4 Overspecifying the tests
- •Summary
- •6 Test hierarchies and organization
- •Having automated builds run automated tests
- •6.1.1 Anatomy of an automated build
- •6.1.2 Triggering builds and continuous integration
- •6.1.3 Automated build types
- •Mapping out tests based on speed and type
- •6.2.1 The human factor of separating unit from integration tests
- •6.2.2 The safe green zone
- •Ensuring tests are part of source control
- •Mapping test classes to code under test
- •6.4.1 Mapping tests to projects
- •6.4.2 Mapping tests to classes
- •6.4.3 Mapping tests to specific methods
- •Building a test API for your application
- •6.5.1 Using test class inheritance patterns
- •6.5.2 Creating test utility classes and methods
- •6.5.3 Making your API known to developers
- •Summary
- •Writing trustworthy tests
- •7.1.1 Deciding when to remove or change tests
- •7.1.2 Avoiding logic in tests
- •7.1.3 Testing only one thing
- •7.1.4 Making tests easy to run
- •7.1.5 Assuring code coverage
- •Writing maintainable tests
- •7.2.1 Testing private or protected methods
- •7.2.2 Removing duplication
- •7.2.3 Using setup methods in a maintainable manner
- •7.2.4 Enforcing test isolation
- •7.2.5 Avoiding multiple asserts
- •7.2.6 Avoiding testing multiple aspects of the same object
- •7.2.7 Avoiding overspecification in tests
- •Writing readable tests
- •7.3.1 Naming unit tests
- •7.3.2 Naming variables
- •7.3.3 Asserting yourself with meaning
- •7.3.4 Separating asserts from actions
- •7.3.5 Setting up and tearing down
- •Summary
- •8 Integrating unit testing into the organization
- •Steps to becoming an agent of change
- •8.1.1 Be prepared for the tough questions
- •8.1.2 Convince insiders: champions and blockers
- •8.1.3 Identify possible entry points
- •Ways to succeed
- •8.2.3 Getting an outside champion
- •8.2.4 Making progress visible
- •8.2.5 Aiming for specific goals
- •8.2.6 Realizing that there will be hurdles
- •Ways to fail
- •8.3.1 Lack of a driving force
- •8.3.2 Lack of political support
- •8.3.3 Bad implementations and first impressions
- •8.3.4 Lack of team support
- •Tough questions and answers
- •8.4.1 How much time will this add to the current process?
- •8.4.2 Will my QA job be at risk because of this?
- •8.4.3 How do we know this is actually working?
- •8.4.4 Is there proof that unit testing helps?
- •8.4.5 Why is the QA department still finding bugs?
- •8.4.6 We have lots of code without tests: where do we start?
- •8.4.7 We work in several languages: is unit testing feasible?
- •8.4.8 What if we develop a combination of software and hardware?
- •8.4.9 How can we know we don’t have bugs in our tests?
- •8.4.10 My debugger shows that my code works: why do I need tests?
- •8.4.11 Must we do TDD-style coding?
- •Summary
- •9 Working with legacy code
- •Where do you start adding tests?
- •Choosing a selection strategy
- •Writing integration tests before refactoring
- •Important tools for legacy code unit testing
- •9.4.1 Isolate dependencies easily with Typemock Isolator
- •9.4.2 Find testability problems with Depender
- •9.4.3 Use JMockit for Java legacy code
- •9.4.4 Use Vise while refactoring your Java code
- •9.4.5 Use FitNesse for acceptance tests before you refactor
- •9.4.6 Read Michael Feathers’ book on legacy code
- •9.4.7 Use NDepend to investigate your production code
- •9.4.8 Use ReSharper to navigate and refactor production code
- •9.4.9 Detect duplicate code (and bugs) with Simian
- •9.4.10 Detect threading issues with Typemock Racer
- •Summary
- •Appendix A
- •Design and testability
- •Design goals for testability
- •A.2.1 Make methods virtual by default
- •A.2.2 Use interface-based designs
- •A.2.3 Make classes nonsealed by default
- •A.2.4 Avoid instantiating concrete classes inside methods with logic
- •A.2.5 Avoid direct calls to static methods
- •A.2.6 Avoid constructors and static constructors that do logic
- •A.2.7 Separate singletons and singleton holders
- •Pros and cons of designing for testability
- •A.3.1 Amount of work
- •A.3.2 Complexity
- •A.3.3 Exposing sensitive IP
- •A.3.4 Sometimes you can’t
- •Alternatives to designing for testability
- •Appendix B
- •Extra tools and frameworks
- •Isolation frameworks
- •B.1.2 Rhino Mocks
- •B.1.3 Typemock Isolator
- •B.1.4 NMock
- •B.1.5 NUnit.Mocks
- •Test frameworks
- •B.2.1 Microsoft’s Unit Testing Framework
- •B.2.2 NUnit
- •B.2.3 MbUnit
- •B.2.4 Gallio
- •B.2.5 xUnit
- •IoC containers
- •B.3.1 StructureMap
- •B.3.2 Microsoft Unity
- •B.3.3 Castle Windsor
- •B.3.4 Autofac
- •B.3.5 Common Service Locator Library
- •B.3.6 Spring.NET
- •B.3.7 Microsoft Managed Extensibility Framework
- •B.3.8 Ninject
- •B.4.1 Use integration tests for your data layer
- •B.4.2 Use rollback attributes
- •B.4.3 Use TransactionScope to roll back
- •B.5.1 Ivonna
- •B.5.2 Team System Web Test
- •B.5.3 NUnitAsp
- •B.5.4 Watir
- •B.5.5 WatiN
- •B.5.6 Selenium
- •B.6.1 NUnitForms
- •B.6.2 Project White
- •B.6.3 Team System UI Tests
- •Thread-related testing
- •B.7.1 Typemock Racer
- •B.7.2 Microsoft CHESS
- •B.7.3 Osherove.ThreadTester
- •Acceptance testing
- •B.8.1 FitNesse
- •B.8.2 StoryTeller
- •Index
- •Symbols

26 |
CHAPTER 2 |
A first unit test |
In this book, we’ll write tests that verify LogAn’s parsing, event-recog- nition, and notification abilities. Before we get started testing our project, though, we’ll look at how to write a unit test with NUnit. The first step is installing it.
2.3 First steps with NUnit
As with any new tool, you’ll need to install it first. Because NUnit is open source and freely downloadable, this task should be rather simple. Then we’ll see how to start writing a test with NUnit, use the various built-in attributes that NUnit ships with, and run our test and get some real results.
2.3.1Installing NUnit
You can download NUnit from www.NUnit.org or www.NUnit.com. NUnit is free to use and is an open source product, so you can get the source code for NUnit, compile it yourself, and use the source freely within the limits of the open source license. (See the license.txt file in the program directory for license details.)
NOTE At the time of writing, the latest version of NUnit is 2.2.8. The examples in this book should be compatible with most future versions of the framework.
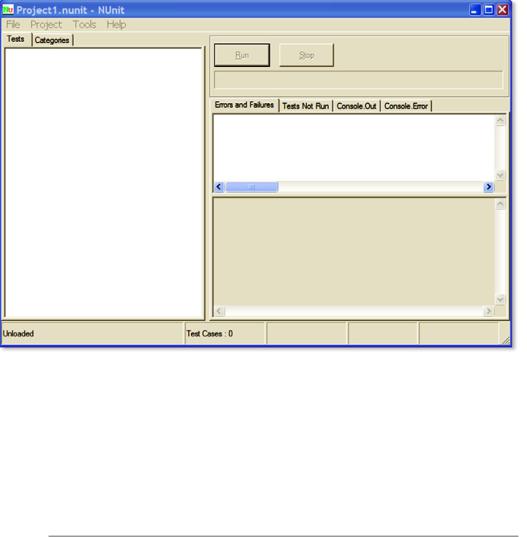
To install NUnit, run the setup program you downloaded. The installer will place a shortcut to the GUI part of the NUnit runner on your desktop, but the main program files should reside in a directory named something like c:\Program Files\NUnit-Net-2.0 2.2.8. If you doubleclick the NUnit desktop icon, you’ll see the unit test runner shown in figure 2.2.
We’ll be using this GUI to run our tests shortly.
2.3.2Loading up the solution
If you have the book’s code on your machine, load up the ArtOfUnitTesting.sln solution from the Code folder inside Visual Studio 2008.

First steps with NUnit |
27 |
Figure 2.2 The NUnit GUI is divided into three main parts: the tree listing the tests on the left, messages and errors at the top right, and stack trace information at the bottom right.
NOTE The C# Express Edition of Visual Studio 2008 (or above) is fine for use with this book.
We’ll begin by testing the following simple class with one method (the unit we’re testing) inside it:
public class LogAnalyzer
{
public bool IsValidLogFileName(string fileName)
{
if(!fileName.EndsWith(".SLF"))
{
return false;
}

28 |
CHAPTER 2 |
A first unit test |
return true;
}
}
This method may not seem complicated, but we’ll test it to make sure it works. In the real world, you’ll want to test any method that contains logic, even if it seems to be simple. Logic can fail, and we want to know when it does. In the following chapters, we’ll test more complicated scenarios and logic.
The method looks at the file extension to determine whether a file is a valid log file or not. Our first test will be to send in a valid filename, and make sure the method returns true.
Here are the first steps for writing an automated test for the IsValid-
LogFileName method:
1Add a new class library project to the solution, which will contain your test classes.
2To that library, add a new class that will hold your test methods.
3Add a new method to the preceding test case named IsValid-
LogFileName.
We’ll touch more on test-naming and arrangement standards later in the book, but the basic rules are listed in table 2.2.
Table 2.2 Basic rules for placing and naming tests
Object to be tested |
Object to create on the testing side |
|
|
Project |
Create a test project named [ProjectUnderTest].Tests. |
|
|
Class |
For each class, create at least one class with the name [ClassName]Tests. |
|
|
Method |
For each method, create at least one test method with the following name: |
|
[MethodName]_[StateUnderTest]_[ExpectedBehavior]. |
|
|
First steps with NUnit |
29 |
For example, the name for our LogAn test project would be AOUT.Logan.Tests (with AOUT standing for Art of Unit Testing). The name for the LogAnalyzer test class would be LogAnalyzerTests.
Here are the three parts of the test method name:
MethodName—The name of the method you’re testing
StateUnderTest—The conditions used to produce the expected
behavior
ExpectedBehavior—What you expect the tested method to do under the specified conditions
In our test of the IsValidLogFileName method, the state or condition is that we’re sending the method a valid filename, and the expected behavior is that the method will return a true value. Our test method
name might be IsValidFileName_validFile_ReturnsTrue().
We haven’t used the NUnit test framework yet, but we’re close. We still need to add a reference to the project under test for the new testing project. Do this by right-clicking on the test project and selecting Add Reference. Then select the Projects tab and select the LogAn project.
The next thing to learn is how to mark the test method to be loaded and run by NUnit automatically.
2.3.3Using the NUnit attributes in your code
NUnit uses an attribute scheme to recognize and load tests. Just like bookmarks in a book, these attributes help the framework identify the important parts in the assembly that it loads, and which parts are tests that need to be invoked.
NUnit provides an assembly that contains these special attributes. You just need to add a reference in your test project (not in your production code!) to the NUnit.Framework assembly. You can find it under the
.NET tab in the Add Reference dialog box. Type Nunit and you’ll see several assemblies starting with that name; add nunit.framework.
NUnit needs at least two attributes to know what to run: