


Chapter 16: Mixing Your Project 291
You can route the output of a track to an output other than the main stereo output if your audio hardware supports it. You can use your additional outputs to route audio to external hardware or additional monitors. You can also choose No Output if you don’t want the track to sound at all, or you can select the Surround output if your hardware supports it. You can even select the Binaural output setting, which allows you to pan the track as if it were coming from behind your head. (Wear headphones for this type of panning.)
Selecting channel strip settings
When you set up a channel strip the way you like it, you can save the settings for recall. Click the Setting button at the top of the channel strip and choose Save Channel Strip Setting As. A dialog opens where you can name and save the setting. You can load your saved channel strip settings with the same menu as well as copy, paste, and reset the channel strip.
\You can change channel strip settings by sending MIDI program changes from your MIDI controller. Click the Setting button and choose Save as Performance.
Have your MIDI controller send a program change message to change the channel strip setting on the selected track. Only 127 performances can be saved. The MIDI program change value is listed next to the performance name on the Performance menu.
Adding Effects to Tracks
I don’t know many Logic Pro users who get excited about setting track volumes or panning, but they can’t seem to get enough of plug-ins and effects. And for good reason, too, because using effects is where a lot of the fun, experimentation, and magic come into the mix. Logic Pro comes with some of the most amazing sound effects on the market and includes everything you need to make great sounding music.
Adding audio and MIDI insert effects
Audio insert effects can be added to audio, instrument, auxiliary, and output channel strips. You add effects plug-ins via the channel strip Audio FX slot. Click an empty effects slot and, on the menu that appears, choose the plugin you want to add. Insert effects have three clickable areas, as shown in Figure 16-7. You open the plug-in interface by clicking the center of the plug-in slot. You can choose a different plug-in by clicking the right side of the plug-in to open the plug-in menu. You can turn plug-ins on and off by clicking the left side of the plug-in.

292 Part V: Mixing, Mastering, and Sharing Your Music
Figure 16-7:
An insert effect slot.
\\
Insert effects are added to the channel strip in series, which means that the audio signal goes through each effect in the order in which it is inserted. You can reorder effects by click-dragging the center of the plug-in to the new location. You can also drag plug-ins to other channel strips. You can copy an effect by Option-dragging the plug-in to a new location.
MIDI effects, which are new to Logic Pro X, sound and look gorgeous, as shown in Figure 16-8. MIDI effects can be added only to instrument channel strips. You add MIDI effects plug-ins via the channel strip MIDI FX slot. You can replace, move, and copy MIDI effects plug-ins just like audio effects plug-ins.
Figure 16-8:
The MIDI
Arpeggiator
plug-in.
\\
\Choose Help Logic Pro Effects to open the online effects manual. Logic Pro X comes with 58 audio effects plug-ins and 9 MIDI effects plug-ins. The
Pedalboard plug-in includes an additional 35 cool-looking stompboxes — and they’re not just for guitar players. Logic Pro has plenty of built-in tone-shaping capabilities.

Chapter 16: Mixing Your Project 293
|
Adding send effects |
|
While insert effects are serial in the signal flow (one goes through the |
|
next), send effects are parallel in signal flow (one goes beside the other). |
|
Send effects are useful when you want to send a portion of the signal |
|
through an effect, but you want the original sound to remain untouched. |
|
For example, you can send a portion of a snare or vocal through a reverb |
|
and mix the reverb with the original sound. Reverbs, delays, and compres- |
|
sors are commonly used as send effects. The auxiliary channel that hosts |
|
the effects will often have other insert effects on it, such as EQ, compres- |
|
sion, or dynamics. |
|
To add a send effect to a channel strip, follow these steps: |
\ |
1.\ Click the channel strip send slot, and choose a bus on the menu. |
\ |
The send slot routes the signal through a bus to an auxiliary channel |
|
strip. If the bus is empty, an auxiliary channel strip is created and added |
|
to the mixer. |
\2.\ Drag up or down on the send level knob to change the level sent to
the auxiliary channel strip.
\ |
You can also double-click the send knob and enter the value directly. |
\ |
3.\ Add the insert effects you want to the auxiliary track. |
\ |
The effects on the auxiliary track process the signal you route through |
|
the send. |
|
Similar to insert effects, you can click the left side of the send slot to turn it |
|
on and off. Click-hold the right side of the slot to choose a different bus and |
|
the way the fader and pan controls affect the send. Select pre-fader when |
|
you want the send effect level to remain unchanged as you lower or raise the |
|
fader of the channel strip. Select post-fader when you want the send effect |
|
level to remain relative to the fader level. Select post-pan (the default) to |
|
allow both the fader and the pan knob to determine how the signal is sent to |
|
the auxiliary channel strip. |
Controlling Signal Flow
After your tour of channel strips and insert and send effects, you understand that signal flow is flexible in Logic Pro. You can route audio in many ways for both practical and creative purposes. In this section, you find more ways to control signal flow.

294 Part V: Mixing, Mastering, and Sharing Your Music
Understanding how insert and send effects work
As you learned previously, insert effects are inserted in a series. The order in which you insert the effects can have a big effect on your sound. However, many Logic Pro plug-ins, such as Compressor and Space, have a mix control, so you can adjust the level of dry and wet signal, effectively turning it into a parallel effect.
Send effects are always parallel to the source that’s sending the signal. But on the auxiliary channel that’s hosting the effects, the plug-ins are inserted in
series. You can also use effects sends on auxiliary channel strips. For example, you can add a distortion or overdrive plug-in to an auxiliary track and send a small amount of your lead vocal to it so it’s in the background, adding a little color. Then you can send the distorted auxiliary track to a delay or reverb so that the distorted vocal is adding a bit of depth and interest to your mix.
\Make your mix as complicated or as simple as you want, but don’t lose sight of your mixing goal and concept. What are you trying to do to the audio? Is it
necessary? Is it enhancing your audio? Experiments are great, but give yourself a time limit. Otherwise, you’ll easily spend your creative time tweaking instead of finishing your project. You’ll have plenty of opportunities to try out new ideas on your next project.
|
Using auxiliary channel strips |
|
You just discovered some ways to use auxiliary channel strips creatively. You |
|
can also use auxiliary channel as submixes, without any effects, by selecting |
|
an auxiliary track as the output on a group of tracks. To create submixes. |
|
follow these steps: |
\ |
1.\ Select the tracks you want to group. |
\ |
Drum tracks or background vocal tracks are great examples of tracks |
|
you would group in a submix. |
\2.\ Click-hold the output slot on one of the selected tracks and choose an
|
empty bus. |
\ |
An auxiliary channel strip is added to the mixer, and you can control the |
|
sound and level of all the tracks as a group from the auxiliary track. |
Chapter 16: Mixing Your Project 295
Another important use of auxiliary channel strips is for efficient use of effects on multiple tracks. There’s no need to create a separate reverb effects send on every track that needs reverb, especially because reverbs such as Space Designer are processor intensive. Create one reverb effects send and add multiple tracks to the same reverb. This technique also gives your mix a cohesive sound.
Another popular use of an auxiliary channel strip is for parallel compression. Create an effects send on the lead vocal or a group of drums. Add the Compressor plug-in to the auxiliary channel strip and compress it heavily, as described later, in the “Using the Compressor” section. Then mix the compressed sound with the dry sound, and you’ll get more presence and loudness without raising the level of the dry tracks.
\After you have your effects sends set up the way you like, you can add them to
a track stack and save them as a patch for later recall. For details, see Chapter 4.
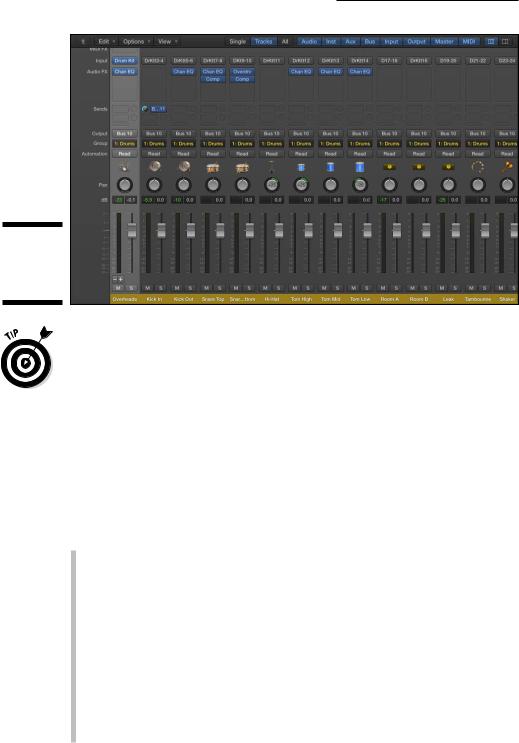
Using multi-output instruments
Multi-output capabilities are built into some Logic Pro software instruments, such as Drum Kit Designer, EXS24, and Ultrabeat. Multi-output instruments enable you to route audio within the instrument to its own channel strip. This gives you individual control over sounds and enables you to route sounds to separate outputs. To use a multi-output instrument:
\1.\ Click the right side of the instrument slot on the channel strip, and
choose the Multi Output option of the instrument on the menu.
\ |
The mixer channel strip is updated with a plus icon and a minus icon |
|
above the mute icon, as shown in Figure 16-9. |
\ |
2.\ Click the plus icon to add instrument outputs to the mixer. |
\ |
New channel strips are added to the right of the first instrument channel |
|
strip. The number of outputs you have available depends on the soft- |
|
ware instrument. |
\ |
3.\ Click the center of the instrument slot to open the instrument interface. |
\ |
4.\ In the instrument interface, route the sounds to the outputs in the mixer. |
\ |
Each instrument handles routing differently. Some instruments, such as |
|
Drum Kit Designer, have sounds hard-wired to specific outputs. Others, |
|
such as Ultrabeat, are more flexible and allow you to choose how sounds |
|
are routed. Consult the instruments’ manual (Help Logic Pro Instruments) |
|
for specific instrument instructions. |
296 Part V: Mixing, Mastering, and Sharing Your Music
Figure 16-9:
A multioutput instrument.
\ |
Because setting up multi-output instruments can be time consuming, save |
|
your multi-output instrument setups as patches for later recall. For instruc- |
|
tions on saving patches, see Chapter 4. |
Using the output and master channel strips
Unless you have a channel strip’s output set to No Output or an additional output that doesn’t return into Logic Pro, all channel strips are summed to your stereo output channel strip and finally to your master output. Here’s a description of your output and master channel strips:
\\Output: Your stereo output behaves similarly to other channel strips,
except you can’t add send effects to it. You can use this channel strip to adjust the final level of your mix, as described in Chapter 18. The output channel strip has a bounce icon below the meter to export your project to a single file or burn it to CD or DVD. For details on bouncing your project, see Chapter 19.
\\Master: Your master output is stripped to the basics. Many professionals
never touch the master fader during a project and instead use the output for overall volume control. You can adjust the fader level and even automate the fader, as described in Chapter 17. In addition to the mute icon, you have a dim icon, which allows you to adjust the playback volume according to the dim level. To set the dim level, choose Logic Pro X Preferences Audio, click the General tab, and adjust the Dim Level slider.