


Chapter 9
Making Beats with Drummer and Ultrabeat
In This Chapter
\Creating beats with your virtual drummer \Producing drum sounds
\Designing grooves with Ultrabeat \Sequencing drum patterns
Did your drummer get lost on the way to the studio? Don’t you just hate it when that happens? Oh, you have Logic Pro X? Never mind.
Listen, I love playing with a live drummer. Some of my best musical partnerships have been with amazing drummers. But I’ve kept my greatest rhythm relationships private because I haven’t wanted to hurt any of my drummers’ feelings. Because I’m putting my own feelings in print, I might as well go all in. I love Drummer and Ultrabeat. There, I said it.
In this chapter, you discover how to use the new virtual drummer and Ultrabeat, the groove machine. You create beats, build custom drum kits, and use a pattern sequencer. Drummer and Ultrabeat make Logic Pro X an amazing songwriting tool and a music-producing powerhouse. But whatever you do, don’t beat on your computer. It only sounds like a drum — it’s not built like one.
Playing with Your Virtual Drummer
New to Logic Pro X is Drummer, your virtual session player. Drummer is a combination of a new track type and new software instrument. The track type does the drumming and the software instrument provides the drum sounds. As described in Chapter 4, a drummer track is a special MIDI track that looks like audio in the tracks area.

134 Part III: Making Music with Virtual Instruments
The drummer track comes with its own drummer editor, which chooses the style of music and the player, and tells the drummer how to play the track. The editor is so simple that even a drummer could use it. Okay, no more potshots at drummers. Promise. I love Drummer so much because I wish I could play the drums. Honest.
The Drum Kit Designer software instrument is added to a drummer track automatically, but you don’t have to use the Drum Kit Designer. But Drummer and Drum Kit Designer were made for each other, so I won’t separate them in this chapter.
Creating a drummer track
To create a drummer track, choose Track New Drummer Track. A new drummer track is added to the track list, and two default eight-bar regions are added to the tracks area, as shown in Figure 9-1.
Figure 9-1:
A drummer track and regions.
\\
\ |
|
You can have only one drummer track in a project. You can convert a drum- |
|
|
mer track into a MIDI track and then add another drummer track, but you |
|
|
lose the ability to use the drummer editor and will have to edit the drum part |
|
|
manually. You learn more about converting your drummer track to MIDI later |
|
|
|
|
|
in this section. By the way, Drummer prevents you from creating “impossible” |
|
|
beats, where you might accidentally program something a real drummer |
|
|
simply couldn’t play. |
Chapter 9: Making Beats with Drummer and Ultrabeat 135
Creating drummer regions
Drummer automatically creates two eight-bar regions, but you don’t have to live with them. By using several regions to build your project rather than one big region, you can more easily change what your drummer plays during different song sections (as you’ll soon see).
To create a drummer region, select the pencil tool in the tracks area and click where you would like the region to begin. By default, drummer regions are eight bars long. If you want to change the size of the region, drag the lowerleft or lower-right edge of the region to resize it. You could also split a region (making two regions out of one) by using the scissors tool.
\If you want to force the drummer to hit the crash cymbal at the beginning of a song section, create a new region. You may need to adjust the Fills parameter,
as you learn next, but getting Drummer to play a cymbal crash at the beginning of a region is a good reason why you want new regions to start at song sections or groove changes.
Choosing and directing your drummer in the editor
The real power of Drummer’s artificial intelligence–like personality is in the drummer editor. To open the editor, double-click a drummer region or choose View Show Editor (E). The editor opens at the bottom of the tracks area, as shown in Figure 9-2.
Figure 9-2:
The drummer editor.
The drummer editor is filled with personality. The left side of the drummer editor is where you change settings for the entire drummer track. At the top of the area is a style button. Click the button and a drop-down menu appears so you can choose between Rock, Alternative, Songwriter, and R&B. Each style has several

136 Part III: Making Music with Virtual Instruments
different drummers with names and headshots, as shown in Figure 9-3. The current drummer’s name is yellow in the headshot. Click the drummer you want for the entire track. The track regions and drummer editor are updated with the style of the selected drummer. Since Logic Pro X first came out, developers have added new drummers and kits, and more are bound to be on the way.
Figure 9-3:
The drummer chooser.
\\
The right side of the drummer editor is where you change settings for the selected region. Here’s a description of each section:
\\Ruler: At the top of the region settings are a ruler and a play icon. You
can play the region or move the playhead within the region in this ruler.
\\Presets: Each drummer comes with a set of presets that you can click
to update the editor controls. At the top of the Presets menu is a dropdown list where you can save, delete, and recall the default preset. You can also refresh the region to make subtle changes to the current region. Finally, you can choose to keep the settings while changing drummers.
\\X/Y pad: The X/Y pad has a yellow puck that you can move between
Loud/Soft and Complex/Simple. The position of the puck makes a big difference in the beat the drummer will play.
\\Drum kit: Click the drum group to select the drums that will play in the
region. You can also choose to add one of three percussion instruments. The sliders to the right of the drum kit allow you to choose between

Chapter 9: Making Beats with Drummer and Ultrabeat 137
variations of the groove. If you select the Follow check box for the Kick and Snare slider, the slider changes to a drop-down menu and you can select a track in the project that the kick and snare will follow.
\\Fills: The Fills knob, shown in Figure 9-4, adjusts the number and length of
fills. Click the lock icon to freeze the fills setting when changing presets.
\\Swing: The Swing knob adjusts the amount of shuffle feel. Click the lock
icon to freeze the swing setting when changing presets. You can also click the 8th or 16th buttons to decide whether the swing is based on eighth notes or sixteenth notes.
\\Details: Click the Details button to open an additional editing panel, as
shown in Figure 9-4. Use this panel to change Feel, Ghost Notes, and Hi-Hat performance. The Feel knob adjusts how Drummer plays relative to the tempo. You can pull back the performance so that it plays behind the beat or push it forward so it plays in front of the beat. The Ghost Notes knob adjusts how loudly or quietly Drummer plays ghost notes (notes that are played at a low volume between the loud notes). The Hi-Hat knob adjusts the amount of closed or open hi-hat that Drummer plays. The panel has a lot of personality, so don’t forget to make use of it.
Figure 9-4:
The Details area of the drummer editor.
Selecting producer kits
Each drummer has a default kit connected to the drummer. The kit is automatically loaded into the stereo Drum Kit Designer software instrument. You can upgrade the kit to a special producer kit that has more tracks and channel strips for ultimate control. To select a producer kit, simply do the following:
\1.\ Choose View Show Library to open the library.
\ |
The library opens on the left side of the tracks area. |
138 Part III: Making Music with Virtual Instruments
\ |
|
2.\ Choose Drum Kit Producer Kits, and then select a patch. |
\ |
|
The track is upgraded to a track stack containing several tracks of indi- |
|
|
vidual drums. |
\ |
|
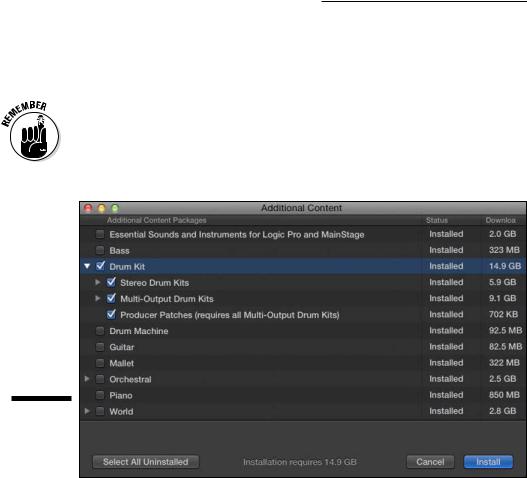
To have access to all producer kits, choose Logic Pro X Download Additional |
|
|
Content. The Additional Content window opens, as shown in Figure 9-5. Select |
|
|
the Drum Kit check box and click Install. Be mindful of size. The multi-output |
|
|
drum kits are 9.1 gigabytes, but these kits were engineered by golden-eared |
|
|
|
|
|
professionals and are worth every gigabyte. |
|
Figure 9-5: |
|
|
The addi- |
|
|
tional con- |
|
|
tent menu. |
|
\ |
|
\ |
|
||
|
Building custom kits with |
|
Drum Kit Designer |
|
The Drum Kit Designer software instrument is a gorgeous interface. I can’t |
|
wait for you to open it, so follow these steps: |
\ |
1.\ Display the inspector by choosing View Show Inspector (I). |
\ |
The inspector opens to the left of the tracks area. |

|
|
Chapter 9: Making Beats with Drummer and Ultrabeat 139 |
|
|
|
\ |
2.\ Click the instrument slot in the channel strip. |
|
\ |
The Drum Kit Designer software instrument opens, as shown in |
|
|
Figure 9-6. |
|
Figure 9-6:
Drum Kit
Designer.
\\
Click any drum to play it. As you click a drum, the left side displays the Exchange panel where you can choose different drums. The right side displays the Edit panel where you can control the selected drum sound, as shown in Figure 9-7.
Each type of drum or cymbal has different parameters. You can tune and dampen every sound, and you can adjust the volume by using the gain knob. If you’ve loaded a producer kit (refer to the previous section, “Selecting producer kits”), you can select whether the sound should be included in the overheads and room microphones or should leak into other drum mics. For the room mics, you can select between two mic setups by using the A/B slider.
At the bottom of the software instrument screen is a disclosure triangle that opens the additional settings shown in Figure 9-8. In this area, you can adjust the volume of the drummer’s percussion instruments.

140 Part III: Making Music with Virtual Instruments
Figure 9-7:
Drum Kit
Designer
Exchange
and Edit
panels.
\\
Figure 9-8:
Additional settings in Drum Kit Designer.
\\