- •Contents at a Glance
- •Table of Contents
- •Introduction
- •About This Book
- •Foolish Assumptions
- •Icons Used in This Book
- •Beyond the Book
- •Where to Go from Here
- •Embracing Logic Pro
- •Transitioning from Other Software
- •Starting Your Project
- •Augmenting Your Project
- •Customizing Your Project Settings
- •Tidying Up Your Project
- •Navigating Logic Pro
- •Taking Inventory of Your Track List
- •Zooming Tracks
- •Your Logic Pro Toolbox
- •Keeping It Simple with Smart Controls
- •Navigating with Key Commands
- •Saving Workspaces with Screensets
- •Knowing Your Track Types
- •Around the Global Tracks
- •Sorting and Hiding Tracks
- •Knowing the Region Types
- •Editing Regions
- •Understanding Digital Audio
- •Connecting Your Audio Devices
- •Understanding MIDI
- •Connecting Your MIDI Devices
- •Preparing to Record Audio
- •Recording Your First Audio Take
- •Recording Multiple Takes in Cycle Mode
- •Recording Multiple Inputs
- •Punching In and Punching Out
- •Setting Up Multiple Monitor Mixes
- •Preparing to Record MIDI
- •Recording Your First MIDI Take
- •Creating Tracks in Cycle Mode
- •Overdubbing MIDI
- •Recording Multiple MIDI Inputs
- •Adding Apple Loops to Your Project
- •Adding Prerecorded Audio to Your Project
- •Importing Video to Your Project
- •Playing with Your Virtual Drummer
- •Creating Beats with Ultrabeat
- •Taking Stock of Vintage Instruments
- •Spinning Your Tonewheels with the Vintage B3
- •Funking Up the Vintage Clav
- •Getting the Tone of Tines with the Vintage Electric Piano
- •Fusing Four Synths with Retro Synth
- •Exploring the Logic Pro Synths
- •Sampling with the EXS24 Sampler
- •Modeling Sounds Using Sculpture
- •Building an Orchestral Template
- •Performing Your Orchestra
- •Traveling the World Instruments
- •Working in the Tracks Area
- •Showing Your Global Tracks
- •Beat Mapping Your Arrangement
- •Arranging Regions in the Tracks Area
- •Creating Folder Tracks
- •Using Groove Templates
- •Knowing Your Audio Editors
- •Time Traveling with Flex Time
- •Tuning with Flex Pitch
- •Editing Audio in the Audio File Editor
- •Knowing Your MIDI Editors
- •Editing MIDI in the Piano Roll Editor
- •Editing MIDI in the Step Editor
- •Editing MIDI in the Score Editor
- •Editing MIDI in the Event List Editor
- •Editing Your MIDI Environment
- •Knowing Your Channel Strip Types
- •Adjusting Channel Strip Controls
- •Adding Effects to Tracks
- •Controlling Signal Flow
- •Adjusting the EQ of Your Tracks
- •Adding Depth with Reverb and Delay
- •Adding or Removing Dynamics with Compression
- •Taking Track Notes
- •Turning Your Mix Into a Performance with Automation
- •Choosing Your Automation Mode
- •Adding Automation to Your Tracks
- •Recording Live Automation
- •Fine-Tuning EQ
- •Adding Multiband Compression
- •Turn It Up
- •Bouncing Your Project
- •Creating Stems and Alternate Mixes
- •Sharing Your Music
- •Playing Keys
- •Playing Guitar
- •Playing Drums
- •Editing Tracks and Your Arrangement
- •Using Your iPad Mixing Console
- •Recording Remotely
- •Commanding Logic Pro
- •Navigating Logic Pro
- •Sketching Songs with GarageBand
- •Importing iPad Audio
- •Use Key Commands
- •Use Screensets
- •Choose a Tool and Master It
- •Choose a Tool and Ignore It
- •Use the Fastest Way, Not the Right Way
- •Establish a Troubleshooting Strategy
- •Save and Back Up Frequently
- •Don’t Lose Sight of the Music
- •Index
- •About the Author

Chapter 8
Adding Media to Your Project
In This Chapter
\Importing audio and MIDI into your project \Using Apple loops
\Navigating the Logic Pro browsers \Importing video to your project
What if you don’t play an instrument or sing? Are you destined to stare at an empty project? No way. Apple loops and prerecorded media
come to the rescue.
Logic Pro X comes with an enormous amount of media that you can add to your project. You can build an entire song with nothing but this media. In this chapter, you learn how to use Apple loops, import audio and video files, and much more.
Adding Apple Loops to Your Project
Apple loops are audio and MIDI files that contain additional metadata, such as the key signature, time signature, and tempo. Logic Pro reads this metadata and adjusts the Apple loop to your project settings. For example, if you take an Apple loop in the key of G at 120 beats per minute and put it into a project in the key of E at 100 beats per minute, the Apple loop will automatically adjust to the project tempo and key. Apple loops are flexible. They do a lot of yoga when you’re not using them. It would be a shame for all that stretching to go to waste, so please use Apple loops.
Apple loops can be beats, instrument parts, sound effects, or anything that you want to repeat. You can build an entire project with only Apple loops, or you can use them as accents to live instruments. As limber as they are with time and key signatures, they’re equally able to fit into your project needs.

120 Part II: Digital Recording and Using Prerecorded Media
Navigating the loop browser
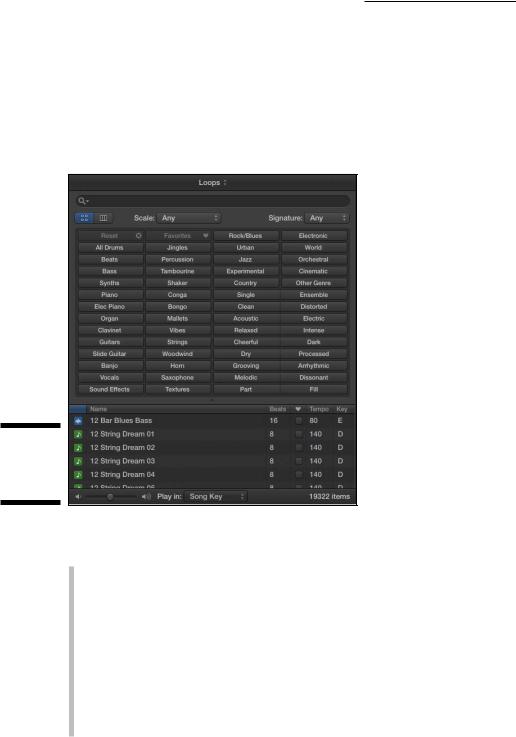
Logic Pro X gives you a special loop browser to search and find Apple loops, as shown in Figure 8-1. To open the loop browser, choose View Show Apple Loops or press O. You can also open the loop browser by clicking the loop browser icon in the control bar. If you don’t see the loop browser icon, you can customize the control bar as described in Chapter 3.
Figure 8-1:
The Apple
loop
browser.
\\
Here’s a description of the loop browser and its functions:
\\Loops index drop-down menu: At the top of the loop browser is a drop-
down menu where you can select different loop collections installed on your computer. To view only loops that you’ve created, choose the My Loops category. At the bottom of the menu, you can choose Reindex All Loops to rebuild the catalog. You may want to reindex your loops after you’ve added loops to your system.
\\Search bar: You can search for loops by name with the search bar.
\\View icons: Below the search bar are two view icons that let you switch
between button view and column view. The button view is the default state that shows you clickable keyword buttons to refine your loop search. The column view lets you navigate through loops by category.

Chapter 8: Adding Media to Your Project 121
\\Scale menu: You can filter your search by scale type, including Major,
Minor, Neither, or Good for Both.
\\Signature menu: You can filter your search by time signature.
\\Keyword buttons: While in button view, you can click multiple keyword
buttons to filter the search results. The top-left button is the Reset button, which clears all button choices. To the right of the Reset button is the Favorites button, which filters the search results to any loop that has been selected as a favorite.
\\Category columns: While in column view, you filter the search results by
navigating through categories of loops.
\\Results list: This area displays the Apple loops. It has six columns:
loop type, loop name, beats, favorites, tempo, and key. Loop types are divided into blue audio Apple loops and green MIDI Apple loops.
\\Volume slider: Selecting a loop automatically plays it. The volume slider
adjusts the loudness of the loop as you audition it.
\\Play In menu: You can select the auditioned loop to play in the Song
Key (the key of the current project), the Original Key (the key of the
Apple loop), or a specific key.
\\Count: The number of loops that fit your search criteria is displayed at
the bottom right of the loop browser.
Adding audio loops
Audio loops are audio files and can be added to audio tracks. In the loop browser, you can spot an audio Apple loop by its blue icon containing a waveform. You can edit audio Apple loops just as you can a recorded audio region. To add an audio Apple loop to your project, do one of the following:
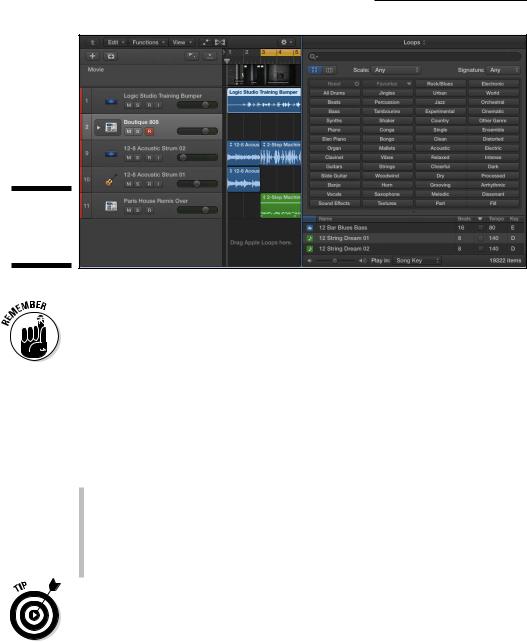
\\Drag an audio Apple loop from the loop browser to an empty area of the
tracks area or track list, as shown in Figure 8-2. An audio track will be created and the loop will be added to a region on the track.
\\Drag an audio Apple loop from the loop browser to an existing audio
track. The Apple loop will be added to the tracks area at the position where you drop the loop.
\ |
|
You can’t drag an Apple loop to a software instrument track or an external |
|
|
MIDI track from the loop browser. Logic Pro is thoughtful enough to warn you |
|
|
if you try. After the loop is in the tracks area, however, you can drag an Apple |
|
|
loop region to a software instrument track or an external MIDI track but it will |
|
|
|
|
|
not play. So if you drag an Apple loop into your project and it’s not playing, |
|
|
make sure it’s on the right type of track. |

122 Part II: Digital Recording and Using Prerecorded Media
Figure 8-2:
Drag Apple loops to the tracks area.
\ |
|
If you stretch an audio Apple Loop too far from its original key or tempo, your |
|
|
loop may end up with a pulled muscle. An audio Apple loop doesn’t always |
|
|
sound good when it’s stretched too far, but it still makes a great placeholder |
|
|
until you can replace it. |
|
|
Adding MIDI loops
MIDI loops can be added to software instrument tracks or external MIDI tracks. You can identify MIDI Apple loops by their green icon in the loop browser. To add MIDI Apple loops to your project, do one of the following:
\\Drag a MIDI loop to an external MIDI track. A MIDI region is created on
the track with the Apple loop contents.
\\Drag a MIDI loop to a software instrument track or to an empty area of
the tracks area or track list. A software instrument track is created, the corresponding software instrument is added to the track, and the loop is added to a MIDI region on the track.
\If you drag a MIDI Apple loop to an audio track, the loop will be converted to
audio and added to the tracks area at the position where you drop the loop.
You can also create your own Apple loops from any audio or MIDI region in your project. To create your own Apple loops, Control-click any region and choose Export Add to Loop Library (Shift-Control-O). The Add Region to Apple Loops Library window appears, as shown in Figure 8-3.
