


Chapter 6: Recording Audio 103
\2.\ Set the autopunch locators by dragging from left to right in the auto-
punch area of the ruler.
\ |
The autopunch area will be displayed by a red stripe (refer to |
|
Figure 6-10). |
\ |
3.\ Start recording before the punch-in point. |
\ |
Recording begins automatically when the playhead reaches the left auto- |
|
punch locator and ends when it reaches the right autopunch locator. |
\ |
4.\ Stop recording after the punch-in point. |
\ |
A take folder is created, and a new lane is added that includes your auto- |
|
punch recording. |
Setting Up Multiple Monitor Mixes
In the recording world, the monitor mix is what the engineer hears from the speakers. It’s possible to create multiple monitor mixes if your hardware supports multiple outputs. Small nearfield monitors are the standard choice for getting a good sound. Sometimes, a large set of speakers is used to get a full giant sound that impresses the clients and, well, everyone else. A third set of small speakers or even a single mono speaker may be used to imitate cheaper sound systems, though you can use your built-in computer speakers for this job.
To set up additional monitor mixes, follow these steps:
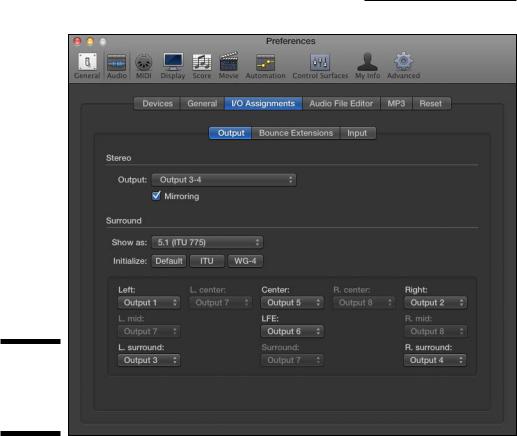
\1.\ Choose Logic Pro Preferences Audio.
\2.\ Click the I/O Assignments tab and then click the Output tab.
\3.\ On the Output menu, choose the output pair you want to set up, as
shown in Figure 6-11.
\ |
The outputs you have available depend on your hardware. |
\ |
4.\ Select Mirroring to mirror the stereo output to the selected output. |
\ |
Your mix will now be played through the additional output pairs. |
104 Part II: Digital Recording and Using Prerecorded Media
Figure 6-11:
The I/O
Assign ments Output tab.
Giving your singer a separate vocal cue mix
If you’re recording by yourself and using a microphone, you need headphones so that any audio played back won’t leak into your recording. But as you add other people to the recording process, you might need to set up different headphone submixes for each person you record.
Giving a performer a separate headphone mix, known as a cue mix, can improve the precision and emotion of a performance. Vocalists need to hear different things than drummers need to hear. And if you want to get the best performance out of a performer, you need his or her recording process to be smooth and productive. That’s why you need to give performers their own mix, the way they want it.
|
|
|
|
Chapter 6: Recording Audio 105 |
|
|
|
|
|
\ |
|
|
Your hardware must have multiple outputs to route the submix to the correct |
|
|
|
|
output. |
|
|
|
|
||
|
|
|
The process of setting up different submixes involves splitting the audio |
|
|
|
|
signal of a track and routing the parallel signal to an auxiliary track via the |
|
|
|
|
Send slot. (Refer to Figure 6-1 for the location of the Send slot.) To set up a |
|
|
|
|
submix: |
|
\ |
|
|
1.\ Click the Send slot on each track you want to send to the submix. |
|
\ |
|
|
2.\ On the Bus drop-down menu, choose an unused bus. |
|
\ |
|
|
An auxiliary track is automatically added to the mixer. A bus is used to |
|
|
|
|
route audio to auxiliary tracks. To open the mixer and view the auxiliary |
|
|
|
|
track, press X. |
|
\ |
|
|
3.\ Click the Send slot again, and choose Pre Fader. |
|
\ |
|
|
Setting the send to pre-fader allows you to adjust the volume of the track |
|
|
|
|
in the monitor mix using the track fader without changing the volume of |
|
|
|
|
the signal sent to the auxiliary track. If the send is set to post-fader, any |
|
|
|
|
adjustments you make to the volume of the track are also sent to the |
|
|
|
|
submix. |
|
\4.\ Adjust the volume of the track in the submix by using the Send Level
knob.
\5.\ Click the Output slot on the auxiliary track, and set it to the correct
|
hardware output. |
\ |
You can adjust the overall level of the submix by using the auxiliary |
|
track’s volume fader in the mixer. |
|
Eight sends are available per channel strip, so you can send the track’s signal |
|
to eight different parallel submixes. |
|
The recording techniques you discover in this chapter will put you well on |
|
your way to bringing your musical visions into reality. Recording in Logic Pro |
|
is straightforward but flexible enough to meet your needs. You have a power- |
|
ful tool that will capture your music so you can share it with the world. |

106 Part II: Digital Recording and Using Prerecorded Media