

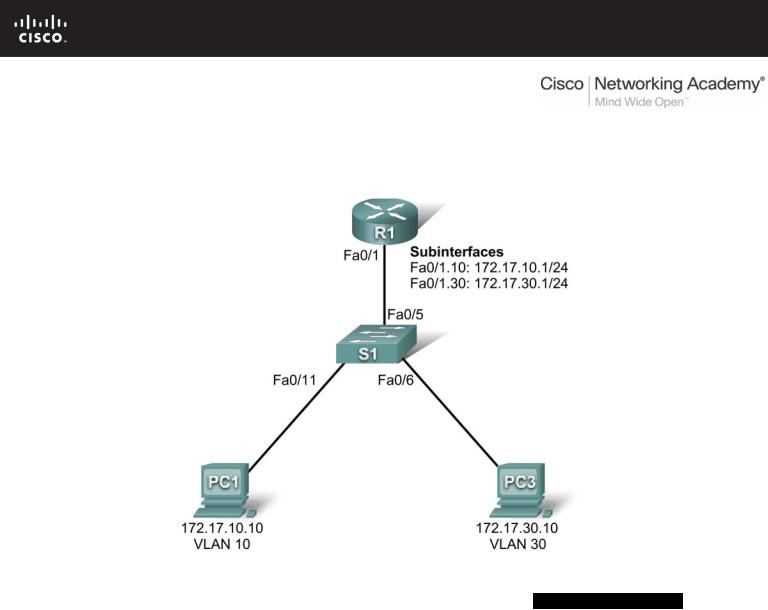
PT Activity 6.3.3: Troubleshooting Inter-VLAN Routing
Topology Diagram
Addressing Table
|
Device |
|
Interface |
IP Address |
|
Subnet Mask |
|
Default Gateway |
|
|
|
|
|
|
|
|
|
|
R1 |
|
Fa0/1.10 |
172.17.10.1 |
|
255.255.255.0 |
|
N/A |
|
|
|
|
|
|
|
|
|
|
|
Fa0/1.30 |
172.17.30.1 |
|
255.255.255.0 |
|
N/A |
|
|
|
|
|
|
||||
|
|
|
|
|
|
|
|
|
|
PC1 |
|
NIC |
172.17.10.10 |
|
255.255.255.0 |
|
172.17.10.1 |
|
|
|
|
|
|
|
|
|
|
PC3 |
|
NIC |
172.17.30.10 |
|
255.255.255.0 |
|
172.17.30.1 |
|
|
|
|
|
|
|
|
|
Learning Objectives
•Test connectivity between PCs and a router.
•Gather data on the problem.
•Implement the solution and test connectivity.
Introduction
In this activity, you will troubleshoot connectivity problems between PC1 and PC3. The activity is complete when your completion result is 100% and the two PCs can ping each other. Any solution you implement must conform to the topology diagram.
Task 1: Test Connectivity between PCs and a Router
All contents are Copyright © 1992–2007 Cisco Systems, Inc. All rights reserved. This document is Cisco Public Information. |
Page 1 of 3 |

CCNA Exploration |
|
LAN Switching and Wireless: Inter-VLAN Routing |
PT Activity 6.3.3: Troubleshooting Inter-VLAN Routing |
From Simulation mode, use the Add Simple PDU tool to ping between two PCs on the same VLAN. The following tests should be successful at the conclusion of this activity:
•PC1 can ping R1.
•PC3 can ping R1.
•PC1 can ping PC3.
Can PC1 ping R1? ___________
Can PC3 ping R1? ___________
Can PC1 ping PC3? ___________
Task 2: Gather Data on the Problem
Step 1. Verify the configuration on the PCs.
Are the following configurations for each PC correct?
•IP address
•Subnet mask
•Default gateway
Step 2. Verify the configuration on S1.
Are the configurations on the switch correct? Be sure to verify the following:
•Ports assigned to the correct VLANs.
•Ports configured for the correct mode.
•Ports connected to the correct device.
Step 3. Verify the configuration on R1.
Are the configurations on the router correct? Be sure to verify the following:
•IP addresses
•Interface status
•Encapsulation and VLAN assignment
Step 4. Document the problem and suggest solutions.
What are the reasons why connectivity failed between the PCs? What are the solutions? There could be more than one problem and more than one solution. All solutions must conform to the topology diagram.
PC1 and/or PC3
Problem: ___________________________________________________________________________
Solution: ___________________________________________________________________________
S1
Problem: ___________________________________________________________________________
Solution: ___________________________________________________________________________
R1
All contents are Copyright © 1992–2007 Cisco Systems, Inc. All rights reserved. This document is Cisco Public Information. |
Page 2 of 3 |

CCNA Exploration |
|
LAN Switching and Wireless: Inter-VLAN Routing |
PT Activity 6.3.3: Troubleshooting Inter-VLAN Routing |
Problem: ___________________________________________________________________________
Solution: ___________________________________________________________________________
Task 3: Implement the Solution and Test Connectivity
Step 1. Make changes according to the suggested solutions in Task 2.
Note: If you make changes to the switch configuration, you should make the changes in Realtime mode rather than Simulation mode. This is necessary so that the switch port will proceed to the forwarding state.
Step 2. Test connectivity between PCs and R1.
If you change any IP configurations, you should create new pings because the prior pings use the old IP address.
•PC1 should be able to ping R1.
•PC3 should be able to ping R1.
•PC1 should be able to ping PC3.
Can PC1 ping R1? ___________
Can PC3 ping R1? ___________
Can PC1 ping PC3? __________
If any pings fail, return to Task 2 to continue troubleshooting.
Step 3. Check completion percentage.
Your completion percentage should be 100%. If not, return to Step 1 and continue to implement your suggested solutions. You will be unable to click Check Results and see which required components are not yet completed.
All contents are Copyright © 1992–2007 Cisco Systems, Inc. All rights reserved. This document is Cisco Public Information. |
Page 3 of 3 |
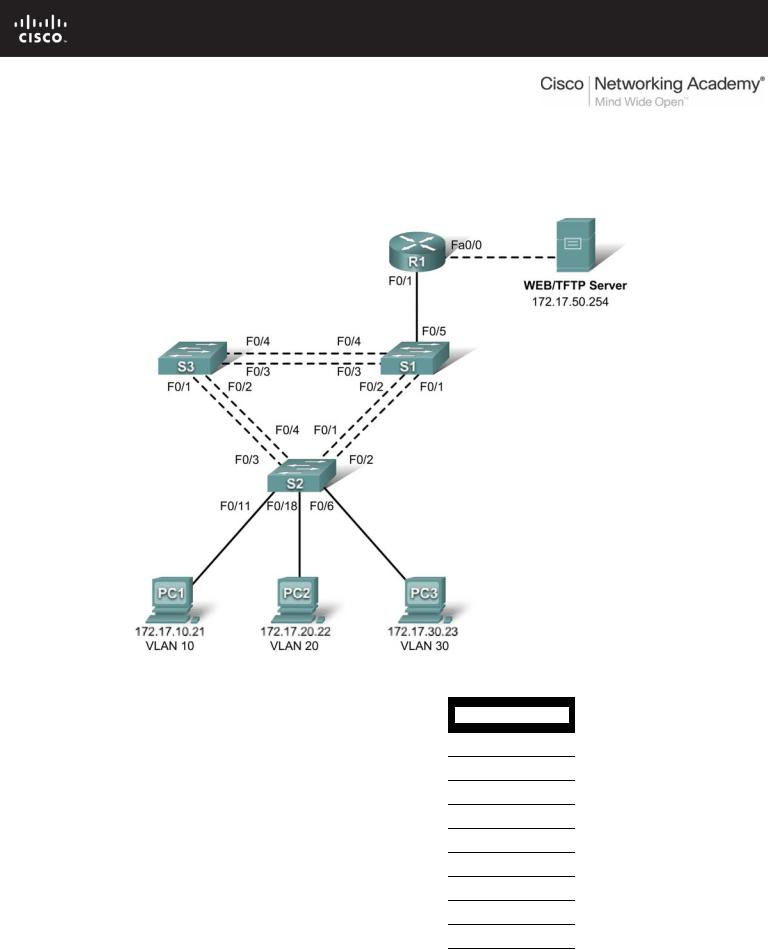
PT Activity 6.4.1: Basic Inter-VLAN Routing
Topology Diagram
Addressing Table
|
|
|
|
|
|
|
|
|
|
|
|
Device |
|
Interface |
IP Address |
|
|
Subnet Mask |
|
|
Default Gateway |
|
|
|
|
|
|
|
|
|
|
|
|
S1 |
|
VLAN 99 |
172.17.99.11 |
|
255.255.255.0 |
|
|
172.17.99.1 |
|
|
|
|
|
|
|
|
|
|
|
|
|
S2 |
|
VLAN 99 |
172.17.99.12 |
|
255.255.255.0 |
|
|
172.17.99.1 |
|
|
|
|
|
|
|
|
|
|
|
|
|
S3 |
|
VLAN 99 |
172.17.99.13 |
|
255.255.255.0 |
|
|
172.17.99.1 |
|
|
|
|
|
|
|
|
|
|||
|
R1 |
|
Fa0/0 |
See Interface Configuration Table |
|
N/A |
||||
|
|
|
|
|
|
|
|
|
|
|
|
|
Fa0/1 |
172.17.50.1 |
|
255.255.255.0 |
|
|
N/A |
||
|
|
|
|
|
|
|||||
|
|
|
|
|
|
|
|
|
|
|
|
PC1 |
|
NIC |
172.17.10.21 |
|
255.255.255.0 |
|
|
172.17.10.1 |
|
|
|
|
|
|
|
|
|
|
|
|
|
PC2 |
|
NIC |
172.17.20.22 |
|
255.255.255.0 |
|
|
172.17.20.1 |
|
|
|
|
|
|
|
|
|
|
|
|
|
PC3 |
|
NIC |
172.17.30.23 |
|
255.255.255.0 |
|
|
172.17.30.1 |
|
|
|
|
|
|
|
|
|
|
|
|
|
Server |
|
NIC |
172.17.50.254 |
|
255.255.255.0 |
|
|
172.17.50.1 |
|
|
|
|
|
|
|
|
||||
|
All contents are Copyright © 1992–2007 Cisco Systems, Inc. All rights reserved. This document is Cisco Public Information. |
Page 1 of 8 |
||||||||

CCNA Exploration |
|
LAN Switching and Wireless: Inter-VLAN Routing |
PT Activity 6.4.1: Basic Inter-VLAN Routing |
Port Assignments – S2
Ports |
Assignment |
Network |
|
|
|
Fa0/1 - 0/5 |
802.1q Trunks (Native VLAN 99) |
172.17.99.0 /24 |
|
|
|
Fa0/6 - 0/10 |
VLAN 30 – Guests(Default) |
172.17.30.0 /24 |
|
|
|
Fa0/11 - 0/17 |
VLAN 10 – Faculty/Staff |
172.17.10.0 /24 |
|
|
|
Fa0/18 - 0/24 |
VLAN 20 - Students |
172.17.20.0 /24 |
|
|
|
Subinterface Configuration Table – R1
Interface |
Assignment |
IP Address |
|
|
|
Fa0/0.1 |
VLAN 1 |
172.17.1.1 /24 |
|
|
|
Fa0/0.10 |
VLAN 10 |
172.17.10.1 /24 |
|
|
|
Fa0/0.20 |
VLAN 20 |
172.17.20.1 /24 |
|
|
|
Fa0/0.30 |
VLAN 30 |
172.17.30.1 /24 |
|
|
|
Fa0/0.99 |
VLAN 99 |
172.17.99.1 /24 |
|
|
|
Learning Objectives
•Perform basic switch configurations.
•Configure the Ethernet interfaces on the host PCs.
•Configure VTP on the switches.
•Configure the router and the remote server LAN.
Introduction
In this activity, you will perform basic switch configurations, configure addressing on PCs, configure VTP and inter-VLAN routing.
Task 1: Perform Basic Switch Configurations
Configure the S1, S2, and S3 switches according to the addressing table and the following guidelines:
•Configure the switch hostname.
•Disable DNS lookup.
•Configure the default gateway.
•Configure an encrypted privileged EXEC mode password of class.
•Configure a password of cisco for console connections.
•Configure a password of cisco for vty connections.
Switch>enable
Switch#config term
Enter configuration commands, one per line. End with CNTL/Z. Switch(config)#hostname S1
S1(config)#enable secret class S1(config)#no ip domain-lookup
All contents are Copyright © 1992–2007 Cisco Systems, Inc. All rights reserved. This document is Cisco Public Information. Page 2 of 8

CCNA Exploration |
|
LAN Switching and Wireless: Inter-VLAN Routing |
PT Activity 6.4.1: Basic Inter-VLAN Routing |
S1(config)#ip default-gateway 172.17.99.1 S1(config)#line console 0
S1(config-line)#password cisco S1(config-line)#login S1(config-line)#line vty 0 15 S1(config-line)#password cisco S1(config-line)#login S1(config-line)#end
%SYS-5-CONFIG_I: Configured from console by console S1#copy running-config startup-config
Destination filename [startup-config]? [enter] Building configuration...
Your completion result should be 16%. If not, check for missing configuration statements.
Task 2: Configure the Ethernet Interfaces on the Host PCs
From the Desktop tab, use the IP Configuration window to configure the Ethernet interfaces of PC1, PC2 and PC3 with the IP addresses from the addressing table.
Your completion result should be 23%. If not, check for missing configuration statements.
Task 3: Configure VTP on the Switches
Step 1. Enable the user ports on S2 in access mode.
S2(config)#interface fa0/6
S2(config-if)#switchport mode access
S2(config-if)#no shutdown
S2(config-if)#interface fa0/11
S2(config-if)#switchport mode access
S2(config-if)#no shutdown
S2(config-if)#interface fa0/18
S2(config-if)#switchport mode access
S2(config-if)#no shutdown
Step 2. Configure VTP.
Configure VTP on the three switches using the following table. Remember that VTP domain names and passwords are case-sensitive.
|
Switch Name |
|
|
VTP Operating Mode |
|
|
VTP Domain |
|
VTP |
|
|
|
|
|
|
Password |
|||
|
|
|
|
|
|
|
|
|
|
|
S1 |
|
Server |
|
Lab5 |
cisco |
|||
|
|
|
|
|
|
|
|||
|
S2 |
|
Client |
|
Lab5 |
cisco |
|||
|
|
|
|
|
|
|
|||
|
S3 |
|
Client |
|
Lab5 |
cisco |
|||
|
|
|
|
|
|
|
|
|
|
S1(config)#vtp mode server
Device mode already VTP SERVER.
S1(config)#vtp domain Lab6
Changing VTP domain name from NULL to Lab6
S1(config)#vtp password cisco
Setting device VLAN database password to cisco
S1(config)#end
All contents are Copyright © 1992–2007 Cisco Systems, Inc. All rights reserved. This document is Cisco Public Information. |
Page 3 of 8 |

CCNA Exploration |
|
LAN Switching and Wireless: Inter-VLAN Routing |
PT Activity 6.4.1: Basic Inter-VLAN Routing |
S2(config)#vtp mode client
Setting device to VTP CLIENT mode
S2(config)#vtp domain Lab6
Changing VTP domain name from NULL to Lab6
S2(config)#vtp password cisco
Setting device VLAN database password to cisco
S2(config)#end
S3(config)#vtp mode client
Setting device to VTP CLIENT mode
S3(config)#vtp domain Lab6
Changing VTP domain name from NULL to Lab6
S3(config)#vtp password cisco
Setting device VLAN database password to cisco
S3(config)#end
Step 3. Configure trunking ports and designate the native VLAN for the trunks.
Configure Fa0/1 through Fa0/5 as trunking ports, and designate VLAN 99 as the native VLAN for these trunks. When this activity was started, these ports were disabled and must be re-enabled now using the no shutdown command.
Only the commands for the FastEthernet0/1 interface on each switch are shown, but the commands should be applied up to the FastEthernet0/5 interface.
S1(config)#interface fa0/1 S1(config-if)#switchport mode trunk S1(config-if)#switchport trunk native vlan 99
S1(config-if)#no shutdown S1(config)#end
S2(config)#interface fa0/1
S2(config-if)#switchport mode trunk
S2(config-if)#switchport trunk native vlan 99
S2(config-if)#no shutdown
S2(config-if)#end
S3(config)#interface fa0/1
S3(config-if#switchport mode trunk
S3(config-if)#switchport trunk native vlan 99
S3(config-if)#no shutdown
S3(config-if-#end
Step 4. Configure the VTP server with VLANs.
Configure the following VLANS on the VTP server:
VLAN |
VLAN Name |
|
|
VLAN 99 |
management |
|
|
VLAN 10 |
faculty-staff |
|
|
VLAN 20 |
students |
|
|
VLAN 30 |
guest |
|
|
S1(config)#vlan 99
S1(config-vlan)#name management
S1(config)#vlan 10
All contents are Copyright © 1992–2007 Cisco Systems, Inc. All rights reserved. This document is Cisco Public Information. Page 4 of 8

CCNA Exploration |
|
LAN Switching and Wireless: Inter-VLAN Routing |
PT Activity 6.4.1: Basic Inter-VLAN Routing |
S1(config-vlan)#name faculty-staff
S1(config)#vlan 20
S1(config-vlan)#name students
S1(config)#vlan 30
S1(config-vlan)#name guest
S1(config-vlan)#end
Verify that the VLANs have been created on S1 with the show vlan brief command.
Step 5. Verify that the VLANs created on S1 have been distributed to S2 and S3.
Use the show vlan brief command on S2 and S3 to verify that all four VLANs have been distributed to the client switches.
S2#show vlan brief
VLAN |
Name |
Status |
Ports |
---- |
------------------------------ |
--------- |
----------------------------- |
1 |
default |
active |
Fa0/1, Fa0/2, Fa0/4, Fa0/5 |
|
|
|
Fa0/6, Fa0/7, Fa0/8, Fa0/9 |
|
|
|
Fa0/10, Fa0/11, Fa0/12,Fa0/13 |
|
|
|
Fa0/14, Fa0/15, Fa0/16,Fa0/17 |
|
|
|
Fa0/18, Fa0/19, Fa0/20,Fa0/21 |
|
|
|
Fa0/22, Fa0/23, Fa0/24, Gi0/1 |
10 |
faculty/staff |
active |
Gi0/2 |
|
|||
20 |
students |
active |
|
30 |
guest |
active |
|
99 |
management |
active |
|
S3#show vlan brief |
|
|
|
VLAN Name |
Status |
Ports |
|
---- |
---------------------------- --------- ------------------------------- |
||
1 |
default |
active |
Fa0/5, Fa0/6, Fa0/7, Fa0/8 |
|
|
|
Fa0/9, Fa0/10, Fa0/11, Fa0/12 |
|
|
|
Fa0/13, Fa0/14, Fa0/15, Fa0/16 |
|
|
|
Fa0/17, Fa0/18, Fa0/19, Fa0/20 |
|
|
|
Fa0/21, Fa0/22, Fa0/23, Fa0/24 |
10 |
faculty-staff |
active |
Gig1/1, Gig1/2 |
|
|||
20 |
students |
active |
|
30 |
guest |
active |
|
99 |
management |
active |
|
1002 |
fddi-default |
active |
|
1003 |
token-ring-default |
active |
|
1004 |
fddinet-default |
active |
|
1005 |
trnet-default |
active |
|
Step 6. Configure the management interface address on all three switches.
S1(config)#interface vlan99
S1(config-if)#ip address 172.17.99.11 255.255.255.0
S2(config)#interface vlan99
S2(config-if)#ip address 172.17.99.12 255.255.255.0
S3(config)#interface vlan99
All contents are Copyright © 1992–2007 Cisco Systems, Inc. All rights reserved. This document is Cisco Public Information. |
Page 5 of 8 |
CCNA Exploration |
|
LAN Switching and Wireless: Inter-VLAN Routing |
PT Activity 6.4.1: Basic Inter-VLAN Routing |
S3(config-if)#ip address 172.17.99.13 255.255.255.0
Verify that the switches are correctly configured by pinging between them. From S1, ping the management interface on S2 and S3. From S2, ping the management interface on S3.
Were the pings successful? ______________________
If not, troubleshoot the switch configurations and try again.
Step 7. Assign switch ports to VLANs on S2.
Port assignments are listed in the table at the beginning of the activity. However, since Packet Tracer 4.11 does not support the interface range command, only assign the first port from each range.
S2(config)#interface fa0/6 S2(config-if)#switchport access vlan 30 S2(config-if)#interface fa0/11 S2(config-if)#switchport access vlan 10 S2(config-if)#interface fa0/18 S2(config-if)#switchport access vlan 20
S2(config-if)#end
S2#copy running-config startup-config
Destination filename [startup-config]? [enter] Building configuration...
[OK]
S2#
Step 8. Check connectivity between VLANs.
Open the Command Prompt on the three PCs.
•Ping from PC1 to PC2 (172.17.20.22)
•Ping from PC2 to PC3 (172.17.30.23)
•Ping from PC3 to PC1 (172.17.30.21) Are the pings successful? ______________
If not, why do these pings fail?
Your completion result should be 82%. If not, check for missing configuration statements.
Task 4: Configure the Router and the Remote Server LAN
Step 1. Create a basic configuration on the router.
•Configure the router with hostname R1.
•Disable DNS lookup.
•Configure an encrypted privileged EXEC mode password of class.
•Configure a password of cisco for console connections.
•Configure a password of cisco for vty connections.
Step 2. Configure the trunking interface on R1.
You have demonstrated that connectivity between VLANs requires routing at the network layer, exactly like connectivity between any two remote networks. There are a couple of options for configuring routing between VLANs.
The first is something of a brute force approach. An L3 device, either a router or a Layer 3 capable switch, is connected to a LAN switch with multiple connections--a separate connection for each VLAN
All contents are Copyright © 1992–2007 Cisco Systems, Inc. All rights reserved. This document is Cisco Public Information. |
Page 6 of 8 |

CCNA Exploration |
|
LAN Switching and Wireless: Inter-VLAN Routing |
PT Activity 6.4.1: Basic Inter-VLAN Routing |
that requires inter-VLAN connectivity. Each of the switch ports used by the L3 device are configured in a different VLAN on the switch. After IP addresses are assigned to the interfaces on the L3 device, the routing table has directly connected routes for all VLANs, and inter-VLAN routing is enabled. The limitations to this approach are the lack of sufficient Fast Ethernet ports on routers, under-utilization of ports on L3 switches and routers, and excessive wiring and manual configuration. The topology used in this lab does not use this approach.
An alternative approach is to create one or more Fast Ethernet connections between the L3 device (the router) and the distribution layer switch, and to configure these connections as dot1q trunks. This allows all inter-VLAN traffic to be carried to and from the routing device on a single trunk. However, it requires that the L3 interface be configured with multiple IP addresses. This can be done by creating virtual interfaces, called subinterfaces, on one of the router Fast Ethernet ports and configuring them to be dot1q aware.
Using the subinterface configuration approach requires these steps:
•Enter subinterface configuration mode.
•Establish trunking encapsulation.
•Associate a VLAN with the subinterface.
•Assign an IP address from the VLAN to the subinterface. The commands are as follows:
R1(config)#interface fastethernet 0/0
R1(config-if)#no shutdown
R1(config-if)#interface fastethernet 0/0.1
R1(config-subif)#encapsulation dot1q 1
R1(config-subif)#ip address 172.17.1.1 255.255.255.0
R1(config-subif)#interface fastethernet 0/0.10
R1(config-subif)#encapsulation dot1q 10
R1(config-subif)#ip address 172.17.10.1 255.255.255.0
R1(config-subif)#interface fastethernet 0/0.20
R1(config-subif)#encapsulation dot1q 20
R1(config-subif)#ip address 172.17.20.1 255.255.255.0
R1(config-subif)#interface fastethernet 0/0.30
R1(config-subif)#encapsulation dot1q 30
R1(config-subif)#ip address 172.17.30.1 255.255.255.0
R1(config-subif)#interface fastethernet 0/0.99
R1(config-subif)#encapsulation dot1q 99 native
R1(config-subif)#ip address 172.17.99.1 255.255.255.0
Note the following points in this configuration:
•The physical interface is enabled using the no shutdown command, because router interfaces are down by default. The subinterface will then be up by default.
•The subinterface can use any number that can be described with 32 bits, but it is good practice to assign the number of the VLAN as the interface number, as has been done here.
•The native VLAN is specified on the L3 device so that it is consistent with the switches. Otherwise, VLAN 1 is native by default, and there is no communication between the router and the management VLAN on the switches.
Step 3. Configure the server LAN interface on R1.
R1(config)#interface FastEthernet0/1
R1(config-if)#ip address 172.17.50.1 255.255.255.0
R1(config-if)#description server interface
R1(config-if)#no shutdown
R1(config-if)#end
All contents are Copyright © 1992–2007 Cisco Systems, Inc. All rights reserved. This document is Cisco Public Information. |
Page 7 of 8 |

CCNA Exploration |
|
LAN Switching and Wireless: Inter-VLAN Routing |
PT Activity 6.4.1: Basic Inter-VLAN Routing |
There are now six networks configured. Verify that you can route packets to all six by checking the routing table on R1.
R1#show ip route
<output omitted>
Gateway of last resort is not set
172.17.0.0/24 is subnetted, 6 subnets
C 172.17.1.0 is directly connected, FastEthernet0/0.1 C 172.17.10.0 is directly connected, FastEthernet0/0.10 C 172.17.20.0 is directly connected, FastEthernet0/0.20 C 172.17.30.0 is directly connected, FastEthernet0/0.30 C 172.17.50.0 is directly connected, FastEthernet0/1
C 172.17.99.0 is directly connected, FastEthernet0/0.99
If your routing table does not show all six networks, troubleshoot your configuration and resolve the problem before proceeding.
Your completion percentage should be 100%. If not, click Check Results to see which required components are not yet completed.
Step 4. Verify Inter-VLAN routing.
From PC1, verify that you can ping the remote server (172.17.50.254) and the other two hosts (172.17.20.22 and 172.17.30.23). It may take a couple of pings before the end-to-end path is established.
These pings should be successful. If not, troubleshoot your configuration. Check to make sure that the default gateways have been set on all PCs and all switches.
Task 5: Reflection
In Task 4, you configured VLAN 99 as the native VLAN in the router Fa0/0.99 interface configuration. Why would packets from the router or hosts fail when trying to reach the switch management interfaces if the native VLAN were left in default?
All contents are Copyright © 1992–2007 Cisco Systems, Inc. All rights reserved. This document is Cisco Public Information. |
Page 8 of 8 |