

C# ПІДРУЧНИКИ / c# / Hungry Minds - ASP.NET Bible VB.NET & C#
.pdfFigure 18-7: Configuring MIT installation
Clicking the Next button two more times will finish our installation. Let's build and test our first MIT form.
Building your first MIT page
MIT is considered an intelligent solution. It will detect what type of device is requesting data and will return the appropriately formatted data. For example, if a browser is requesting your mobile page, the respective HTML will be returned. If a cell phone is requesting your page, the appropriate WML will be returned. This happens because all mobile pages must inherit from System.Web.UI.MobileControls.MobilePage.
The object MobilePage is the outermost layer of all the containers in a mobile Web application. However, unlike a normal ASP.NET page, a MobilePage object can contain multiple forms, specifically multiple <mobile:form>...</mobile:form> tags. Each of these <mobile:form> tags will match with our cards in a deck.
Converting your WML to MIT
Now that you've installed the MIT and understand a little about mobile forms, let's convert our Bike.wml page to Bike.aspx. In all of the examples, you will be building your pages in VS.NET. VS.NET enforces the CodeBehind model, separating application logic and HTML layout in two separate files. The following code is a conversion of our original WML deck to the MIT:
[bike.aspx]
<%@ Register TagPrefix="mobile" Namespace="System.Web.UI.
MobileControls" Assembly="System.Web.Mobile" %>
<%@ Page Language="vb" AutoEventWireup="false" Codebehind=
"bike.aspx.vb" Inherits="wVB.bike" %>
<body Xmlns:mobile="http://schemas.microsoft.com/Mobile/WebForm">
<mobile:Form id="Form1" runat="server">
<P>Select a Bike Style
<BR>
<mobile:Link id="Link1" NavigateUrl=#Form2 runat="server">
Road Bike</mobile:Link>
<BR>
<mobile:Link id="Link2" NavigateUrl=#Form3 runat="server">
Mountain Bike</mobile:Link>
</P>
</mobile:Form>
<mobile:Form id="Form2" runat="server">
<p>
<b>You Selected a Road Bike!</b>
</p>
</mobile:Form>
<mobile:Form id="Form3" runat="server">
<p>
<b>You Selected a Mountain Bike!</b>
</p>
</mobile:Form>
</body>
Notice how our <card> tags are now replaced with <mobile:Form> tags. Also, we decided to use the <mobile:Link> tag instead of the <a> tag. Using MIT will enable us to build a single page, but provide output to multiple devices. For example, Figures 18-8, 18-9, and 18-10 show our page viewed in the Openwave emulator, Pocket PC emulator, and a browser, respectively.

Figure 18-8: Bike.aspx displayed on a cell phone

Figure 18-9: Bike.aspx displayed on a Pocket PC
Figure 18-10: Bike.aspx displayed in a browser
Mobile Lists
Now that you've been introduced to some basic mobile controls, you will see how to use mobile lists. Mobile lists are one of the most powerful, and most popular mobile controls. They provide an easy way for the user to input data through their mobile device.
Simple lists
Let's take our example one step further and explore some other controls. In the following example code, we are going to use the <mobile:List> control. This control is much more flexible than the standard <mobile:Link>tag, because it provides special commands and formatting features.
[list.aspx]
<mobile:Form id="Form1" runat="server">
<mobile:Label id="Label1" runat="server">
Select a Bike Style</mobile:Label>
<BR>
<mobile:List id="List1" runat="server"
OnItemCommand="SelectBike">
<Item Text="Road Bike" Value="Road"></Item>
<Item Text="Mountain Bike" Value="Mountain"></Item>
</mobile:List>
</mobile:Form>
<mobile:Form id="Form2" runat="server">
<P>
<B>You Selected a Road Bike!</B>
</P>
</mobile:Form>
<mobile:Form id="Form3" runat="server">
<P>
<B>You Selected a Mountain Bike!</B>
</P>
</mobile:Form>
In this code, we use the <mobile:List> tag to present a few options to our users. By specifying the action of the OnItemCommand event, we can determine what mobile form we want to display. In this case, we are calling the function "SelectBike". The following code shows the code for VB.NET and C#, respectively.
VB.NET:
[list.aspx.vb]
Public Sub SelectBike(ByVal sender As Object, ByVal
e As ListCommandEventArgs)
If e.ListItem.Value = "Road" Then
ActiveForm = Form2
Else
ActiveForm = Form3
End If
End Sub
C#:
[list.aspx.cs]
protected void SelectBike( object sender,
ListCommandEventArgs e)
{
if ( e.ListItem.Value=="Road")
{
ActiveForm = Form2;
}
else
{
ActiveForm = Form3;
}
}
In this code, we take advantage of the ListCommandEventArgs parameter, e. Based upon the value of the ListItem, we check to see if a "Road" bike or a "Mountain" bike was selected. If a "Road" bike was selected, we take advantage of setting the ActiveForm to Form2. If the "Mountain" bike was selected, we set the ActiveForm to Form3. Figure 1811 displays the output of our list.
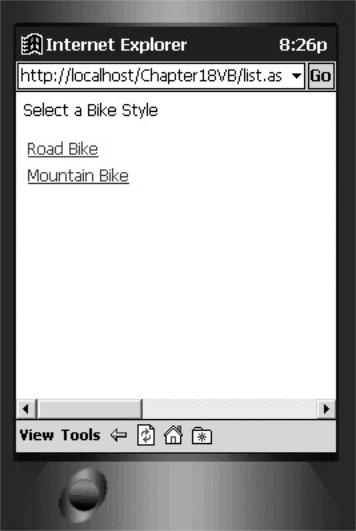
Figure 18-11: A simple list
Note By default, when a mobile page is first rendered, the first form is made Active. This can be overridden programmatically by setting the ActiveForm property to a different Form control, as seen in the preceding code.
Decorated lists
Lists are much more functional than just displaying data. When the device permits it, list items can be undecorated, or decorated with bullets or numbers. The following code shows how to set the Decoration property to "Bulleted" to produce a bulleted list:
[listdecoration.aspx]
<mobile:Form id="Form1" runat="server">
<mobile:Label id="Label1" runat="server">
Select a Bike Style</mobile:Label>
<BR>
<mobile:List id="List1" runat="server"
OnItemCommand="SelectBike" Decoration="Bulleted">
<Item Text="Road Bike" Value="Road">
</Item>
<Item Text="Mountain Bike"
Value="Mountain"></Item>

</mobile:List>
</mobile:Form>
If we wanted a numbered list, we would have set Decoration=" Numbered". Figure 18-12 shows the results.
Figure 18-12: A bulleted mobile list
ListDataBinding
Like any ASP.NET list, mobile lists also support data binding, which we will cover in the following example. To support data binding, our data source must either implement IEnumerable or IListSource. In the following example, we use an arraylist to build our data source. We could have just as easily used a datareader or datatable as our data source. The following shows the code required to build our arraylist and bind to our mobile list in VB.NET and C#, respectively.
VB.NET:
[listdatabinding.aspx.vb]
Private Sub Page_Load(ByVal sender As System.Object,
ByVal e As System.EventArgs) Handles MyBase.Load
If (Not Page.IsPostBack) Then
Dim al As New ArrayList()
al.Add("Road Bike")
al.Add("Mountain Bike") List1.DataSource = al List1.DataBind()
End If
End Sub
C#:
[listdatabinding.aspx.cs]
private void Page_Load(object sender, System.EventArgs e)
{
if (! Page.IsPostBack) //build datalist
{
ArrayList al = new ArrayList();
al.Add( "Road Bike" );
al.Add( "Mountain Bike" );
List1.DataSource=al;
List1.DataBind();
}
}
First, we check to see if the page has not been posted back to the server. In VB.NET, we actually use the word "Not" as the operator. In C#, we use the "!" as the not operator. If the page has not been posted back, then we build our arraylist. In this example, our arraylist will consist of two strings: "Rode Bike" and "Mountain Bike". Once our arraylist is built, we use it as the list datasource. We set the list datasource by coding as follows: List1.DataSource=al. After we set our datasource, we bind it to the mobile list, by calling List1.DataBind().
Pagination
Often times, we want to send more text to the client or device than what can fit on a single screen. After all, most cell phones are only around 15 characters wide and have 4 to 6 lines for text. Some devices have more room for display, some have less. So, how much text should you show at a time and for what device? Fortunately for us, MIT takes care of this by the way of pagination.
Pagination automatically formats the text to fit the device. By default, pagination is not turned on, or set to true. To turn pagination on, you set the Paginate property of the <mobile:form> control to true, as in the following example:
<mobile:form id=form1 Paginate="true">.
In the following example, we are going to link to two separate forms and display a couple of screens of text. We don't have to worry about where to end one screen and start with the next because pagination will take care of that for us. The following code shows an example of this:
[pagination.aspx]
<mobile:Form id="Form1" runat="server">
<mobile:Label id="Label1" runat="server">Select
a Bike Style</mobile:Label>
<BR>
<mobile:List id="List1" runat="server"
OnItemCommand="SelectBike">
<Item Text="Road Bike" Value="Road"></Item>
<Item Text="Mountain Bike" Value=
"Mountain"></Item>
</mobile:List>
</mobile:Form>
<mobile:Form id="Form2" runat="server" Paginate="True">
<mobile:TextView>
<b>Road Biking</b>
<br>
Road biking is a challenging sport.
There riding on a group ride
can bring your level of riding up a notch.
Especially when riding with experienced riders.
If you want to increase your speed there are
a number of techniques to choose from, including,
aero bars, drafting, intervals, and sprints.
During the winter months it is important to build a good
base for the upcoming summer races. Contact
your local bike shop for classes on spinning during the
off season and group rides during the summer.
</mobile:TextView>
</mobile:Form>
<mobile:Form id="Form3" runat="server" Paginate="True">
<mobile:TextView>
<b>Mountain Biking</b>
<br>
Mountain biking is technically challenging.
Although it does not usually offer the speed that road
biking does, it offers its own set of challenges.
When first mountain biking, it's best to find an easy
trail and to
follow someone that is more experienced than you.
As you are trail riding, be careful to watch out for
rocks, dirt, roots,
and tree branches. Any of these items can
be an obstacle in your path and cause bodily injury.
</mobile:TextView>
</mobile:Form>
In the preceding code, we are presenting our users with our standard form to select either Road Biking or Mountain Biking. When the user makes their selection, the SelectBike function will determine which form to show next. In Figures 18-13, 18-14, and 18-15, we demonstrate this by first selecting "Road Bike" and then viewing our first page of text and then clicking to our next page of text. Pagination occurs automatically because we set Paginate="True" in our <mobile:form> tags.