C# ПІДРУЧНИКИ / c# / MS Press - Msdn Training Programming Net Framework With C#
.pdf
Module 16 (Optional): Using Microsoft ADO.NET to Access Data |
33 |
|
|
|
|
Demonstration: Calling Stored Procedures
Topic Objective
To introduce the demonstration.
Lead-in
In this demonstration, you will see how to call stored procedures both with and without parameters.
*****************************ILLEGAL FOR NON-TRAINER USE******************************
In this demonstration, you will see how to create and call stored procedures with and without parameters.
Run the Visual Studio .NET StoredProcedure project from the following location:
<install folder>\Democode\Mod16\Demo16.3
Tip You can examine the database tables and stored procedures by using the
Server Explorer window Data Connections entries.
To create and execute a stored procedure that returns the product names of all the entries in the Products table, click the Load Product Names button.
Typing a name in the text box that is labeled Enter Product Name allows you to click on the Load Product Data button. This button creates and executes a stored procedure that takes the product name as an input parameter and returns all the fields of that product.
To create and execute a stored procedure that has an output parameter, which gets set to the number of products in the database’s Products table, click the
Get Number of Products button.


Module 16 (Optional): Using Microsoft ADO.NET to Access Data |
35 |
|
|
|
|
Scenario
This lab is based on the Visual Studio .NET Framework SDK Walkthrough: Creating a Distributed Application. In this lab, you will create a multi-tiered, distributed application.
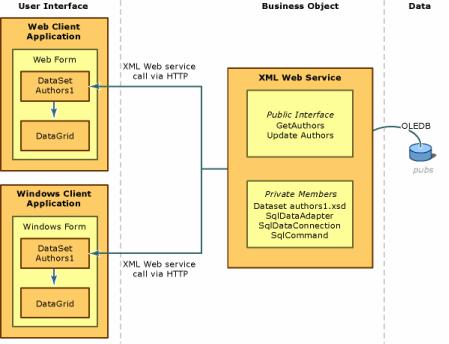
The application consists of three logical tiers: data, business object, and user interface. The data tier is a SQL Server database. The business object tier handles the tasks of accessing the data and distributing it to the clients. The user interface tier consists of a Windows-based application.
You will create the Authors XML Web service and the Windows Client Application. The following diagram shows the architecture of the distributed application:
As part of the distributed application, you will build a simple data application with look-up and update functionality. You will create an XML Web service to retrieve data from the Authors table in the SQL Server Pubs sample database. You will also build a Windows-based client application to display the results of the query by the XML Web service. The communication between the client and the XML Web service is handled by using HTTP and XML.
For this lab, the data has already been generated and is available in the Pubs sample database. Therefore, you will begin by creating the business object, the XML Web service, followed by building the Windows Form user interface.
Estimated time to complete this lab: 60 minutes

Module 16 (Optional): Using Microsoft ADO.NET to Access Data |
37 |
|
|
|
|
6.Find the authors node and expand it to show the fields in the authors table.
7.Using CTRL+Click, select the au_id, au_lname, au_fname, and city fields.
8.Drag these fields from Server Explorer onto the design surface.
A SqlConnection that is paired with a SqlDataAdapter appears in the designer. A connection has now been created to the database, with the transfer of information to be handled by the SqlDataAdapter. These components are configured to move a dataset with the selected fields of the authors table in and out of the database.
! Configure Integrated Windows authentication
1.Start the Internet Information Services tool. It can be run from the Start button, Control Panel, Performance and Maintenance, Administrative Tools.
2.Expand the node for your server.
3.Expand the Default Web Site node.
4.Right-click the node for AuthorsWebService and click Properties.
5.Click the Directory Security tab.
6.Click the Edit button in the Anonymous access and authentication control section, click the Edit button.
7.Clear the Anonymous access check box.
8.Select the Integrated Windows authentication check box. Click OK to return to the AuthorsWebService Properties and click OK again. You have now configured your XML Web service directory.
9.Returning to the project in Visual Studio, in Solution Explorer, doubleclick the Web.config file.
10.Add the following tag on the line after the <system.web> tag to configure integrated security for your XML Web service.
<identity impersonate="true"/>
! Create a dataset class definition
1.In Solution Explorer, double-click the AuthorsService.asmx file to open it in the designer.
2.On the Data menu, click Generate DataSet. In the Generate Dataset dialog box, select New and name the dataset authors1. Do not select the
Add this dataset to the designer check box. Click OK.
Note A dataset schema file, authors1.xsd, is created and added to the project. This schema file contains a class definition for authors1. This class, which inherits from DataSet, contains a typed dataset definition for the authors table.
3.On the File menu, click Save All.

38Module 16 (Optional): Using Microsoft ADO.NET to Access Data
!Add methods to the XML Web service
1.In Solution Explorer, double-click AuthorsService.asmx, if it is not already open in the designer.
2.On the View menu, click Code.
3.Add a method named GetAuthors to deliver a dataset to the client.
This method creates a new authors1 dataset, and fills it by using the SqlDataAdapter that is based on the authors table. The method then returns the dataset:
The following code shows the method:
[WebMethod]
public authors1 GetAuthors()
{
authors1 authors = new authors1(); sqlDataAdapter1.Fill(authors); return authors;
}
4.Add a method named UpdateAuthors to propagate changes from the client back to the database.
This method has an authors1 dataset parameter (authorChanges) that contains the changed data and updates the database through the SqlDataAdapter.Update method. The Update method accepts the changes in the dataset. The dataset is returned to the client. The client then uses this returned dataset to update its own instance of the authors1 dataset.
The following code shows the method:
[WebMethod]
public authors1 UpdateAuthors(authors1 authorChanges)
{
if (authorChanges != null)
{
sqlDataAdapter1.Update(authorChanges); return authorChanges;
}
else
{
return null;
}
}
Note In a production application, you would add error checking and exception handling to these methods.
5.On the File menu, click Save All.
6.On the Build menu, click Build Solution.
7.To test the XML Web service, in the Solution Explorer right-click
AuthorsService.asmx and click View in Browser. In the browser, click
GetAuthors and in the resulting GetAuthors page, click the Invoke button. You should see the list of authors displayed as XML.
Module 16 (Optional): Using Microsoft ADO.NET to Access Data |
39 |
|
|
|
|
Exercise 2
Creating a Windows User Interface
In this exercise, you will create a Windows Forms client application. The application consists of one Windows Form that contains a reference to AuthorsWebService. The data in the database is displayed in a DataGrid control when a Load button on the form is clicked.
To implement the display of data in the DataGrid, you call the XML Web service’s GetAuthors method. The DataGrid control enables direct editing of the data, with changes being passed directly to the underlying dataset.
In addition to a Load button, the form has a save button. The code for this button calls the XML Web service's UpdateAuthors method to save the changes back to the database.
! Create the Windows application
1.Open Visual Studio .NET and on the File menu, click New, and then click Project to display the New Project dialog box.
2.Select Visual C# Projects in the Project Types pane, then select Windows Application in the Templates pane.
3.Name the project AuthorsWinClient.
4.In the Location box, type the name of the Starter folder:
<install folder>\Labs\Lab16\Starter
5.Click OK.
The AuthorsWinClient project is created and Form1 is automatically added to the project and appears in the Windows Forms Designer.
6.Add a reference to the XML Web service project that you created earlier.
a.In Solution Explorer, expand the AuthorsWinClient node, right-click the References node, and on the shortcut menu, click Add Web Reference.
b.In the Address box at the top of the Add Web Reference dialog box, type the following and then press ENTER:
http://localhost/AuthorsWebService/AuthorsService.asmx
This is the location of the XML Web service file of your ASP.NET Web Service project.
c.Click Add Reference.
You can now create an instance of the authors1 dataset in your application.

40Module 16 (Optional): Using Microsoft ADO.NET to Access Data
!Add the controls to the form
1.Drag a DataGrid control from the Windows Forms tab of the Toolbox onto the form.
2.Drag a Button control from the Windows Forms tab of the Toolbox onto the form. Set the button's Name property to LoadData and its Text property to Load.
3.Drag a second Button control from the Windows Forms tab of the Toolbox onto the form. Set the button's Name property to SaveData and its Text property to Save.
4.Drag a DataSet object from the Data tab of the Toolbox onto the form. In the Add DataSet dialog box, select Typed dataset and then select
AuthorsWinClient.localhost.authors1 from the Name list. Click OK.
This action creates a DataSet object in the component tray that is based on the authors1 dataset class definition.
5.Select the DataSet control and set the Name property to AuthorData.
6.Select the DataGrid control and select AuthorData from the DataSource property list. Select authors from the DataMember property list.
The column headings of the DataGrid are set to the Authors table column names.
You may want to adjust the width of the form and the DataGrid control to accommodate all of the column headings. The user can then avoid having to scroll horizontally to view all of the columns in the DataGrid.
!Add code for the LoadData and SaveData buttons
1.On the View menu, click Designer. Double-click the button that is labeled Load to create an empty event handler for the Click event. Add the following code to the LoadData_Click method:
private void LoadData_Click(
object sender, System.EventArgs e)
{
AuthorsWinClient.localhost.AuthorsService ws = new AuthorsWinClient.localhost.AuthorsService(); ws.Credentials = System.Net.CredentialCache.DefaultCredentials; AuthorData.Merge(ws.GetAuthors());
}
XML Web service methods are called by first creating an instance of the service class, and then calling the service methods. In this case, the GetAuthors method is called. The dataset returned is merged with the
AuthorData dataset.
Module 16 (Optional): Using Microsoft ADO.NET to Access Data |
41 |
|
|
|
|
2.On the View menu, click Designer. Double-click the button labeled Save to create an empty event handler for the Click event. Add the following code to the SaveData_Click method:
private void SaveData_Click(
object sender, System.EventArgs e)
{
if (AuthorData.HasChanges())
{
AuthorsWinClient.localhost.AuthorsService ws = new
AuthorsWinClient.localhost.AuthorsService(); ws.Credentials = System.Net.CredentialCache.DefaultCredentials; AuthorsWinClient.localhost.authors1 diffAuthors =
new AuthorsWinClient.localhost.authors1(); diffAuthors.Merge(AuthorData.GetChanges()); ws.UpdateAuthors(diffAuthors); AuthorData.Merge(diffAuthors);
}
}
If there are changes in the dataset, a new dataset of type authors1 is created to hold just the changed data. This dataset is then passed to the XML Web service's UpdateAuthors method. The dataset is returned with the changes accepted, and the AuthorData dataset is updated to reflect these new changes.
! Run the application
1.On the File menu, click Save All.
2.In Solution Explorer, right-click AuthorsWinClient, and click Set as StartUp Project.
3.Press CTRL+F5 to run the application.
A window is displayed that contains an empty table with headers from the authors table in the pubs database.
4.Click Load to populate the table. Make some changes to the data, and then click Save.
You can click Load again to see that the changes that you made were stored in the database. Also, close and reopen the application. The next time you click Load, you will see that your changes have persisted.

