

C# ПІДРУЧНИКИ / c# / Premier Press - C# Professional Projects
.pdf
|
DEPLOYING THE APPLICATION |
Chapter 26 |
|
589 |
||
|
|
|||||
|
|
|
|
|||
Table 26-1 File System Editor Properties for Web Application Folder |
|
|
||||
(continued) |
|
|
|
|
|
|
|
|
|
|
|
|
|
Property |
Description |
|
|
|
|
|
|
|
|
|
|
|
|
IsApplication |
Specifies whether the IIS application root will be created for the |
|
|
|||
|
selected folder |
|
|
|
|
|
LogVisits |
Sets the IIS Log Visits property for the selected folder |
|
|
|||
Name |
Specifies the name for the selected folder |
|
|
|
|
|
Port |
Specifies the port where a Web server is located on the target |
|
|
|||
|
computer |
|
|
|
|
|
Property |
Specifies the named property that can be accessed during installa- |
|
|
|||
|
tion to override the path of a custom folder |
|
|
|
|
|
VirtualDirectory |
Specifies the virtual directory on the Web server where a Web |
|
|
|||
|
application will be installed on the target computer |
|
|
|
|
|
|
|
|
|
|
|
|
Adding the Output of SkySharkDeploy to the Deployment Project
Perform the following steps to add the project output to the deployment project.
1.Select the Web Application folder.
2.Press F4 to open the Properties window. Set the VirtualDirectory property to SkySharkDeploy.
3.Set the DefaultDocument property to default.aspx.
4.In the File System editor, select the Web Application folder.
5.On the Action menu, point to Add and choose Project Output.
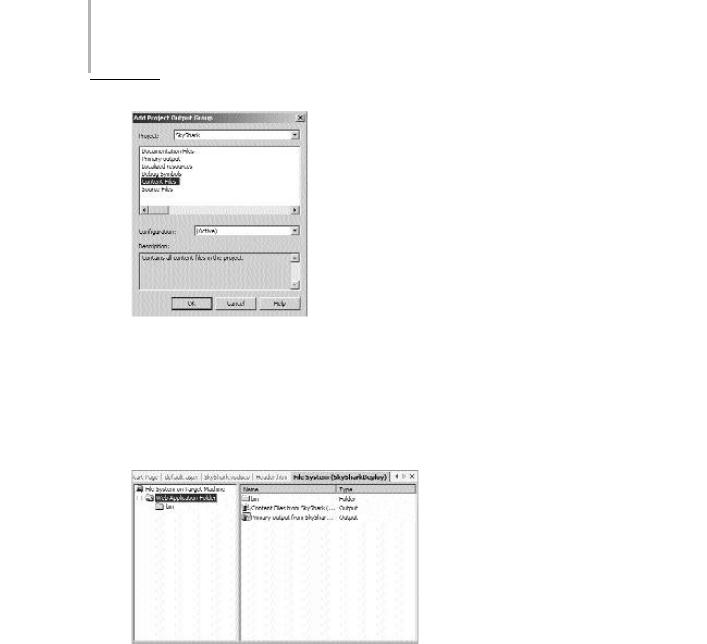
6.In the AddProjectOutputGroup dialog box (refer to Figure 26-5), choose SkyShark from the drop-down list.
590 Project 4 CREATING AN AIRLINE RESERVATION PORTAL
FIGURE 26-5 The AddProjectOutputGroup dialog box
7.Select the Primary output and Content Files from the list and click on OK.
The File System editor is shown in Figure 26-6.
FIGURE 26-6 The File System editor
8. On the Build menu, choose Build SkySharkDeploy.
The SkyShark Airlines application is now ready for deployment. However, the database also needs to be packaged and distributed. For this purpose, you need to

DEPLOYING THE APPLICATION |
Chapter 26 |
591 |
|
|
|
|
|
create a custom action to create the database and associated tables during installation.
You can create a custom action by performing the steps given as follows.
1.Create an installer class.
2.Create a data connection object.
3.Create a text file that contains the SQL statements to create the database and its associated tables.
4.Add code to the installer class to read the text file.
Deploying the Project to a Web Server on Another Computer
The steps that follow describe the procedure to deploy the application to a Web server on another computer.
1.In Windows Explorer, navigate to the project and locate the installer. The default path is \documents and setting\yourloginname\My Documents\Visual Studio Projects\WebDeploy\project configuration \SkySharkDeploy.msi. The default project configuration is Debug.
2.Copy the SkySharkDeploy.msi and all other files and subdirectories to the Web server computer.
3.Double-click on the Setup.exe on the Web server to run the installer.
Summary
Deployment is the process of distributing a ready application or even its component to other computers. Visual Studio .NET provides templates for four different types of deployment projects: Merge Module, Setup, Web Setup, and Cab. Visual Studio .NET provides six deployment editors that enable you to specify the location where files should be installed on a target computer, the registry keys to be added, or any other conditions that need to be fulfilled during installation.
This page intentionally left blank

PARTVIIProfessional Project 5
This page intentionally left blank

Project 5
Creating a Web
Portal for a
Bookstore

Project 5 Overview
A Web portal for a bookstore is an enterprise solution that allows businesses to interoperate. A portal for a bookstore offers users a variety of books from several publishers.Therefore, implementing Web services with the Web portal enables organizations to share their data with each other. For example, publishers can publish their catalog of books on the Web site of the retailer. Retailers, in turn, can share the data of their customers with the publishers. In addition to sharing data across organizations, these organizations share the business objective of achieving success.
Traditionally, customers used to visit a bookstore to buy a book. However, with the advent and increasing popularity of the Internet, customers can now shop for books on the Internet. In addition, book lovers can keep abreast of virtually all newly published books.
In this context, Bookers Paradise, a chain of retailers of books, has planned to launch its Web site.The Web site will display the catalogs of books from various publishers. To display information about books from the publishers, Bookers Paradise has planned to create Web services for each of the publishers.
In the Web portal project, you will learn to develop a complete solution for Bookers Paradise. You will learn to create a Web portal that accesses data by using Web services.In addition,the data displayed on the portal is stored in the SQL databases that act as the back end. The Web portal and the Web services are created by using the
.NET Framework. The language used as the front end will be Visual C# .NET.
In this project, you will learn to create a Web portal for Bookers Paradise. In addition, you will learn to create Web services for two publishers, Deepthoughts Publications and Black and White Publications.
After completing this project, you will be able to appreciate the support that the
.NET Framework extends to create Web services.In addition, you will be able to create an integrated business solution in the form of Web portal. This Web portal can then be customized to meet your business requirements.
