

C# ПІДРУЧНИКИ / c# / Premier Press - C# Professional Projects
.pdf338 Project 3 CREATING A CREATIVE LEARNING PROJECT
|
|
Y |
|
L |
|
|
F |
|
|
M |
|
A |
|
|
E |
|
|
FIGURE 15-2 A TabControl control in the Windows Forms toolbox |
||
T |
|
|
You can now create a tab control for your application. To create a tab control, perform the following steps:
1. Drag a TabControl control from the Windows Forms toolbox to the Creative Learning form.
A blank TabControl control is added to the form. To add pages to the tab control, you need to change the properties of the tab control.
2. Press the F4 key to display the properties of the tab control.
3. In the Properties window, click on the ellipsis button of the TabPages property.
The TabPage Collection Editor page is displayed. This page allows you to add tabbed pages to the control as a Collection object.
4. To add a tabbed page, click on the Add button.
A tabbed page with an index 0 is added to the Members: text box. The properties of the tabbed page are displayed in the tabPage1 Properties: window.
5. In the tabPage1 Properties: window, change the following properties of the tabbed page.
Text: Source Options
Name: tabSource
Team-Fly®
PROJECT CASE STUDY AND DESIGN |
Chapter 15 |
339 |
|
|
|
|
|
When you change the name of the tabbed page to tabSource, the name of the tabPage1 Properties: window changes to tabSource Properties: window.
6.Repeat Steps 4 and 5 to add another tabbed page to the form.
7.Name the new tabbed page tabDest, and change the Text property to Destination Options.
You can change the order in which the tabbed pages are displayed by clicking on either the Up or Down Arrow buttons.
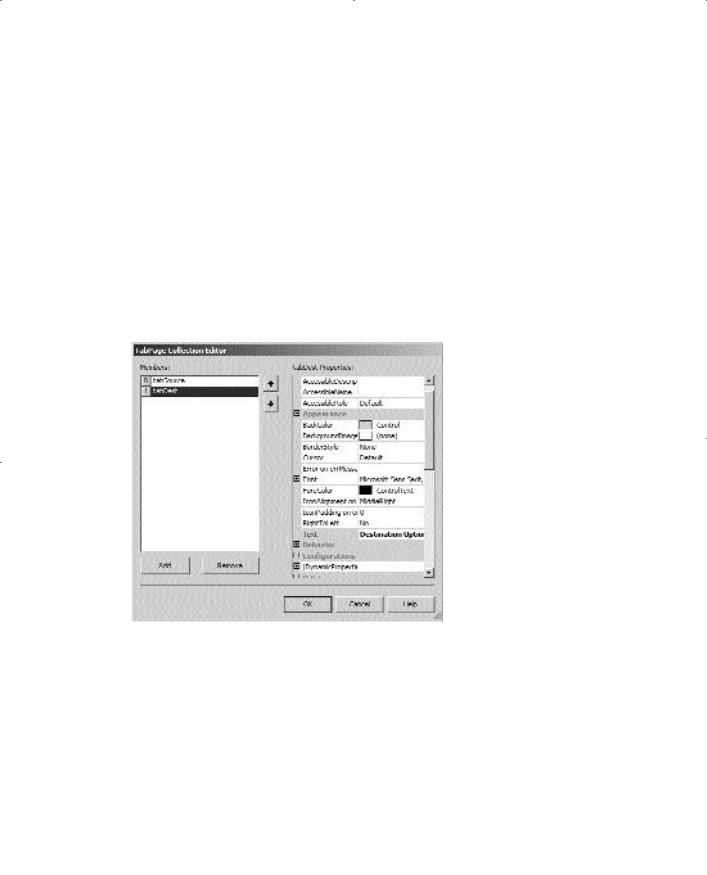
Figure 15-3 shows the TabPage Collection Editor page.
8.Click on the OK button to add tabbed pages.
FIGURE 15-3 The TabPage Collection Editor page
The tabbed pages are added, as shown in Figure 15-4. You can resize the tab control to display the tabbed pages.

340 Project 3 CREATING A CREATIVE LEARNING PROJECT
FIGURE 15-4 The TabControl control added to the Creative Learning form
The tabs in the tab control do not contain an image yet. You can add images to the tabs in the tab control by changing the ImageIndex property in the TabPage Collection Editor page. However, to do this, you first need to add an ImageList control to the Creative Learning form.
The ImageList Control
Visual Studio .NET provides you with an ImageList control that you can use to add images to the controls in a Windows form. These include various controls, such as TabControl, Button, ToolBar, TreeView control, and so on. An ImageList control is a collection of images. You can add images to the ImageList control by using the Images property.
However, to associate an ImageList control to a Windows Forms control, you can change the ImageList property of the Windows Forms control. The ImageList control is present in the Windows Forms toolbox, and to add the control to the form, you must drag the control to the form.
To add an ImageList control to the Creative Learning form, perform the following steps:
1.Drag an ImageList control from the Windows Forms toolbox to the form.

PROJECT CASE STUDY AND DESIGN |
Chapter 15 |
|
341 |
|
|
||||
|
|
|
|
|
An ImageList control with the name ImageList1 is added to the component tray. Figure 15-5 shows the ImageList control added to the component tray of the Creative Learning form.
FIGURE 15-5 The ImageList control added to the component tray of the Creative Learning form
Until now, the ImageList control does not contain any image. To add images to the ImageList control, you need to change the Images property of the ImageList control. When you add images to the ImageList control, the images are added to a Collection object of the control. To add images to a ImageList control in Visual Studio .NET, perform the following steps:
2.Click on the ellipsis button of the Images property. The Image Collection Editor dialog box is displayed.
3.Click on the Add button to add an image to the Members: textbox.
You can browse for the image to add it to the ImageList control. The image that you add is included in the System.Drawing namespace. The index value of the first image that is added is 0. As you add more images to the ImageList control, the index value increases. However, in the case of Creative Learning form, you will add only one image.
4.Click on the OK button to close the Image Collection Editor dialog box.
Figure 15-6 shows the Bitmap image added to the Image Collection Editor dialog box.

342 Project 3 CREATING A CREATIVE LEARNING PROJECT
FIGURE 15-6 The Bitmap image added to the Image Collection Editor dialog box
To add the image in the ImageList control to the TabControl control, perform the following steps:
5.Click on the drop-down button of the ImageList property of the TabControl control.
6.From the drop-down list, select the imageList1 option. imageList1 is associated with the TabControl control.
However, the Bitmap image is not presently visible on the tabbed pages. To display the image on the tabbed pages, you need to modify the properties of the tabbed pages on the TabPage Collection Editor page.
7.Click on the ellipsis button of the TabPages property of the tab control to display the properties of the tabbed pages.
The tabSource tabbed page is selected by default.
8.Click on the drop-down button of the ImageIndex property.
9.From the drop-down list, select the 0 option.
10.Repeat Steps 8 and 9 to add an image to the tabDest tabbed page. The images get added to the tabbed pages.

PROJECT CASE STUDY AND DESIGN |
Chapter 15 |
343 |
|
|
|
|
|
TIP
You can add the same image to all tabbed pages or different images to different tabbed pages in a tab control.
Having created the tabbed pages in the tab control, you can add label controls and text boxes to be displayed on the tabbed pages.
Adding Controls to Tabbed Pages
The tab control that you created contains two tabbed pages, Source Options and Destination Options. You can first add controls to the Source Options page.
The Source Options page consists of a check box control, two label controls, and two text box controls. You can add these controls to the tabSource tabbed page by dragging the controls from the Windows Forms toolbox. Then, change the following properties of the controls.
Label1
Name: label1
Text: Source Directory
Label2
Name: label3
Text: After processing, move source file to:
TextBox1
Name: txtSource
TextBox2
Name: txtProcessedFile

344 Project 3 CREATING A CREATIVE LEARNING PROJECT
CheckBox
Name: optGenerateLog
Text: Generate event log for bad file format
After adding controls to the tabSource tabbed page, the page looks as shown in Figure 15-7.
FIGURE 15-7 The tabSource page with the cont rols added
Similarly, you can add controls to the tabDest page. The tabDest page contains a label, a text box, a list box, a group box, and two button controls. Change the following properties of the controls after adding them to the tabbed page.
Label
Name: label2
Text: Destination Directory
TextBox
Name: txtDest
ListBox
Name: lstEvents

PROJECT CASE STUDY AND DESIGN |
Chapter 15 |
345 |
|
|
|
|
|
GroupBox
Name: groupEventLog
Text: Event Log
Button1
Name: btnRefresh
Text: Refresh Log
Button2
Name: btnViewSummary
Text: View Summary
Figure 15-8 shows the controls added to the tabDest page.
FIGURE 15-8 The tabDest page with the controls added
Low-Level Design
After creating the design of a form in the high-level design phase, the development team creates a detailed design of software modules.These software modules are then used to create a detailed structure of the application. In addition to

346 Project 3 CREATING A CREATIVE LEARNING PROJECT
creating software modules, the team decides the flow and interaction of each module. This includes creating flowcharts for each module.
Based on the high-level design of the Creative Learning form, the development team created the flowchart for the form, as shown in Figure 15-9.
FIGURE 15-9 Flowchart of the Creative Learning module

PROJECT CASE STUDY AND DESIGN |
Chapter 15 |
347 |
|
|
|
|
|
Having decided the interface and the software module, the development team proceeds with the construction and testing of the Windows application. After the application is tested and the errors in the application are detected and removed, the application is deployed at the client site. I will discuss writing the code and deploying the Creative Learning application in the next chapter.
Summary
In this chapter, you were introduced to the project case study. Based on the case study of the project, you analyzed the requirements of Creative Learning and learned to create a detailed high-level and low-level design of the application. You will learn to create and deploy the application in the next chapter.