

Blog Design Solutions (2006)
.pdfB L O G D E S I G N S O L U T I O N S
After this is done, you can safely delete any CSS for #sidebar-1 because you won’t need it again.
What you should see now in the foot are the RSS/Atom links and the TxP logo to the left of the stretchy man’s feet. We want to bring at least some of that in to our design.
We’ll lose the TxP logo for now; we can add a credit somewhere else at a later date if we so wish. We need, then, to find and delete the following XHTML from the foot <div> in our default page template:
<p><img src="textpattern/txp_img/txp_slug105x45.gif" alt="textpattern" /></p>
Looking at the design, we see the RSS/Atom links are not aligned center within the foot <div>, and this is the effect we’re looking for. You will see that there is already text-align:center to be found among the CSS code for #foot; we have a bug! After a bit of searching, I found that it is because of some CSS already in place that is overriding our new CSS:
p, blockquote, li, h3{
font-family: Verdana, "Lucida Grande", Tahoma, Helvetica; font-size: 0.9em;
line-height: 1.6em; text-align: left; padding-left: 10px; padding-right: 10px;
}
We no longer need the text-align:left; in the preceding CSS code, so locate it and delete it, leaving the following:
p, blockquote, li, h3{
font-family: Verdana, "Lucida Grande", Tahoma, Helvetica; font-size: 0.9em;
line-height: 1.6em; padding-left: 10px; padding-right: 10px;
}
The RSS/Atom links are now central, but they are sitting on top of the bottom line of the design. We want to move these links down a little to sit halfway between the two feet of the stretchy man. To do this, we target the <p> tag that contains them and add a little padding, which will push the whole paragraph downward. We do this by adding the following CSS to our styles; add it just under the styles for #foot:
#foot p{ padding-top:40px;
}
256

T E X T PAT T E R N
The end result should look a little something like Figure 6-33.
6
Figure 6-33. The results of all our hard work
Adding a little color to the text
Somewhere near the beginning of the chapter, while we were slicing up Kev’s cartoon, we discussed extracting colors from the cartoon to bring a bit of color to our text. What we’ll do, as we have done all along, is try and preserve as much of the original TxP CSS as possible and simply tweak it a bit to get the colors we want into the design.
If you look at your front page in your web browser and choose View View Source, you see that the site heading is contained within the following XHTML:
<h1><a href="http://mysite.com/">My Site</a></h1>
To target this specific tag, jump to the CSS and look for the following code:
h1 a, h2 a{ border: 0px;
}
257

B L O G D E S I G N S O L U T I O N S
Directly below the code for the h1-a and h2-a, add the following:
h1 a{
color: #99CC99;
}
This is the hex value of a light green I extracted from the cartoon, and I have targeted the anchor (represented by the <a>tag) and not just the heading. Had I simply targeted the heading, the anchor would have stayed its default color, and no change would have been noticeable.
Note that Browse the archive link is already colored red. This is CSS that ships as part of the default TxP design; our link just happens to have inherited it. I planned to pick a red for links from my color palette, but I think this color works well, so I’ll use it for all links.
I need to locate the bit of CSS that relates to the Browse the archive link in the #sidebar-2 <div> and find the color value. Because I’ll apply this style to all anchors, I’ll also delete the code out because I no longer need it. So having noted the color #C00, delete the following from the CSS:
#sidebar-2 a, #sidebar-1 a{ border: 0px;
color: #C00;
}
Then locate the code for all anchors:
a{
color: black; text-decoration: none;
border-bottom: 1px black solid;
}
Changing the color from black to our new red color:
a{
color: #C00; text-decoration: none;
/* border-bottom: 1px black solid; */
}
The preceding code also shows how I chose to comment out the border in this instance and to leave text-decoration:none; in place, which serves the purpose of removing the underline effect of links. This was simply personal choice, but you might want to simply change the border color to match or remove both the border and text-decoration, which would mean all anchors would be underlined.
CSS shortcuts
I just want to stray off topic slightly, even though we don’t have the page space to go into much detail about CSS shortcuts. Because you just used some, though, I thought I should give you a quick side-by-side comparison to see what they are. The CSS currently looks as follows:
258

a{
color: #C00; text-decoration: none;
/* border-bottom: 1px black solid; */
}
That code is full of CSS shortcuts; the long version of the code might look like this:
a{
color: #CC0000; text-decoration: none; border-bottom-width: 1px; border-bottom-color: #CC0000; border-botttom-style: dotted;
}
I think that is pretty self-explanatory (with perhaps the exception of the color value). We can abbreviate hex values in this way: as long as the red, green, and blue hex pairs are the same we can go ahead and abbreviate. Looking back at the color we applied to the anchor on the <h1> tag, therefore, instead of writing it as color: #99CC99; we can abbreviate it to color: #9C9;. Back now to adding the color to our site design: coloring the anchors has had the effect of showing that the heading First post is in fact a link. Don’t click it just yet; we’ll be coming back to it next. Before we move away from colors, let’s sort out the rollover effects for the links.
We need to add a rollover effect to our anchors so that when a user mouses over the link there is a clear indication that it is a link that can be followed. To do that, we add the following just below the CSS you just altered to change the color of all anchors:
a:hover{ color: #FFF;
background: #C00;
}
Click that First post heading and you will be presented with a bit of a mess; even worse, if you’re using OS X you might get a page not found message. Fear not; we can fix all these things with a few quick tweaks under the hood. Choose Presentation Sections and look for the section with the name article, change the Uses page: archive to Uses page: default, and then press Save at the bottom of that section’s settings. Go back to your site, refresh your browser, and all should now be as you would expect. If you scroll down to the bottom of the article, you will even see a comment and a comment form. Go ahead and leave a test comment for yourself.
Page not found?
If changing the page the article section uses hasn’t finished the job and you are getting a page not found message, you need to make one of two changes.
T E X T PAT T E R N
6
259

B L O G D E S I G N S O L U T I O N S
Messy permanent link mode
This is the simplest and quickest way to solve your page-not-found problem, and if you find yourself working with TxP on a host that doesn’t support the use of an .htaccess file (see the install notes at the beginning of this chapter), it is your only option. Open up the admin tab; in the preferences find the drop-down menu titled Permanent link mode and change it to ?messy. Scroll to the bottom of this page and press Save. Now when you refresh your site and try the link, you’ll see a URL along the lines of http:// localhost/index.php?=1. Although it solves the immediate problem, it means that a little bit of extra TxP knowledge is needed further down the line.
For example, with this option turned on, the link to Browse the archives will not work. To fix it, open up your template_head form, find the code for this link, and change it as follows:
<!-- right -->
<div id="sidebar-2">
<p><a href="?s=archive">Browse the archive</a></p> </div>
You should now be able to browse your archives like everyone else.
To keep life simpler in the long run, we can tell Apache to allow the .htaccess file to work.
Modify the httpd.conf file
In Chapter 2 you set up your development server and you made a few adjustments to the httpd.conf file. You need to locate it again and open it up in your favorite text editor.
I just want to mention at this stage that I am no Apache guru—far from it—and when I first hit the page-not-found problem, I wasn’t too sure why it was happening. Putting TxP into messy URL mode gave an indication that it probably had something to do with the
.htaccess file not working as it should. A little bit of Googling lead me to fellow author Richard Rutter’s excellent blog, in which I found an article explaining that OS X (the most likely platform to experience this problem) does not allow .htaccess by default. The moral of the story? Most problems are a quick Google search from being solved.
Anyway, to the specific fix. With your httpd.conf file open you need to do a find for AllowOverride None. Find is usually done by pressing Ctrl+F (or Apple+F on a Mac). We are searching for two of these statements and change them to AllowOverride All, the first being at about line 377:
#Each directory to which Apache has access
#can be configured with respect
#to which services and features are allowed and/or disabled in that
#directory (and its subdirectories).
#
#First, we configure the "default" to be a very restrictive set of
#permissions.
#
260

<Directory />
Options FollowSymLinks AllowOverride All
</Directory>
The second is at about line 406:
#This controls which options the .htaccess files in directories can
#override. Can also be "All", or any
#combination of "Options", "FileInfo",
#"AuthConfig", and "Limit"
#
AllowOverride All
When you have made these changes, you must restart your server and refresh the site in your browser for them to take effect.
What you should now see when you follow the Browse the archive link is a TxP-branded 404 page (the template for which can be found in Pages error_default), which indicates that our modifications have been successful. But we are still missing an actual archive section, so the next step is to create a simple archive purely with the tools available by default in TxP.
Creating an archive section and page template
Creating a section will take you just a few clicks. Choose Presentation Sections and right there at the top you will see a text input and a Create button. In this case, we want to create an archive section, so tap the word archive (all lowercase) into the text area and press Create. After the page has reloaded, scroll down and you will see it there—job done! Figure 6-34 shows the process.
T E X T PAT T E R N
6
Figure 6-34. Creating the archive section
If you visit your site and click the Browse the archive link that you created a little earlier, you should now be taken through to the archive section that will, at this stage, just contain Kev’s cartoon man holding his paper and the My Site heading. It won’t take us long to sort this out, though. We’ll cover some key TxP theory along the way.
261
B L O G D E S I G N S O L U T I O N S
Page template and TxP forms
We’ll take the long route to a page template, but in doing so I’ll introduce you more thoroughly to TxP forms (found under Presentation Forms). When you come to building bigger TxP sites, planning and forms are your very best friends and make updating that much simpler.
What you’ll do is take a copy of the default page template and modify it slightly to create the archive page template. Before you do that, though, you’ll create a set of forms allowing the two page templates that will result from this exercise to share code common to them both.
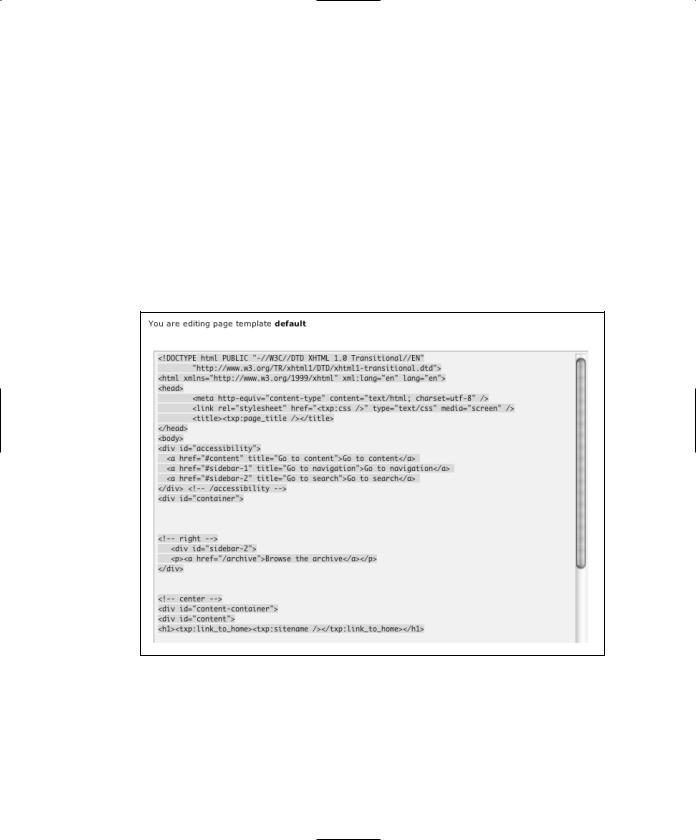
Jump to your default page template, as shown in Figure 6-35. From the very first line (starting with <!DOCTYPE html PUBLIC "-//W3C//DTD XHTML 1.0 Transitional//EN") highlight by dragging the cursor over and all the way down to the line that ends with the </h1> tag. Copy this text to your clipboard (Ctrl+C or Apple+C on a Mac).
Figure 6-35. The contents of the template_head form
Select Presentation Forms and find the link that says Create new form. Click it and you’ll see a blank text area. Paste the code you copied to your clipboard into the text area (Ctrl+V or Apple+V on a Mac). Now scroll down a little and find the text input titled Form name (required) and call this form template_head. Below that is a drop-down options menu titled Form type (required); choose misc from the list and select Save new. Look on
262

T E X T PAT T E R N
the right side of the page after it reloads; you should now see your template_head in the list, probably at the bottom.
Go back to your default page template and select all the code from and including the line that starts with <txp:if_individual_article> and highlight everything right down to the end. Repeat the process as you did to create a form, but this time name it template_foot. Again, your new form should appear in the list on the right when you’re done.
Let’s just review before we do anything drastic. Your template_head should contain the following code:
<!DOCTYPE html PUBLIC "-//W3C//DTD XHTML 1.0 Transitional//EN" |
|
"http://www.w3.org/TR/xhtml1/DTD/xhtml1-transitional.dtd"> |
|
<html xmlns="http://www.w3.org/1999/xhtml" xml:lang="en" lang="en"> |
|
<head> |
|
<meta http-equiv="content-type" content="text/html; charset=utf-8" |
|
/> |
|
<link rel="stylesheet" href="<txp:css />" type="text/css" |
|
media="screen" /> |
6 |
<title><txp:page_title /></title> |
</head>
<body>
<div id="accessibility">
<a href="#content" title="Go to content">Go to content</a>
<a href="#sidebar-1" title="Go to navigation">Go to navigation</a> <a href="#sidebar-2" title="Go to search">Go to search</a>
</div> <!-- /accessibility --> <div id="container">
<!-- right -->
<div id="sidebar-2">
<p><a href="/archive">Browse the archive</a></p> </div>
<!-- center -->
<div id="content-container"> <div id="content">
<h1><txp:link_to_home><txp:sitename /></txp:link_to_home></h1>
And your template_foot should contain this:
<txp:if_individual_article> <p>
<txp:link_to_prev><txp:prev_title /></txp:link_to_prev> <txp:link_to_next><txp:next_title /></txp:link_to_next> </p>
</txp:if_individual_article> <txp:if_article_list>
<p>
<txp:older>Previous</txp:older>
<txp:newer>Next</txp:newer>
</p>
263

B L O G D E S I G N S O L U T I O N S
</txp:if_article_list> </div>
</div>
<div id="foot"> <p>
<txp:feed_link label="RSS" /> / <txp:feed_link label="Atom" flavor="atom" />
</p>
</div>
</div>
</body>
</html>
If that is what you see, go back to your default page template, scroll to the bottom of that page, find the text input titled Copy page as:, type default_backup into that field, and press the Copy button. This gives you something to come back to if any of these form modifications go wrong and you need to start over.
You should still see at the top of your page the words You are editing page template default and from this template delete all the code except the <txp:article /> tag. Now you have one line of code, you need to pull those forms you just created to recover your design.
On the left of the page template text area is a list of useful tags. Scroll down to the set of links with the heading Miscellaneous and there you’ll see an Output form link. Click it, and a pop-up window with a drop-down menu of form options and a Build Tag button displays, as shown in Figure 6-36.
Figure 6-36. Building a tag with the help of TxP
264

T E X T PAT T E R N
Select template_head from the list and press Build Tag; then copy and paste the resulting tag into your default page template above the <txp:article /> tag. Paste it below the <txp:article /> tag, too, so you will have the following:
<txp:output_form form="template_head" /> <txp:article />
<txp:output_form form="template_head" />
Obviously, we don’t want the template_head twice, we need the template_foot, too, so edit the bottom tag accordingly, leaving the following:
<txp:output_form form="template_head" /> <txp:article />
<txp:output_form form="template_foot" />
Press Save to update the site and pop to your browser, making sure that you are on the homepage as opposed to the archive page. Press Refresh and everything should be as it was before—nothing has changed on the surface, but things just got a little more flexible, as I will demonstrate in a moment.
6
Let’s go straight ahead and create a new page template to use for the archive section. In fact, because we quite casually created our backup of the default page earlier, we already covered how this is done—but let’s do it again anyway:
Making sure that the heading for the page template reads You are editing page template default, scroll down below the text area until you come to the text input titled Copy page as. Type myarchive into the text area and press Copy; it should appear on the list to the right. You now have an exact copy of your default template.
Click the myarchive link so the heading above the template reads you are editing page template myarchive and we can add our code to make the archive work.
A note of caution: always check the heading before you start editing templates |
|
to be sure you are editing the right one and always make a local copy as a text |
|
file or HTML file before you begin editing a template. I have been caught out on |
|
more than one occasion editing the wrong template and then pressing Save |
|
before realizing too late that the damage was done. |
|
Archive |
|
Re |
|
/> |
|
but |
. |
To |
Site |
|
-up |
265