

Blog Design Solutions (2006)
.pdfB L O G D E S I G N S O L U T I O N S
Showing data inside the {exp:weblog:entries} tags
Remember creating/editing some custom entry fields earlier (“Define custom blog fields,” steps 1–10)? Now you will add some EE variables inside the {exp:weblog:entries} tags to show the data.
Field name variables
To add a field to a template, you use a tag with the same name as the field, like so: {fieldname}. So, for example, adding the {summary} field name variable will show the contents of the Summary field from the selected blog. If when you edited that Custom Entry Field you selected XHTML for Default Field Formatting, you leave it as is. If you opted for no formatting, you could add paragraph tags to the variable:
<p>{summary}</p>
1.Remember the My Mood Today field you created in steps 1–10? You gave it the field name mood, so show it as follows:
<p><strong>My mood today:</strong> {mood}</p>
What if you sometimes don’t fill that field in? Perhaps you’ll leave that field blank when you write a new article and you consider it an optional piece of information.
2.If you don’t want to display fields when they have been left empty for a particular blog entry, you’ll also need to remove the related markup. To do this you add a conditional that checks to see whether that field is empty in the database:
{if mood != ""}<p><strong>My mood today:</strong> {mood}</p>{/if}
Here the {if} statement contains a comparison operator (the != bit), which stands for “not equal to” and tests to see whether the mood field is not empty (the "" bit). If it’s empty, the code enclosed within the {if} statement will be ignored, so the mood information will not be displayed. Similar syntax can also be used to see whether a value is equal to another and produce a particular result based on that. If this excites you, go grab a good PHP book and check out the possibilities of comparison operators.
Place this code in the index template just below the {body} tag and remove the {extended} tag. Remember that you removed this field earlier in the chapter so there is now no need for its tag.
Some key {exp:weblog:entries} variables
There are quite a few key variables in use here, placed into the template by the EE chaps. Their aim is to provide you with all major variables so all you have to do is remove the ones you don’t need.
136

E X P R E S S I O N E N G I N E
{date_heading}
The {date_heading} tags display the dates that entries were published. However, again, EE has a clever trick to pull out of the bag here. If two or more are published on one date, that date will only show once, above the latest entry. Next time an article is published on a different date, it will show the new date above it. EE date formats use standard PHP date variables http://uk.php.net/date, and are customized by editing the %d,%m,%y variables and similar.
{date_heading}
<div class="date">{entry_date format=' %l, %F %d, %Y'}</div> {/date_heading}
Data variables |
4 |
The {title} variable is, as you expect, the title of the entry. Note the path variable in the hyperlink. You’ll learn about those in a short while.
<h2>a href="{title_permalink=weblog/index}">{title}</a></h2>
Change the weblog link to blog, so you’re using this blog’s title. You’ll be doing this throughout this section:
<h2>a href="{title_permalink=blog/index}">{title}</a></h2>
Custom entry field variables
By default, EE templates show the original field variables that are created with the blog.
1.Remember that you deleted the {extended} field earlier.
2.You only need {summary} in the index template because you’ll show the full entry when you click through to the more template.
{categories}
The posted section performs a few tasks. If you were building a site allowing users to sign up for whatever reason or if you wanted to link to your User Profile, you’d use the link as shown in the {categories} section.
The {categories} tags list all categories in which the article was archived on submission and uses another path variable to create a link that will append the category ID to the URL to make your index template show only entries from that category.
Posted by <a href="{profile_path=member/index}">{author}</a>in {categories}<a href="{path=SITE_INDEX}">{category_name}</a> {/categories}
For your blog, remove the author link code because users will know whose blog they are visiting.
137

B L O G D E S I G N S O L U T I O N S
Conditionals
Next, you’ll see more EE conditionals. The {if allow_comments} conditional checks to see whether you are accepting comments for the article; if you are, it will execute the code within, showing the total comments so far and adding a link to the more template. You’ll learn a couple of tricks later to make this part work better for you.
{if allow_comments} ({comment_total})
<a href="{url_title_path="blog/more"}">Comments</a> {/if}
Pagination
The {paginate} variable looks at how many articles you have set in the {exp:weblog:entries} limit parameter and creates a Google-style set of page links (Page 1 of 4: 1|2|3|4, etc.):
{paginate}
Page {current_page} of {total_pages} pages {pagination_links} /paginate}
If you set the limit parameter to show five entries, after the fifth this tag will create links to the next page(s) of five, adding a variable to the URL to offset entries on the index template. See, this one template is starting to do a lot of work.
Path variables
The default template install misses a few of the tricks that make EE great, and now is a perfect time to make use of some of them. Path variables are a great feature that the EE documentation needs to make a bigger meal out of. Essentially, you’ll never have to type your full URL with path variables. The following variable will substitute http://localhost/ index.php:
{path="SITE_INDEX"}
Now this is great. When you finally move the site to a live web server or if you ever move to another server, all you need to do is change the paths as defined in General and Weblog Preferences.
You can add the template group and template name you specify, and this will automatically include your base site path.
{path=template_group/template}
The preceding variables can be used anywhere and are particularly useful for navigation.
138

E X P R E S S I O N E N G I N E
Furthermore, if you use the following tag to link to your more template, EE will be sure to add the title of the entry to the URL. The URL title is created automatically when you publish an article, with some clever EE code-smithery replacing spaces and irregular characters with dashes or underscores via the medium of PHP:
{title_permalink="blog/more"}
That actually renders as http://localhost/index.php/blog/more/my_article_title.
Smarter conditionals
If you have data in the {body} field of an article, you create a link to the more template to
show it, but it is worth adding a bit more flexibility here. I suggest that you prepare your 4 template as follows:
1.If you need to use only the {summary} field, and there is nothing extra to show on the more template, add a conditional to see whether {body} is empty; if so, the link will be removed.
2.Remember the {if} statement you used earlier to check whether {mood} was empty or not? Here, you use a similar statement for {body}, wrapped around the {title} variable. It has to be used twice so that both parts of the link markup are conditional:
{if body != ""}
<a href="{title_permalink="blog/more"}">{/if}{title}{if body != ""} </a>
{/if}
Replace the code that displays an <h2> version of the title:
<h2 class="title">
<a href="{title_permalink=weblog/index}">{title}</a> </h2>
Using this code can prevent users from viewing the article on its own and deny access to any other features you might provide on the more template. It is ideal for short posts, quick links, or stuff that’s not that important to you.
Smarter comment totals
In the default template is the following code:
{if allow_comments}
({comment_total}) <a href="{url_title_path="weblog/comments"}"> Comments</a>
{/if}
139

B L O G D E S I G N S O L U T I O N S
That is fine, but what if there are no comments or only one? Wouldn’t it be better to have it say “No comments” rather than “0 comments”, or “1 comment” rather than the terrible “1 comments”. Instead, you use {if} conditionals to test whether {comment_total} is less than, greater than, or equal to one, and show the appropriate result:
{if allow_comments}
{if comment_total < 1}no comments{/if} {if comment_total == 1}
<a href="{title_permalink="blog/more"}"> 1 comment</a> {/if}
{if comment_total > 1}
<a href="{title_permalink="blog/more"}"> {comment_total} comments
</a>
{/if}
{/if}
Notice also that EE allows {if} statements inside {if} statements. You first test to see whether comments are allowed and then test for the quantity inside that.
Sort out the sidebar
By default, EE puts certain tags into the sidebar <div> that you won’t need for this tutorial. Because you are building a personal blog, you need to remove the following conditional aimed at checking whether a user is logged in or not:
<h3>Members</h3>
<ul>
the conditional code
</ul>
Showing your category list
Next, the categories you defined earlier are called in to the sidebar. The {exp:weblog:categories} tag requires the blog to be defined, and by adding the style="nested" parameter, EE will automatically create an unordered list, indenting child categories inside their own list(s). The great thing here is that this type of list is semantic, and you can define multilevel list styles later to control each list. In the following snippets, note that the paths have been pointed to your blog template group:
<h3>Categories</h3>
{exp:weblog:categories weblog="{master_weblog_name}" style="nested"} <a href="{path=blog/index}">{category_name}</a>
{/exp:weblog:categories}
Also, you can add show_empty="no" to the {exp:weblog:categories} code to show categories only after they contain at least one article.
140

E X P R E S S I O N E N G I N E
Using article titles as headlines
Now this is where you can start to define exactly what you want to show in the sidebar. Use {exp:weblog:entries} tags to show a set number of headlines from your blog:
<h3>Most recent posts</h3> <ul>
{exp:weblog:entries orderby="date" sort="desc" limit="15" weblog="{master_weblog_name}"}
<li><a href="{title_permalink=blog/more}">{title}</a></li>
{/exp:weblog:entries}
</ul> |
|
Note that here you do need to add unordered list markup. The <ul> and </ul> tags come |
4 |
outside of the {exp:weblog:entries} tag to avoid being looped. The <li> </li> tags are |
|
within, and they will be multiplied however many times you specify in the limit parameter. |
|
Using parameters, you can show the most commented articles using the orderby= |
|
"comment_total" parameter. For a full list of available parameters, see the User Guide |
|
(www.pmachine.com/expressionengine/docs/templates/weblog/parameters.html). |
|
So, the index template should be working a bit harder for you now, and the concept of EE |
|
tags should be clearer. The final thing to do is change all the links to the weblog blog to |
|
links to the blog blog, as you have done with all the examples so far. After that, index is |
|
complete as a template, and you need not do anything else to it. Still, there must be a few |
|
sections of the code that you want to use on other pages or might need to edit later on. |
|
It’s time to consider embeds. |
|
Make it easier with embedding
After you are happy with the index template, you can think about turning some of the chunks into embeds—blocks of code that can be included in other pages and make sitewide editing much easier.
Embed the main navigation
I guarantee that you’ll want to change your main navigation menu regularly. Perhaps you’ll want to link to your new photo galleries section or maybe change the order of the nav items. This can be a real pain in the markup, so having your main navigation exist as an embedded template makes great future-thinking sense. Later in this section you’ll make the actual menu more dynamic, and when you do, you’ll be glad you only need to change the one file. Here’s how to create the embed:
1. Select Templates from the main menu.
2. Click Create a New Template Group and create a group called includes.
3. Do not duplicate a group nor make the index template your homepage. Just give the group a name and submit.
141

B L O G D E S I G N S O L U T I O N S
4.Next, create a new empty template in the include group and call it main_nav. This empty template will soon power the main menu on every page.
5.Go back to the blog/index template, and find the following menu code:
<div id="nav_wrapper"> <div id="nav_header">
<ul id="primary">
<li><a href="{homepage}" class="current">Home</a></li>
(all nav links)
<li><a href="#">Spare 2</a></li> </ul>
</div>
</div>
6.Copy that code and type the following in its place:
{embed="includes/main_nav"}
7.Save the blog/index template.
8.Navigate back to your new includes template group, and open main_nav.
9.Paste the menu code you copied a few moments ago into it and save the template (save Figure 4-13). You have just created your first embed.
Just think, you can now edit the main menu for every page that has the {embed="includes/main_nav"} marker. Thus, if you need to rename a menu tab, add another, or change a path, you only need to edit the includes/main_nav template.
Figure 4-13. Your new main_nav template
142

E X P R E S S I O N E N G I N E
Use your <head>?
Some EE users turn all the <head> information into an embed, which can be very useful, but be aware that you might need to redefine the <title> element on subsequent pages. So, you leave <title> and anything else that might not be the same on every template and make an embed of the following head data:
<meta http-equiv="Content-Type" content="text/html; charset={charset}" />
<link rel='stylesheet' type='text/css' media='all' href='{stylesheet=weblog/weblog_css}' />
<style type='text/css' media='screen'>@import |
|
"{stylesheet=weblog/weblog_css}";</style> |
4 |
|
|
Then, if you want to change the CSS reference, add metadata, a link to external JavaScript, |
|
or anything else, you can still edit the embed to inform all your EE pages in one move. |
|
Your <head> will then look more like this: |
|
<head> |
|
<title> |
|
{exp:weblog:info weblog="{master_weblog_name}"} {blog_title} |
|
{/exp:weblog:info} |
|
</title> |
|
{embed="includes/head"} |
|
</head> |
|
A bit on the side |
|
Now that you’re coming to grips with embeds, you should add an embed to your sidebar |
|
<div>. |
|
1. Create a blank template called sidebar in your includes group |
|
2. Add {embed="includes/sidebar"} somewhere in the sidebar <div>, which will |
|
allow you to add content to every page’s sidebar if you need to flag something up. |
|
Later, you could use this embed to show the latest images added to your Image |
|
Gallery. |
|
That’s it! Your index page is now complete. The full code for the revised index page is |
|
available to download from www.friendsofed.com. Let’s leave the index page now, and |
|
start building the rest of the blog. |
|
143
B L O G D E S I G N S O L U T I O N S
More page
Before you start creating other templates, you need to create your blog/more template. The more template will show your entire article, combining all the data from your Custom Entry Fields into one seamless entry.
Open the blog group, and you will see a menu of five options next to the group name.
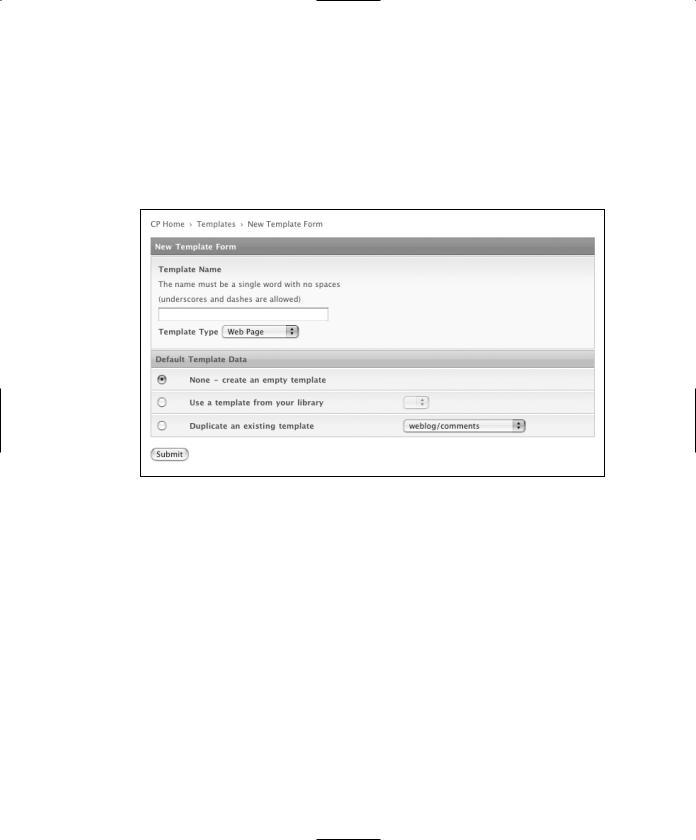
Click New Template and you’ll get some juicy options (see Figure 4-14).
Figure 4-14. Create new templates
Name the new template (more). By default, EE will show Template Type as Web page on the drop-down menu.
Rather than create an empty template, select Duplicate an existing template, and from the drop-down menu, select weblog/index.
Submit it, and EE will automatically place a clone of that template in your blog template group, called more.
1.Remove the login code as you did in the index template.
2.Replace the same code you removed from the index template with the same embeds—that’s main_nav, sidebar, and any others you created earlier. For example, all the navigation links will be replaced with {embed="includes/main_nav"}, and you’ll insert {embed="includes/sidebar"} in the sidebar just as you did on the index template.
144
E X P R E S S I O N E N G I N E
3.Also, you need to reflect your Custom Entry Fields on the more page between the {exp:weblog:entries} tags, so add {mood} plus your {body} field below the {summary} field, thus creating a full article.
4.Remove some of the extraneous tags that EE places between the {exp:weblog:entries} tags, such as the path link around the title, as you are already on the page, and the member profile_path around the {author} variable. The code to remove is bold in the following listing:
<h2 class="title">
<a href="{title_permalink=weblog/index}">{title}</a> </h2>
{summary}
{body} 4 {extended}
{if mood != ""}<p><strong>My mood today:</strong> {mood}{/if} <div class="posted">
Posted by <a href="{profile_path=member/index}">{author}</a> in {categories}
<a href="{path=SITE_INDEX}">{category_name}</a> {/categories}
<br />
{if allow_comments}({comment_total})
<a href="{url_title_path="weblog/comments"}">Comments</a> •
{/if}
{if allow_trackbacks}({trackback_total})
<a href="{trackback_path="weblog/trackbacks"}"> Trackbacks
</a> • {/if}
<a href="{title_permalink=weblog/index}">Permalink</a>
</div>
Note that the {exp:weblog:entries} tag has only one parameter, limit="1", because you need to show only the selected article, and the URL will inform the page which article to show. Make sure that any paths specified point to the correct template group and template (blog/index or blog/more). Again, the full code is available from www.friendsofed.com.
145