

Blog Design Solutions (2006)
.pdfB L O G D E S I G N S O L U T I O N S
Integrating with TxP
This is the bit where it is all supposed to look well organized; where I take you through each step of getting this design to work in TxP with military precision, making it look like the well-planned job of a true professional. But what really happened before I started writing? Well I fiddled, and tweaked, and then fiddled some more, broke it a bit, and retraced my steps to fix the breakage. Basically, I made it up as I went along (I really do enjoy doing things this way, especially when it’s all so new). As long as you take the time to review what went wrong and learn from your mistakes, this can be the most fun way to do it. Kids tend to do things this way, and hey, how happy are kids?
Let’s not reinvent the wheel, though; as I have explained there is more to the default TxP design than meets the eye. All the information architecture is done for us, so all we need to do is add our design on top of it to make it our own.
Built-in code editing
TxP allows you to edit the CSS and Page templates using its built-in editors located under the presentation tab. Personally I prefer to use an external editor such as Dreamweaver because it gives me the option of undo, find and replace, line numbers, and code coloring. I also find it much easier to work with the code this way.
During the walkthrough of this build, that is the way I’ll do it: cutting and pasting between my external editor and the relevant TxP interfaces. It is up to you how you do it, of course, and it is perfectly possible to edit directly in TxP. What is more important than how you decide to edit your code is to remember to press Save at the bottom of the page after you finish editing in TxP. It’s easy to forget and can lead to much head-scratching as things fail to work.
Live design
At this stage, all we have is Kev’s cartoon. Actually, that’s all we need because the rest of the design is done purely via XHTML and CSS. We are, for want of a better term, going to go through a live design process.
The slicing of the image we’ll come back to shortly, but first let’s go and explore to see what we have in the way of XHTML to play with. Before we can plan how we will incorporate the cartoon using CSS, we need to know the ids and classes of XHTML elements and where they are in the structure of the page.
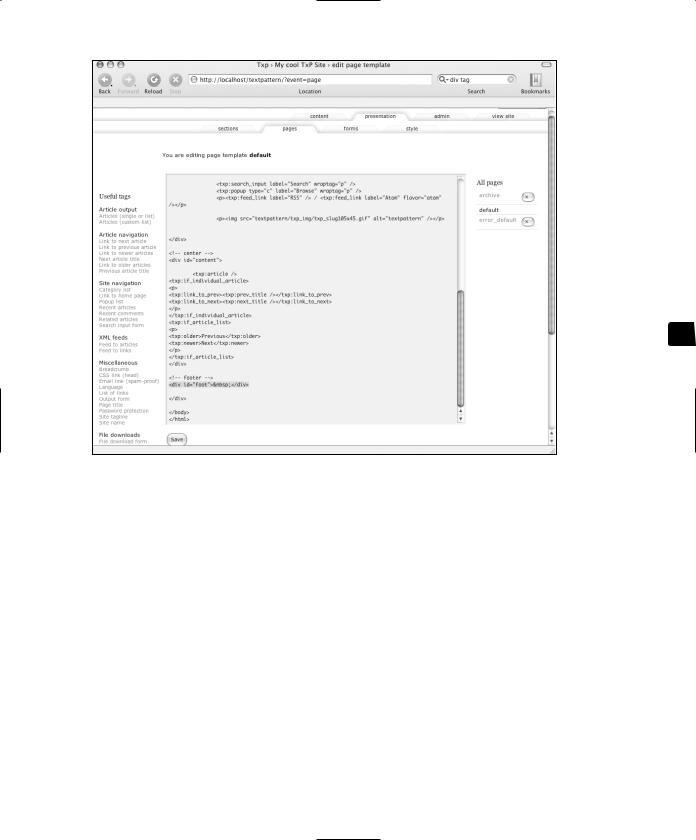
In the TxP back end, navigate to Presentation Style and you should see a sentence on the left that says you are editing CSS default.
Let’s jump straight in and make some tweaks, I’ll discuss the end result once we are done. Change the following:
#sidebar-1{ float: left; width: 150px;
236

T E X T PAT T E R N
\width: 150px; w\idth: 150px; margin-right: 5px; padding-top: 100px;
}
to:
#sidebar-1{ border:1px solid red;
}
Do the same to #sidebar-2 and #content, so we end up with this:
#sidebar-2{
border:1px solid blue;
}
and this:
#content{ 6 border:1px solid green;
}
Add a black border to the #container <div>:
#container{
border:1px solid black; width: 760px;
\width: 770px; w\idth: 760px; margin: 10px; margin-left: auto; margin-right: auto; padding: 10px;
}
We want to remove the right alignment from the #sidebar-1 paragraph, so find the following code and delete it:
#sidebar-1 p{ text-align: right;
}
Finally there is a <div> called #foot that also needs a border added:
#foot{
border:1px solid yellow; clear: both; margin-top: 5px; text-align: center;
}
237

B L O G D E S I G N S O L U T I O N S
Remember to press Save at the bottom of the style page when you are done.
Admittedly, if you look at the site now it’s not the prettiest layout, but you did it to give a strong visual clue about how we’ll set about getting Kev’s cartoon in place.
It’s time to start tweaking the default page template. But wait, what is this <div> I talked about?
The div tag
XHTML <div> tags are simple containers for content, a bit like real-world boxes in which you store stuff. Unlike other elements that attempt to define the nature of the content contained within them, such as a paragraph (<p>) tag or a Level 1 heading (h1) tag, a <div> tag does not describe the nature of its contents at all. In this respect it is very much a blank canvas and therefore extremely useful. It is the norm to add an id or class attribute, or both, to a <div> to give some meaning to the contents it contains and to target it reliably with CSS.
As you have seen in the previous code, the TxP developers gave us a <div> tag with the id of foot (or <div id="foot"> as it appears on the page template) to let us know that the contents of that <div> tag belong at the foot of the page, as highlighted in Figure 6-24.
When naming a <div> tag using an id or class, you should always try and describe the nature of the content as opposed to the visual aspects of the <div> tag. For example <div id="foot"> is slightly better than <div id="greenBar"> because the id foot makes some attempts to explain the contents of the <div> tag, whereas the id greenBar, we assume, tells us instead something about its visual nature. Let’s suppose you get fed up with green and change the actual color to red via the CSS; the id then becomes both meaningless and confusing because there is no longer a green bar present on the site.
I did say the id foot was only slightly better, though, and for this reason: The foot id works only because it relies on our understanding of what tends to go at the foot of most sites (copyright notices, back to top links, and so on). However, it is still questionable how sound it is, semantically speaking, because it describes the physical location of the <div> tag as opposed to its actual contents. Who knows, for some reason we might want to move the foot to the top of the page in the future (visit http://csszengarden.com to see plenty of examples of this sort of practice), rendering the id meaningless and confusing. What should we call it then? Well, there is no right answer but, although we will keep at as foot throughout this chapter, I have a tendency to call the <div> tag containing copyright notices and so on <div id="site-info">. Here’s betting there are plenty of people who would disagree with that choice, though, and have their own ideas about the correct name.
The subject of semantics can and should absorb a bit of your time, and everyone has slightly different ideas, (although most agree on the core principles). Try not to lose sleep over it; this is your blog and as long as you understand what the <div> ids describe, that’s what really matters for now.
238
T E X T PAT T E R N
6
Figure 6-24. The foot <div> tag
And the difference between ids and classes? An id is unique, a bit like you, and must appear only once on any given page, whereas classes can appear as many times as you like.
So, that, basically, is a <div> tag. Let’s move swiftly on, shall we?
Modifying the page template
We’ll inherit most of the functionality present in the default page template, we are simply going to shift it around a little. So move out of Presentation Style and head to
Presentation Pages. You will see a sentence that says You are editing page template default. This is the code you are going to edit.
This step will probably be the most tricky part of the whole process, so take your time. Before you start, you might also want to copy and paste the entire page template into your favorite editor and save it as something like pagecode.txt so that you have a backup should it all go wrong.
239
B L O G D E S I G N S O L U T I O N S
The first job is to move the sidebar-1 <div> tag underneath the content <div> tag, so highlight and cut the following code:
<!-- left -->
<div id="sidebar-1"> <txp:linklist wraptag="p" />
</div>
Then scroll down a little until you find the following:
</txp:if_article_list> </div>
<!-- footer -->
<div id="foot"> </div>
Between the closing </div> and the opening foot <div> tags, paste the sidebar-1 code:
</txp:if_article_list> </div>
<!-- left -->
<div id="sidebar-1"> <txp:linklist wraptag="p" /> </div>
<!-- footer -->
<div id="foot"> </div>
The next job is to move the TxP logo and the RSS/Atom links into the foot <div> tag. Find <div id=" sidebar-2">, locate the code that follows, and highlight and cut it to your clipboard:
<p><txp:feed_link label="RSS" /> / <txp:feed_link label="Atom" flavor="atom" /></p>
<p><img src="textpattern/txp_img/txp_slug105x45.gif" alt="textpattern" /></p>
Scroll down to <div id="foot">, delete the and paste the preceding code in its place:
<!-- footer --> <div id="foot">
<p><txp:feed_link label="RSS" /> / <txp:feed_link label="Atom"
~flavor="atom" /></p>
<p><img src="textpattern/txp_img/txp_slug105x45.gif"
_alt="textpattern" /></p>
</div>
Press Save directly below the default template text area.
Before we move on, there are two quick jobs to do. First, having already done this once, I have the benefit of hindsight and I know we’ll need an extra <div> tag for our design to work, so let’s add that now.
240
At the top of the content <div> tag, add a new <div> tag with an id of content-container and close it after the content </div> tag ends:
<!-- center -->
<div id="content-container"> <div id="content"> <txp:article /> <txp:if_individual_article> <p>
<txp:link_to_prev><txp:prev_title /></txp:link_to_prev> <txp:link_to_next><txp:next_title /></txp:link_to_next> </p>
</txp:if_individual_article> <txp:if_article_list>
<p>
<txp:older>Previous</txp:older>
<txp:newer>Next</txp:newer>
</p> </txp:if_article_list> </div>
</div>
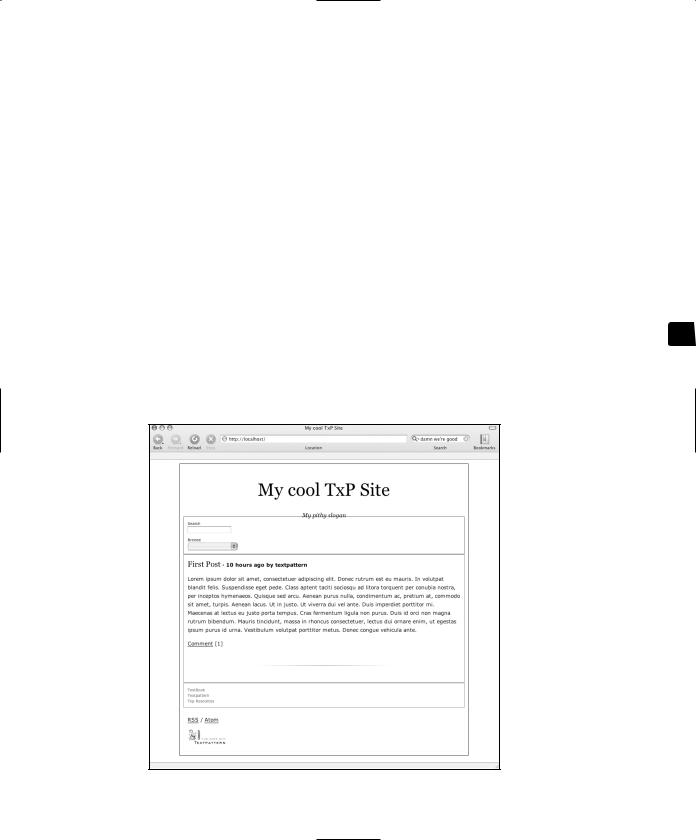
After all this is done, remember to press Save. Let’s take a quick look at your site now—it should look very much like that shown in Figure 6-25.
T E X T PAT T E R N
6
Figure 6-25. Your site so far
241
B L O G D E S I G N S O L U T I O N S
We’ll leave it there for now. That gives us all we need to get the design well under way, although we’ll be back to tweak the template later.
Before we move back to Kev’s cartoon and the CSS, take two minutes to pop along to the World Wide Web Consortium (W3C) validator at http://validator.w3.org/ and check that there are no mistakes in the resulting XHTML code.
Because you’re running from a localized setup, open up your site in the browser, choose View Page Source via the browser’s toolbar, highlight all the HTML code, and copy and paste it into the Validate by Direct Input text area at the bottom of the W3C validator page. If you don’t get a Passed validation result, retrace the previous steps and check for mistakes.
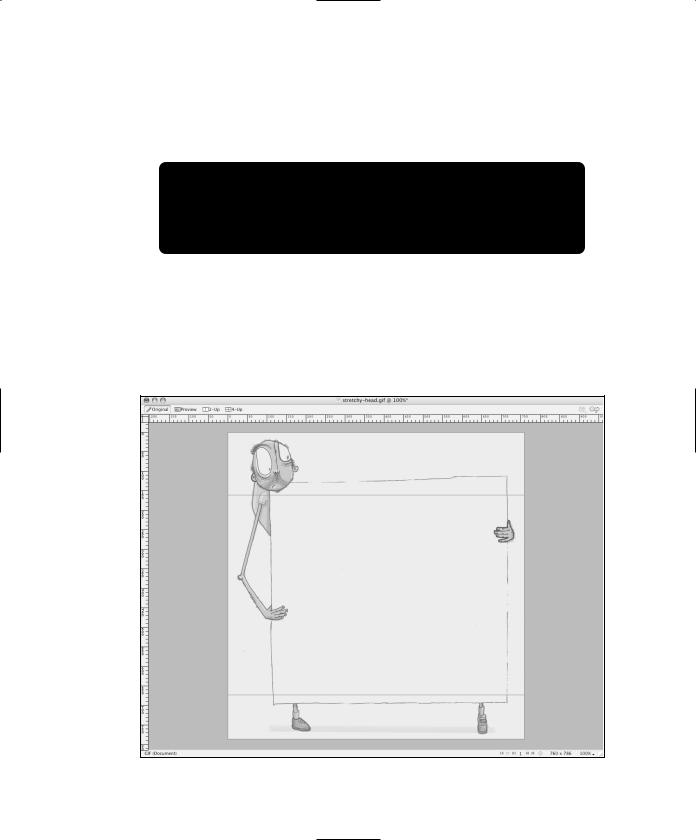
Preparing the image
From here, we need to slice Kev’s cartoon image into three parts: a head, a middle, and a foot. Figure 6-26 shows this process in Fireworks using the slice tool (it’s very much the same process in Photoshop). We will then export these three slices and use them as backgrounds in our site.
Figure 6-26. Slicing the cartoon in Fireworks 8
242
T E X T PAT T E R N
These images are available in the code download for this chapter on www.friendsofed.com
(the filenames are stretchy-head.gif, stretchy-middle.gif, and stretchy-foot.gif).
Creating a color swatch
We will need some color to liven up our text, and one way to get colors is to extract them from the main image used throughout the design. I use Macromedia Fireworks to create color swatches for this very purpose, but if you use Photoshop you can read Andy Clarke’s writeup at www.stuffandnonsense.co.uk/archives/arrangement_de_couleurs.html and get much the same effect.
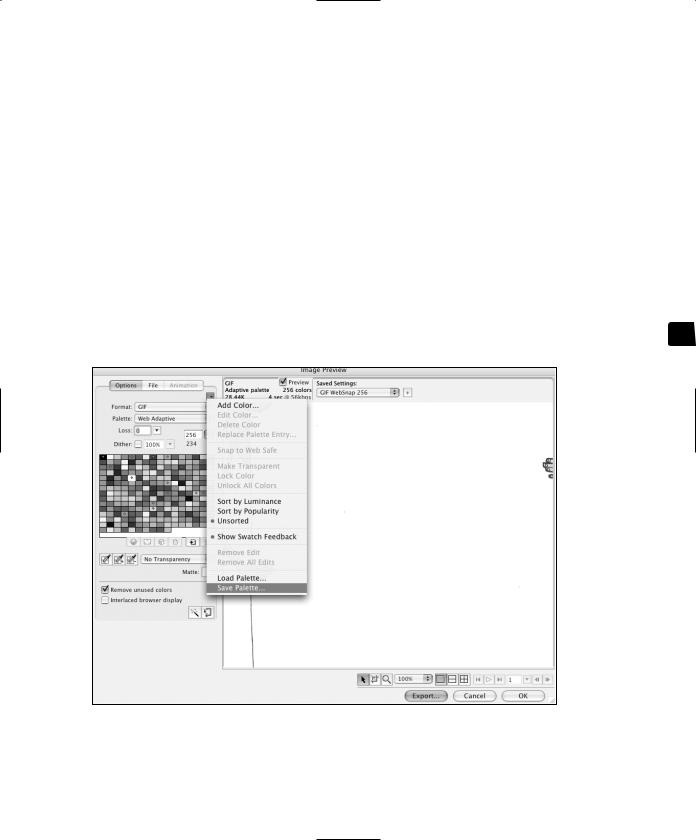
To do this in Fireworks is really very simple. Open up the image you’ll use in Fireworks (in |
|
this case, our cartoon) and choose File Image Preview in Fireworks 8 or File Export |
|
Preview in earlier versions. Make sure that the format is GIF and look for the arrow at the |
|
top right of the format menu. Here you will find the Save Palette function. When |
|
prompted, save to somewhere convenient as mycolours.act (or any name you can remem- |
|
ber). Press Cancel in the image preview to take you back to the main Fireworks canvas. |
6 |
Figure 6-27 shows this process. |
Figure 6-27. Saving a color swatch in Fireworks 8
243
B L O G D E S I G N S O L U T I O N S
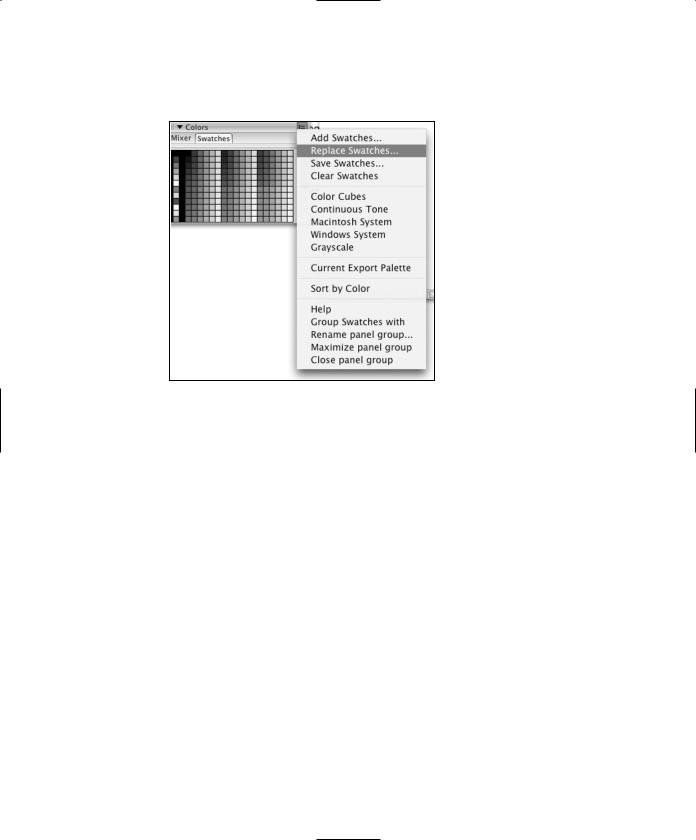
To get the values of these colors, load them into Fireworks by opening the swatches window via Windows Swatches. Choose Replace Swatches, which is reached via the small menu icon located at the top right of this window, as shown in Figure 6-28.
Figure 6-28. Loading color values
From here you can navigate to the .act file you created and load up your colors. Then draw a rectangle on a blank canvas and pick off the colors from your swatch to get the hex values, which can then be copied and pasted directly in your CSS file when you want to add color.
Uploading the image slices
There are two ways to load the image slices onto the server to be ready for use: place them manually into the images directory or use TxP’s built-in image upload tool, located under Content Images. The problem with doing it via TxP’s built-in image upload tool is that TxP will rename the image, giving it a numeric value. So although it is possible to add it via TxP, in this case it is probably easier and quicker to just export the image slices directly from the graphics editor into the images directory at the root of the server, or copying and pasting them there. That is exactly what I have done for this example, as shown in Figure 6-29.
244
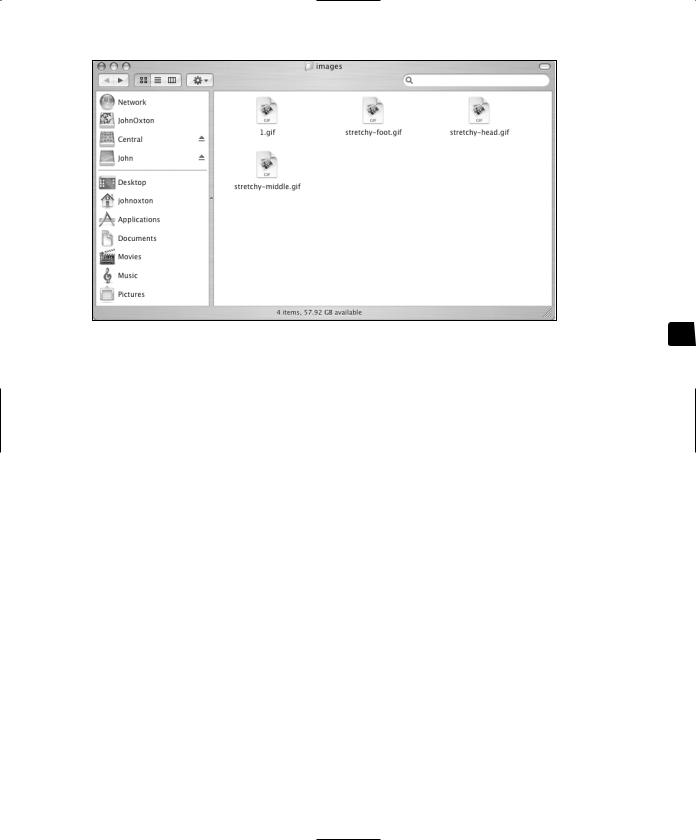
Figure 6-29. Placing the image slices in the web server’s images directory
If you really do want to use TxP’s image upload tool, you’ll simply need to make a note of the number TxP gives the image and then use it accordingly in the CSS.
Adding the image slices to the design
The colored borders we added to the three <div> tags earlier on and the three image slices we have created should give some clue about what comes next. Let’s choose Presentation Style and start adding our images via the CSS:
#sidebar-2{
border:1px solid blue;
}
to this:
#sidebar-2{
border:1px solid blue; background-image:url(../images/stretchy-head.gif);
}
And this:
#content{
border:1px solid green;
}
T E X T PAT T E R N
6
245