

Beginning Visual Basic 2005 (2006)
.pdfChapter 12
Building a Class Library for Favorites Viewer
When you’re writing Visual Basic 2005 applications, a solution can contain multiple projects. At the moment you have one project in the solution: the Favorites Viewer application. In the next Try It Out, you add a Class Library project to this solution and then move the classes from the Windows Application project to the Class Library project.
Try It Out |
Adding a Class Library Project to an Existing Solution |
1.Switch to the InternetFavorites project.
2.Save the project and then close Visual Studio 2005.
3.Open the Favorites Viewer project.
4.Click the File menu and select Add Existing Project.
5.Navigate to the where you saved your InternetFavorites solution and then select the Internet Favorites.vbproj file. Click Open to add this project to the solution.
6.Right-click the Favorites Viewer project in the Solution Explorer and select Set As StartUp Project.
7.Now right-click the Favorites Tray project in the Solution Explorer and select Remove.
How It Works
Now you have two projects within your solution. You have a Windows application and a class library. Currently, the class library is empty; all the classes that you want to add to the class library are in the Windows application project.
You have already seen how to add a new class to a Windows application, and you can add new classes to a class library in exactly the same way. You just right-click the InternetFavorites project and select Add Class. You don’t want to do that, though, because the classes already exist. The quickest way to move a class between two projects in the same solution is to drag and drop them, which is what you do in the next Try It Out.
Try It Out |
Moving Classes Between Projects |
1.Select the Favorites.vb file in the Solution Explorer, as shown in Figure 12-2, and drag it onto the InternetFavorites project. This causes a copy of the Favorites class to be added to the InternetFavorites project.
Figure 12-2
386
Building Class Libraries
2.Follow the same procedure for WebFavorite.vb and WebFavoriteCollection.vb.
3.Now right-click the Favorites.vb file in the Favorites Viewer project and select Delete from the context menu to delete the file from that project.
4.Follow the same procedure for WebFavorite.vb and WebFavoriteCollection.vb.
You now have a Class Library project and a Windows Application project. However, even though they are both contained in the same solution, they cannot see each other. If you try running the application now, you will see an error that type Favorites is not defined.
These errors occur because the code in Form1.vb cannot see the classes in the class library. There are two stages to solving this problem:
Add a reference to the Class Library project, so that the Windows application knows to look for the compiled InternetFavorites.dll file that contains the classes. Previously, all code was compiled into one file, so you didn’t need to do this.
Add an Imports statement to Form1, so that it can see the classes in the InternetFavorites namespace without giving a fully qualified name (that is, including the namespace as well as the class name). Previously, all classes were in the same namespace, so you didn’t need to do this. As you saw in Chapter 4, classes are by default given their project name as their namespace.
If this doesn’t seem very clear — don’t worry! Both of these things are easy to do.
Try It Out |
Adding a Reference and Imports Statement |
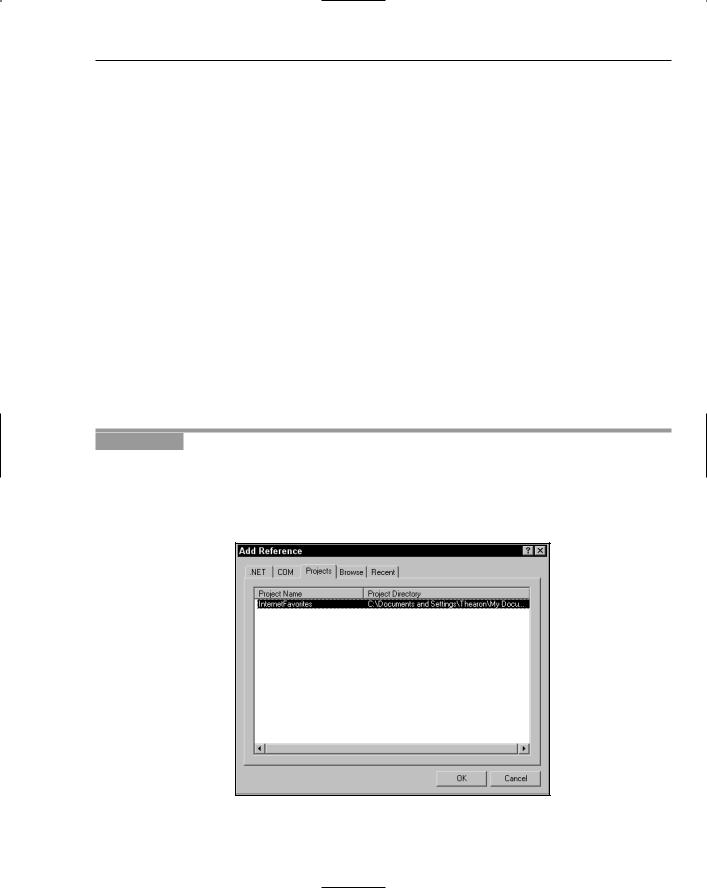
1.Right-click the Favorites Viewer project in the Solution Explorer and select Add Reference.
2.Select the Projects tab in the Add Reference dialog box and you’ll see that the InternetFavorites project is already populated in the list, as shown in Figure 12-3. Click OK to have this reference added to your Favorites Viewer project.
Figure 12-3
387

Chapter 12
3.Right-click Form1.vb in the Solution Explorer and select View Code. Add the following line right at the very top of the code file:
Imports InternetFavorites
How It Works
By adding a reference in steps 1 and 2, you tell Visual Studio 2005 that the Favorites Viewer.exe file will require the InternetFavorites.dll file to run. Visual Studio 2005 can use the classes exposed from InternetFavorites to check the syntax of the code, so the automatic underlining of errors and so on will work correctly.
Whenever you want to use a class library you must add a reference to it. You can add references to projects within the solution or to compiled DLLs if you wish.
However, if you tried to run the application before you perform step 3, you would still get errors, because the classes in the Favorites Viewer application would be trying to use classes in the InternetFavorites class library without giving a fully qualified name. Unless you specify otherwise, classes are given the name of the project they are in as their namespace name. This means that the classes you moved from Favorites Viewer to InternetFavorites changed namespace too.
The easiest way to cope with this problem is to add an Imports statement to the top of the classes that rely on this class library. This is what you did in step 3, but remember that you have two other choices:
You can use fully qualified names every time you want to access a class in the class library from a class in the application. This would have required quite a few changes.
You can change the namespace of either the classes in the application or the classes in the class library. If the namespace was the same for both projects, you would not need to use fully qualified names or have an Imports statement. However, because the two projects are quite different, it would not really be sensible to give both of them the same namespace.
The Imports statement means that any time there is a reference to a class that is not qualified with a namespace, the Visual Basic 2005 compiler will check the InternetFavorites namespace to see whether a matching class exists there. Therefore, the compiler will be able to resolve the class name when you insert the Imports statement.
That’s it! You have converted your Windows application into a small client application and a class library. Run the application and it will work perfectly, and you’ll see the same results you saw in the last chapter; the application will display a list of your Internet Favorites shortcuts.
Note that when you run this application, Visual Studio 2005 compiles the class library to a DLL, then compiles the application to an EXE, and then runs the EXE. It needs to compile the DLL first because the compiler depends upon it while compiling the EXE.
A Multitiered Application
In the previous demonstration, you split your application into two tiers or layers. The class library is a tier that handles the concept of a favorite and obtains a list of the user’s favorites from their computer. The other tier presents the favorites to the user and enables the user to perform actions on them. Class
388

Building Class Libraries
libraries are really a powerful tool for creating tiered applications, because they enable you to completely separate the code that exists in different tiers. You may often hear the term n-tier design. What this means is that an application has at least three separate tiers. Usually, these three tiers are:
A data tier is concerned with obtaining raw data from a data source such as a database, text file, or, in this case, your Favorites folder and then writing data back. It generally doesn’t worry about what the data means. It just enables data read and write operations.
A business tier is concerned with applying certain business rules to the data retrieved from the data source or ensuring that data that is being written to the data source obeys these rules. In this case, there may be certain sites that you would not want to list in your Favorites viewer, or you may want to ensure that URLs are valid before displaying them. The business tier may also contain code for manipulating or working with data — for example, the code needed to open a particular favorite.
A presentation tier displays the data to the users and lets them interact with it in some way. In this case, you have a Windows Form that displays a list of favorites and a link button that lets users view them.
Your application is so small that there’s no practical need to separate the data tier and the business tier. However, in a big application it can make the project far more manageable, even if it does mean spending a bit more time on design before the coding starts.
One of the great things about tiers is that you can mix and match them quite easily. For example, if a new browser becomes popular, then you could change the data tier to read a different data format but still use the same presentation tier and business tier. This would be much easier if the data tier and business tier were separate.
Soon, you are going to use your class library, which is really a combination of the business and data tiers, in conjunction with a different presentation tier, namely the Favorites Tray application.
In this chapter, you are working with existing projects so that you can concentrate specifically on class libraries rather than on writing code. In most cases you would develop the class library first and then develop applications to use that library. Of course, as you were building the application, you might decide to modify the library slightly. Using Visual Studio 2005 you can do this very easily. When working in Visual Studio 2005 you can make any changes you like to the code in the library, and the change will instantly be available in the application.
Using Strong Names
Your complete solution now compiles to two files: a DLL and an EXE. You have written both files. Nobody else is writing applications that rely on the DLL, and nobody else is going to change the DLL. In real life, this is often not the case. Often you use off-the-shelf DLLs, or two separate developers are working on the DLL and the EXE.
For example, imagine that Matt is working on InternetFavorites.dll and Robbin is working on Favorites Viewer.exe. Matt decides that ScanFavorites is not a very good name for a method and changes it to LoadFavorites. Then he recompiles the DLL. Later, Robbin runs Favorites Viewer.exe. Favorites Viewer.exe tries to call ScanFavorites in the DLL, but the method no longer exists. This generates an error and the program doesn’t work.
389

Chapter 12
Of course, Matt shouldn’t really have made the change to the DLL. He should have known that applications existed that required the ScanFavorites method. All too often, however, developers of libraries don’t realize this. They make changes to DLLs that render existing software unusable.
Another possible scenario is that Jay is working on a system to manage favorites, and he creates a file called InternetFavorites that is different from the one that Matt developed. There is a danger that the two different DLLs will be confused, and once again Favorites Viewer will stop working.
These DLL management problems have been a nightmare for Windows developers, and it spawned the expression “DLL Hell.” However, Visual Basic 2005 goes a long way toward solving the problem. The problem is connected with two things:
There can be several versions of a DLL, and these can all work in different ways. It is not possible to tell the version from the filename alone.
Different people can write DLLs with the same filename.
Strongly named assemblies store information about their version and their author within the assembly itself. Because of this, it would be possible to tell the difference between the DLL used (when Favorites Viewer compiled) and the changed version. It would also be possible to tell the difference between Matt’s InternetFavorites.dll and Jay’s InternetFavorites.dll. Strong naming can also store information about other properties that will help to uniquely identify an assembly (for example, the culture for which it was written), but you will concentrate on version and author.
Signing Assemblies
One way to certify who wrote an assembly is to sign it. To do this, you generate a key pair and sign the assembly with it. A key-pair is unique and, therefore, can identify the person or company who wrote an assembly. The principles behind assembly signing are quite advanced, but the actual practice is quite simple.
A strongly named assembly cannot reference a simply named assembly, because it would lose the versioning control that it enjoys.
Two steps are involved in creating a strongly named or signed assembly:
Create a key pair that you can use to sign your assembly, as you do in the next Try It Out.
Apply this key pair to your assembly, so that it will be used to sign the assembly at the time of compilation.
Try It Out |
Creating a Key Pair |
1.First, you create a new key pair. From the Windows Start menu select All Programs Microsoft Visual Studio 2005 Visual Studio 2005 Tools Visual Studio 2005 Command Prompt.
2.Type the following into the command prompt that appears:
sn -k InternetFavoriteskey.snk
This will generate a key pair in the folder where the command is run (in this case, C:\Program Files\Microsoft Visual Studio 8\VC).
390

Building Class Libraries
How It Works
Running the Visual Studio 2005 command prompt opens a DOS-style command window with the environment set up so that you can use the .NET command-line tools. You use this environment to run the Visual Studio 2005 strong naming command, sn. The k switch means that the command will generate a new key pair and write it to the specified file.
Now you have a key pair in the file C:\Program Files\Microsoft Visual Studio 8\VC\Internet Favoriteskey.snk. If you want, you can move this to a more convenient location, such as your project folder for the InternetFavorites project. After this, in the next Try It Out, you use it to sign your assembly.
Try It Out |
Signing the FavoritesLib Assembly |
1.In the Solution Explorer, double-click the My Project file in the InternetFavorites project.
2.Now click the Signing tab along the left side of the project file, as shown in Figure 12-4.
3.Check the “Sign the assembly” check box.
4.In the Choose a strong name key file combo box, select <Browse...> and then browse to the location of your key file and select it.
5.Build your project, and the DLL will then be strongly named.
Figure 12-4
How It Works
When you compile an assembly with a key file, it adds a copy of your public key to the assembly. It also adds a hash of the whole assembly, encrypted using the private key.
391

Chapter 12
With public–private key cryptography, a message encrypted with one key can be decrypted only with the other key. You can’t use the same key to encrypt and decrypt. You can give a public key to a lot of people and they can encrypt messages with it. If you keep the private key secret, nobody else will be able to read the encrypted messages — even if they have a copy of the public key.
You can also make this work the other way around. If you encrypt a message with the private key, people can use the public key to decrypt it. If the decryption works and you haven’t let somebody else get their hands on your private key, it proves that you wrote the message.
Part of the purpose of signing an assembly is to prove who wrote it and to prove that it has not been tampered with. This could be done by encrypting the whole assembly using the private key and then decrypting the whole assembly using the public key, when it needs to be used. However, this would be very slow. Instead, the Visual Basic 2005 compiler takes a hash of the assembly and encrypts that using the private key. If anybody tries to tamper with the assembly, the hash will cease to be valid.
Assembly Versions
Visual Basic 2005 automatically keeps track of versions for you. When you build an assembly, a number signifying the version is automatically updated. There are four elements of this number: major version, minor version, build, and revision. If you click the Application tab of the project file and then click the Assembly Information button, you see the assembly version near the bottom of the Assembly Information dialog box.
This means that when you compile this assembly, the major version will be 1, the minor version will be 0, and the build and revision number will be generated by Visual Studio 2005. Every time you recompile the assembly, Visual Basic 2005 will adjust these numbers to ensure that every compilation has a unique version number. You could choose to replace the build and revision numbers with your own hard-coded numbers and increment them yourself, but if you’re happy with Visual Basic 2005’s decision, then you can just leave it. If you are changing an assembly significantly, you may want to change the major or minor version — and, of course, you are free to do that.
It is recommended that you set the entire version number manually, especially when you are releasing the assembly formally, so that you have complete control. It will then be easier to manage different versions and bring in fewer unfortunate deployment problems.
Registering Assemblies
You’ve seen how an assembly can contain information to prove who wrote it (in the sense that a unique identifier is unique per publisher) and information to prove its own version. This is really useful, because it means that executables using these assemblies know what assembly author and version to look for in place of just a filename. However, this doesn’t prevent Matt from overwriting an existing DLL with a new version — it just means that applications using the DLL will be able to tell that it’s changed.
This is where the Global Assembly Cache (GAC) comes in. The GAC can ensure that several versions of the same assembly are always available. If your application requires the InternetFavorites assembly version 1 and Matt’s application requires the assembly version 2, both can go in the GAC and both can
392

Building Class Libraries
be available. Moreover, assemblies with the same name but written by different people can go in the GAC. You can guarantee that your applications will use the same assembly while running as they did when they were compiled, provided the required assembly is in the GAC.
To register an assembly into the GAC, you simply need to drag the relevant .dll file into the GAC (located in the c:\winnt\assembly on Windows 2000 or c:\windows\assembly on Windows XP).
Gacutil Utility
Gacutil.exe is a utility provided with the .NET Framework for installing/uninstalling assemblies into the GAC via a command line.
From the Windows Start menu, select Programs Microsoft Visual Studio 2005 Visual Studio 2005 Tools Visual Studio Command Prompt. Navigate to the bin folder for your InternetFavorites project and then enter the following command to install your assembly into the GAC:
Gacutil -i internetfavorites.dll
In the console window, you can use the i and u options to install and uninstall, respectively.
Gacutil -u internetfavorites
Why Is My Assembly Not Visible in the References Dialog
Box?
It is important to understand that the GAC is not shown in the References dialog box within Visual Studio. For this reason, after you add your assembly to the GAC, you will not see it in the References dialog box and must browse for it.
Visual Studio does, however, look for assemblies to load into the References dialog box by checking keys in the Registry that map to physical paths on your drive. In the next Try It Out, you list your assembly in the References dialog box.
Try It Out |
Getting Your Assembly Listed in the References Dialog Box |
1.Click Start and Select Run.
2.Type regedit and press Enter.
3.In the Registry Editor locate the key HKEY_LOCAL_MACHINE\SOFTWARE\Microsoft\.NET Framework\AssemblyFolders.
4.Right-click AssemblyFolders and select New Key.
5.Create the key with any name that you wish. We named ours Developer Assemblies.
6.Double-click (Default) value key in the pane and enter a path. We added C:\Developer Assemblies. (See Figure 12-5.)
393

Chapter 12
Figure 12-5
7.Open Windows Explorer and create the new directory that you specified in the previous step, if it doesn’t exist, and then copy the InternetFavorites.dll into this directory
8.You may have to stop and start Visual Studio 2005 for this to take affect, but when you do, you will see the assembly listed in this directory from within the References Dialog Box as shown in Figure 12-6.
Figure 12-6
394

Building Class Libraries
Designing Class Libraries
By now, you should be aware of how useful class libraries are, and you have an understanding of the nature of classes, objects, and class libraries.
When designing an application, it is best to understand what you are dealing with. Much like an architect designing a house, you need to understand how things work (the rules, the regulations, and the recommendations) in order to know how to draw the best plan.
When software architects plan, draw out, and generate template code for components and applications, they may use a drawing tool such as Microsoft Visio, which integrates with Visual Studio 2005. Visio contains various types of symbol libraries that can be used for creating schematics, flowcharts, and other diagrams. A very well-known set of descriptive symbols and diagram types is Unified Modeling Language (UML), which has its own symbols and rules for drawing software and architecture models. UML has various types of symbol libraries containing symbols that have different meaning and functions. These symbols have been derived from previous modeling symbols to form something of a fusion of styles. UML also has many types of diagrams. These diagrams range from deployment-type diagrams to component definition diagrams.
If you wish to learn more about UML, take a look at the UML Bible (Wiley, ISBN: 0-7645-2604-9).
If the questions “How many parameters and methods should an object expose?” and “Should an object have properties rather than methods?” are not answered correctly, your object would not be rendered completely useless, although it may be ineffective. There are, however, some things to consider.
Imagine a class library that contains over 40 methods and properties on each of its 20 or so classes. Also imagine that each class’s methods contain at least 15 parameters. This component might be a little daunting — in fact, a component should never be designed this way.
Instead, when designing your objects, try to follow the golden rule: simplicity. Simplicity is probably the most crucial element that you can have in your classes. While creating an extremely large class library is not necessarily a bad thing, using a small number of related classes, aided by a few other class libraries, is by far a better solution.
When you’re dealing with a large, complex set of business rules for a large system, the code within the library can be extremely complicated, often leading to debugging and maintenance nightmares. In many situations, getting around the fact that many objects need to be created is a difficult task, but the
point that needs to come across is that there are many situations that lend themselves to reuse. The more reusable the classes are, the smaller the end-product will be and the easier it will be to create new applications that need the same functionality provided by the components.
Every developer who uses your class library should be able to do so successfully, without any major effort or a tremendous amount of reading. You can achieve this in the following ways:
Try to keep your methods to five or six parameters maximum, unless completely necessary. This will make coding easier.
Make sure that all of those parameters and your methods have meaningful names. Try to spell out the function rather than keeping it short. As an example, it is not easy to identify the meaning of StdNo as it is to identify the meaning of StudentNumber.
395