Добавил:
Опубликованный материал нарушает ваши авторские права? Сообщите нам.
Вуз: Предмет: Файл:

Asp Net 2.0 Security Membership And Role Management

.pdf
Скачиваний:
51
Добавлен:
17.08.2013
Размер:
12.33 Mб
Скачать

SqlRoleProvider

Role Manager ships with a number of different providers in the Framework: WindowsToken RoleProvider, which was covered at the end of the previous chapter; SqlRoleProvider, which is the topic of this chapter; and AuthorizationStoreRoleProvider, which is discussed in the next chapter. SqlRoleProvider is already configured in machine.config as the default provider for the Role Manager feature. As with SqlMembershipProvider, SqlRoleProvider is the reference provider for the feature because it implements all of the functionality defined on the

RoleProvider base class.

This chapter will cover the following areas of the SqlRoleProvider:

The database schema used by the SqlRoleProvider

Database security and trust level requirements for the provider, including how to configure the provider for use in partially trusted non-ASP.NET environments

Using the SqlRoleProvider with Windows-authenticated websites

Extending the provider to support “run-with-limited-roles” scenarios

Leveraging role data for authorization checks in the data layer

Supporting multiple applications with a single provider

SqlRoleProvider Database Schema

The database schema contains tables, views, and stored procedures used by the provider. As with the Membership feature, SqlRoleProvider’s schema integrates with the common set of tables covered in Chapter 11. This allows you to use SqlMembershipProvider for authentication and then use SqlRoleProvider to associate one or more roles with the users already registered in the Membership feature. Keying off of the common tables also allows SqlRoleProvider to be used in conjunction with the other SQL-based providers (SqlProfileProvider and SqlPersonalizationProvider)

Chapter 14

supplied by ASP.NET. However, there is no requirement that SqlRoleProvider be used on conjunction with the Membership feature. The integration with the common provider schema is nice if you want to leverage it, but you can also use Role Manager and SqlRoleProvider as a standalone authorization feature. You will actually see how this works later on in the chapter, where using SqlRoleProvider with Windows authentication is described.

Because the concept of a role in Role Manager is very simple, and Role Manager also doesn’t support the concept of nested roles, the database tables for the SqlRoleProvider are also very simple. The first table in the database schema is the aspnet_Roles table shown in the following code:

CREATE TABLE dbo.aspnet_Roles (


ApplicationId

uniqueidentifier

NOT NULL

FOREIGN KEY REFERENCES dbo.aspnet_Applications(ApplicationId),

RoleId

uniqueidentifier

PRIMARY KEY

NONCLUSTERED DEFAULT NEWID(),

RoleName

nvarchar(256)

NOT NULL,

LoweredRoleName

nvarchar(256)

NOT NULL,

Description

nvarchar(256)


)


Each of the table’s columns is described here:

ApplicationId — Because multiple provider instances can be configured to point at the same database, you can horizontally partition each application’s role data using the applicationName configuration attribute supported in the provider’s configuration. In the database schema, this attribute’s value is translated to the GUID application ID that is stored in the common aspnet_Applications table. Whenever a SqlRoleProvider needs to look up role information, it always does so within the context of a specific application, and thus the provider always includes the ApplicationId column in the various stored procedures used by the provider.

RoleId — The primary key for the table. Each role that is created using SqlRoleProvider is uniquely identified by its RoleId. Although the stored procedures perform most of their work using the RoleId, the public Role Manager API has no way to expose this value. As a result, the provider always starts its work with a role name.

RoleName — For all practical purposes, this is the role “object” in the Role Manager feature. This is the value that you supply when creating new roles, and it is the value that you use when performing authorization checks with a RolePrincipal.

LoweredRoleName — The case insensitive representation of the RoleName column. Although you write code using the value stored in the RoleName column, internally the SqlRoleProvider enforces the uniqueness of role names by first lowering the role string and then attempting to store it in this column. The combination of this column, and the ApplicationId column, acts as an alternate primary key for the table. Also, whenever you call the IsUserInRole method on the provider, the provider looks at the value in this column as part of determining whether a specific user is associated with a role. In this way, the provider is able to enforce case-insensitive string comparisons on role names when performing role checks in the database. Note though that the culture setting (that is, collation order) of the underlying database still has an effect when the stored procedures are performing string comparisons. In the previous chapter, the potential mismatch between case-insensitive invariant-culture comparisons and case-insensitive culture-specific comparisons was discussed. You can always deploy the SqlRoleProvider schema in a database using the Latin1_General collation to roughly mirror the string comparison functionality used inside of

RolePrincipal.

554

SqlRoleProvider

Description — This is an orphan column because it is never used by the SqlRoleProvider. At one point, there were plans to make a full-fledged role object, but that work could not be fit into the ASP.NET 2.0 development schedule. Because ASP.NET may introduce a role object sometime in the future, the column was left in the schema for future use. You should basically ignore the existence of the column, and you should not store anything in it.

The second table in the SqlRoleProvider database schema stores the mapping of users to roles:

CREATE TABLE dbo.aspnet_UsersInRoles (

UserId

uniqueidentifier NOT NULL PRIMARY KEY(UserId, RoleId)


FOREIGN KEY REFERENCES dbo.aspnet_Users (UserId),

RoleId

uniqueidentifier NOT NULL


FOREIGN KEY REFERENCES dbo.aspnet_Roles (RoleId)

)


The aspnet_UsersInRoles table is ultimately used by various stored procedures to determine which users belong to which roles. The table works in a self-explanatory way; however, a brief description of each column is provided here.

UserId — This is the user identifier from the common aspnet_Users table. For SqlRoleProvider to perform an authorization check, it must convert a string user name along with the application name specified on a provider, into a UserId value. Remember that the aspnet_Users table and aspnet_Applications tables together are used to accomplish this.

RoleId — The role identifier from the aspnet_Roles table. During a database lookup, the string role name and the application name specified on a provider are converted into a RoleId. With the UserId and RoleId in hand, a stored procedure can perform a lookup in this table.

In addition to the database tables, two views are supplied with the schema: vw_aspnet_Roles and vw_aspnet_UsersInRoles. Both of these views map all of the columns in the corresponding tables. Later on in this chapter, you will see how you can use these views to perform authorization checks inside of your own stored procedures. Also note that, as with the Membership feature, the views are intended only for use with read-only queries. Although nothing technically prevents you from writing data through the views, the intent is that all data modifications flow through the provider API.

SQL Server–Specific Provider Configuration Options

Because the SqlRoleProvider connects to SQL Server, it supports two SQL Server–specific configuration attributes on the provider definition:

connectionStringName — As you would expect, the provider needs to know what database and server to connect to. The value of this attribute must point at a named connection string defined up in the <connectionStrings /> section.

commandTimeout — As you work with larger databases, you may find that the default ADO.NET SqlCommand timeout of 30 seconds is too short for certain operations. For SqlRoleProvider, the AddUsersToRoles and RemoveUsersFromRoles methods are especially prone to timing out when working with large sets of role information (for example, the aspnet_UsersInRoles table contains 100K or more rows). If you run into timeout problems with either of these methods, you can boost the value of the commandTimeout configuration attribute to give the database server more time to complete its work. Alternatively, you can reduce the number of user-to-role associations being modified in a single method call and simply call these methods in a loop with only a chunk of user and role data being changed in a single iteration.

555

Chapter 14

Transaction Behavior

Not all of the data modification work performed in the provider can be accomplished with single

INSERT or UPDATE commands. The SqlRoleProvider methods AddUsersToRoles and

RemoveUsersFromRoles both explicitly manage transactions within the provider’s code. If you look inside of the stored procedures used by SqlRoleProvider, you will see that for operations like deleting or creating a role, all the work is encapsulated within a transaction that is managed within a stored procedure.

However, the AddUsersToRoles and RemoveUsersFromRoles methods can affect many rows of user- to-role associations. As a result of limitations in passing parameter data down to a stored procedure, there isn’t a great way to get all of the parameter data from these methods (an array of users and an array of roles) passed down to SQL Server. The most elegant approach would have been to use the XML capability in SQL Server 2000, but this approach would have required forking the code to support SQL Server 7.0. There are also edge cases where errors can occur in stored procedures without being able to properly clear up XML documents that have been parsed on the server.

So, the solution to the overall problem was to have SqlRoleProvider explicitly begin a transaction in the provider code. Then the provider passes chunks of user and role data down to SQL Server, potentially calling the underlying stored procedures multiple times. When all the parameter data has been chunked and passed to SQL Server, the provider issues an explicit COMMIT TRANSACTION to SQL Server. If anything fails along the way, all of the work is rolled back by the provider when it issues an explicit

ROLLBACK TRANSACTION.

You should keep this transaction behavior in mind when calling AddUsersToRoles and RemoveUsersFromRoles. If you pass a large number of users and roles these two methods can take quite a while to run, and there is the possibility of a failure occurring along the way thus causing a rollback (just 100 users and 100 roles will result in 10K rows being inserted or deleted — so it doesn’t take much to trigger large numbers of inserts or deletes). If you want to smooth out the load on your SQL Server while performing large numbers of adds or removes, you should call these methods iteratively, passing only a small number of roles and users on each iteration. In this way, you eliminate the possibility of SQL Server locking large portions of the aspnet_UsersInRoles table while it grinds through large data modifications.

The product team has successfully tested performing 100K and 250K inserts and deletes using these methods. However, these tests were mainly to exercise the commandTimeout provider configuration attribute. Issuing such a huge number of changes in a single transaction ends up locking most of the aspnet_UsersInRoles table. In a production application, this type of change would potentially fail if the system was under load with other connections simultaneously attempting to get roles data from the same table. For this reason, limiting the number of associations being changed in any one method call to a small number makes sense for cases where the database needs to remain responsive to other applications using the same set of Role Manager data.

Provider Security

There are two levels of security enforced by SqlRoleProvider: trust-level checks and database-level security requirements. You influence the trust-level check by setting the appropriate trust level for your web application and optionally making other adjustments to the CAS policy on your machine. Databaselevel security requirements are managed through the use of SQL Server roles.

556

SqlRoleProvider

Trust-Level Requirements and Configuration

Inside of the provider’s Initialize method a check is made for Low trust. If the current application is running at Low trust or higher, then the provider will initialize itself. Otherwise, if the application is running in Minimal trust, the initialization process will fail. Outside of ASP.NET, local applications like console applications or Winforms application implicitly run in Full trust, so the trust level check in the Initialize method always succeeds.

For an ASP.NET application running in Low trust, the provider may still fail when you attempt to call any of its methods because the default Low trust policy file does not include SqlClientPermission. In this case, the Initialize method completes successfully because the Low trust-level check succeeds. But then when an individual method attempts to access SQL Server, the System.Data.SqlClient classes throw a security exception because the web application does not have SqlClientPermission. If you want to enable the provider for use in Low trust, you should do two things:

1.Create a custom trust policy file for the Low trust bucket, and add SqlClientPermission to the custom trust policy file.

2.Configure the database security for your application using one of the provider’s SQL Server roles. Because, conceptually, Low trust applications are not supposed to be modifying sensitive data, the aspnet_Roles_BasicAccess role makes sense for use with the SqlRoleProvider in a Low trust environment.

Using Providers in Partially Trusted Non-ASP.NET Applications

If you happen to run partially trusted non-ASP.NET applications, you don’t have the convenience of using the <trust /> configuration element. For example, if you run an application off of a UNC share, and you want that application to work with SqlRoleProvider (or for that matter, any other providerbased feature in ASP.NET, including the Membership and Profile features), you will initially end up with a rather obscure security exception.

For example, you can create a basic console application that triggers initialization of the feature and the SqlRoleProvider with the following code:

using System;

using System.Web.Security;

namespace PartialTrustRoleManager

{

class Program

{

static void Main(string[] args)

{

Console.WriteLine(Roles.Provider.ApplicationName);

if (Roles.RoleExists(“some random role name”)) Console.WriteLine(“The random role exists.”);

else

Console.WriteLine(“The random role does not exist”);

}

}

}

557

Chapter 14

Because Role Manager is not enabled by default, the sample application also explicitly enables it in the application configuration file.

<configuration>

<system.web>

<roleManager enabled=”true” /> </system.web>

</configuration>

If you compile this on your local machine and run it, everything works. However, if you take the compiled executable and the configuration file, move them onto a remote UNC share, and then run the executable, you get the following exception.

Unhandled Exception: System.Security.SecurityException: Request for the permission of type ‘System.Web.AspNetHostingPermission, ...’ failed.

<snipped for brevity>

at PartialTrustRoleManager.Program.Main(String[] args) The action that failed was:

LinkDemand

The type of the first permission that failed was: System.Web.AspNetHostingPermission

The first permission that failed was:

<IPermission class=”System.Web.AspNetHostingPermission, ...” version=”1”

Level=”Minimal”/>

Although the exception dump is a bit intimidating, hopefully parts of it look familiar to you from Chapter 3 on trust levels. In this situation, the executable is on a UNC share; it runs with a permission set defined by the Framework for applications running in LocalIntranet_Zone. You can see the zone membership and the permissions associated with it using the Microsoft .NET Framework 2.0 Configuration MMC. Note that this tool used to be available in the Administrative Tools menu in earlier builds of the 2.0 Framework. However you now have to install the Framework SDK and look for mscorcfg.msc in the SDK’s bin directory. The permission set associated with LocalIntranet_Zone is called LocalIntranet, and it includes only basic permissions like access to isolated storage, the use of default printers on the machine, and so forth.

The LocalIntranet permission set lacks AspNetHostingPermission. It also lacks

SqlClientPermission, although the previous exception dump doesn’t show this. The reason that the application immediately fails when run from a UNC share is that both the static Roles class and the SqlRoleProvider class are attributed with the following:

[AspNetHostingPermission(SecurityAction.LinkDemand,

Level=AspNetHostingPermissionLevel.Minimal)]

When the console application attempts to call into the Roles class, the declarative link demand immediately causes a SecurityException because UNC based applications lack any kind of

AspNetHostingPermission.

Because a fair amount of work was invested in making the Membership, Role Manager and Profile features ASP.NET-agnostic, it would be unfortunate if these features were limited to only fully trusted nonASP.NET applications. Luckily, this is not the case, although as you will see it does require configuration work on your part to get things working. Because there is no convenient code access security (CAS)

558

SqlRoleProvider

abstraction like trust levels outside of ASP.NET, you need to configure the Framework’s CAS system directly. The logical starting point is to add both AspNetHostingPermission and SqlClient Permission to the LocalIntranet permission set.

Because there is a convenient MMC tool that theoretically allows you to do this, you would probably think of using the tool first. Unfortunately, due to some bugs in the MMC you cannot add the System.Web.dll assembly as a policy assembly (that is, an assembly that can be used as a source of permission classes such as AspNetHostingPermission). So instead, you have to drop down to using the tool caspol.exe, which is located in the framework’s installation directory.

There are a number of things you need to accomplish with caspol:

Add the AspNetHostingPermission to a named permission set. You need to get it into a named permission set with the Level attribute set to at least “Low.” Even though the link demand is for Minimal trust, the Roles class will trigger a demand for Low trust while loading the SqlRoleProvider.

Add the SqlClientPermission to the named permission set because SqlRoleProvider will trigger a demand for this when it calls into ADO.NET.

It isn’t immediately obvious, but because Role Manager and its providers internally depend on ASP.NET’s HttpRuntime object, you also need to grant file I/O read and path discovery permissions to the installation directory for the framework. The HttpRuntime object depends on loading DLLs (for example aspnet_isapi.dll has internal support functions that are used even in non-ASP.NET environments) that exist in this directory, and without the correct FileIOPermission on the machine, it will fail to initialize.

One of the not-so-nice things about mucking with the Framework’s CAS policy information directly is that the XML format for a named permission set is not easily discoverable. With a little enterprising hacking around, you can eventually stitch together the correct representation of a named permission set that is consumable by the caspol.exe tool. For the demo application, I simply looked for the named permission set called LocalIntranet inside of the file security.config, which is located in the CONFIG subdirectory underneath the framework’s install directory. You can copy the <PermissionSet /> element for LocalIntranet and all of its nested <IPermission /> elements from this file and paste them into a separate file.

At this point, I admit that I could never get caspol.exe to properly recognize the class names used for the individual <IPermission /> elements. Luckily, though, you can always use the fully qualified strong name in its place (the ASP.NET trust policy files use a short name that references <SecurityClass /> elements at the top of the trust file. (The same approach seems to cause obscure errors in caspol.exe though). The last step is to pop in the three additional <IPermission /> elements for the three permissions that were discussed previously. The end result is a file called CustomSecurity.config with the following XML definition: (Note: the strong names have been trimmed down for brevity):

<PermissionSet class=”NamedPermissionSet” version=”1” Name=”LocalIntranet_MODIFIED

Description=”Modified local intranet permissions”>

<IPermission

class=”System.Web.AspNetHostingPermission, System, ...” version=”1”

559

Chapter 14

Level=”Low” /> <IPermission

class=”System.Security.Permissions.FileIOPermission, mscorlib, ...” version=”1”

Read=”C:\WINNT\Microsoft.NET\Framework\v2.0.50727\” PathDiscovery=”C:\WINNT\Microsoft.NET\Framework\v2.0.50727\” />

<IPermission class=”System.Security.Permissions.EnvironmentPermission, mscorlib...”

version=”1”

Read=”USERNAME”/>

<IPermission class=”System.Security.Permissions.FileDialogPermission, mscorlib...”

version=”1”

Unrestricted=”true”/>

<IPermission class=”System.Security.Permissions.IsolatedStorageFilePermission...” version=”1”

Allowed=”AssemblyIsolationByUser”

UserQuota=”9223372036854775807”

Expiry=”9223372036854775807”

Permanent=”True”/>

<IPermission class=”System.Security.Permissions.ReflectionPermission, mscorlib...”

version=”1”

Flags=”ReflectionEmit”/>

<IPermission class=”System.Security.Permissions.SecurityPermission, mscorlib...” version=”1”

Flags=”Assertion, Execution, BindingRedirects”/> <IPermission class=”System.Security.Permissions.UIPermission, mscorlib...”

version=”1”

Unrestricted=”true”/>

<IPermission class=”System.Net.DnsPermission, System...” version=”1”

Unrestricted=”true”/>

<IPermission class=”System.Drawing.Printing.PrintingPermission, System.Drawing...”

version=”1”

Level=”DefaultPrinting”/>

<IPermission

class=”System.Data.SqlClient.SqlClientPermission, System.Data...” version=”1”

Unrestricted=”true” />

</PermissionSet>

The three bolded portions of the file indicate the new permissions that you need to add that are above and beyond the default set of permissions normally granted to applications running in the LocalIntranet zone. The FileIOPermission includes read and path discovery access for the framework install directory on the machine that will be running the application. You will need to tweak the physical file path to match the appropriate location on your machine.

With these changes made, you can now import the custom permission set (which is called LocalIntranet_Modified) using the following command line:

..\caspol.exe -m -ap CustomSecurity.config

560

SqlRoleProvider

In my case, I saved the preceding XML file into a file called CustomSecurity.config located in the CONFIG subdirectory of the framework install directory. Because the command line was running from the CONFIG subdirectory, the command uses ..\caspol.exe to reference the utility. The -m command line option tells caspol.exe that the named permission set in the file should be imported into the local machine’s set of security information — as opposed to the enterpriseor user-specific security policies.

The -ap switch tells caspol.exe that the file CustomSecurity.config contains a definition of a new named permission set.

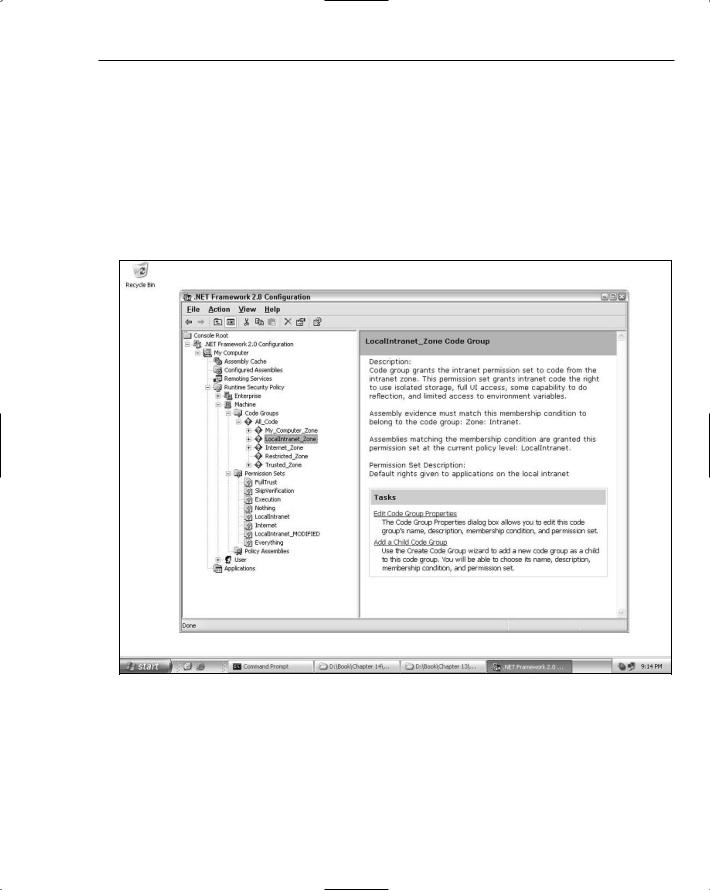
After you run caspol.exe, you can open the Framework’s MMC configuration tool. Expand the machine policy node so that you can see both configured security zones on the machine as well as the named permission sets that are available. You can see what this looks like in Figure 14-1:

Figure 14-1

Notice that underneath the Permission Sets node the new custom permission set appears. At this point, you can right click the LocalIntranet_Zone node that is underneath the Code Groups node and select Properties. In the resulting dialog box, switch to the Permission Set tab and select LocalIntranet_MODIFIED from the drop-down list. You can see what this all looks like in Figure 14-2:

561