

Asp Net 2.0 Security Membership And Role Management
.pdfChapter 12
Figure 12-9 shows a special read-only user account being configured:
Figure 12-9
Notice how the ability to read and write the encrypted password answer field is being revoked from the userpopareader account. The password answer field needs to be readable only for accounts that fetch the answer from the directory for comparison with the answer typed in by a user. For ActiveDirectory MembershipProvider, this only occurs when calling ResetPassword, so only the administrative account that was configured earlier needs read access on this attribute. Write access to the password answer attribute is only necessary for methods that the update this information. The only methods on
ActiveDirectoryMembershipProvider where these updates occur are CreateUser (where the question and answer are initially created) and ChangePasswordQuestionAndAnswer (where the question and answer are updated). For this reason, it makes sense to have a separate provider instance (like the administrative provider used in the examples in this chapter) configured for creating users, updating questions and answers and carrying out password resets.
502

ActiveDirectoryMembershipProvider
Using ADAM
From the ActiveDirectoryMembershipProvider’s perspective, using ADAM as a backing store is pretty much the same as using Active Directory as the backing store. ADAM’s schema supports the user class, and just as with Active Directory, you can extend the schema in ADAM if you choose to enable self-service password resets. In terms of directory structure, you can use the same general approaches for both AD and ADAM: using a single container for storing users, or separate user containers for different applications. The behavior around user creation/deletion as opposed to other operations works the same way in ADAM as well — that is, creation and deletion always occur in the container pointed at by the connection string, whereas searches and operations that bind to a user start at the root of the specified container and then wend their way down through the container hierarchy looking for a match.
The differences you will encounter when using ADAM as a directory store with the provider are:
You can choose to run ADAM on a machine that is not joined to a domain. This will probably not be common for folks that run a lot of Windows Server machines, but it would be familiar to UNIX shops that just need to talk to an LDAP server and don’t need the security mechanisms supported by an AD domain infrastructure.
ADAM can be installed multiple times on a single machine, with separate ADAM installations running on different ports. Unlike AD, this means you can install ADAM to listen on something other than port 389 (if using non-SSL connections) or port 636 (if using SSL connections).
For an ADAM server that is part of a domain, you can connect to the ADAM instance using either a domain principal or an ADAM principal. An ADAM principal is simply a user account that only exists inside of the ADAM instance and is unknown in the general AD directory.
You need to manually set up ADAM properly to store the data needed by the provider. With that said, you can go through the GUI installer for ADAM and have it perform 95% of the setup work for you. If you don’t get the GUI portion of the install correct though, you have to use the dsmgmt.exe command-line tool that comes with ADAM to manually create an application partition for use by your application.
Quite honestly, security management of ADAM is either much simpler or much more complicated depending on which approach you take to securing your application data. You can take the simple approach where you use the application identity of your worker process (or application impersonation identity if you choose) and make it an administrator in an ADAM partition. This gives your web servers easy access to read and write data via ActiveDirectory MembershipProvider. On the other hand, you can follow the lockdown approaches described in the previous section on Active Directory where you grant specific rights to specific accounts (for example, admin accounts versus read-only accounts) and then use different provider instances for different operations. The snag with this approach is that the administrative tool for modifying ADAM ACLs is quite simply abominable for anyone who isn’t directory savvy (and I definitely do not fall in the directory guru camp!). You have to use the command-line dsacls
.exe tool that comes with ADAM to manually ACL your application containers. This same process with Active Directory can be a little intimidating, but the MMC management tools for AD help you through the process. No such GUI tool support currently exists for ADAM, although there is supposed to be an updated version of the ldp.exe tool in Windows Server 2003 R2 that should have some level of GUI support for editing ACLs in ADAM. With that said, if you feel comfortable manually ACL’ing containers in ADAM, you can definitely use that approach to narrow the privileges granted to different accounts.
503
Chapter 12
Connectivity to the ADAM instance is either in the clear or over an SSL connection. Active DirectoryMembershipProvider does not support any type of connection security other than SSL. Of course, you can always use lower-level security measures such as IPSEC, but that level of network security functions at a lower level and is transparent to both the provider and the LDAP networking stack.
Because using ADAM has a bit of a different flavor from using Active Directory, you will see some common steps described in this section so that you get an idea of how to get an application partition installed properly. After you see how to get to that point, you will look at connecting to the ADAM store and carrying out basic provider operations against the directory store.
Installing ADAM with an Application Partition
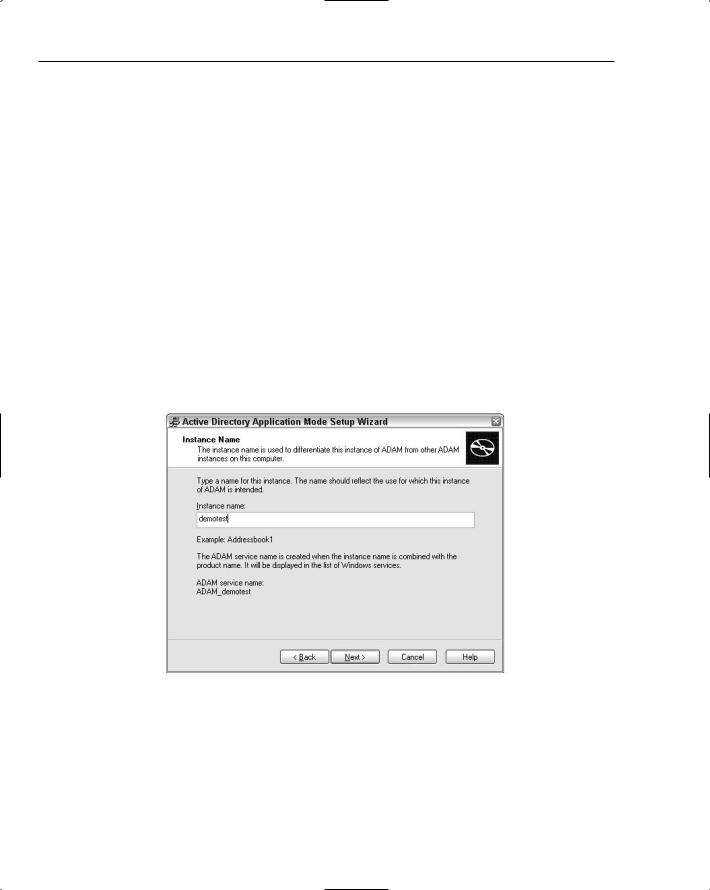
The first thing you need to accomplish is the installation of an ADAM instance that the provider can connect to. Unlike Active Directory, where you already have a server running with the default Users container, with ADAM you are starting from scratch. The first step is to download the ADAM installation package and then run the installer. The installer walks you through a number of wizard steps for setting up an ADAM instance. The first important step in the installation process is the naming the ADAM instance. This is important when you work with ADAM through a tool like the services control panel, but the service name itself has no impact when using the provider. Figure 12-10 shows the wizard step where you name the ADAM instance.
Figure 12-10
One of the next wizard steps lets you choose the port numbers for SSL and non-SSL communications. If this is the only ADAM instance that will be running on the server, and the server is also not an AD domain controller (in which case AD already owns ports 389 and 636), you can just leave the default port selections as is.
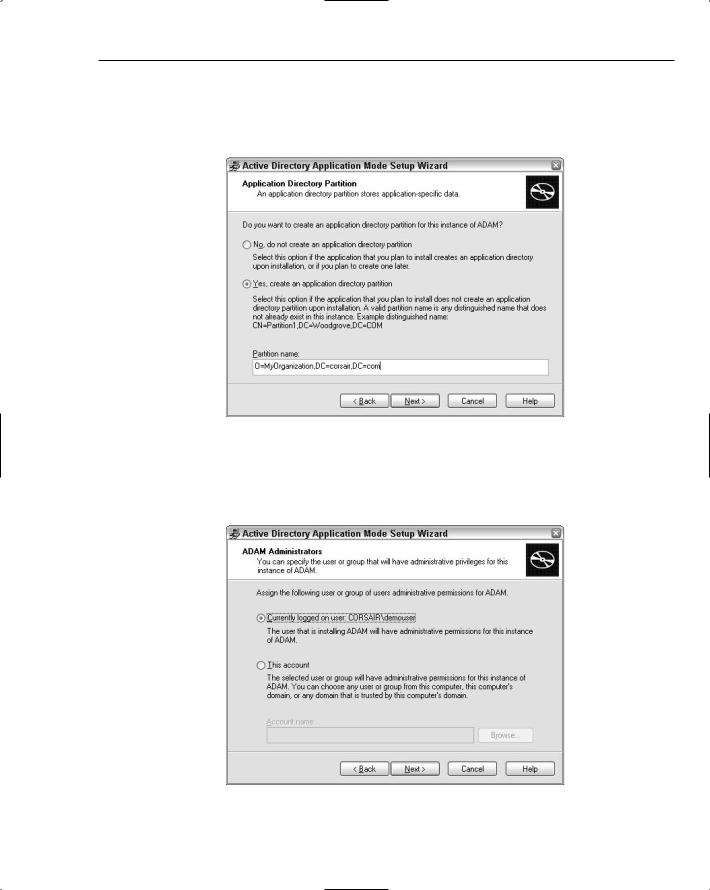
Later on in the wizard, there is a step where you create an application partition. This is important because it determines the first part of the distinguished name that you will use in the connection string. Because ADAM directories are their own little world, you can use any type of distinguished name that
504
ActiveDirectoryMembershipProvider
makes sense. However, if you plan to create organizational units within this application partition, you are limited to specific types of objects in the distinguished name that you choose — the ADAM FAQ on the web describes the limitations that apply. In Figure 12-11, you can see that I chose a distinguished name that ends in an organization because organizations in ADAM can contain OUs.
Figure 12-11
As you progress through the wizard, one of the next steps is choosing an administrative user for the application partition. This user account will by default be able to use command-line and GUI tools to configure ADAM further. In Figure 12-12, I left the wizard with the default of the currently logged on user.
Figure 12-12
505
Chapter 12
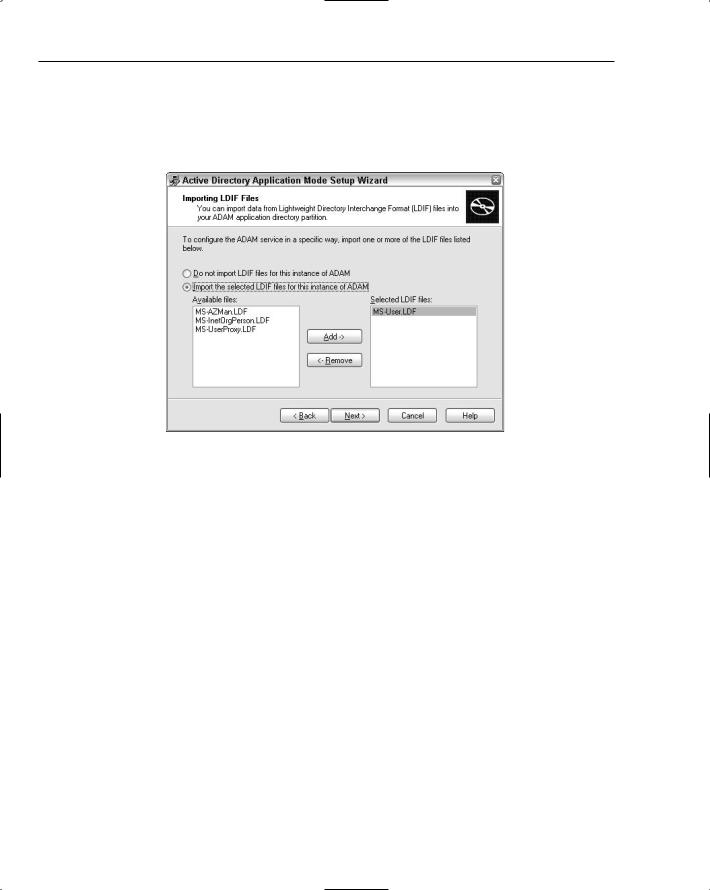
One of the last major steps in the wizard that you definitely want to take advantage of is the option to import an LDIF file. LDIF files are conceptually the same as running .sql files against SQL Server to install schema elements. In Figure 12-13, I selected the MS-User.ldf file to import because it contains the definition of the user class that is required by the provider. If you forget to choose anything in this step, then you have to import the LDIF file from the command-line using a tool like ldifde.exe.
Figure 12-13
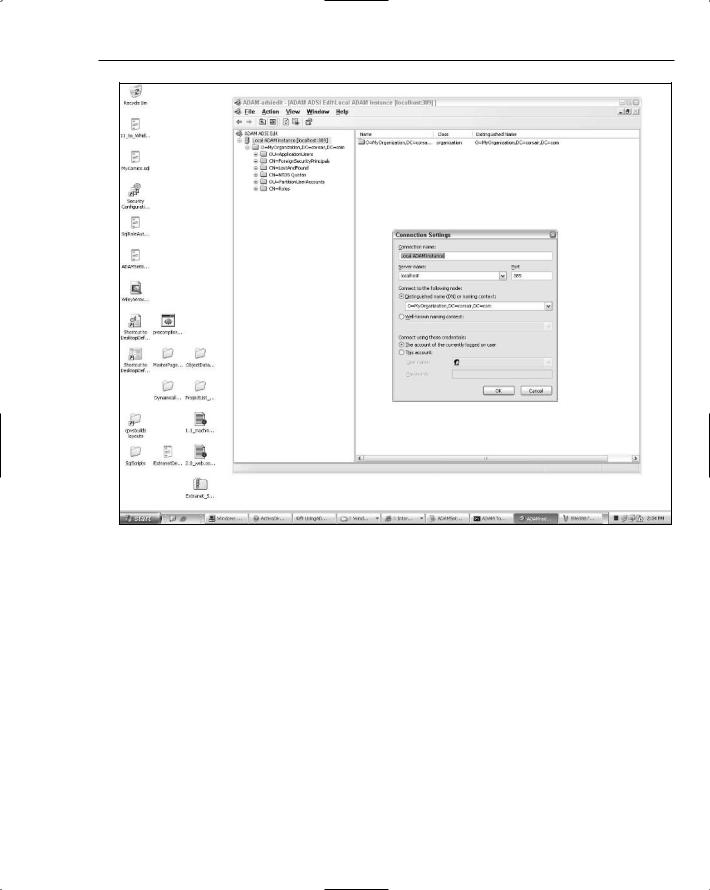
With these steps completed, you can finish the wizard, and after a bit of a pause you will have an ADAM directory server running and available for use by the provider. To connect to the ADAM instance and the application partition that you just created, you can use the adsiedit MMC tool, which is automatically installed with ADAM on your machine. You will need to set up the connection settings by choosing Connect To from the ADAM ADSI Edit node in the MMC. You can see how to set up the connection settings in Figure 12-14.
In this case, I have pointed the MMC at my local machine’s ADAM instance listening on port 389. The connection settings also point at the application partition O=MyOrganization,DC=corsair,DC=com that was created with the ADAM install wizard. Because you probably don’t want user objects to be stored directly at the root of the application partition, you should create a container to store your application’s user objects. In my case, I created an OU by right-clicking the partition node and choosing New Object. In the dialog box that pops up after this selection, I chose an object of type organizationalUnit and then named it ApplicationUsers. Note that if you don’t see the object type organizationUnit in the selection list box, it is probably because your application partition used a container type that cannot be a parent of OU objects.
506
ActiveDirectoryMembershipProvider
Figure 12-14
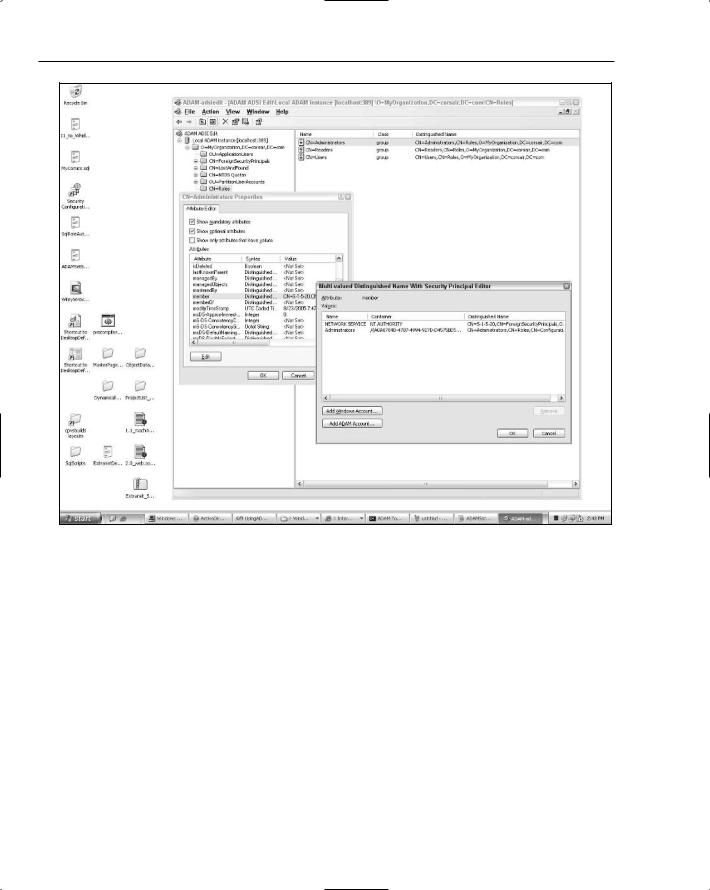
The last step at this point is to configure a domain account with administrative rights in the partition so that all of the methods on ActiveDirectoryMembershipProvider will work. Unlike AD where a familiar security UI is used, in ADAM you have to go through a somewhat awkward configuration process. Using the adsiedit MMC tool, click the CN=Roles node. This displays all of the ADAM groups (not Active Directory domain groups) that currently exist in the ADAM application partition. In the right-hand side of the MMC, right-click the CN=Administrators entry and select Properties. This pulls up a list of all of the attributes on the Administrators object. You need to scroll through this list and find the member attribute. Highlight that attribute and click the Edit button. This pulls up the clearly named Multivalued Distinguished Name with Security Principal Editor dialog box. In this box, there are two buttons: Add Windows Account and Add ADAM Account.
This dialog box allows you to add either domain principals (such as domain users, as well as well-known accounts like the NETWORK SERVICE account) or ADAM user principals into the Administrators group. For now, I just added the web server’s NETWORK SERVICE account to the group. You can see what this all looks like in Figure 12-15.
507
Chapter 12
Figure 12-15
If you don’t plan on setting up SSL for your ADAM instance, then you will to add some other account aside from NETWORK SERVICE to the Administrators group. Remember that you can only connect to ADAM with the ActiveDirectoryMembershipProvider in one of two ways: over SSL or in the clear. The provider is not able to connect to ADAM over non-SSL connections using either the default process credentials or explicit domain account credentials. Instead, you always need an ADAM user principal that can be used as the explicit username configured for the provider.
Because the demo code in the next section uses an ADAM instance that is not configured to use SSL, you need to add some other security principal to the Administrators group. I created another OU in the application partition called PartitionUserAccounts, and I added a user to it called Application UsersAdministrator. The full distinguished name for this new account is:
CN=ApplicationUsersAdministrator,OU=PartitionUserAccounts,O=MyOrganization,DC=corsa
ir,DC=com
508
ActiveDirectoryMembershipProvider
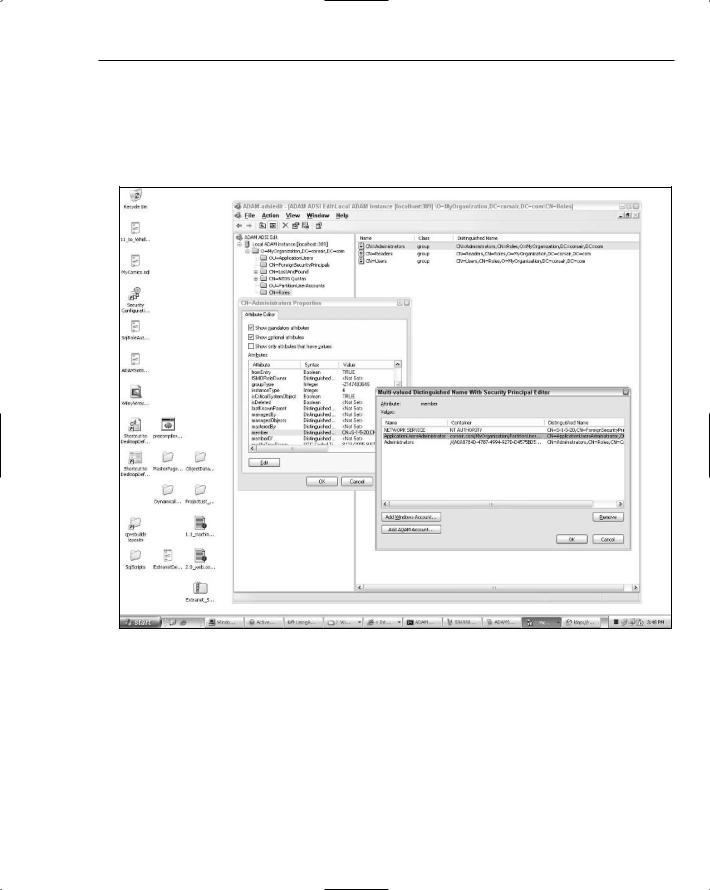
You can add this account to the Administrators group using the same process described earlier, though you will want to click the Add ADAM Account button for this case. Make sure that you have the distinguished name of the administrators account handy because you won’t get any nice GUI for selecting ADAM principals — instead you have to type in the full distinguished name. Figure 12-16 shows the end result of adding the ADAM user principal to the Administrators group. Notice the highlighted account in the security principal dialog box.
Figure 12-16
One thing to warn you about — at this point even though you now have an ADAM user principal it is very likely that you still can’t use it at this point. Unfortunately, the errors you will get back from the provider or from other tools like ldp.exe won’t tell you the problem. There are two more things you need to do to get the ADAM user principal working:
1.You need to explicitly set a password on it. You might have noticed that when you created the ADAM user principal, at no point were you prompted for a password.
2.You need to enable the user account. By default newly created ADAM user principals are created in a disabled state when running on Windows Server 2003 machines that have any type of password restrictions in effect. As a result, you need to enable the account after you set the password.
509

Chapter 12
You can easily set the password for the ADAM user principal by right-clicking the user object in the adsiedit tool and choosing Reset Password. After you have set the password for the account, right-click the user object again and choose Properties. Scroll down the list of properties until you find the property called msDS-UserAccountDisabled. Notice that it is currently set to true. Double-click it, and set the property to false. With these two steps the ADAM user principal has a password and the account is now enabled so that you can actually use it for authentication purposes.
At this point you have an ADAM instance, an application partition with an OU for storing users, and administrative security privileges on the application partition with an ADAM user principal so that the ActiveDirectoryMembershipProvider can be configured with explicit connection credentials. So now you are at a point where you can hook up an ASP.NET application to the ADAM instance and start making use of it.
Using the Application Partition
As with using Active Directory, the first step to getting ActiveDirectoryMembershipProvider to work is getting the connection string set up properly. Unlike connecting to Active Directory, for ADAM you must supply a container in the connection string. By now, this restriction should make sense because in ADAM you saw that you always work in the context of an application partition — so at the very least you will be creating users starting in this partition. In this case, though, because there is also a user OU, you use a connection string that points at the OU:
<connectionStrings>
<add name=”adamConnection” connectionString=
“LDAP://localhost:389/OU=ApplicationUsers,O=MyOrganization,DC=corsair,DC=com”
/>
</connectionStrings>
In this case, I explicitly specified a port number as well. Because the ADAM instance on my machine is running on the default 389 port, the number is not really required. But if you installed ADAM in a nondefault port, the syntax shown above is what you would use.
Because the sample application will be connecting over a non-SSL connection, the provider configuration needs to use an explicit set of credentials. In the configuration that follows, the provider is configured to use the ADAM user principal that was just created.
<membership defaultProvider=”adamprovider”> <providers>
<clear/>
<add name=”adamprovider” type=”System.Web.Security.ActiveDirectoryMembershipProvider...” connectionProtection=”None”
connectionUsername=
“CN=ApplicationUsersAdministrator,OU=PartitionUserAccounts,O=MyOrganization,DC=cors
air,DC=com”
connectionPassword=”pass!word1” connectionStringName=”adamConnection” />
</providers>
</membership>
510

ActiveDirectoryMembershipProvider
As noted earlier, for a production environment you should use protected configuration so the credentials are not visible in cleartext. Because the ADAM instance doesn’t support SSL, the connectionProtection attribute is set to None. This causes the provider to skip looking for an SSL connection to the directory instance. For the explicit username, the full distinguished name of the user account is needed. This is one visible case where configuring the provider for ADAM differs from AD. Unlike AD, ADAM doesn’t really have the concept of binding to a user object by way of a user principal name that is indexed in a global catalog. Instead, when you connect to ADAM with an ADAM user principal you need to supply the distinguished name so that ADAM can actually find the user object in the directory.
Because the provider is configured to use a non-SSL connection, one last piece of ADAM configuration is necessary. For security reasons, ADAM does not allow passwords to be set or changed over non-SSL connections. You can change this behavior by using the dsmgmt.exe tool included with the ADAM installation. The following output shows the command-line conversation with dsmgmt that reenables the ability to set passwords over non-SSL connections:
dsmgmt: ds behavior
ds behavior: connections
server connections: connect to server localhost:389 Binding to localhost:389 ...
Connected to localhost:389 using credentials of locally logged on user. server connections: quit
ds behavior: allow passwd op on unsecured connection
Successfully modified DS Behavior to reset password over unsecured network. ds behavior: quit
dsmgmt: quit
This type of configuration is acceptable for a development environment or a test-bed environment. However, I would not recommend doing this for a production environment unless you are securing the network traffic with some other mechanism such as IPSEC. Although it requires more hoops to jump through (you need to obtain the SSL certificate and then follow the ADAM help topics for installing the certificate on the ADAM server and on all of the clients that will communicate with it), securing ADAM traffic with SSL in your production environments is definitely the right thing to do.
By this point, I really promise that all of the mucking around with ADAM configuration magic is done. To test things, you can drop a CreateUserWizard on a page and create a new user account. I created a new account called testuser@corsair.com. If you look in the adsiedit tool after running the test page (make sure to refresh the ApplicationUsers OU so that the tool will see the new user), you will see that a new user object with common name CN=testuser@corsair.com has been created in the OU. A few things to note about this user object:
Although I typed in testuser@corsair.com for the username in the wizard, the provider automatically set the common name to testuser@corsair.com as well. If you look at the properties for the user object both the “common name” (aka CN) and the userPrincipalName have been set to the same value. As a developer using the provider you don’t ever deal with the common name, but other applications that are more LDAP-aware will depend on the CN as opposed to the userPrincipalName because in the world of LDAP you constantly reference objects using their distinguished name. The CN attribute is part of an object’s distinguished name. So in the case of testuser, its distinguished name is now CN=testuser@corsair.com,OU=ApplicationUsers, O=MyOrganization,DC=corsair,DC=com.
511