

Pro Visual C++-CLI And The .NET 2.0 Platform (2006) [eng]-1
.pdf618 C H A P T E R 1 4 ■ W I N D O W S S E R V I C E S
Let’s continue the example. Since I started a Timer in the OnStart(), I better stop it on the OnStop(). Plus, I will write a system event log entry stating that the Windows service was stopped. (Just like OnStart() if the AutoLog is true, the writing of this event log is sort of redundant.)
Here’s all I need to do to shut down this simple example:
virtual void OnStop() override
{
this->timer->Stop(); eventLog1->WriteEntry("SimpleWinService Stopped");
}
OnPause() and OnContinue()
Two common event handlers you may implement are OnPause() and OnContinue(). Obviously these handles are triggered when the Windows services is paused and continued. You use these events to temporarily stop and then later restart any resources that don’t need to be active while the Windows service is paused.
To continue our example, there is no need to have the timer continue to run while the Windows service is paused. (In fact, if you don’t stop the timer, you have not actually paused the service.) When the Windows service finally continues, you obviously need to start the timer back up. Here is the code to handle the pause and continue process:
virtual void OnPause() override
{
this->timer->Stop(); eventLog1->WriteEntry("SimpleWinService Paused");
}
virtual void OnContinue() override
{
eventLog1->WriteEntry("SimpleWinService Continued"); this->timer->Start();
}
The only trick to using these two handlers is that you need to manually add them to your code, but as you can see, it’s hardly rocket science.
Other ServiceBase Class Handlers
There are a few more ServiceBase class handlers that you might use, but I thought it a bit redundant showing examples of using them, as you code them the exact same way as the other handlers. There is one exception, the OnCustomCommand(), but I will hold off covering this handler until I cover managing Windows services later in the chapter.
Customized Example
Okay, SimpleWinService.cpp has remained unchanged from what was generated by the template (or the safe version, if you used that), but we’ve made quite a few changes to SimpleWinService.h. Since some of the code was auto-generated by Visual Studio 2005, I thought it would be helpful for those of you writing a Windows service without VS 2005 to see the customized SimpleWinService.h, shown in Listing 14-4, in its entirety.
C H A P T E R 1 4 ■ W I N D O W S S E R V I C E S |
619 |
Listing 14-4. Customized SimpleWinService.h Code
#pragma once
using namespace System;
using namespace System::Collections; using namespace System::ServiceProcess; using namespace System::ComponentModel;
namespace Simple
{
private:
double interval;
public ref class SimpleWinService : public ServiceProcess::ServiceBase
{
public:
SimpleWinService()
{
InitializeComponent();
interval = 15000; // 15 seconds - default
}
protected:
~SimpleWinService()
{
if (components)
{
delete components;
}
}
virtual void OnStart(array<String^>^ args) override
{
eventLog1->WriteEntry("SimpleWinService Started");
if (args->Length == 0) eventLog1->WriteEntry("Empty args");
else
{
for each (String ^s in args)
{
eventLog1->WriteEntry(s);
}
}
this->timer = gcnew System::Timers::Timer(interval); this->timer->Elapsed +=
gcnew System::Timers::ElapsedEventHandler(this, &SimpleWinService::timer_Tick);
this->timer->Start();
}
620 C H A P T E R 1 4 ■ W I N D O W S S E R V I C E S
virtual void OnStop() override
{
this->timer->Stop(); eventLog1->WriteEntry("SimpleWinService Stopped");
}
virtual void OnPause() override
{
this->timer->Stop(); eventLog1->WriteEntry("SimpleWinService Paused");
}
virtual void OnContinue() override
{
eventLog1->WriteEntry("SimpleWinService Continued"); this->timer->Start();
}
private:
System::Diagnostics::EventLog^ eventLog1; System::Timers::Timer^ timer;
System::ComponentModel::IContainer^ components;
#pragma region Windows Form Designer generated code
void InitializeComponent(void)
{
this->components = (gcnew System::ComponentModel::Container()); this->eventLog1 = (gcnew System::Diagnostics::EventLog()); (cli::safe_cast<System::ComponentModel::ISupportInitialize^>
(this->eventLog1))->BeginInit();
//
//eventLog1
this->eventLog1->Log = L"Application"; this->eventLog1->Source = L"SimpleWinService";
//SimpleWinService
//
this->CanPauseAndContinue = true; this->ServiceName = L"SimpleWinService";
(cli::safe_cast<System::ComponentModel::ISupportInitialize^> (this->eventLog1))->EndInit();
}

C H A P T E R 1 4 ■ W I N D O W S S E R V I C E S |
621 |
#pragma endregion
private:
void timer_Tick(System::Object^ sender, System::Timers::ElapsedEventArgs^ e)
{
this->timer->Stop();
eventLog1->WriteEntry("SimpleWinService Elapsed Event Occurred"); this->timer->Start();
}
};
}
Installing and Uninstalling Windows Services
With other application types, you would now be ready to compile and run. Not so with Windows services.
You now need to add one ServiceProcessInstaller class and a ServiceInstaller class for each service that makes up the Windows service. These classes then are used by the service configuration application to register the Windows service correctly within the registry. To perform the actual registering process, you normally use the service configuration application provided by .NET called InstallUtil.exe. (You can use other installation programs or even write your own, but doing this is beyond the scope of this book.)
Fortunately, the process for creating the ServiceProcessInstaller and ServiceInstaller class is mostly automated. Here are the steps you will follow:
1.Switch to the Design view of the service. You can double-click SimpleWinService.h to do this.
2.Right-click anywhere on the Design view window to bring up the menu as shown in Figure 14-5.
Figure 14-5. Adding installer
3.Select the Add Installer menu item. This will generate ProjectInstaller.cpp and ProjectInstaller.h.
4.Double-click ProjectInstaller.h in the Solution Explorer to switch to the Design view of the
ProjectInstaller.
5.Select the serviceInstaller1 component.
6.Set the ServiceName property to SimpleWinService if it isn’t that already.
622C H A P T E R 1 4 ■ W I N D O W S S E R V I C E S
7.Set the StartType property to Automatic if you want the service to start automatically on startup or leave it as manual if you want the user to start the Windows service. (You might want to leave it as manual for now, as you will most probably be continually starting and stopping the service manually. Once everything is working properly, switch the property to Automatic.)
8.Select the serviceProcessInstaller1 component.
9.Set the Account property to the security context that most suits the need of the Windows service. (Being lazy, I usually just set this to LocalSystem or NetworkService during development and then change it to something more appropriate during final testing and release.)
10.Build your Windows service.
For those of you who are interested, the auto-generated code for ProjectInstall.cpp is shown in Listing 14-5, and ProjectInstaller.h is shown cleaned up in Listing 14-6.
Listing 14-5. Auto-generated ProjectInstall.cpp
#include "StdAfx.h"
#include "ProjectInstaller.h"
Listing 14-6. Auto-generated ProjectInstall.h
#pragma once
using namespace System;
using namespace System::ComponentModel; using namespace System::Collections;
using namespace System::Configuration::Install;
namespace Simple
{
[RunInstaller(true)]
public ref class ProjectInstaller :
public System::Configuration::Install::Installer
{
public:
ProjectInstaller(void)
{
InitializeComponent();
}
protected:
~ProjectInstaller()
{
if (components)
{
delete components;
}
}
C H A P T E R 1 4 ■ W I N D O W S S E R V I C E S |
623 |
private:
System::ServiceProcess::ServiceProcessInstaller^ serviceProcessInstaller1; System::ServiceProcess::ServiceInstaller^ serviceInstaller1; System::Diagnostics::EventLogInstaller^ eventLogInstaller1;
System::ComponentModel::Container ^components;
#pragma region Windows Form Designer generated code void InitializeComponent(void)
{
this->serviceProcessInstaller1 =
(gcnew System::ServiceProcess::ServiceProcessInstaller()); this->serviceInstaller1 =
(gcnew System::ServiceProcess::ServiceInstaller()); this->eventLogInstaller1 =
(gcnew System::Diagnostics::EventLogInstaller());
//
//serviceProcessInstaller1
this->serviceProcessInstaller1->Account = System::ServiceProcess::ServiceAccount::LocalSystem;
this->serviceProcessInstaller1->Password = nullptr; this->serviceProcessInstaller1->Username = nullptr;
//serviceInstaller1
//
this->serviceInstaller1->ServiceName = L"SimpleWinService";
//
// ProjectInstaller
//
this->Installers->AddRange(
gcnew cli::array<System::Configuration::Install::Installer^>(2)
{
this->serviceProcessInstaller1, this->serviceInstaller1
});
}
#pragma endregion };
}
Now you should have a Windows service that you can finally install and run unless you have added resources to your Windows service that also need to be installed like the system event log. To install the system event log, switch to the Design view of SimpleWinService.h again, right-click the eventLog1 component, and select the Add Installer menu item. Now rebuild the project, and you will have a Windows service ready to be installed.
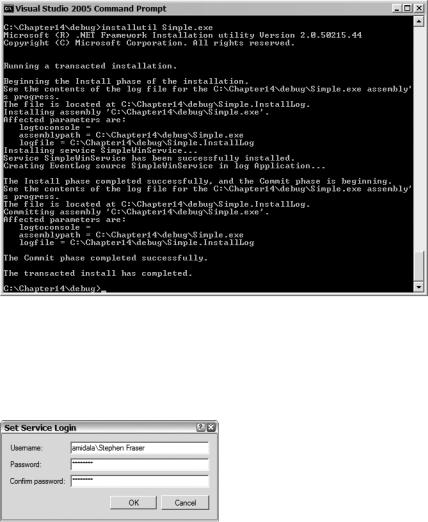
The first thing you do is navigate in the Visual Studio 2005 Command console window to the directory where your Windows service assembly is located. How you actually install your Windows services depends on which version of SimpleWinService.cpp you used, though behind the scenes, you are really doing the same thing.
C H A P T E R 1 4 ■ W I N D O W S S E R V I C E S |
625 |
System::ServiceProcess::ServiceController class, which enables you to connect and control Windows services within your own custom application.
Services Application
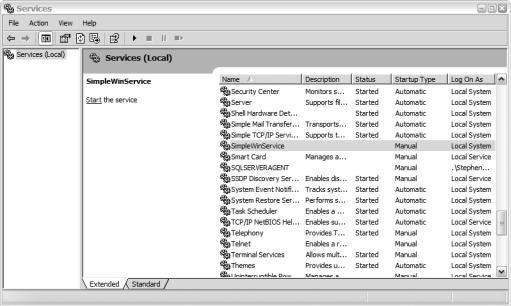
The Administrative Tools’ Services application (see Figure 14-8) is actually a snap-in to the Microsoft Management Console (MMC). Not only does this tool allow you to see, start, pause, continue, stop, and restart all services currently on your system, but it also allows you to perform some configurations on them as well.
Figure 14-8. The Administrative Tools’ Services application
As you can see in Figure 14-8, SimpleWinService is now available on your system, but the status is blank or currently not run. In addition, the startup type is manual and the Windows service uses the LocalSystem security context. Your implementation could be different if you selected different property values for ServiceProcessInstaller and ServicesInstaller.
Double-clicking the SimpleWinService line causes the Services application to present the Windows services properties dialog box as shown in Figure 14-9. The tabs across the top of the control point out the different properties that can be customize for the Windows service:
•Change state and startup method of Windows service.
•Specify user login security context for the Windows service.
•Specify action to perform on Windows service failure.
•View Windows service dependencies.

626 C H A P T E R 1 4 ■ W I N D O W S S E R V I C E S
Figure 14-9. Services application properties dialog box
I usually only deal with the General tab, where I change the Windows service startup method from Manual (user controlled) to Automatic (system controlled started during startup process). You can also specify stop, start, etc. on the General tab, but I usually use the middle panel on the Services application or use the right-click context menu (see Figure 14-10) associated with the Windows service.
Figure 14-10. Services application Windows services context menu
Custom Service Control Application
There will come a time when the Services application just doesn’t provide enough functionality. When that time comes, the ability to create your own custom service control application really comes in handy.
Usually, you will create a GUI service control application, but nothing is stopping you from making it a console application. In the following examples, I’ll show you a couple of GUI tools, but you should have no trouble making equivalent console applications using the same basic logic.
It is remarkably easy to write your own custom service control application. All that really is required is to add an instance of a System::ServerProcess::ServiceController to your application. Link the controller instance to the Windows service you want to interface with, and then call the
C H A P T E R 1 4 ■ W I N D O W S S E R V I C E S |
627 |
controller’s methods. The actual communication between the controller and the Windows service is handled for you behind the scenes. Well, to be more accurate, the communication between your controller and the SCM is hidden from you. As mentioned previously, the Windows service gets its handles triggered from the SCM.
Visual Studio 2005 provides a drag and drop interface to simplify the creation of the controller instance for Windows applications. I’ll show the steps here, though the code that gets generated is so simple, it is almost easier just to code it by hand.
1.Create a Windows application. (If you need a reminder on how to do this, I covered how in Chapters 9 and 10.)
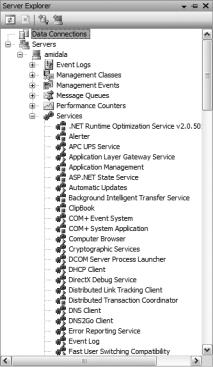
2.Open up the Server Explorer.
3.Navigate to the Services branch of the tree as shown in Figure 14-11.
Figure 14-11. Server Explorer, Services branch
4.Select the service you want to interface with.
5.Right-click and select Add to Designer or simply drag the service directly onto the form.
Doing all that adds the following code to your Windows Form, assuming your server is called Amidala and the Windows service is called SimpleWinService:
private: System::ServiceProcess::ServiceController^ serviceController1; this->serviceController1 = (gcnew System::ServiceProcess::ServiceController()); this->serviceController1->MachineName = L"amidala"; this->serviceController1->ServiceName = L"SimpleWinService";